Revive old WordPress posts with AI and Uncanny Automator. Learn how to reverse content decay…
5 Automations for GiveWP: The Gifts that Keep on Giving
Nothing warms the heart like a hefty donation for a good cause. And, according to the social technology and research firm Blackbaud Institute, donors agree. In the three years between 2018 and 2021, online donations grew by a generous 42%.
While we certainly won’t complain about a growing culture of charity, trying to process all of those donations (while simultaneously saving the world) can be a bit overwhelming. And expensive. Fortunately, there’s one gift that keeps on giving: Uncanny Automator.
Whether you’re fundraising for a personal cause or campaigning to end world hunger, Uncanny Automator can help you exceed your donation goals. Automatically add your donors to email marketing campaigns related to their interests, send special “Thank you” packages to particularly generous donors, invite select donors to events in their area or create more dynamic profiles.
Using any—or all—of these automations for GiveWP will help you grow your donor base, get bigger donations and save more of your time and money for the causes that you care most about.
Here’s how you can start automating your online donation platform and get back to building animal shelters!
An Introduction to Uncanny Automator
Uncanny Automator is going to be helping you raise funds for life-saving medical research so a proper introduction is probably in order. As the #1 automation plugin for WordPress, Automator can connect all of the apps and plugins that you use to run your online donation platform.
Automator’s sleek, no-code interface allows you to create powerful recipes (combinations of actions and triggers) in just minutes. Streamline your workflows, automate repetitive tasks, improve your donor experience and widen your donations funnel with Automator.

You can find Automator’s full pricing schedule by clicking here. However, in the spirit of giving, there is a Free version of Automator so you can try it out before making a commitment. Additionally, Automator will gift you more than enough credits to try out app integrations such as Facebook and Instagram, Hubspot and Twilio. (See? We told you Automator was the gift that kept on giving!)
Download Automator and register your account so you can get the best kind of donation of all: time.
Tag Donors in Your CRM
One of the simplest ways to grow your donations is to notify your existing donors about similar or related campaigns. Using this automation, you can connect GiveWP to just about any customer relationship management (CRM) platform such as ActiveCampaign or Mailchimp.
In this example, we’ll show how to add tags to a donor’s contact in FluentCRM so that you can send them campaigns you know they’ll support. The best part is, you can actually run this recipe with Automator’s Free version. Here’s how:
Step 1: Create a New Recipe
From your WordPress Admin Sidebar, navigate to Automator > Add New. In the pop-up window that appears, select Logged-in users and click Confirm.

Step 2: Name Your Recipe
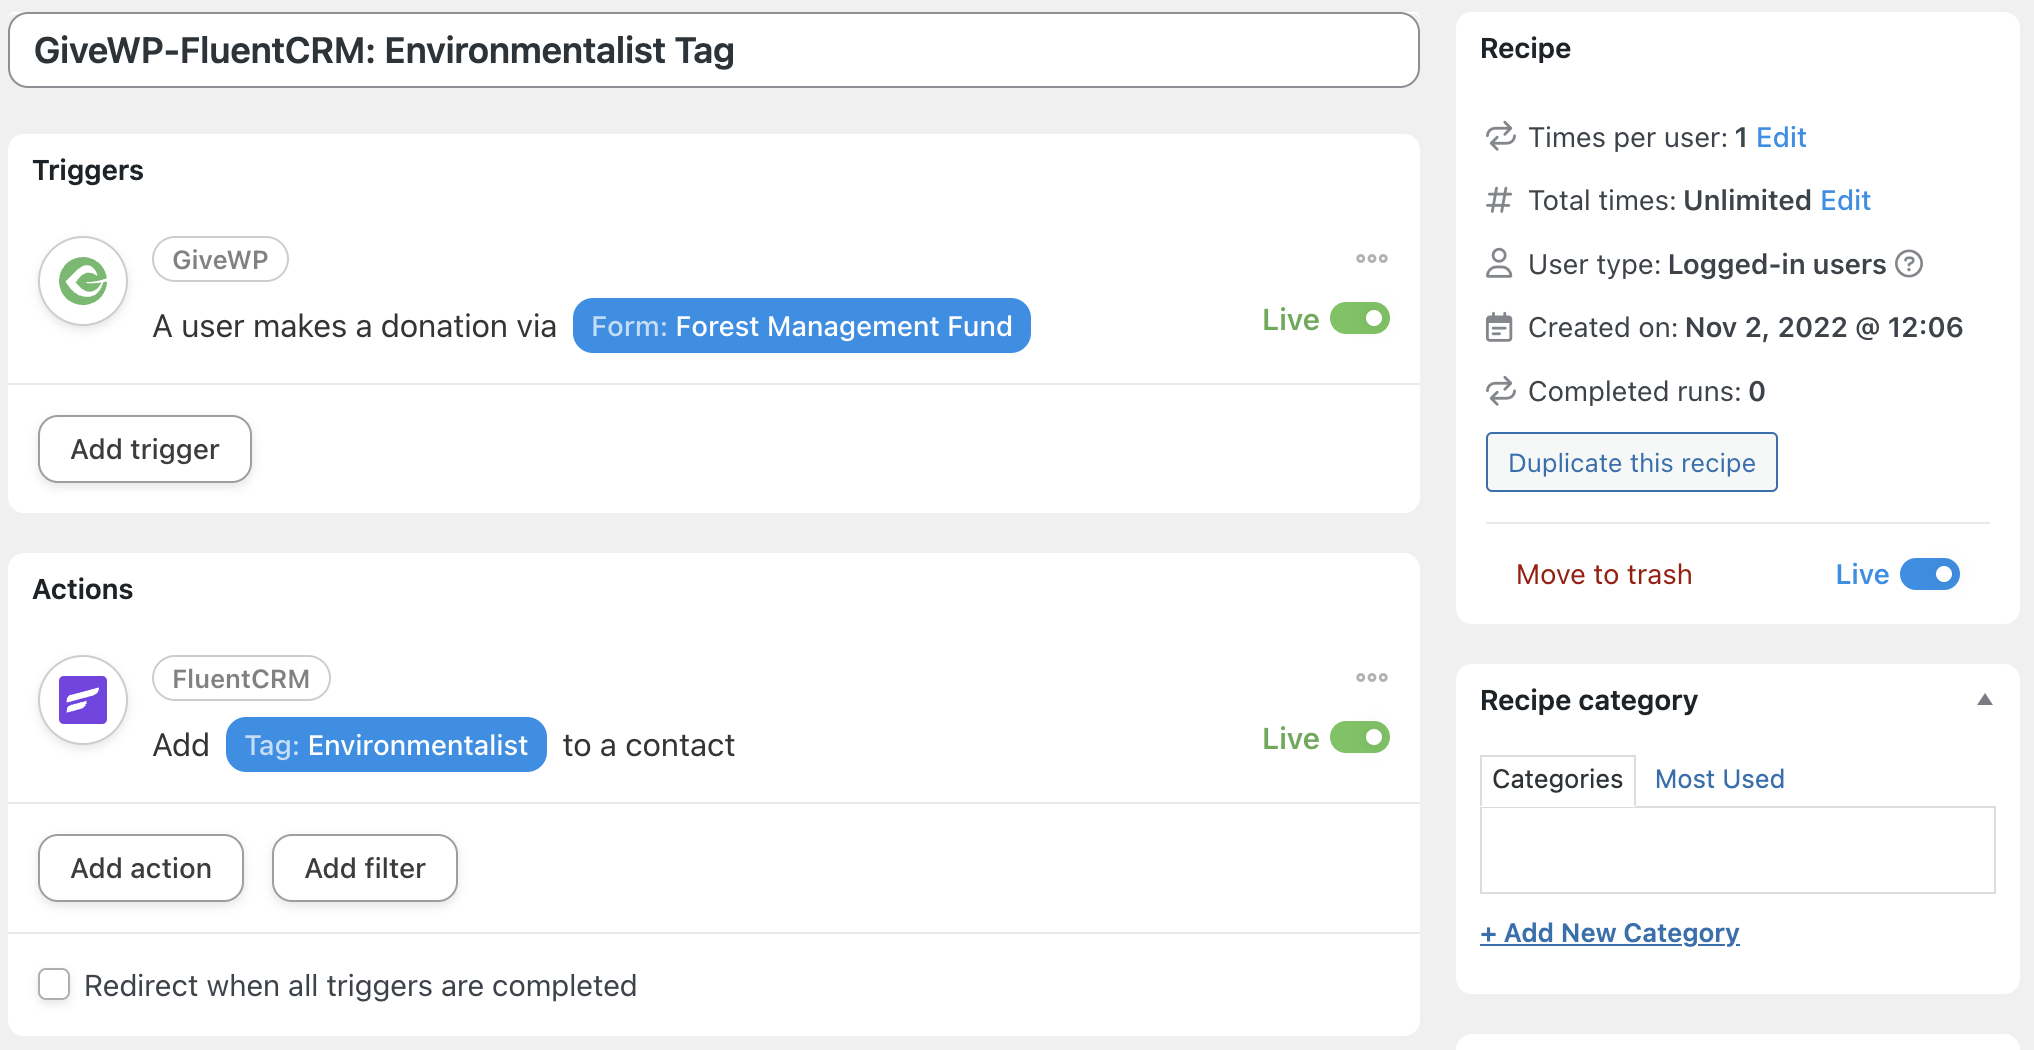
We recommend coming up with a naming convection for your Automator recipes that makes them easy to recognize just by the title. For example, we’ve named this recipe GiveWP-FluentCRM: Environmentalist Tag based on the integrations involved and the end result of the recipe.
Step 3: Configure Your Trigger(s)
In the Triggers panel, from the menu of available integrations, click GiveWP.

From the drop-down list, select A user makes a donation via a form.

Automator will prompt you to select a form. We’ve chosen our Forest Management Fund form. When you’re finished, click Save.
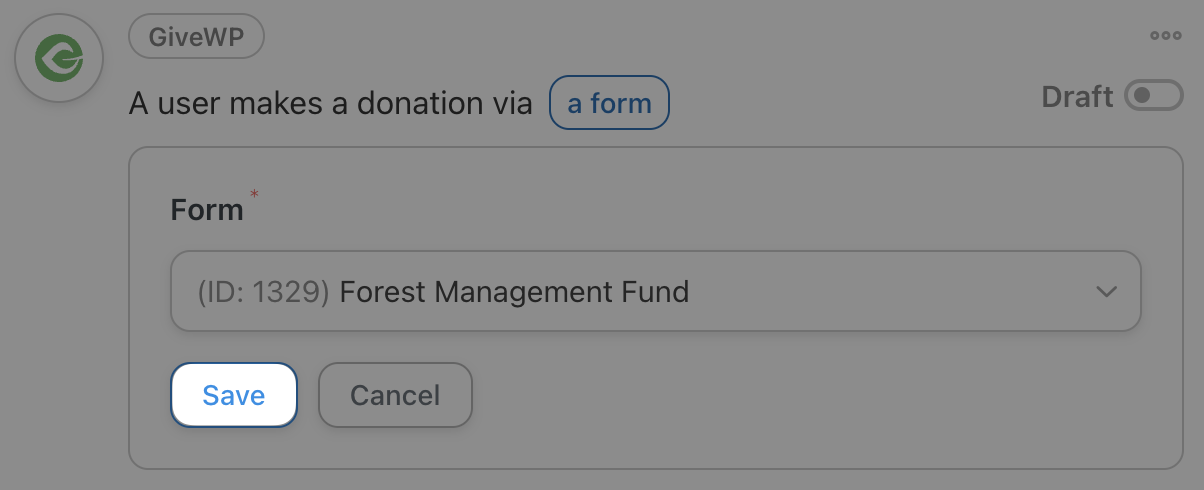
The finished trigger should look something like this:

Step 4: Configure Your Action(s)
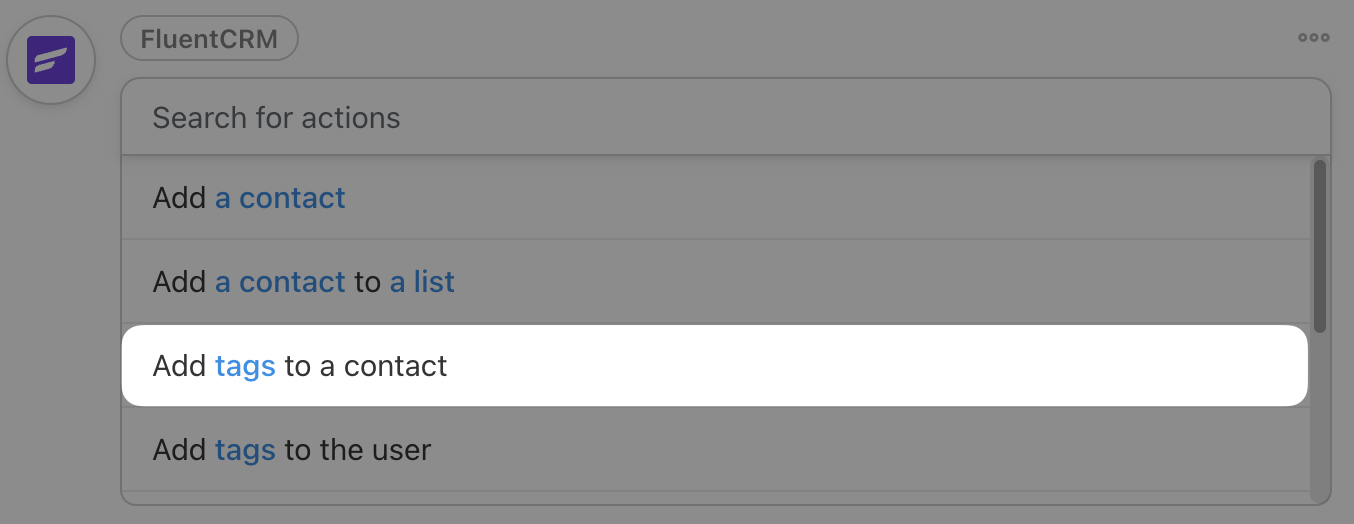
In the Actions panel, click Add action. From the menu of available integrations, click FluentCRM.

From the drop-down list, select Add tags to a contact.
Automator will prompt you to select a tag. We’ve selected our Environmentalist tag. In the Email address field, click the Asterisk and select the user’s email. When you’re finished, click Save.
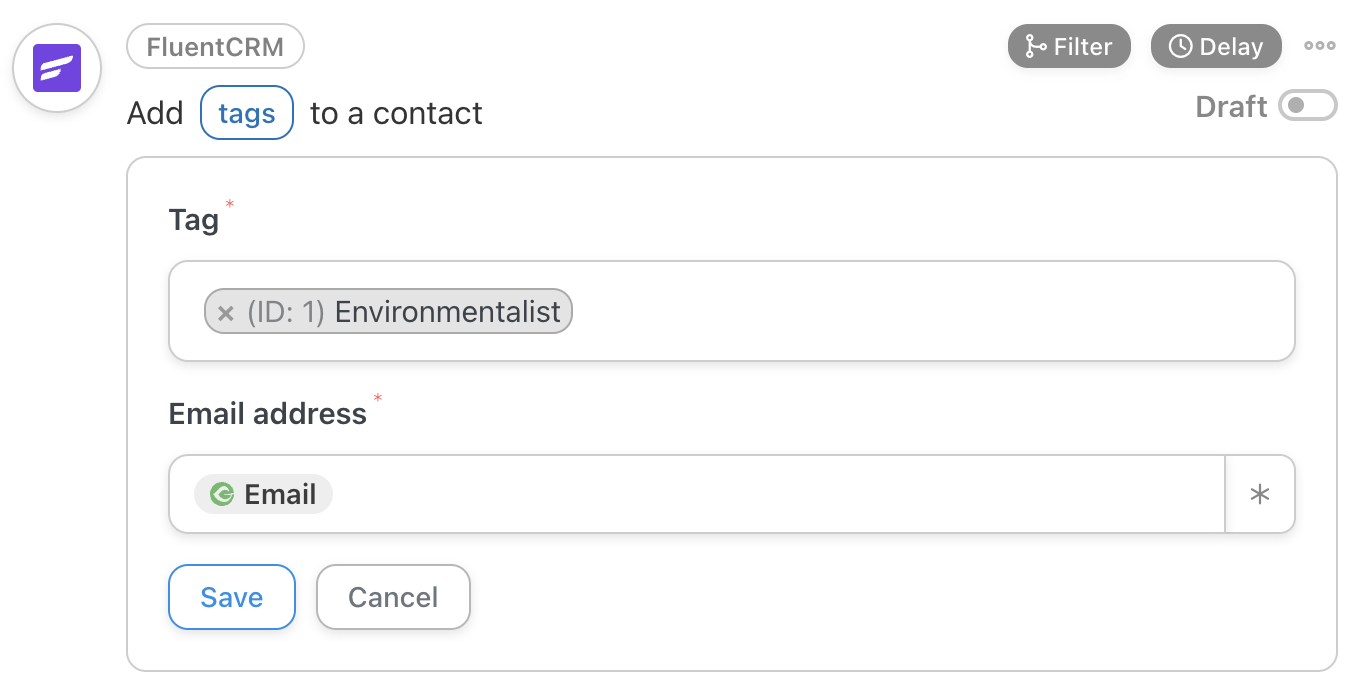
The finished action should look something like this:
Step 5: Go Live and Go Green!
In the Recipe box in the upper-right-hand corner, click Edit next to Times per user: Unlimited.

You can set this recipe to run only once per user by typing “1” into the field. When you’re finished, click Save.

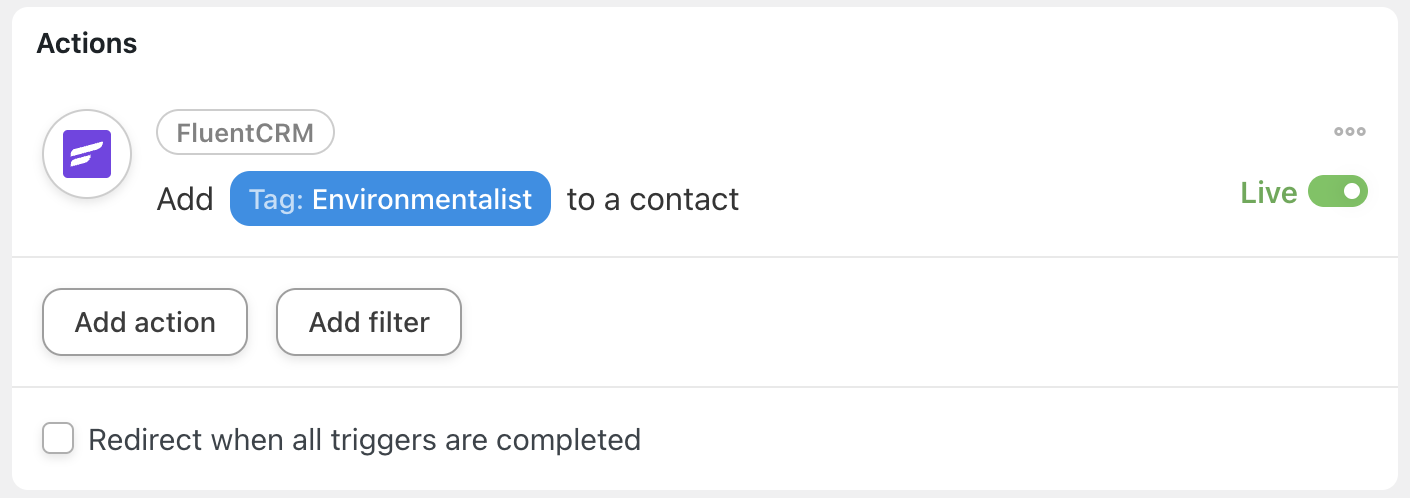
All that’s left for you to do is toggle the recipe from Draft to Live and start tagging your donors for targeted emails.
In the next recipe, we’ll show you how to use more advanced features such as tokens and calculations to create even more powerful automations.
Ship Donor Appreciation Gifts
Giving feels good. But sometimes, potential donors need a little encouragement to make the commitment. With this Automator recipe, you can connect GiveWP to WooCommerce or your preferred e-commerce platform to ship donor appreciation gifts.
Whether you’re offering up your own merchandise or running promotions with affiliates and for-profits, use this recipe to automate your fulfillment process and turn more prospects into pledges.
Step 1: Create a New Recipe
From your WordPress Admin Sidebar, navigate to Automator > Add New. In the pop-up window that appears, select Logged-in users and click Confirm.
Step 2: Name Your Recipe
In keeping with our naming convention, we’ve titled this recipe GiveWP-WooCommerce: Donor Appreciation.
Step 3: Configure Your Trigger(s)
In the Triggers panel, from the menu of available integrations, click GiveWP. From the drop-down list, select A user makes a donation via form for an amount greater than, less than or equal to an amount.

Automator will then prompt you to select a form. Once again, we’ve selected our Forest Management Fund form. After selecting your form, click Save.
Next, Automator will prompt you to set the Condition. Select greater or equal to. Click Save.

Finally, Automator will ask you to enter the Amount. The Amount field only accepts integer values so we’ve typed in “500”, representing the dollar figure. Click Save.

The finished trigger should look something like this:

Step 4: Configure Your Action(s)
In the Actions panel, click Add action. From the menu of available integrations, click WooCommerce.
From the drop-down list that appears, select Create an order with a product.

Automator will present you with an editor where you can configure all of the details for the order. For example, in the Order items and Quantity field, you can select the products that you want to send to your donors.

For other, more dynamic fields, you can use tokens (bits of data stored on your WordPress website). To do this, click on the Asterisk (the token icon) to the right of each field. A drop-down list will appear with all of the available token data.
(To learn more about tokens, click here.)

For example, we have filled in the Billing first name, Billing last name and Billing email fields using tokens from our trigger.
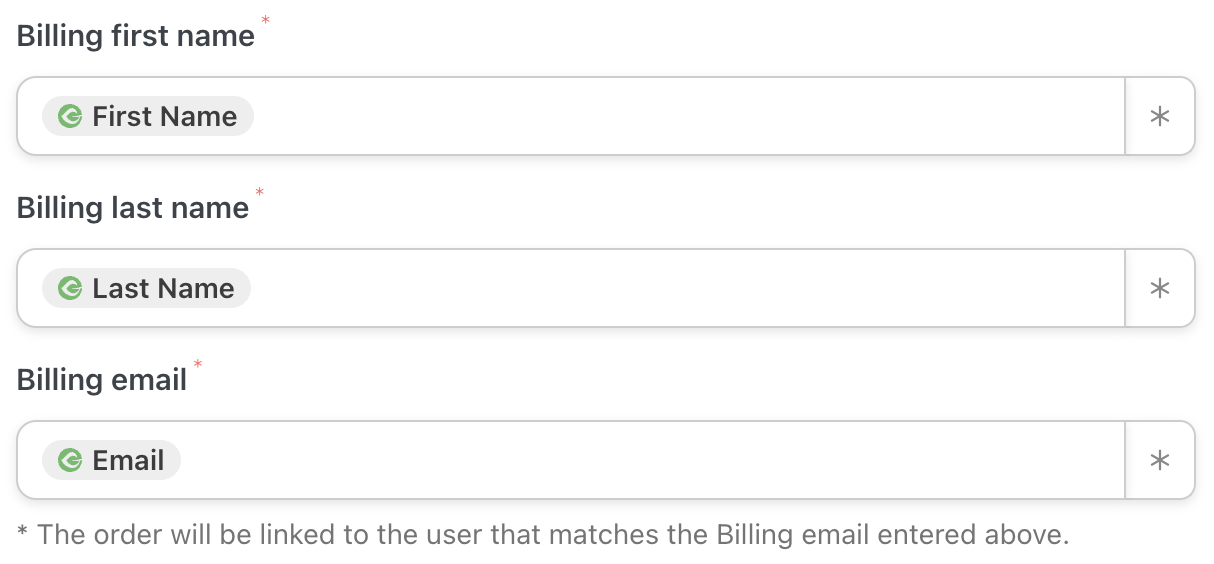
Once you’ve finished configuring your order, click Save. The finished action should look like this:

Step 5: Go Live and Give!
The best charities give as much as they get. And as soon as you toggle this recipe from Draft to Live, you’ll be able to give on-demand.

If you have a limit of one package per donor, don’t forget to limit the Times per user to “1’ in the Recipe box.
Step 6: Use Filters to Give Responsibly
By offering generous gifts, your donors will be lining up to show their support. But, as with most offers, it’s likely that terms and conditions will apply. For example, we would like to restrict donor appreciation gifts to geographic areas where we have preferred shipping rates. Here’s how you can do this using Automator’s filter feature.
Step 6.1
Hover your mouse over the three dots in your WooCommerce action. Click on Filter.

Step 6.2
A pop-up window labeled Condition will appear. Select General > A token meets a condition.

Step 6.3
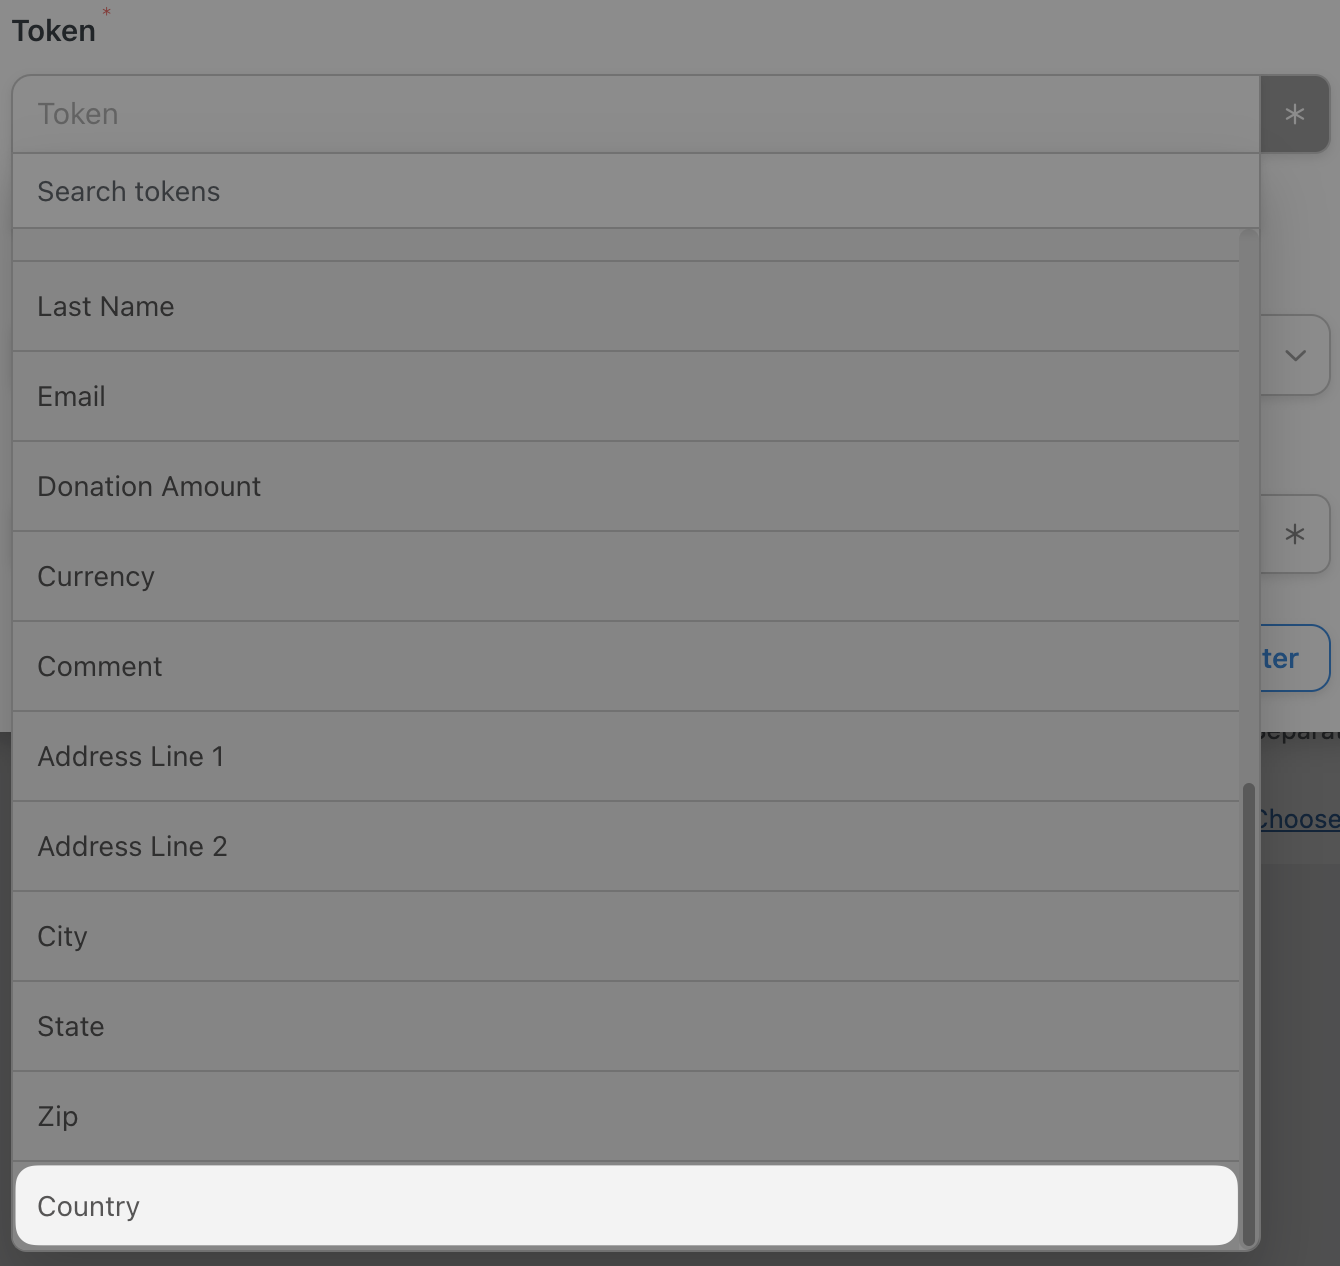
A secondary window labeled Configure the rule will appear. In the Token field, select your trigger tokens then Country.
Step 6.4
You can define the rule that the token data must satisfy for the action to fire. In our example, we want to restrict our donor package to the United States so we’ve configured the rule as follows:

When you’re finished, click Save filter.
Step 6.5
With the filter, your action should look like this:

Add more actions and filters to create unique gifts based on geographic location, payment method or scheduled delivery date. For example, we’ve added a delay to our action so that our donor appreciation gifts will arrive right on time for Thanksgiving.

Step 7: Get More, Give More
In this step, we’ll show you a slight variation on the original action. Instead of delivering an appreciation gift to your donors, you can offer them coupons with a redeemable value relative to the size of their contribution. To do this, we’ll be using tokens once again in conjunction with Automator’s calculations feature.
Step 7.1
In the Actions panel, click Add action. From the menu of available integrations, click WooCommerce. From the drop-down list that appears, select Generate and email a coupon code.

Step 7.2
Automator will present you with an editor, similar to the one you used to create an order for a product. In the Discount type field, select Fixed cart discount.

Step 7.3
The next field will be the Coupon amount. Click on the Asterisk and deselect Only float tokens. Then select Modifiers > Calculation.

Step 7.4
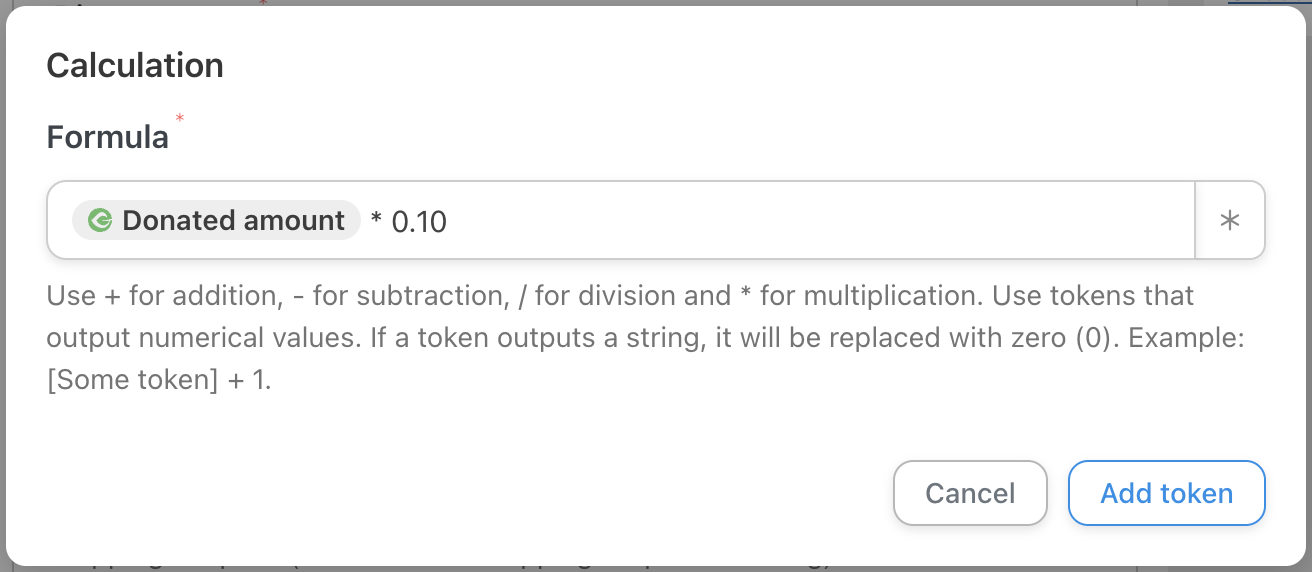
Automator will present you with a Calculation window that contains a Formula field. Once again, click the Asterisk to retrieve tokens and select Donated amount.

Step 7.5
Using regular mathematical annotations (+, -, *, /), in the Formula field, set the Coupon amount as a function of a user’s donation. For example, we have promised to give our donors a coupon equal to 10% of the value of their donation. Therefore, our Formula field contains the function as follows:
When you’re finished click Add token.
Step 7.6
With this action, instead of our previous one, your finished recipe should look like this:

Create Event Invitations
Money is great—community engagement is even better! (Although, we’d still want to see that cheque.) In this example, we’ll show you how to create event invitations using GiveWP and Automator.
Step 1: Create a New Recipe
From your WordPress Admin Sidebar, navigate to Automator > Add New. In the pop-up window that appears, select Logged-in users and click Confirm.
Step 2: Name Your Recipe
We’ve named this recipe GiveWP-Events Calendar: Annual Forest Management Conference. But you could choose something a little less long-winded.
Step 3: Configure Your Trigger(s)
In the Triggers panel, from the menu of available integrations, click GiveWP. From the drop-down list, select A user makes a donation via a form with a specific value in a specific field.

Automator will prompt you to select the form, field and value that the field must contain.

Note: You’ll need a custom form field in order to execute this automation effectively. Fortunately, GiveWP has an add-on with a simple drag-and-drop interface for this purpose. Click here to learn more about Form Field Manager or click here to download the add-on.
When you’re finished, click Save. Your action should look something like this:

Step 4: Configure Your Action(s)
In the Actions panel, click Add action. From the menu of available integrations, click The Events Calendar.
From the drop-down list that appears, select RSVP on behalf of the user for an event.

Automator will prompt you to select the event. After selecting the event, click Save. Your finished action should look like this:

Step 5: Go Live—on Location!
Get ready for a great event! Toggle your recipe from Draft to Live.

Add more actions, filters and delays to ensure that your event goes off without a hitch. Here’s an example of some actions and filters that might improve your donors’ experience:

Create Dynamic Donor Notes
Getting to know your donors can help you better understand where your interests are aligned and, ultimately, boost your donations. GiveWP allows you to create Donor Notes for exactly this purpose. To learn about Donor Notes, click here.
In this example, we’re going to build off of our event invitation automation to include a note on our donor’s profile that they attended our Annual Forest Management Conference.
Step 1: Add Another Action
In the Actions panel, click Add action within the filter window.

From the menu of available integrations, click GiveWP. From the drop-down list that appears, select Add a note to a donor.

Automator will present you with an editor where you can draft the note you’d like to add. Use tokens to create dynamic notes that directly reflect the donor’s behavior. When you’re finished, click Save.
Your new Actions panel should look like this:

Create More Donors
With Automator, you can create new donors based on your site visitors’ behavior. For example, you can pledge a portion of the proceeds from your WooCommerce store to related charitable causes. Then use that visitor’s information to create a new donor profile, add their contact information to your CRM (such as ActiveCampaign) and let them know how they can contribute more directly.
Step 1: Create a New Recipe
From your WordPress Admin Sidebar, navigate to Automator > Add New. In the pop-up window that appears, select Everyone and click Confirm.

Step 2: Name Your Recipe
We’ve named this recipe WooCommerce-GiveWP: New Donor.
Step 3: Configure Your Trigger(s)
In the Triggers panel, from the menu of available integrations, click WooCommerce. From the drop-down list, select A guest completes, pays for, lands on a thank you page for an order with a product in a category.
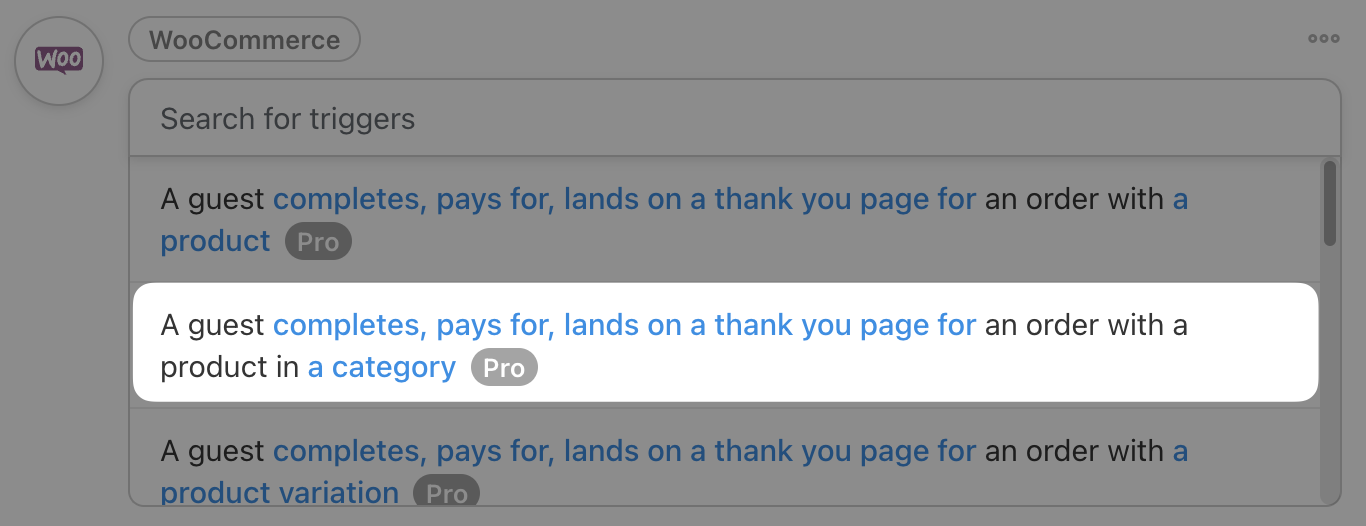
In the Trigger condition field, select completes.

In our example, we’ve pledged a portion of all our sales in our Outdoor & Gardening department to our Forest Management Fund. So, in the Product category field, we’ve selected Outdoor & Gardening.

When you’re finished, click Save. Your completed trigger should look like this:

Step 4: Configure Your Action(s)
In the Actions panel, click Add action. From the menu of available integrations, click WordPress. From the drop-down list, select Create a user.

Automator will present you with an editor. Use trigger tokens to fill out the new user’s information.

When you’re finished, click Save. The completed action should look like this:

Note: This action is not necessary to create a new donor in GiveWP. However, creating a new WordPress user or other account/membership type will help you process other automations in the future.
Click Add action. From the menu of available integrations, click GiveWP. From the drop-down list, select Create a donor.
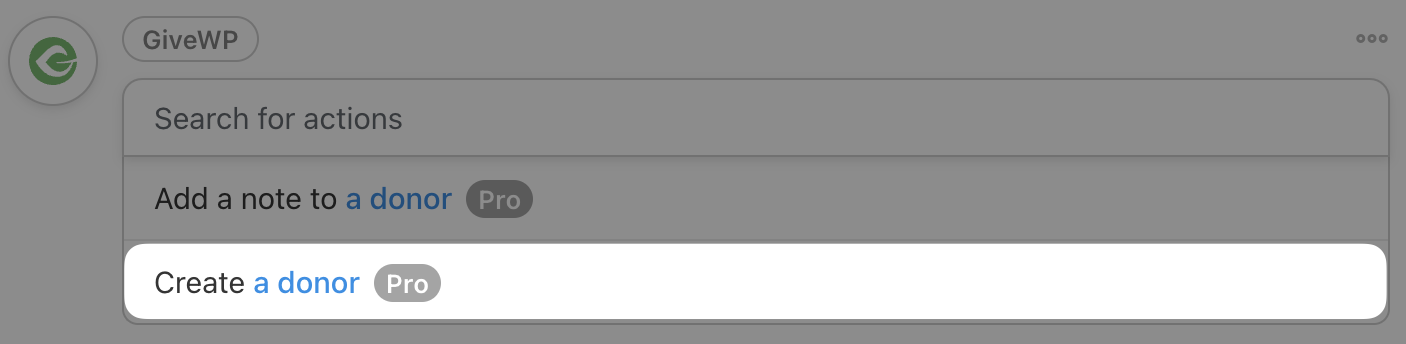
Once again, use tokens to fill out the fields in the editor.

When you’re finished, click Save. We’ve gone ahead and added a few actions to this recipe to get our new donor’s information into our CRM. We’ve also added delays to these actions just to be sure that all of the information has enough to populate. Here’s what our Actions panel look like:

Step 5: Go Live and Collect!
Toggle your recipe from Draft to Live and get ready to collect more contributions from an ever-growing list of donors.

Donate and Automate with GiveWP and Automator
We’re confident that all of these automations will help you build deeper and longer-lasting relationships with your donors. Powerful as they are, however, we’ve only barely scratched the surface of what you can do when you pair GiveWP with Automator.
Keep the recipes rolling out and the donations coming in. Let us know in the comments section below what new automations would help you save the world!

Related Posts


This Post Has 0 Comments