How do you know when it’s time to start automating your WordPress tasks? And which…
Brand your WordPress Emails
Want to upgrade your WordPress admin emails? Tired of sending generic transactional emails to your WooCommerce or EDD customers? You’ve come to the right page!
In this article, we’ll demonstrate the benefits of using HTML emails over plain text to help craft your brand. This includes peeling back the covers to see how emails work in WordPress—don’t worry, it’s not nearly as complicated as you might think.
Next, we’ll dive into one method for transforming a default WordPress email into a branded, professional email.
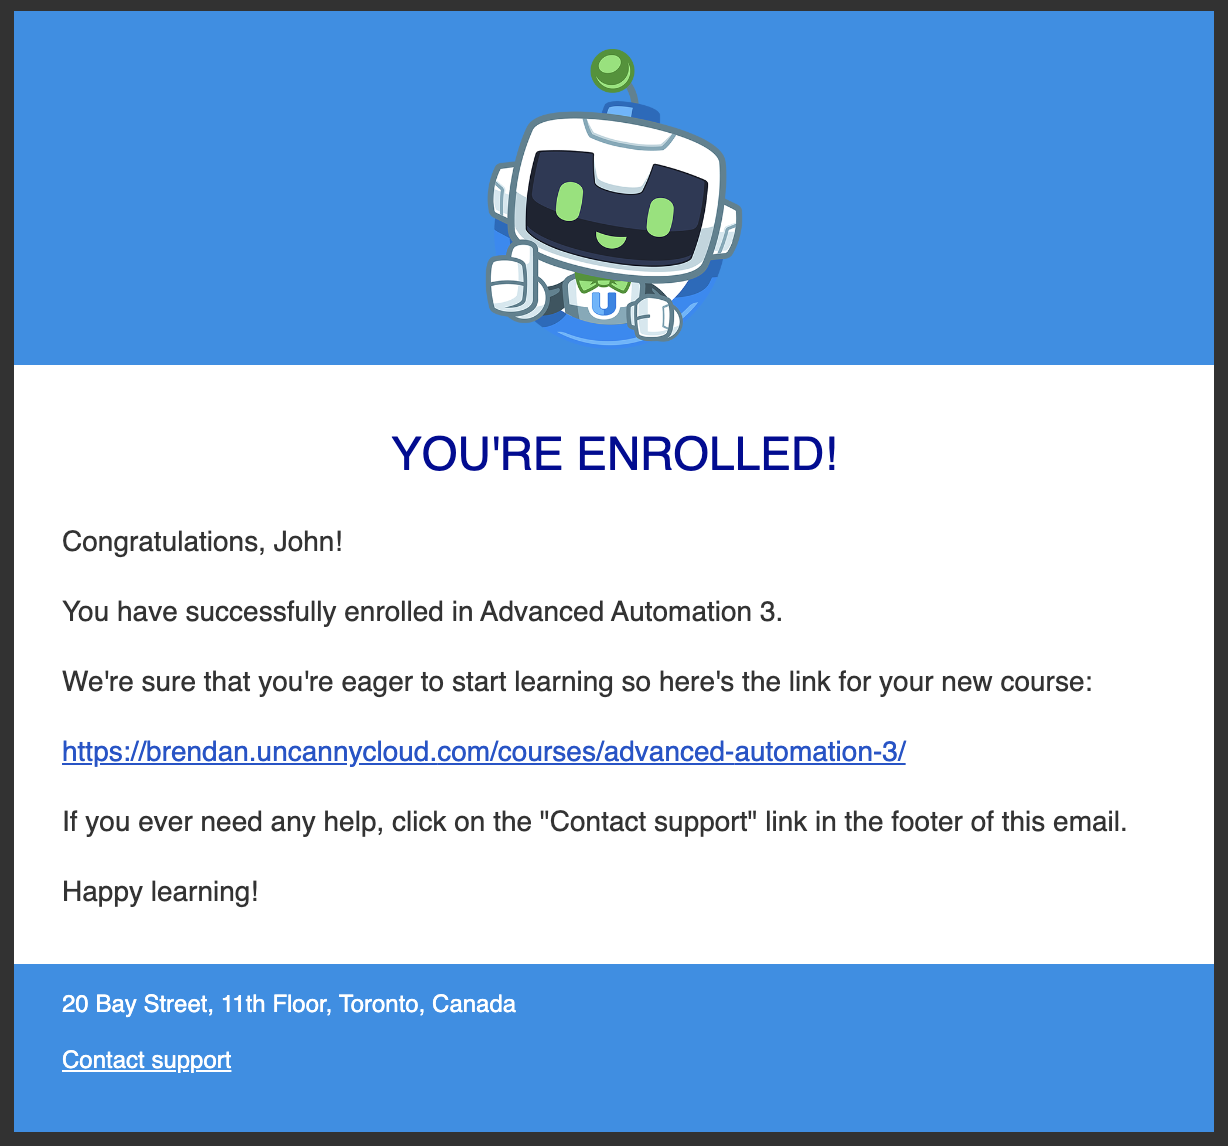
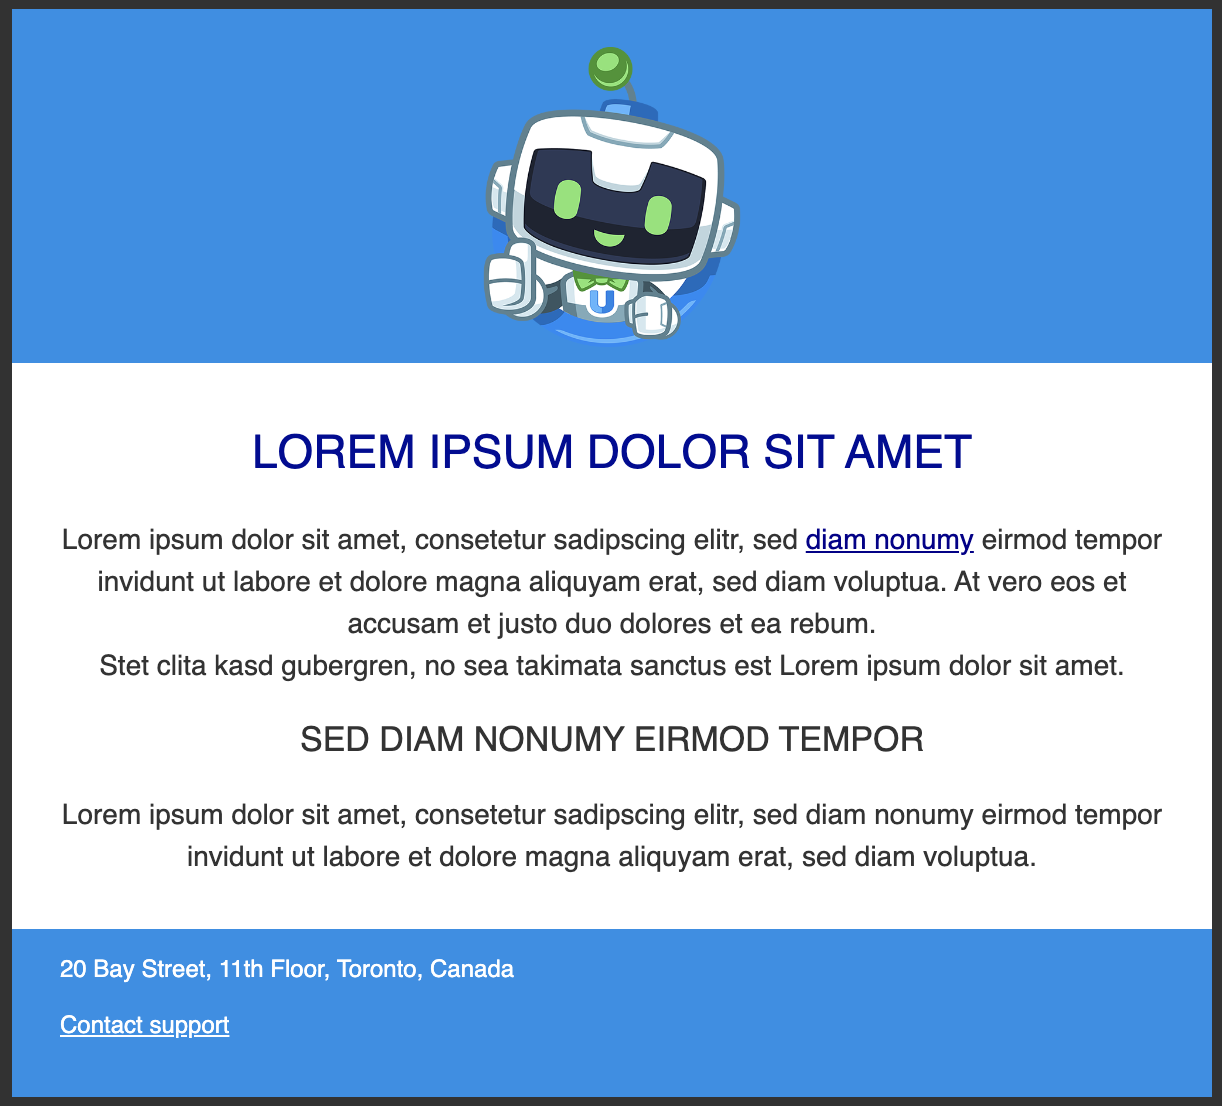
We’ll be using the WP HTML Mail plugin to style and brand our Uncanny Automator emails. Want a sneak peek at the awesome new account notification email that we built?
Lastly, we’ll round things up with a look at some of the other tools out there to help you.
But that’s enough monologuing for now. Let’s get into the good stuff.
Why Branded WordPress Emails Matter
According to a Zendesk study, 87% of the people surveyed thought brand consistency was important. This means your transactional emails should look just as good as your website does. Your emails are an extension of your brand.
Thankfully, whether or not you believe it, you already have a brand!
Your brand is how the world views you. How you shape your brand and what you do with it is the critical thing. So, defining your brand (who and what you are) and building brand awareness (how people find out about you) is vital to the success of your business.
But what makes a brand so special? One way that makes a brand special is its ability to reach into people’s core values more than anything that you can buy off the shelf or the internet. We can physically touch products and company offices. However, we can’t grasp a brand with our hands. Because products will come and go, a powerful brand name can outlast products. A brand has the power to go beyond a material thing.
According to Coschedule, a brand should have these traits:
- Evokes a feeling.
- Delivers a promise.
- Cultivates a relationship.
- Provides a unique value.
By now, you should understand what a brand is and how it plays a pivotal role in any business. Your next question might be, “Should I care about making my emails look good?”
As Canva puts it, you want your emails to stand out and grab the audience’s attention. We definitely want people to open and read our emails.
However, there’s a subtle point lurking here. It’s something that codifies a stronger and more meaningful connection. It’s the glue that binds the styling of emails with branding. And that something is consistency.
When it comes to our audience, brand consistency ranks astonishingly high in their minds.
How WordPress Emails Work
If you check the WordPress documentation, you’ll see that WordPress will send an email for 25 different scenarios. For example, email notifications go out when there’s a new user registration, an admin password change, or a new post comment.
Each specific scenario triggers a PHP function to construct an appropriate email message based on the context. This includes providing the From and the To email addresses, the subject line, and the email body. Each of these email attributes can be different depending on the scenario.
When there’s new user registration, for instance, the from email address defaults to the Administration Email Address in the site’s General Settings, the to email address is set to the new user’s email address, the subject line includes the phrase New User Registration, and the body contains login details.
One gotcha is that the email sender’s name will be WordPress if there is no name set in the sender’s user profile. To make sure that never happens, make sure your sender’s profile is completely filled out with your brand information.
The wp_mail() function
When the email is ready to go, the wp_mail() function goes into action. The wp_mail() function, in turn, uses PHPMailer and SMTP utilities to perform the nitty-gritty of sending the email.
By default, wp_mail() sends plain text emails. Here’s what a new user notification looks like.
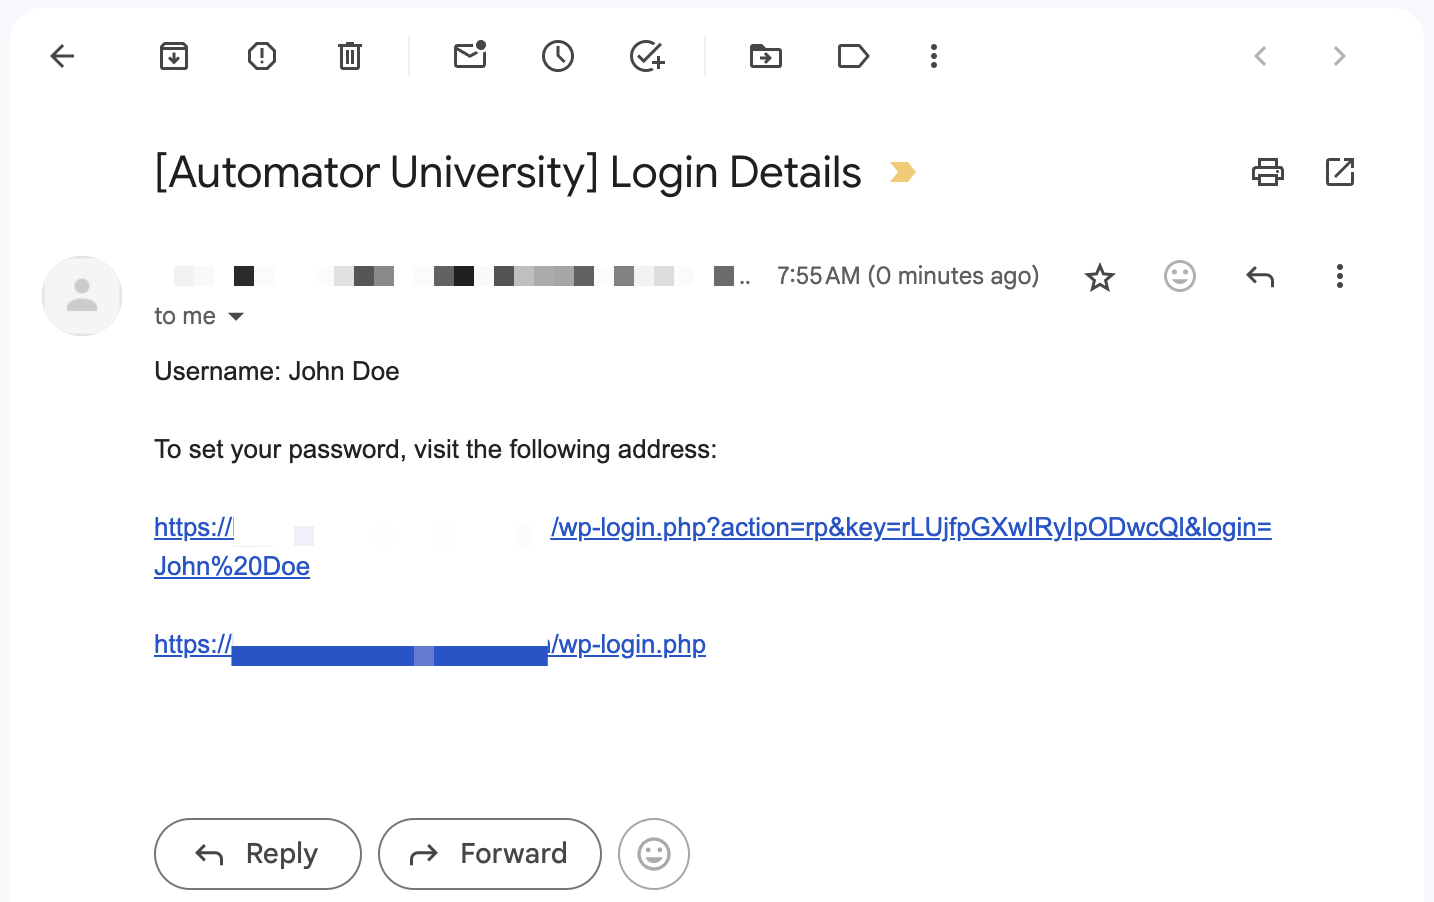
It’s a start. But, we can do better to get it to the level of professionalism that your brand deserves.
As you can see, it turns out that WordPress has done the heavy lifting for us (as a good framework should). And better yet, WordPress gives us the hooks we need to customize our emails as much as we want. This is a game-changer because we’re not stuck with sending only plain text emails that have “no style.”
So let’s design our first HTML email!
Brand Your Emails with WP HTML Mail
Remember that email we showed you at the beginning of this article? What if we told you that you could create a branded email just like that one for your business in a few short steps?
Well, you can! Here’s how.
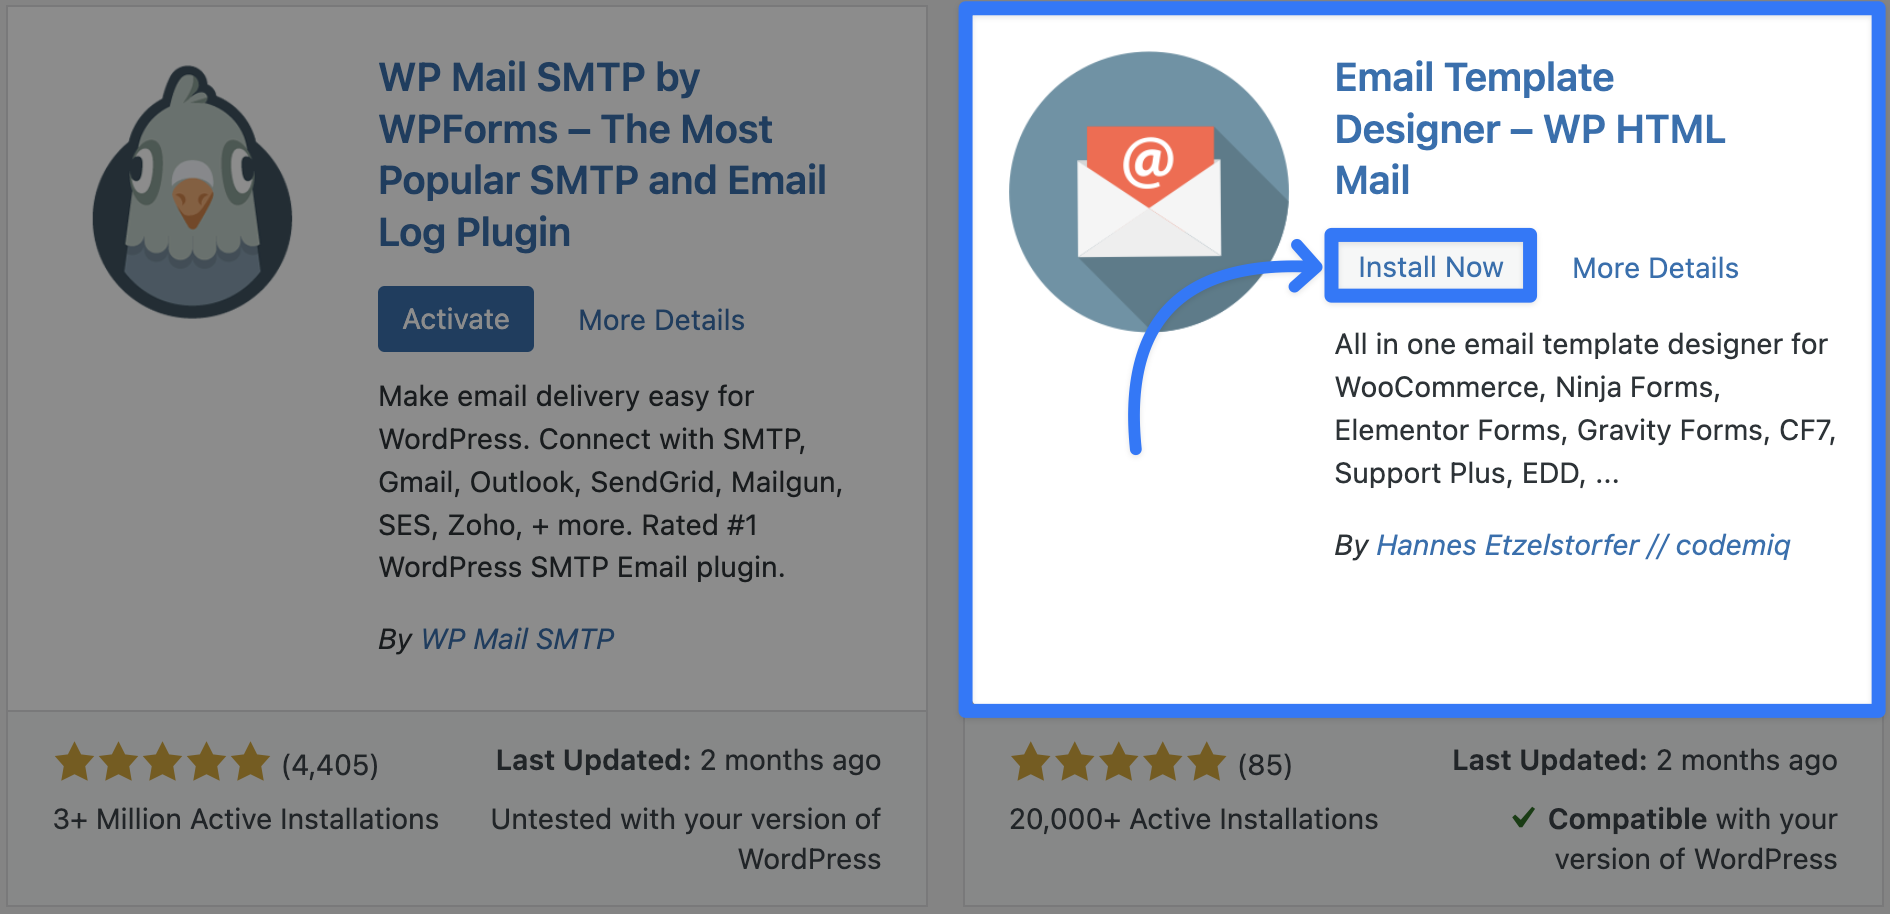
Step 1: Download and Activate WP HTML Mail
From your WordPress Admin Dashboard, download and activate the WP HTML Mail plugin.
With the WP HTML Mail plugin activated, navigate to Settings > Email template. This is where you can edit the template for your WordPress emails.
Step 2: Select a Template
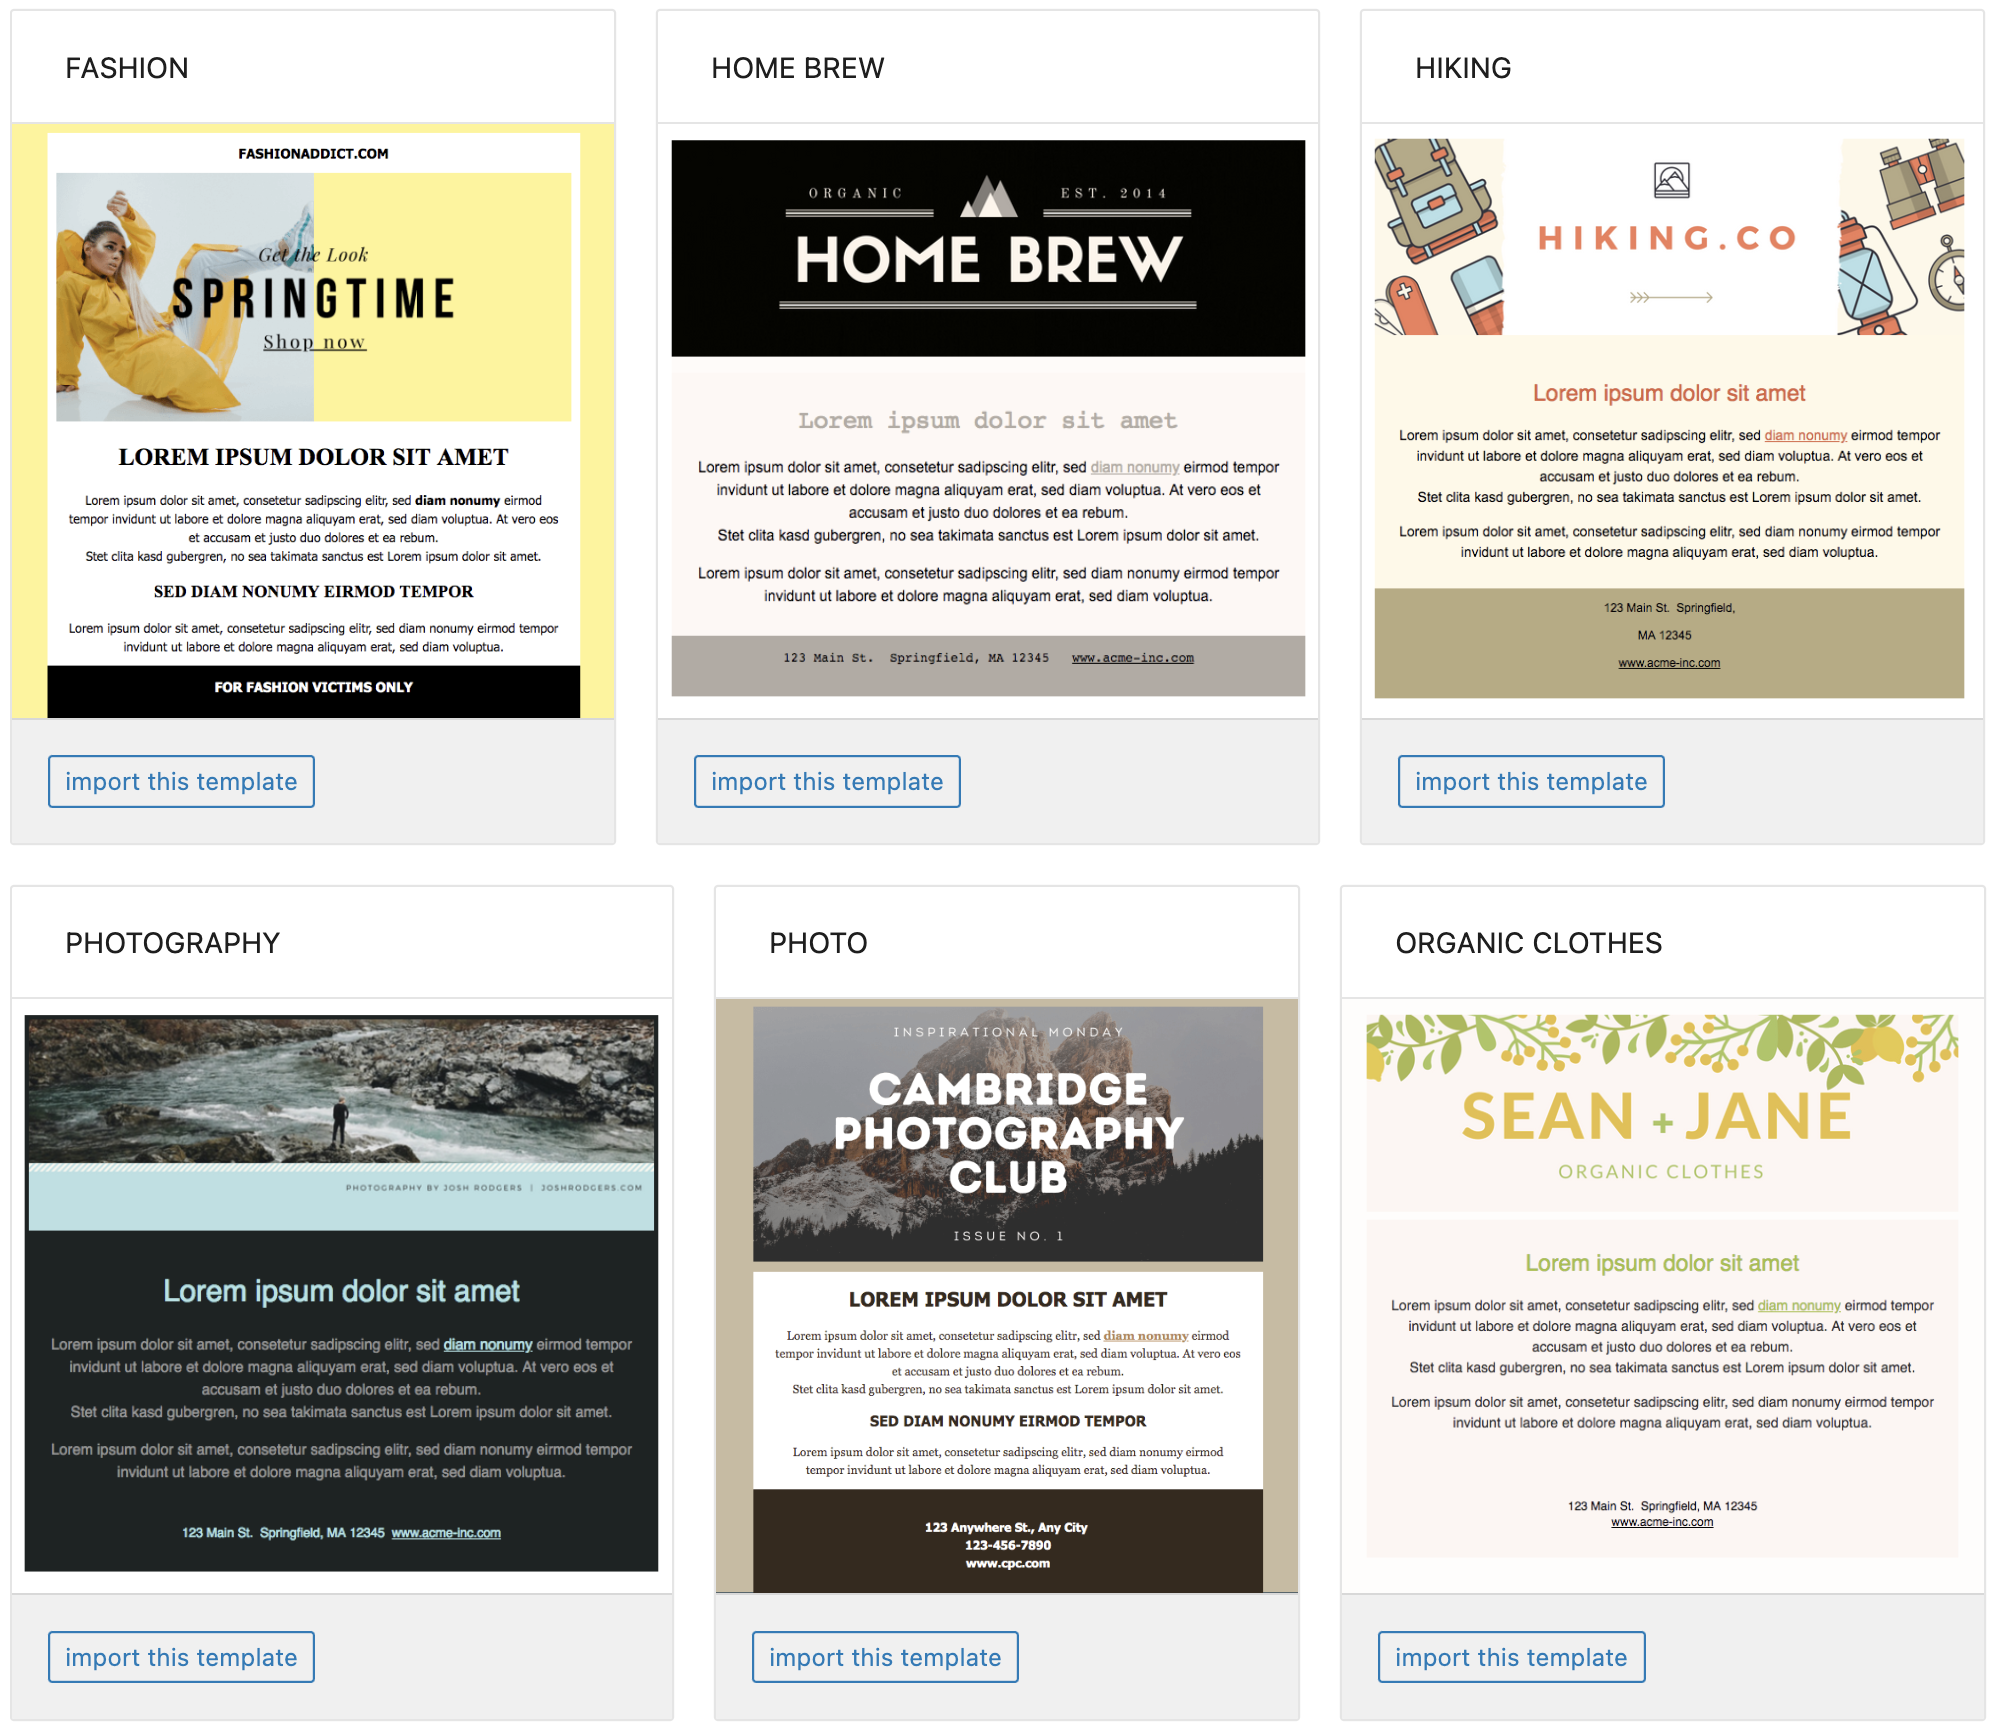
You can either build your email from scratch or select from one of the existing templates by clicking Browse our template library. To save time, we have selected a template.
Step 3: Edit Your Template
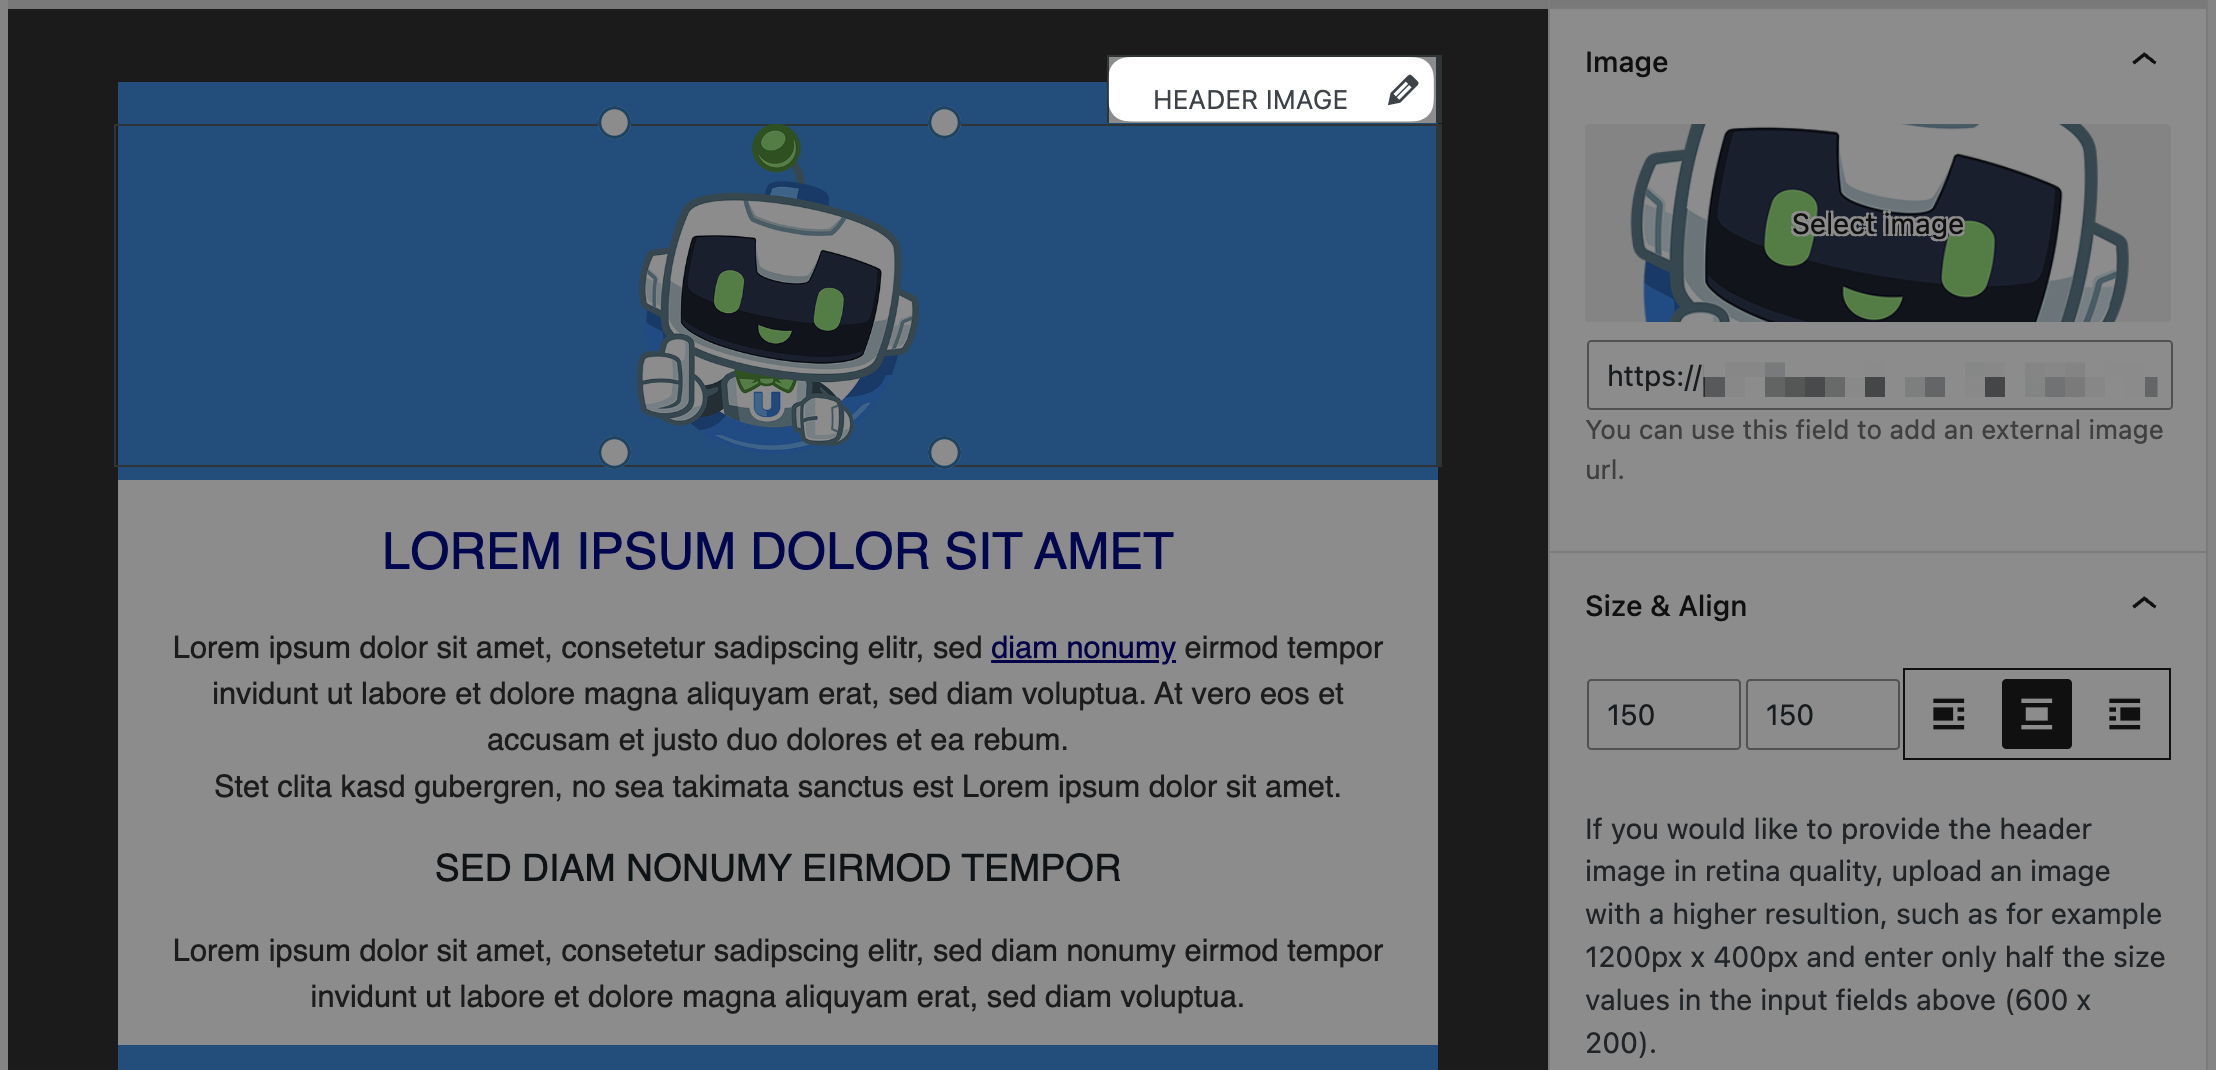
This is where you get to let your imagination (and brand) run wild! Change the email container, header, header image (logo), footer, font and colors to match your brand identity.
Start by editing the Email container. We set the background color to #323232.
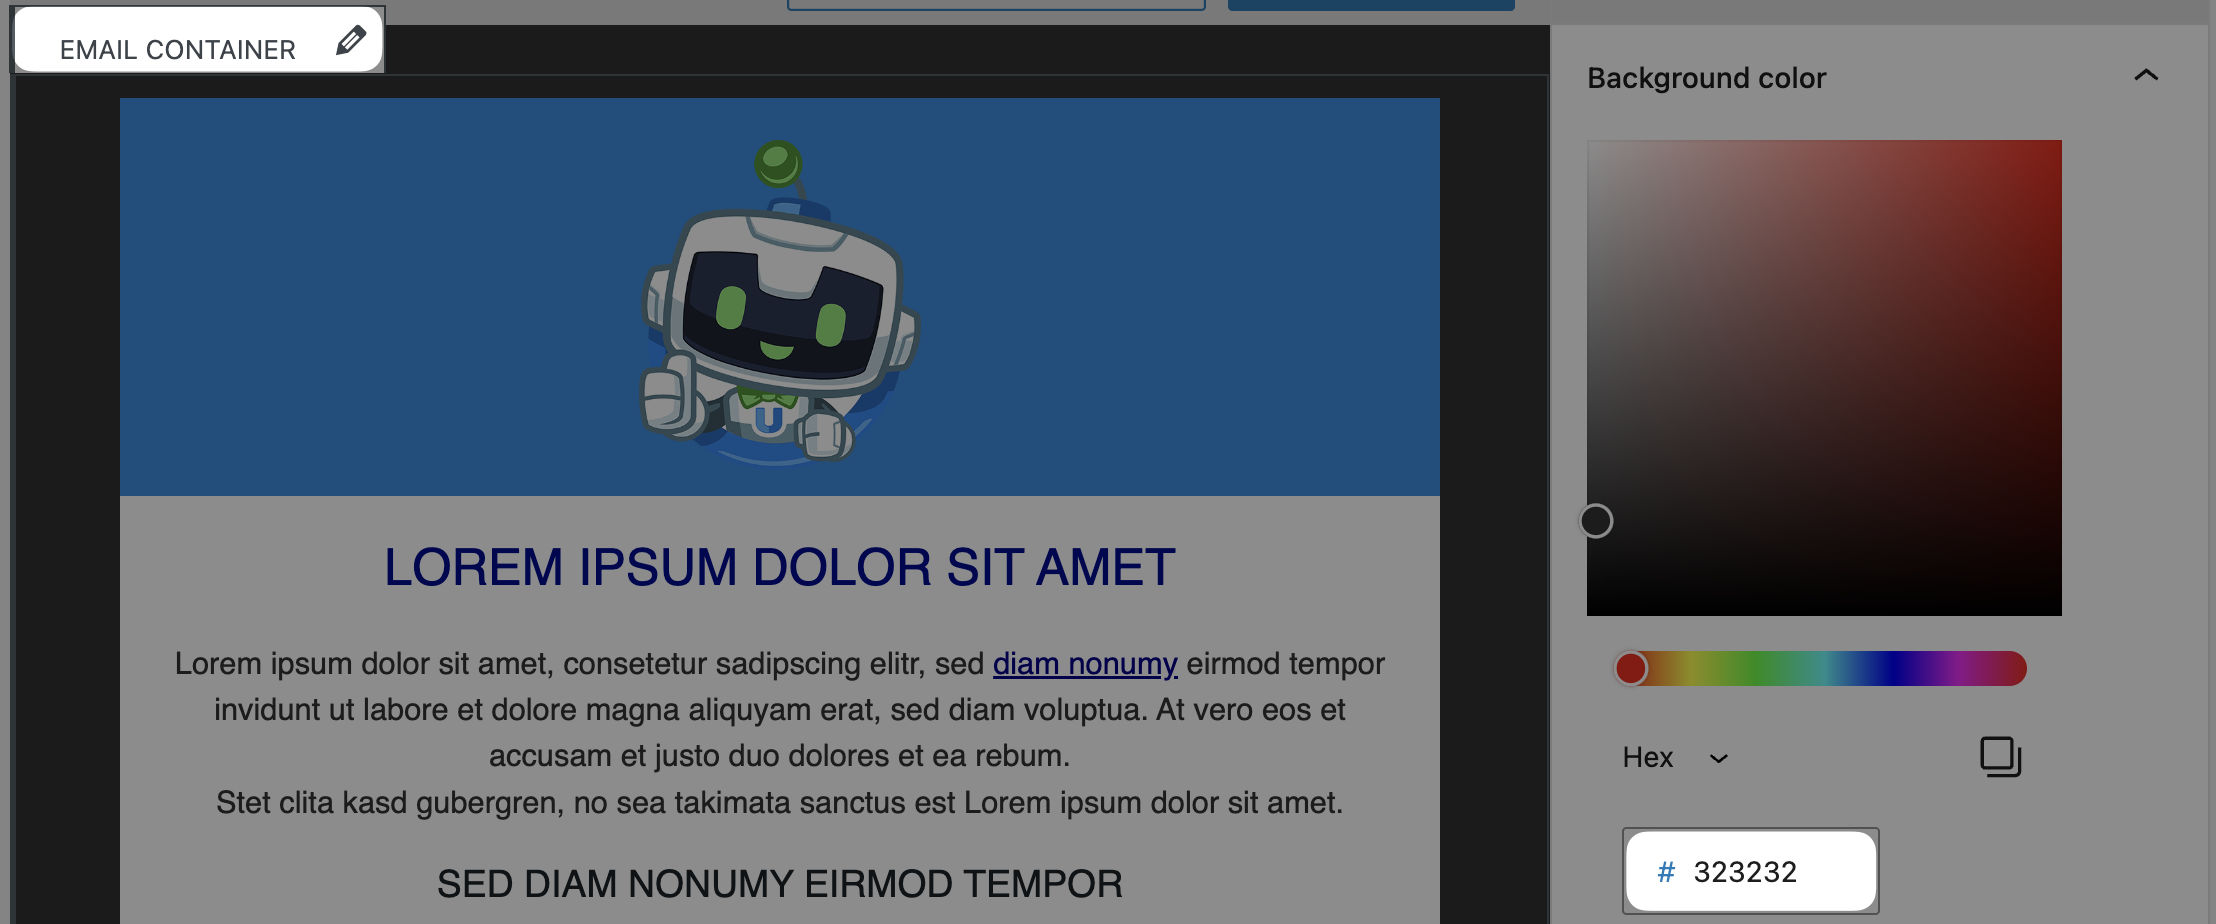
Next, you can edit the Email header. WP HTML Mail gives you several header options; we chose the option that only displays an image and set the background color to match our brand.
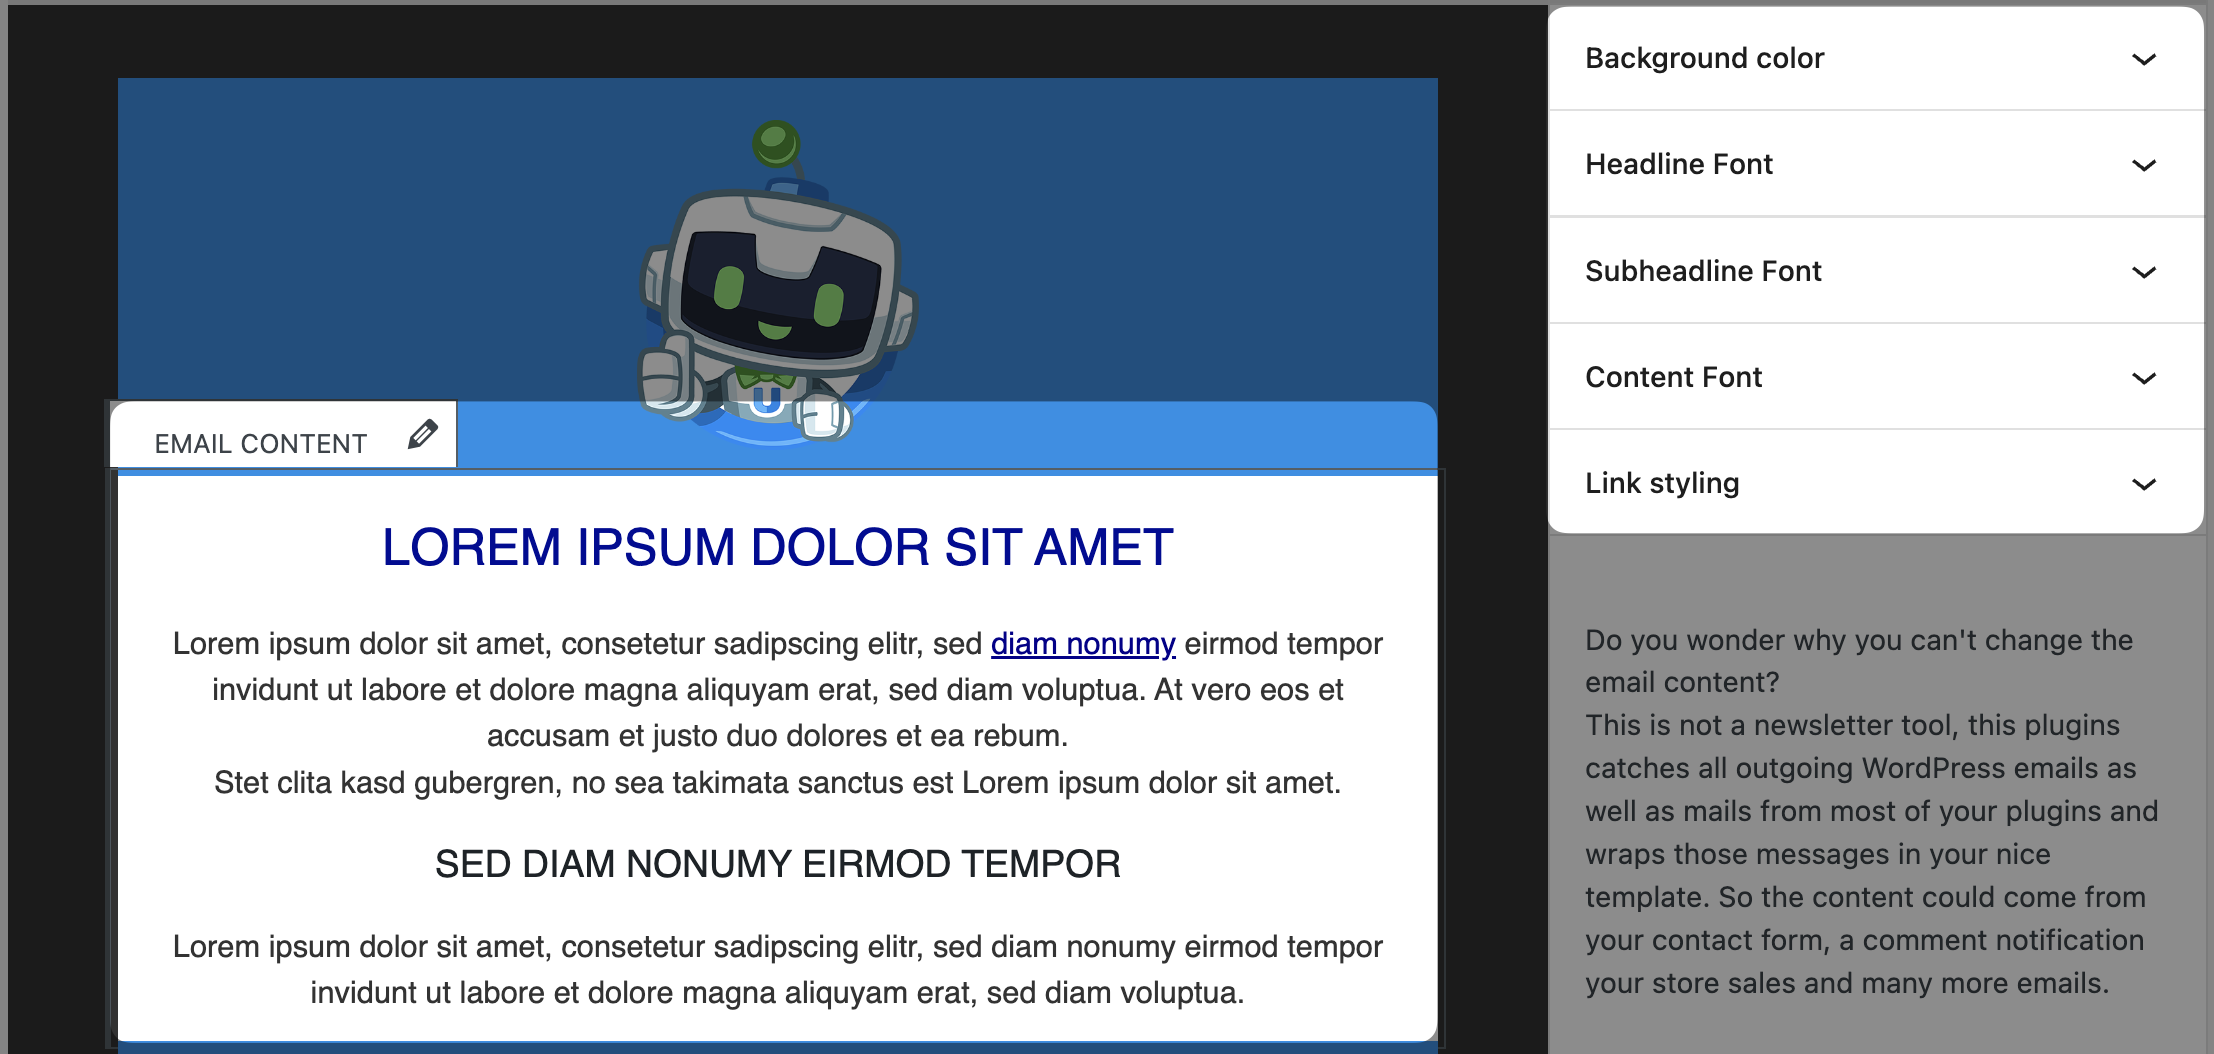
Once you’re happy with the header, you can edit the Email content.
We set the background color to #ffffff (i.e., white). Next, we set the Headline, Subheadline and Content font to “Helvetica”. Finally, for Link Styling, we chose #03018C.
Now you’re ready to edit the Email footer. Once again, we set the background color to match our brand. However, the real magic happened with the html that we added.
<p style="text-align: center;"></p>
<p style="text-align: left;">
  <span style="color: #ffffff; font-family: Helvetica, Arial, sans-serif; font-size: 12px;">
    your company/address information here
  </span>
</p>
<p style="text-align: left;">
  <span style="color: #ffffff; font-family: Helvetica, Arial, sans-serif; font-size: 12px;">
    <a style="color: #ffffff;" href="your support hyperlink here">Contact support</a>
  </span>
</p>
Replace “your company/address information here” and “your support hyperlink here” with your own information.
Step 4: Save, Preview and Test
Once you’re finished branding your email, click Save and Preview.

WP HTML Mail gives you the option to send a test email to an address of your choice. After saving your email template, scroll down to see a preview and send the test email.
If you’re happy with the way your test email turned out, move on to the next step.
Step 5: Choose Your Plugin Emails
Now that your email template is all ready to go, you can decide which plugins will use your new, branded emails. Navigate to the Plugin emails tab and select which plugin(s) will use your branded emails.
WP HTML Mail already supports WooCommerce, WPForms and Easy Digital Downloads amongst others.
But for everything else, you’ll want Uncanny Automator.
Send HTML Emails with Uncanny Automator
On its own, Uncanny Automator is the #1 automation and integration tool for WordPress websites. But, paired with WP HTML Mail, it can also be your #1 marketing automation tool.

Using simple combinations of triggers and actions called recipes, you can automate just about any workflow you can think of.
Want to send branded emails to your LearnDash students upon course completion? How about sending personalized email offers to your Woo customers? Ever wanted to initiate a drip campaign at the click of a button?
You can do it all with Automator!
Get an Automator Pro license today so you can take control your brand!>>>
Automated HTML Emails for LearnDash
Want to know how we sent off that snazzy email that we showed you at the beginning of this post? Follow the steps below to find out!
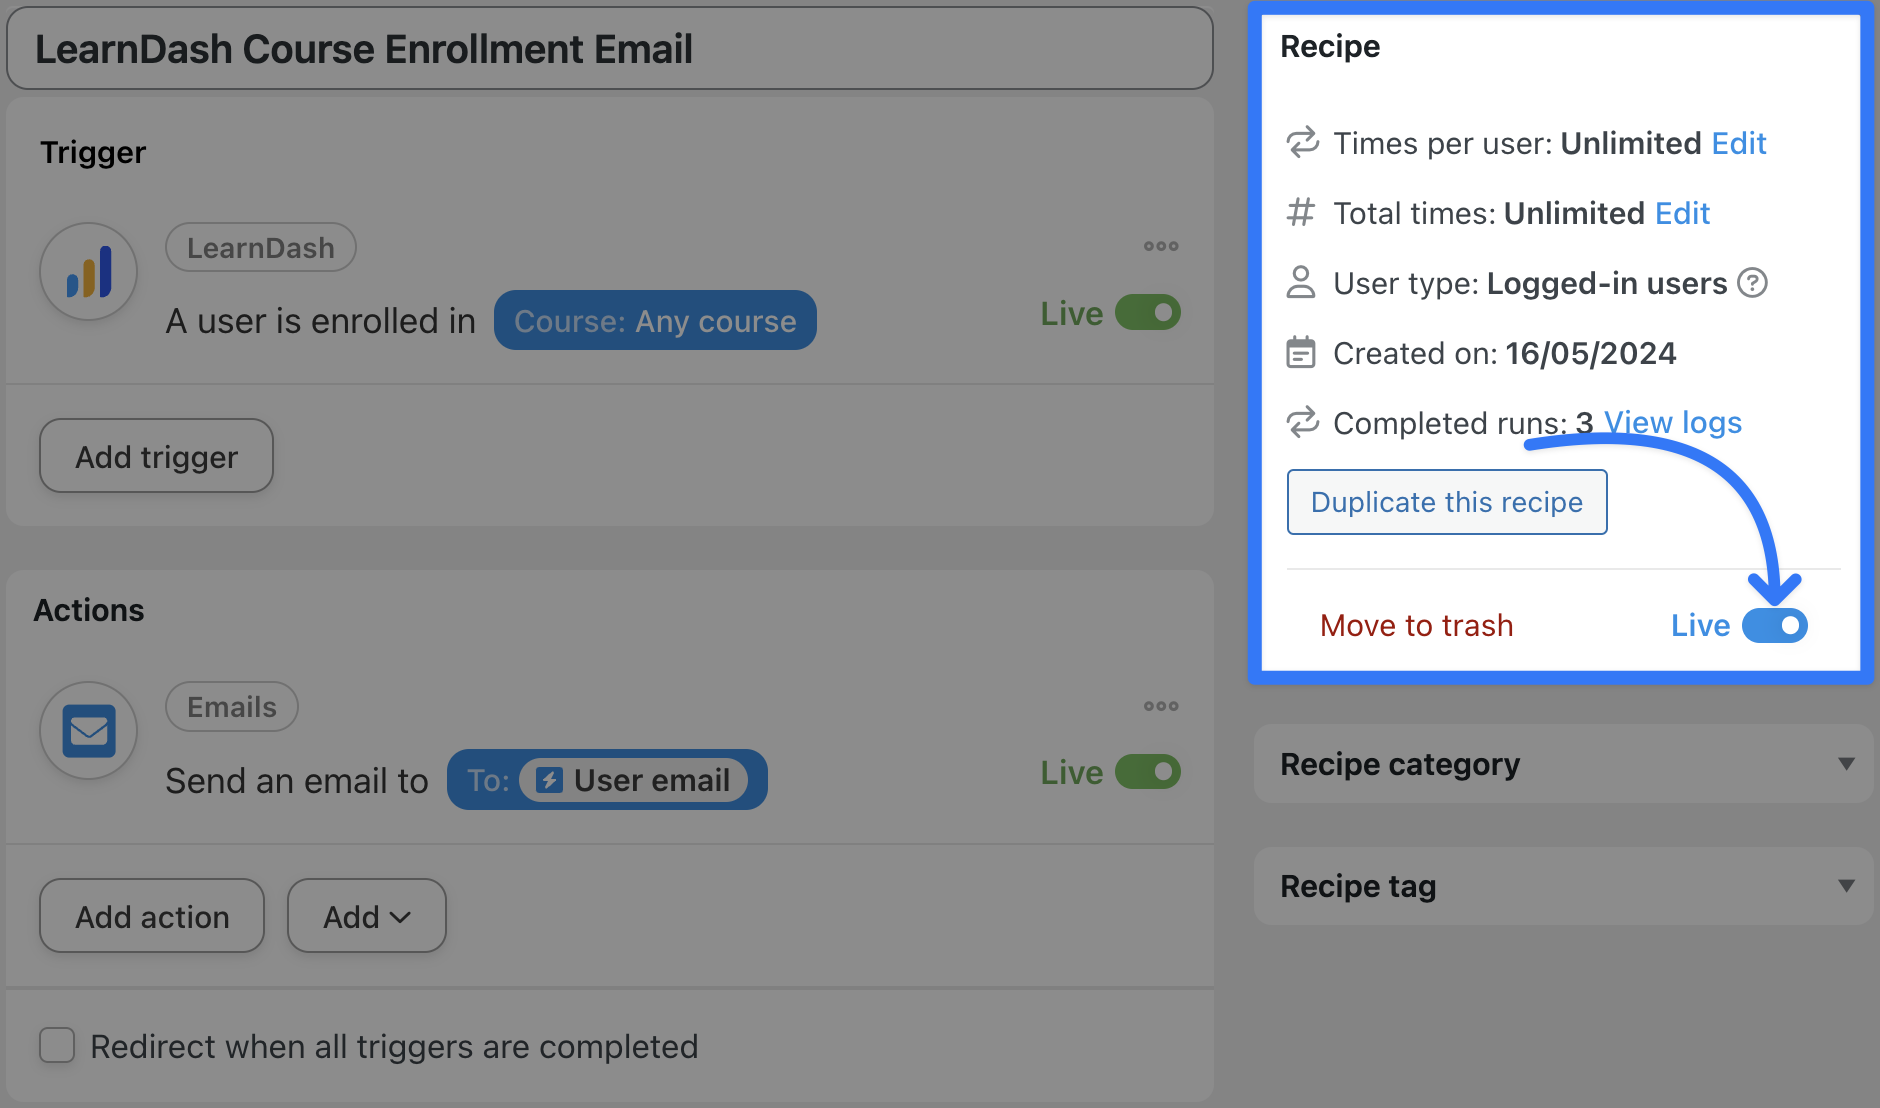
Step 1: Create a New Recipe
From your WordPress Admin Dashboard, navigate to Automator > Add new recipe. In the pop-up window that appears, select Logged-in users.
Step 2: Name Your Recipe
Give your recipe a name that makes it easy to recognize at a glance. For example, we have named this recipe “LearnDash Course Enrollment Email”.
Step 3: Configure Your Trigger(s)
In the Trigger panel, from the menu of available integrations, select LearnDash.

From the dropdown list that appears, select A user is enrolled in a course.
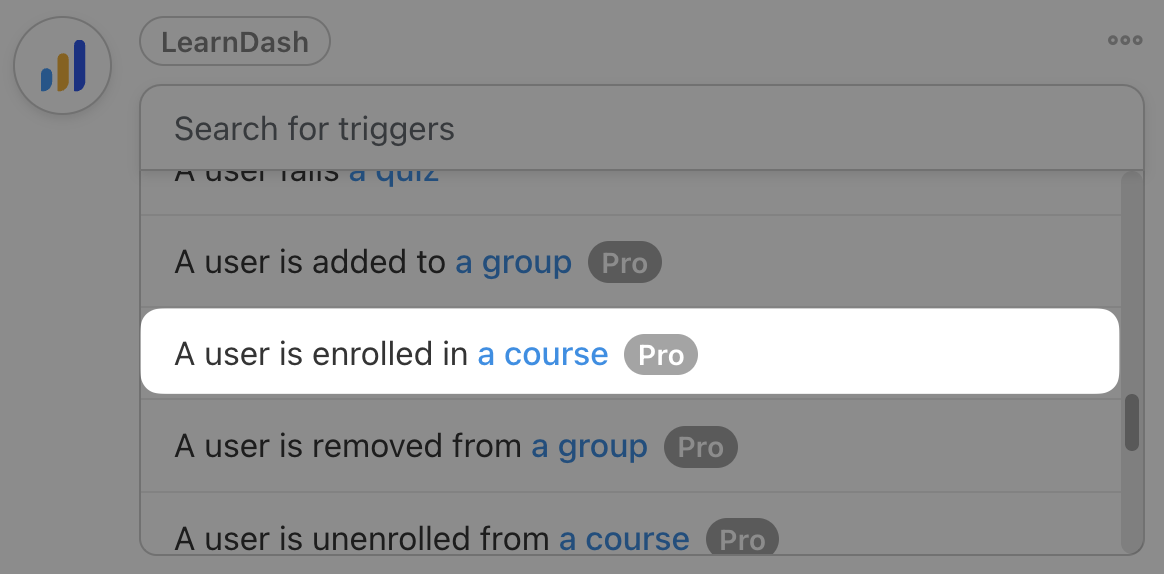
Automator will prompt you to select a course. We have chosen Any course because we will use tokens later on to personalize the email.
Once you’ve selected the course, click Save.
Step 4: Configure Your Action(s)
In the Actions panel, click Add action and select Emails.

From the dropdown list that appears, select Send an email.
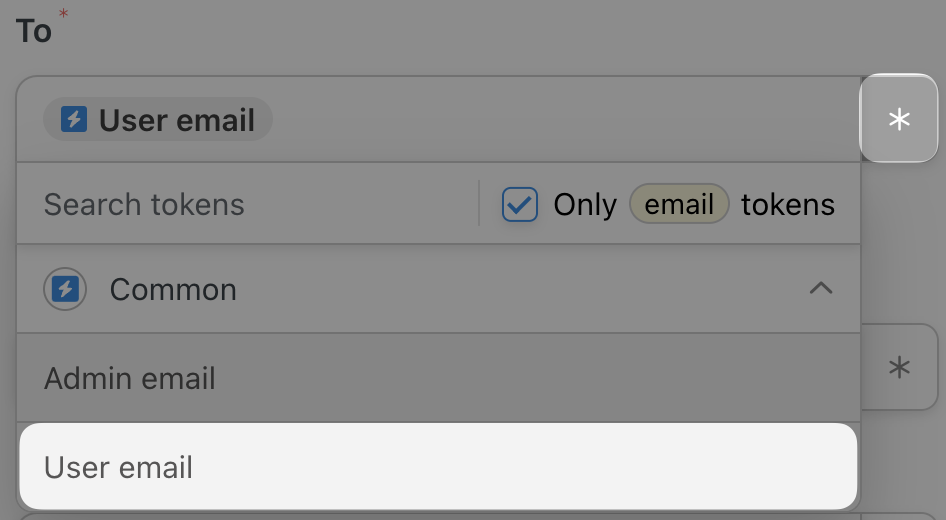
Automator will present you with an email form. You can fill out this form using tokens (dynamic data pulled from your WordPress website and from within recipes). To select a token, click the Asterisk.
For example, in the To field, we selected the User email token so that Automator will dynamically populate this field and send the email to whichever user enrolled in a course.
Fill out the remaining fields, including the Subject and Body field. You can use as many or as few tokens as you would like. When you’re finished drafting your email body, click Send test email.
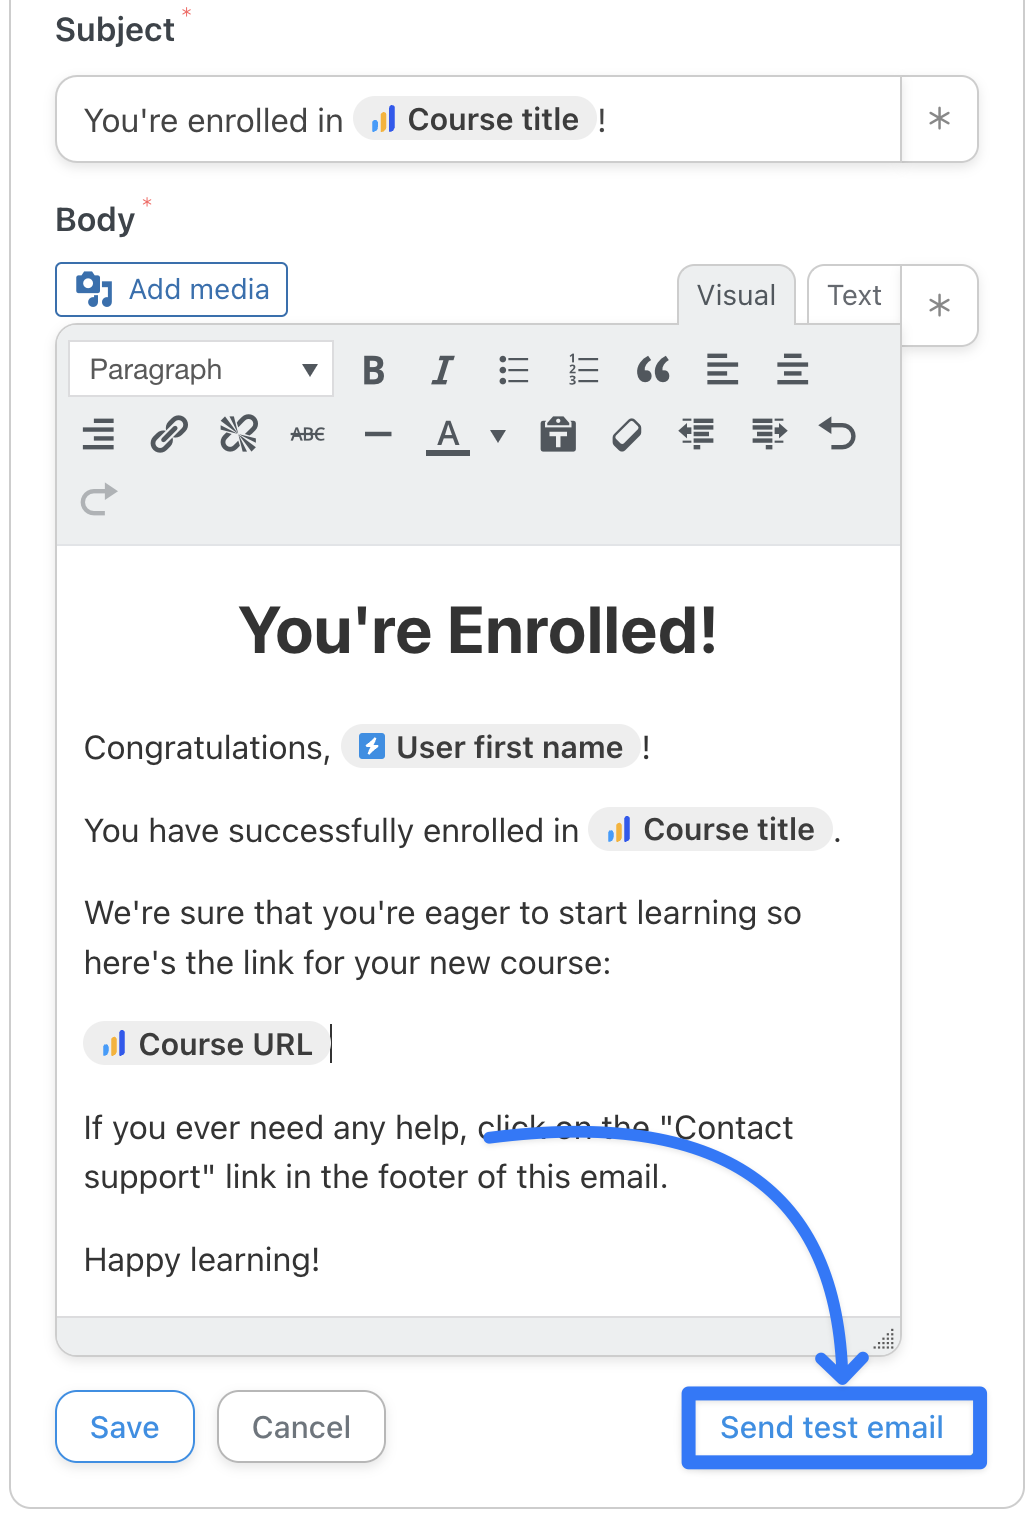
Automator will prompt you to enter an email address. Enter an address and click Send then check your mailbox—you’ve got (branded) mail!
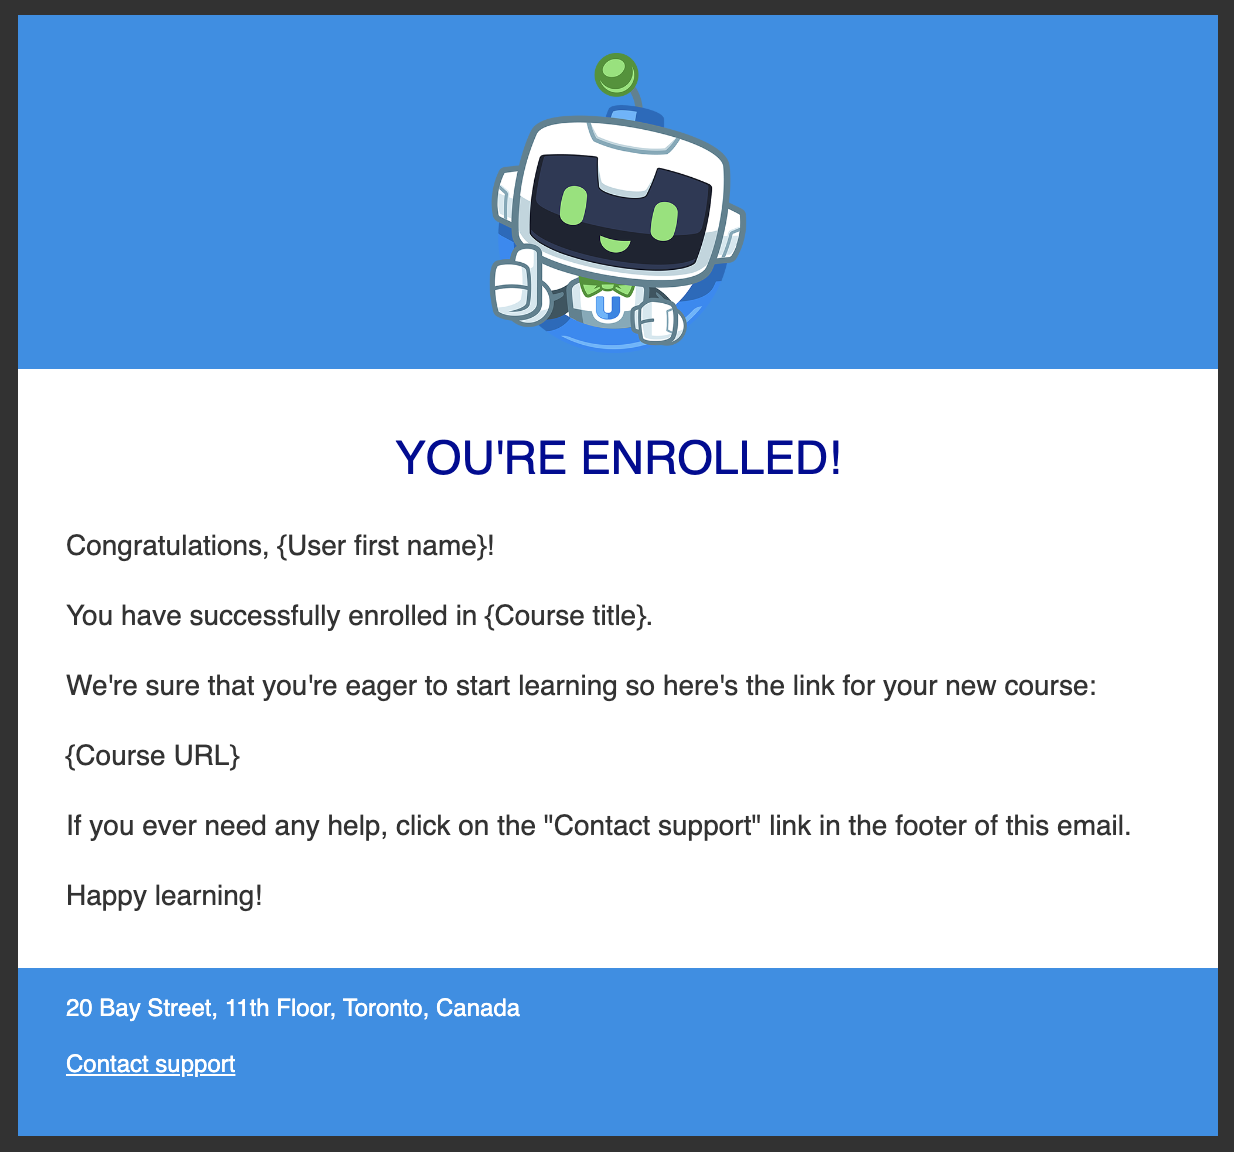
Notice how the email has adopted the html formatting from our template!
If you’re happy with your test email, return to the recipe editor.
Step 5: Go Live!
You’re just about ready to take command of your WordPress emails. All that’s left for you to do is toggle the recipe from Draft to Live.
Now, whenever a user registers for one of our courses, they’ll get an email that looks just like the one we showed you at the very beginning.
Other Tools
WP HTML Mail is a good fit for styling Automator emails because it provides a template without altering the actual email message body. This is a good thing. We want to personalize Automator notifications directly inside the recipe and only call in a plugin to style the rest (e.g., the sender, email container, header, and footer).
Email Templates is another option, and it’s similar to WP HTML Mail. There are a couple of noticeable differences between the two:
- The Email Templates plugin is accessed through the WordPress Customizer. This can be good or bad, depending on how much you like working through the Customizer.
- WP HTML Mail supports the importing and exporting of email templates. Email Templates does not. WP HTML Mail’s import/export feature is extremely useful for making a quick backup or for taking your template to another site.
A word of caution: There are plugins in the WordPress.org directory like Better Notifications for WP that allow you to customize the individual WordPress email notifications. However, the primary purpose of these plugins is for overriding the message body, and they don’t provide template support.
Conclusion
Your brand is how the world sees you and gets to know you. Your brand is your promise to your customers. Brand consistency is your promise to your brand.
In this article, we learned how easy it is to harness the power of WordPress to propel your emails from blah to exquisite. We saw how tools like Uncanny Automator take advantage of WordPress’s built-in email system so you can deliver your message in your style and brand.
Now it’s your turn to share your voice, purpose, and professionalism through your new branded emails.

Related Posts


Maria: ¡Qué gran idea personalizar los correos electrónicos de WordPress para mantener la consistencia de la marca! Con el uso de plugins de WordPress, se puede diseñar y estilizar los correos electrónicos de manera que reflejen la identidad de la marca. Crear plantillas personalizadas para los correos salientes, incluyendo las notificaciones del Automator, es una excelente manera de fortalecer la presencia de la marca en todos los aspectos de la comunicación con los usuarios. ¡Definitivamente una estrategia que vale la pena implementar!