Revive old WordPress posts with AI and Uncanny Automator. Learn how to reverse content decay…
Pro Tip: How to Create LearnDash Reports in Google Sheets
Instantaneously create LearnDash reports in Google Sheets with Uncanny Automator’s loops feature. Get inspired and gain insights with custom LearnDash reports.

Hey there, LearnDash users! Have you been scratching your head wondering how to quickly create custom LearnDash reports? Well, fear not my friend. Uncanny Automator’s loops feature allows you to create custom LearnDash reports in Google Sheets with just a few clicks.
In this detailed and easy-to-follow guide, we’ll show you how to create custom LearnDash reports with a Google Sheets integration. Quickly and easily collect your LearnDash data, analyze your users’ performance and bask in the glory of your well-organized, crystal-clear reports.
Let’s get into it.
Introduction
In this LearnDash + Google Sheets reporting guide, we’ll show you how to create custom reports with the click of a button. However, before we get into the details, let’s answer some of your questions.
Can I create custom reports in LearnDash? The short answer is, not without some help. Creating custom reports in LearnDash isn’t possible without some degree of programming knowledge. Or, for those of us who would simply rather point and click or drag and drop, you’ll need a plugin like Tin Canny Reporting or Uncanny Automator.
What are the benefits of creating custom LearnDash reports in Google Sheets? Exporting your LearnDash data to Google Sheets gives you several advantages. For starters, you can share the information that you want with select members of your team without having to give them back-end access to your WordPress website. Additionally, you get to unleash the full analytical power of Google Sheets on your LearnDash data so that you can dive down into the details—where all of the learning happens!
How can I integrate LearnDash with Google Sheets? Uncanny Automator is the #1 integration tool for WordPress users. Any time you find yourself asking, “How do I connect this plugin to the other one?” just think of Automator. We’ll give you a step-by-step walkthrough for integrating LearnDash and Google Sheets with Automator later on this article. For now, just know that it’s 100% possible—and unbelievably easy.
What do I need to create custom reports in LearnDash?
With the right plugins, you can export your LearnDash data to Google Sheets to create any kind of custom reports that you want. In this section, we’ll give you a quick overview of the tools that we’ll be using; Uncanny Automator, LearnDash and Google Sheets.
Uncanny Automator
LearnDash users far and wide! Do you want to ace your LMS workflows? Then you’ll need a little cheat-sheet (a.k.a. the #1 automation and integration plugin for WordPress): Uncanny Automator. This powerful plugin gives you the ability to connect all of your favorite apps and plugins so that you can automate your workflows and create seamless integrations.

Automator is packed full of features that LearnDash users, in particular, will love. Choose from dozens of LearnDash triggers and actions, integrate your LMS with your sales funnel and CRM and even add custom filters using conditions you define.
You can start with Automator for FREE but you won’t find another automation or integration plugin that offers more value. Unlike other tools, Automator does not charge a per automation fee, meaning the more you automate, the more you save.
We’ll be using Automator Pro features throughout this article to demonstrate Automator’s awesomeness. You can get started with Automator Pro risk-free for 14 days.
Download Automator Pro to follow along.>>>
LearnDash
Forget chalkboards and projectors. LearnDash is the way of the future. As the leading LMS for WordPress, LearnDash allows you to design, market, and sell your own online courses, all from one place within minutes.

While LearnDash comes with its own native reporting features, it isn’t always possible to compile the data you need without an add-on or an extension. Or an amazing tool like Uncanny Automator.
Google Sheets
WordPress users often look for plugins, extensions or add-ons when trying to fill gaps in their tech stack. While the WordPress community does offer tons of great solutions, sometimes there’s just no replacement for an external app. Particularly when it comes to reporting, data collection and analytics, few apps are as powerful or as versatile as Google Sheets.
With Uncanny Automator, you can integrate Google Sheets with your WordPress website without having to write a single line of code. If you don’t already have a Google account, setting one up is easy—and FREE!
Get access to the full suite of Google apps and services today.>>>
Creating your First LearnDash Report in Google Sheets
Now that you have everything you need, let’s create your first LearnDash report in Google Sheets using Uncanny Automator. Automator works using recipes—combinations of triggers and actions that automate workflows across apps and plugins.

In the recipe pictured above, we’re able to compile a report of all of our LearnDash students with a certain membership level who have not completed a particular course. Using some features that are unique to Automator, we can gather the information about these students that matter most to us.
Let’s recreate the recipe pictured above.
Step 1: Create a New Recipe
From your WordPress Admin Sidebar, navigate to Automator > Add New. A pop-up window will appear where you can select your recipe type; either Logged-in users or Everyone. For this recipe, select Everyone and click Confirm.

Step 2: Name Your Recipe
Once you get the hang of making recipes with Automator (which, we promise, is easier than actually cooking something in the kitchen), you’ll be making them by the dozens. As such, we recommend coming up with a naming convention that makes it easy to recognize your recipes at a glance. For example, we’ve named this recipe LearnDash + Google Sheets: Gold Members Report.
Step 3: Configure Your Trigger(s)
In the Triggers panel, from the menu of available integrations, click on Run now.

(Note: The Run now integration allows you to complete an automation on the spot and with a simple click of a button. If you want to learn more about the Run now integration, check out this useful article. We’ll also show you how to create a recipe with an automatic trigger to keep your new report up-to-date, but more on that later.)
From the drop-down list that appears, select Trigger recipe manually and click Save. Your trigger should look like this:

Step 4: Configure Your User Loop
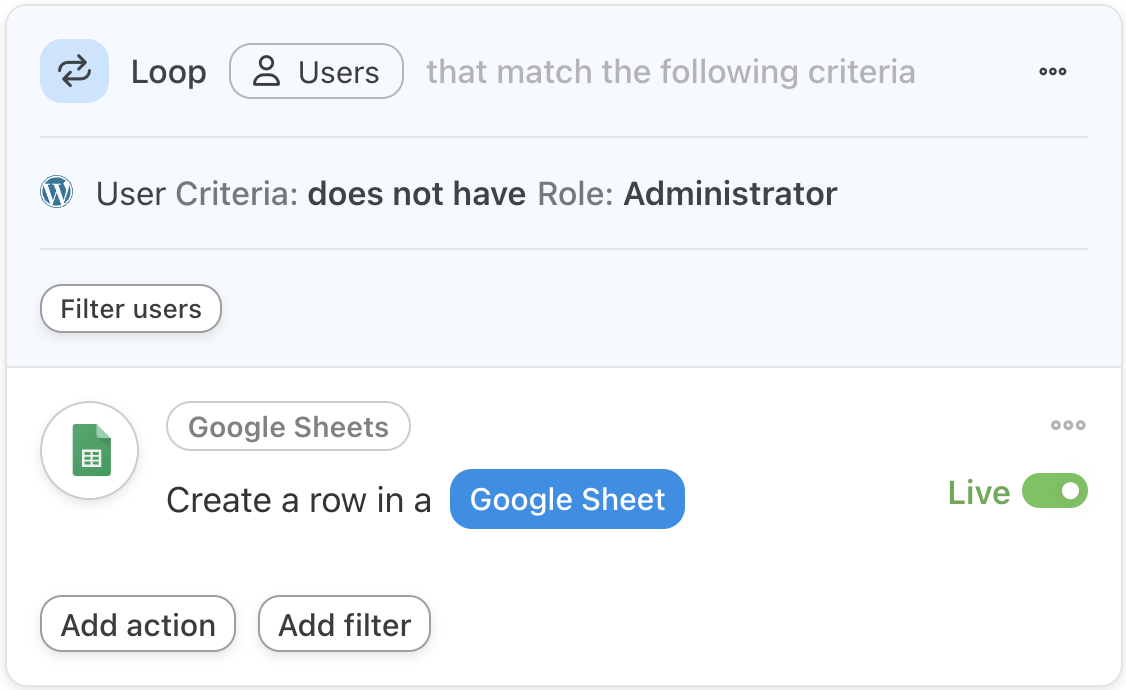
In the Actions panel, click Add > User loop.

Automator will automatically set the User Criteria to include any user who does not have the WordPress role “Administrator”. In other words, Automator will only “loop” through every WordPress user who is not a site administrator.
You can choose to target users more specifically by clicking Add condition.
Step 5: Configure Your Action(s)
Inside your user loop, click on Add action. From the menu of available integrations, click on Google Sheets.

You’ll have to connect your Google account to Automator in order to complete the integration. Fortunately, this only takes a few seconds and even fewer clicks.
After clicking on the Google Sheets integration, this pop-up window will appear:
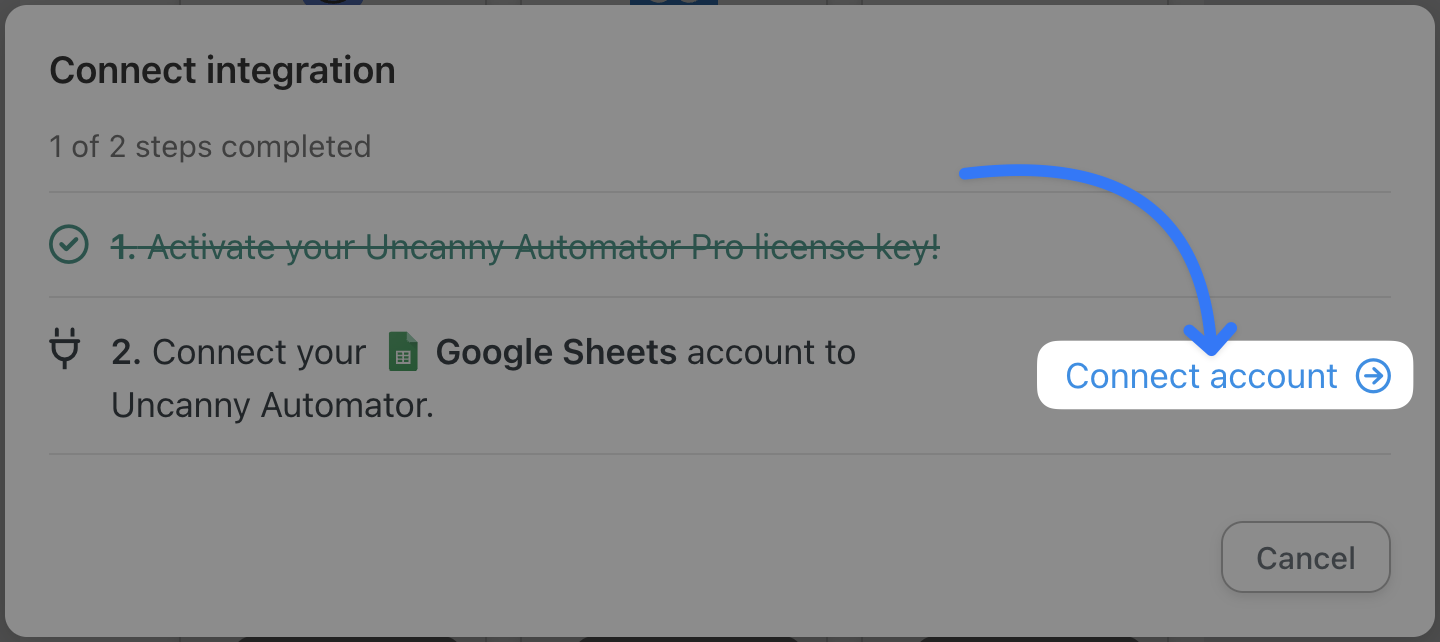
If you have downloaded the free version of Automator, make sure to collect your complimentary credits. Next, click Connect account and follow the prompts to complete the integration.
After you’ve connected your Google account to Automator, return to the recipe editor. From the drop-down list that appears, select Create a row in a Google Sheet.

Automator will prompt you to select the Drive, Spreadsheet and Worksheet where you want to create your custom LearnDash report. For example, we have already created a Google Sheets worksheet entitled LearnDash Gold Member Course Completion with headings for each column we want to populate.
After selecting your Google Sheets worksheet, click Get columns.
(Note: After you click “Get columns”, Automator will retrieve the first value in each column and return that as the column heading.)
We’re going to use tokens (dynamic pieces of data pulled from your WordPress website and even from within recipes) to populate our report.
To select a token, click the Asterisk and select the corresponding token from the drop-down list that appears.

After you’ve populated each Value field with the correct token(s), click Save. Once you’re finished, your action should look like this:
Step 6: Add Your Filter(s)
Now it’s time to add some filters to our Google Sheets action. These filters will allow us to further customize our LearnDash report.
Hover over the Google Sheets action and click Filter.

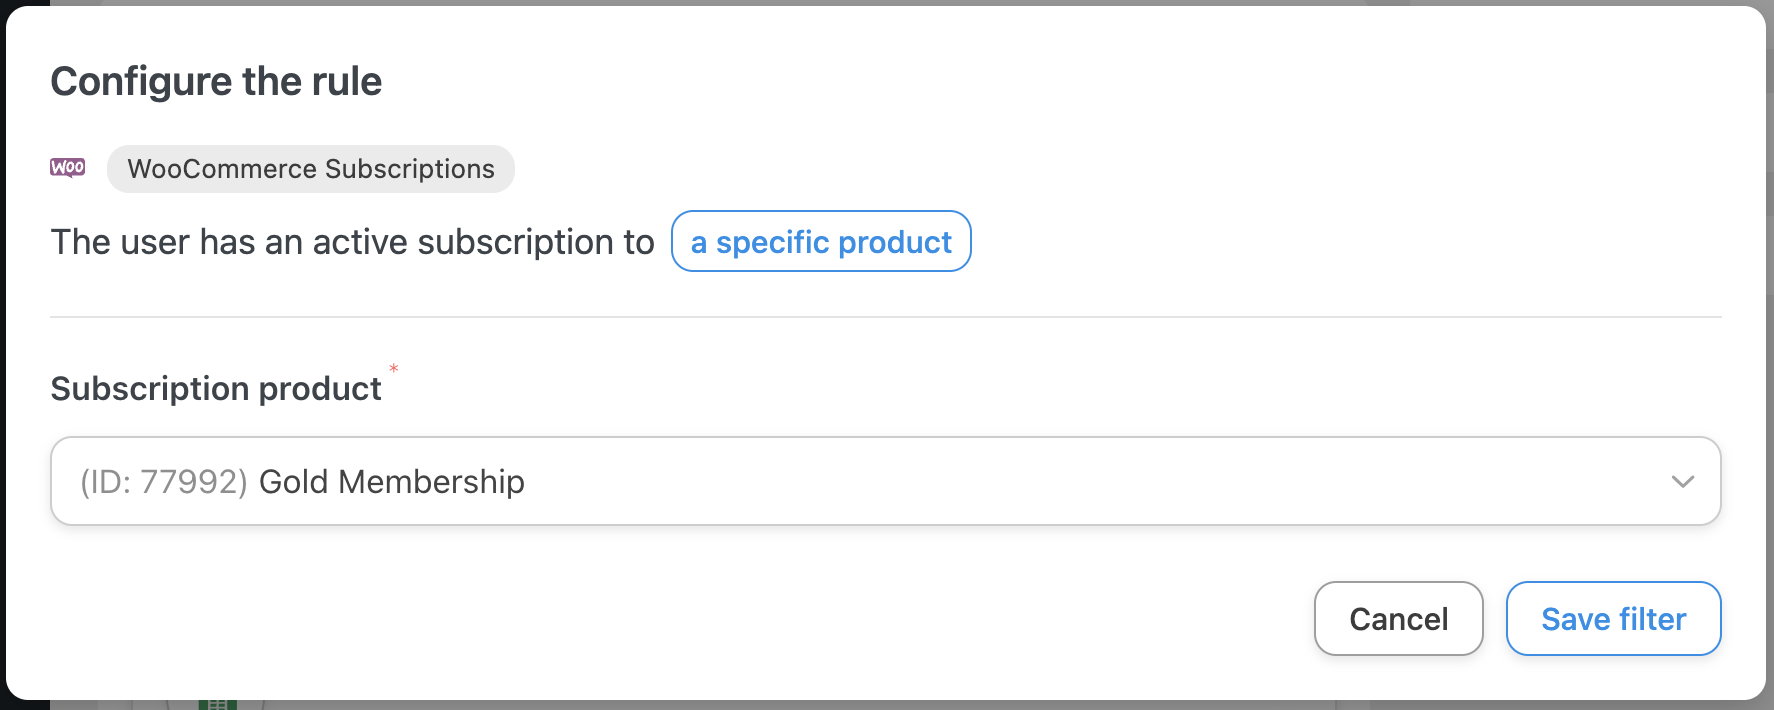
A pop-up window will appear where you can set the condition for your filter. As we stated at the start of this section, we want to compile a report of our members with a specific membership level. As such, we’ve selected WooCommerce > The user has an active subscription to a product.

Depending on the exact condition you’ve chosen, Automator will prompt you to configure the rest of your condition. (If the condition you selected has text in blue, it is an indicator that there will be more information for you to fill out.)
For example, we selected the subscription product, Gold Membership.
Once you’re finished, click Save. Your Google Sheets action, with its filter, should look something like this:
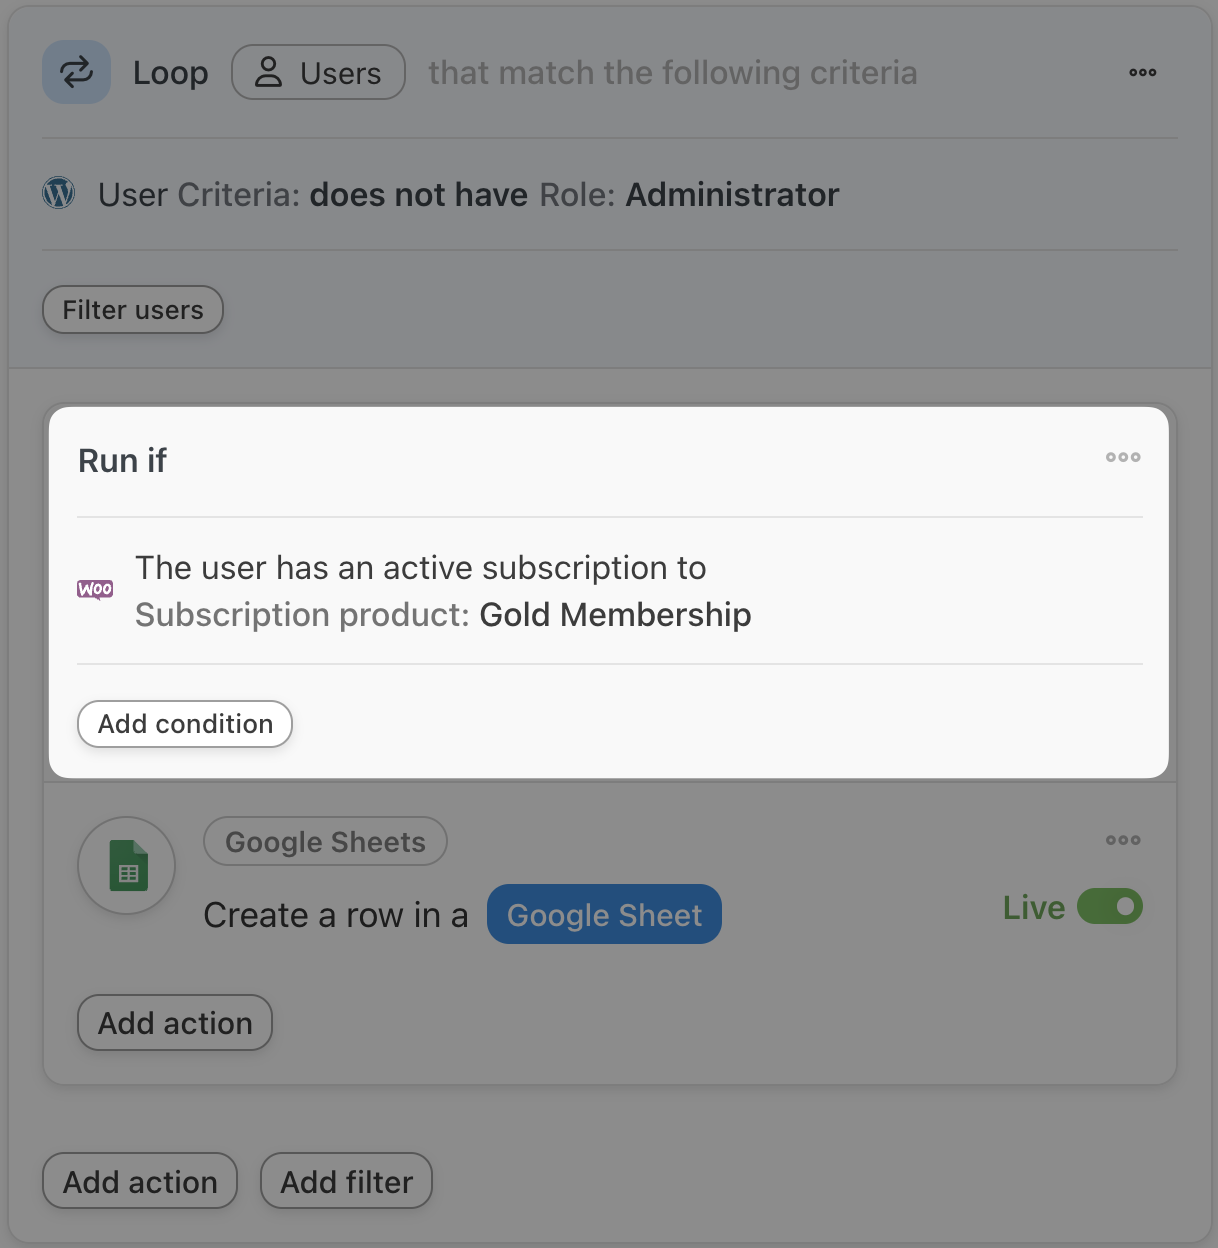
To add the second filter, click Add condition.
We’ve added the secondary condition to our filter, LearnDash > The user has not completed a course.

You can add as many filters as you’d like to further customize your LearnDash report.
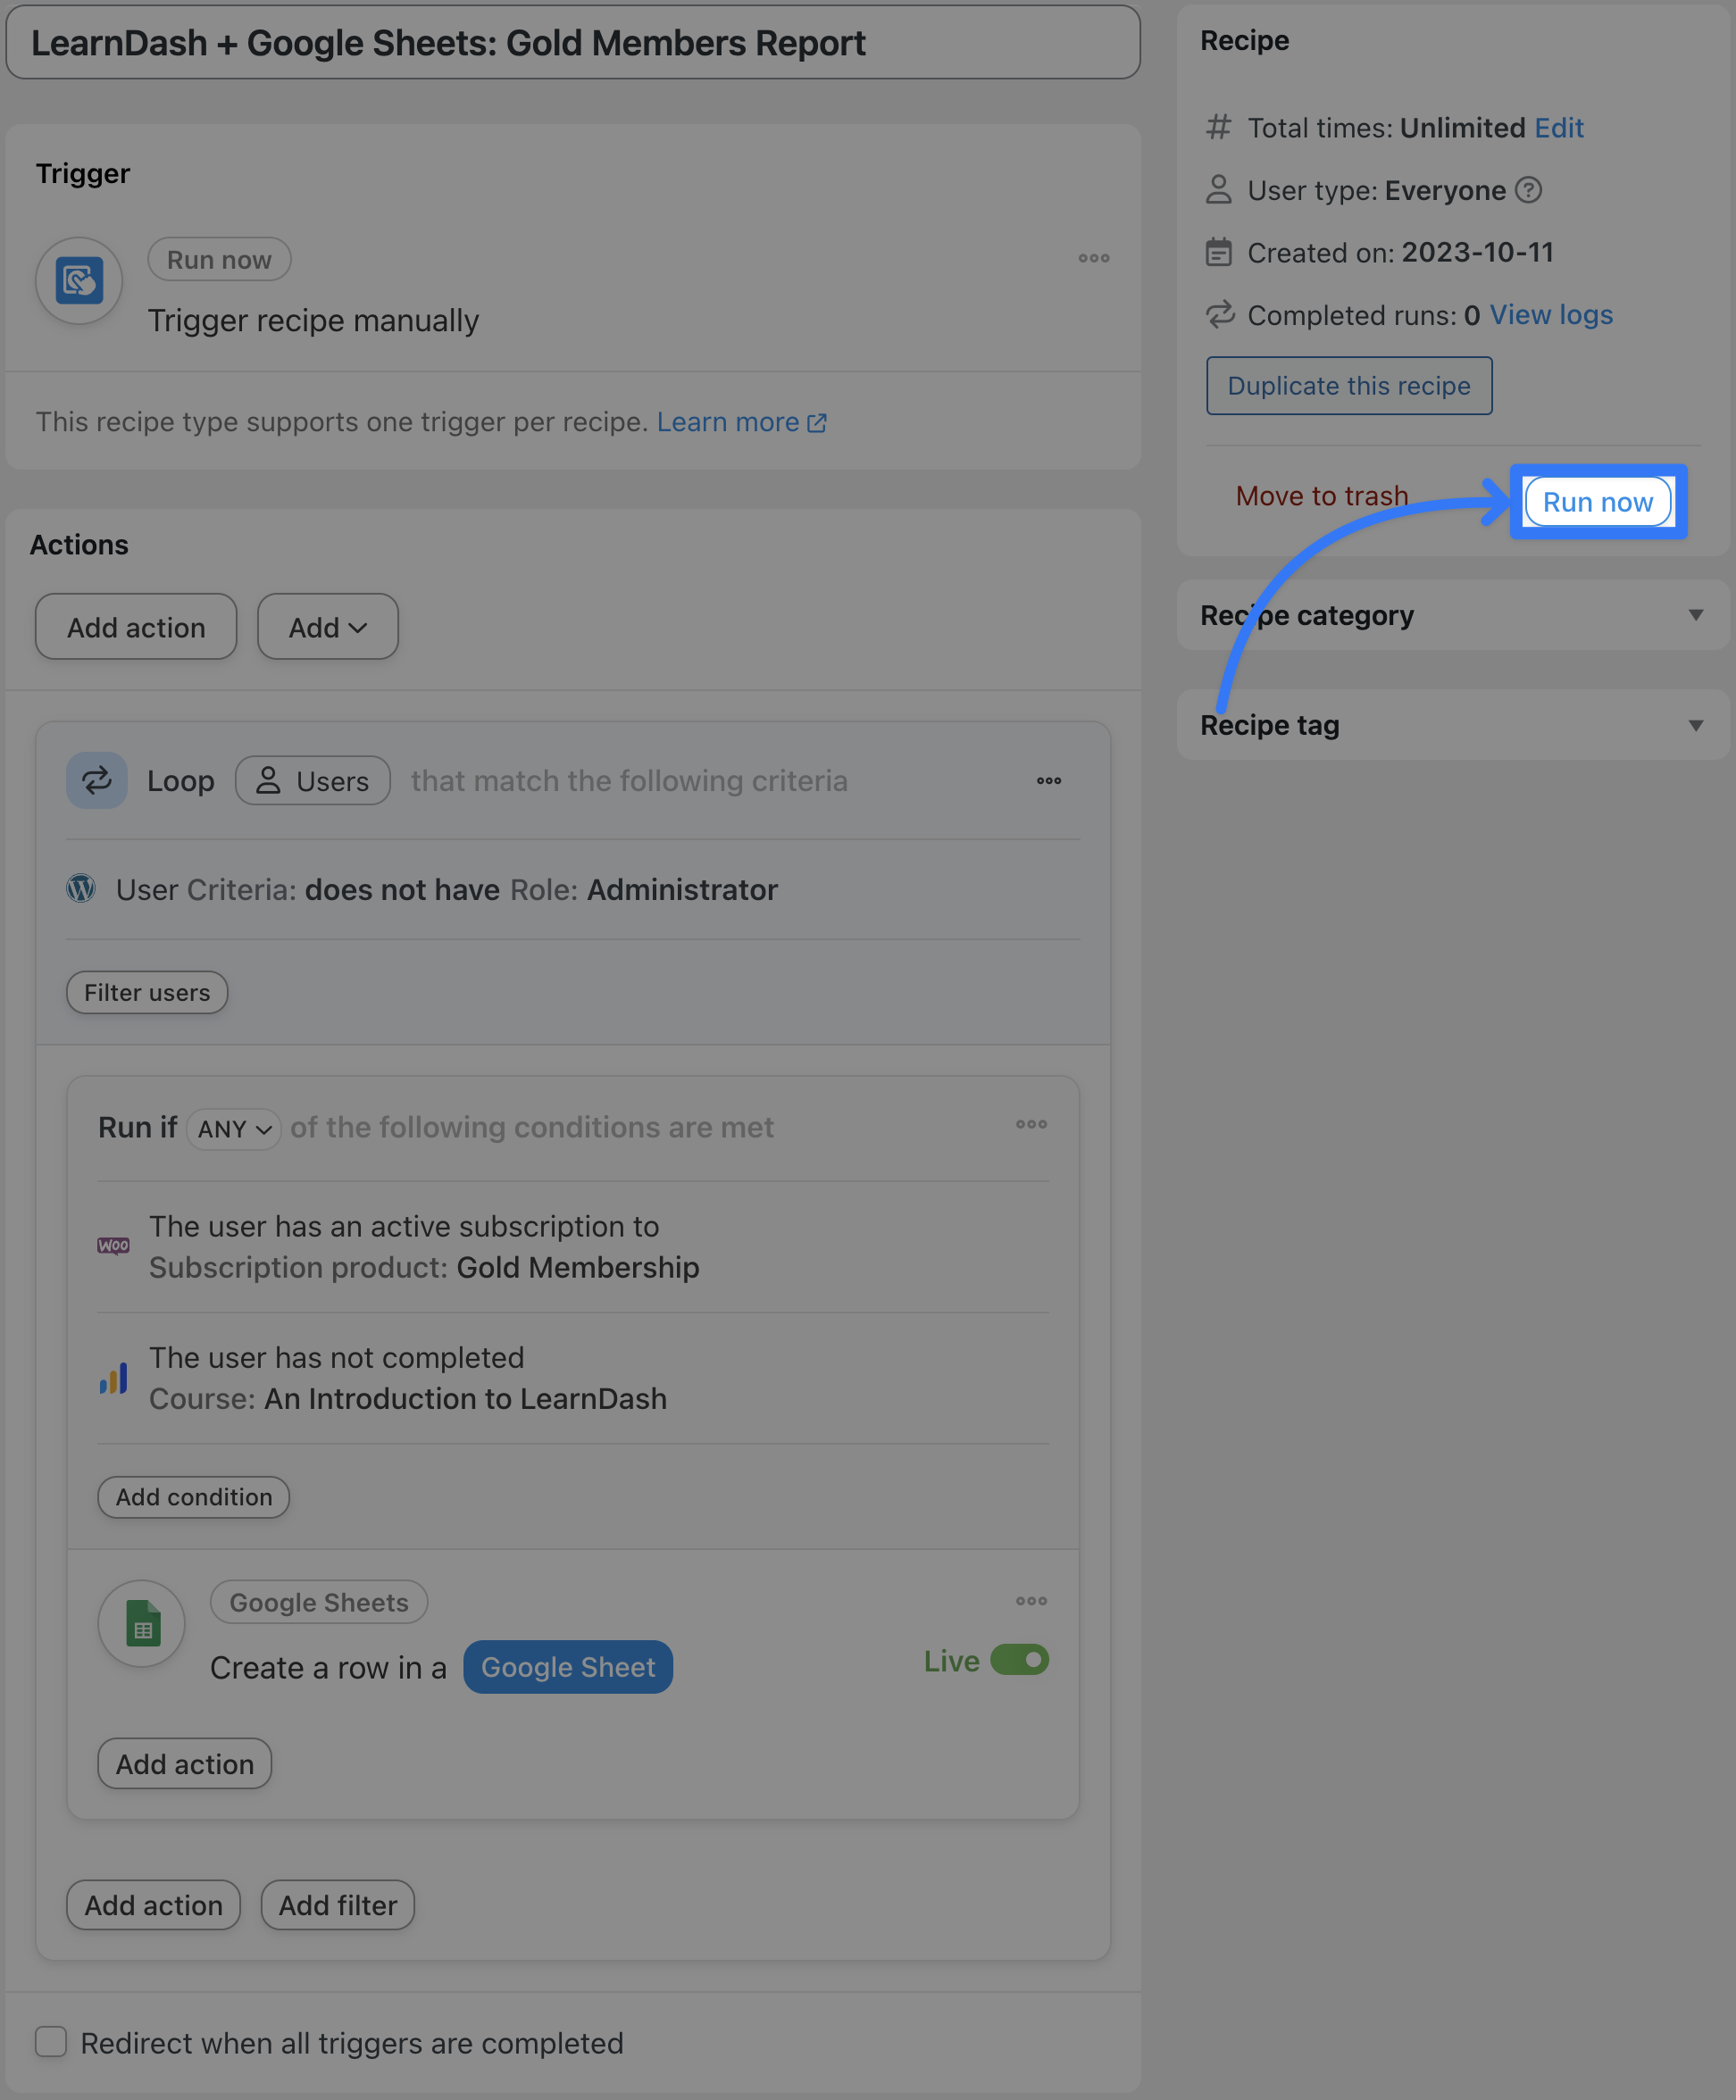
Step 6: Run the Report!
You’re one click away from creating your very own custom LearnDash report in Google Sheets. All you need to do now is click Run now and watch Automator compile your LearnDash data!
Now that you’ve created the report, why not use Automator to keep it updated?
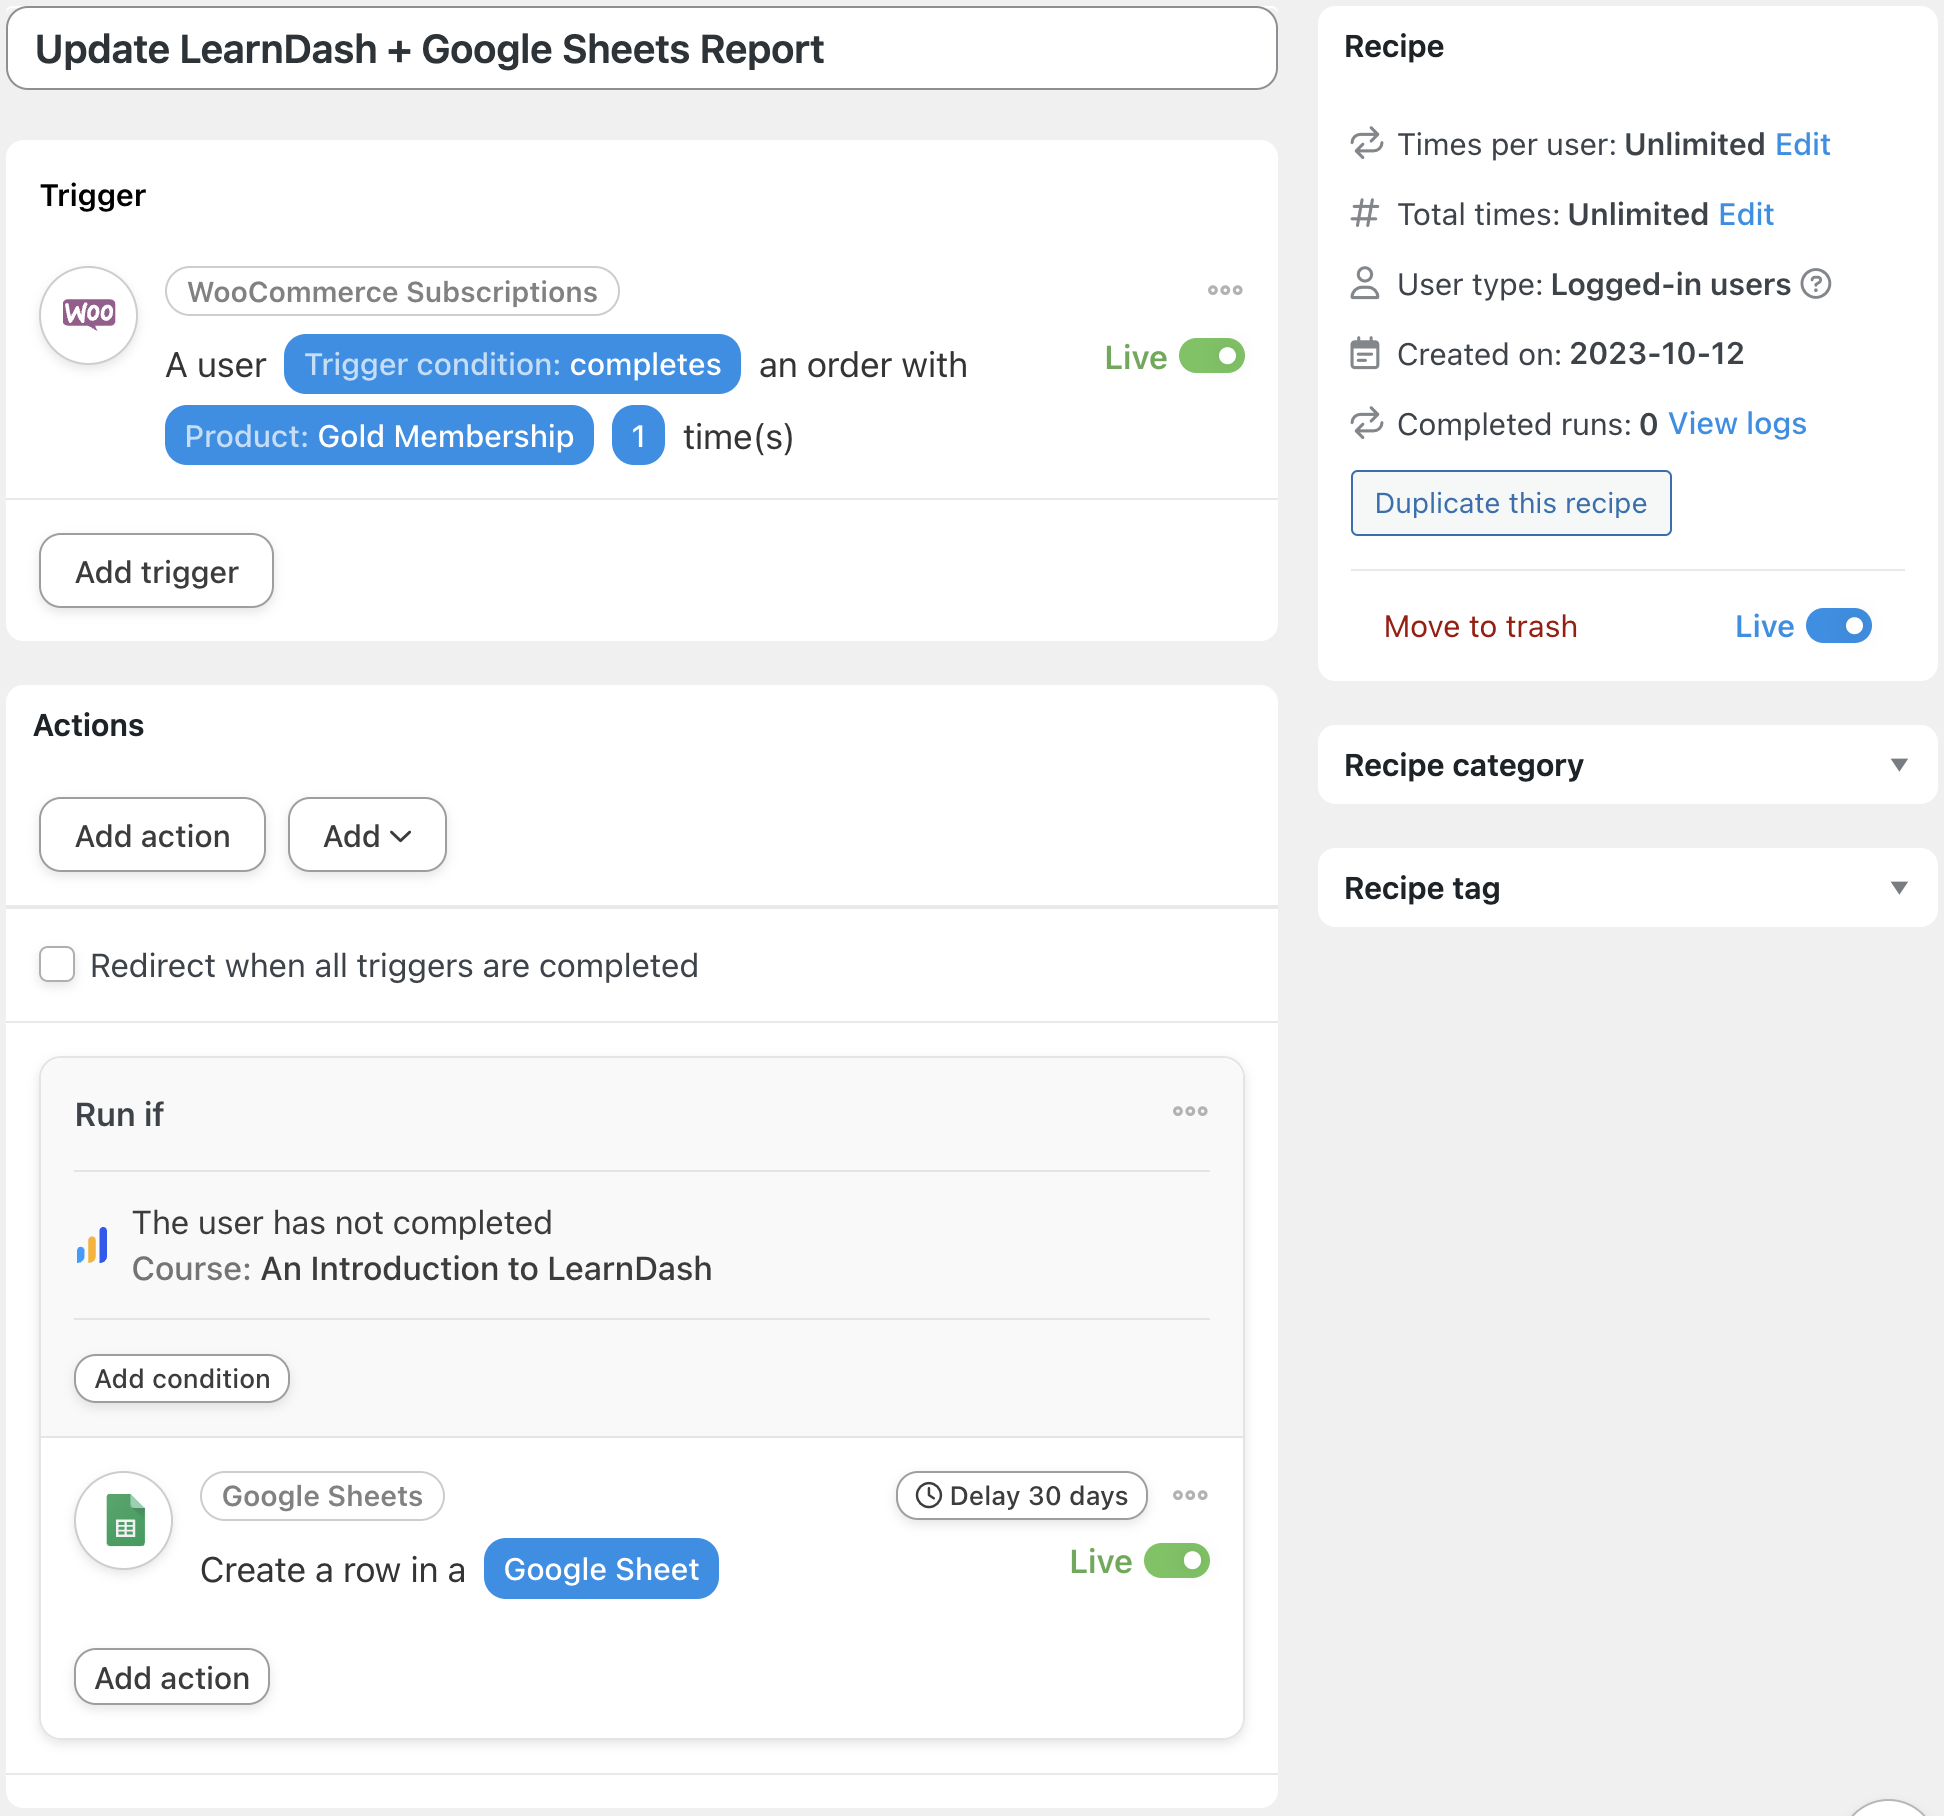
With the recipe pictures above, any time a new user purchases the Gold Membership and doesn’t complete the selected course within 30 days, we’ll automatically add them to the report that we’ve just created.
Create More LearnDash Reports in Google Sheets
Uncanny Automator has 214 integrations with more on the way all of the time! With so many integrations at your fingertips, you can create just about any kind of LearnDash report you want.
And with CRM integrations such as ActiveCampaign and HubSpot, you can take immediate action on the insights that your LearnDash reports provide.
How can we help you customize your LearnDash reports? Let us know in the comments section below and “report” right back to you!

Related Posts


Great guide with clear instructions – thank you!
For my installation, do you know why I don’t seem to have the ‘Loop’ in my list of Actions?
Hi Mitchell,
Make sure you have both Uncanny Automator and Uncanny Automator Pro installed and active. You would also need to be running 5.0 or later versions. If you’re still having trouble, you should open a ticket and we can take a look.