Revive old WordPress posts with AI and Uncanny Automator. Learn how to reverse content decay…
How to Integrate Slack with WordPress for Seamless Team Collaboration
Teamwork makes the dream work with Uncanny Automator. Integrate Slack with WordPress to automate updates, assign tasks, and enhance productivity.

Did you know that team collaboration can enhance productivity, boost morale and improve worker satisfaction? In fact, according to this Stanford study, even the perception of collaboration can lead to higher productivity.
As a WordPress business owner or site manager, you probably already knew about some of those benefits of collaboration. That’s likely what had you scouring the internet for ways to enhance your team’s collaborative efforts.
Well, scour no further!
In this article, we’ll show you how to reap the benefits of seamless teamwork by connecting Slack to your WordPress website (and much more) using Uncanny Automator.
We’ll show you how to send automatic updates, assign tasks and share valuable information across and within teams. Towards the end, we’ll show you a few Automator features for customizing your automations and give you some additional tips, tricks and resources to take your collaborations to the next level.
But that’s enough of an introduction for now. Let’s get into the good stuff.
3 Compelling Ways Automated Communications Improve Team Collaboration
When it comes to teamwork, communication is key. And when it comes to communication, automation is essential.
Don’t believe us? Here are just three ways that automated communications can improve your team’s collaborative efforts and enhance productivity:
- Don’t miss a beat: Automating your communications ensures that you and your team will never miss out on crucial updates and notifications. Whether it’s changes in order status, new posts or form submissions or fundamental changes to your WordPress website. Automated notifications keep you and your team in the loop and in sync.
- The truth, the whole truth: Ever lost out on a sale or failed to reply to a customer because of a typo? Automated communications (particularly with Automator’s tokens feature) ensures that you always send and receive accurate and relevant information. Never risk miscommunicating valuable bits of information such as order IDs, customer emails or form field data. You’ll always get the truth, the whole truth and nothing but the truth.
- Command and control: Storing bits of information here and there (and everywhere) is definitely not good for collaboration, far less productivity. If your sales team’s ecommerce platform isn’t perfectly in-sync with your marketing team’s CRM, they can’t collaborate and convert as well as they should. Automating your various apps, plugins and platforms necessarily means integrating them, centralizing your communications.
Ready to start automating your communications? Then you’ll want Uncanny Automator>>>.

As the #1 automation and integration tool for WordPress websites, no other plugin is better suited for the job of automating your communications. Whether you need to share specific WordPress metadata with a single contact in Slack or send out an entire Slack campaign, Automator is the best tool for the job.
Best of all, Automator’s simple click-and-play interface allows you to create recipes (those automated workflows pictured above) in just a few clicks and even fewer minutes.
In the following sections, we’ll walk you through setting up Automator recipes like the ones pictured above so you can start boosting your team’s collaboration today. To get started, you’ll need an Automator Pro license.
If you haven’t already, grab your Pro license now>>>.
Pro Tip: Upgrade to the Plus or Elite plan to take advantage of Automator’s collaboration-boosting addons.
Getting Started: Connecting Slack to WordPress with Automator
Now that you have your Automator Pro license, you’re only steps away from improving team collaboration and boosting your productivity.
First off, you’ll need to connect your Slack account to your WordPress website. Thanks to Automator, that’s a remarkably simple process.
You can find a detailed guide on connecting Slack to WordPress here. Alternatively, find the abridged version below:
- From your WordPress Admin Dashboard, navigate to Automator > Settings.
- Under the App integrations tab, select Slack and click Connect Slack workspace.
- Enter your Slack workspace URL, sign in when prompted and click Continue.
- Automator will prompt you for permissions. Click Allow.
- From your Slack workspace, click Add apps then download Uncanny Automator.
You can add the Automator Slack bot to a channel just as you would a Slack user.
Let’s create our first Automator recipe to test the connection.
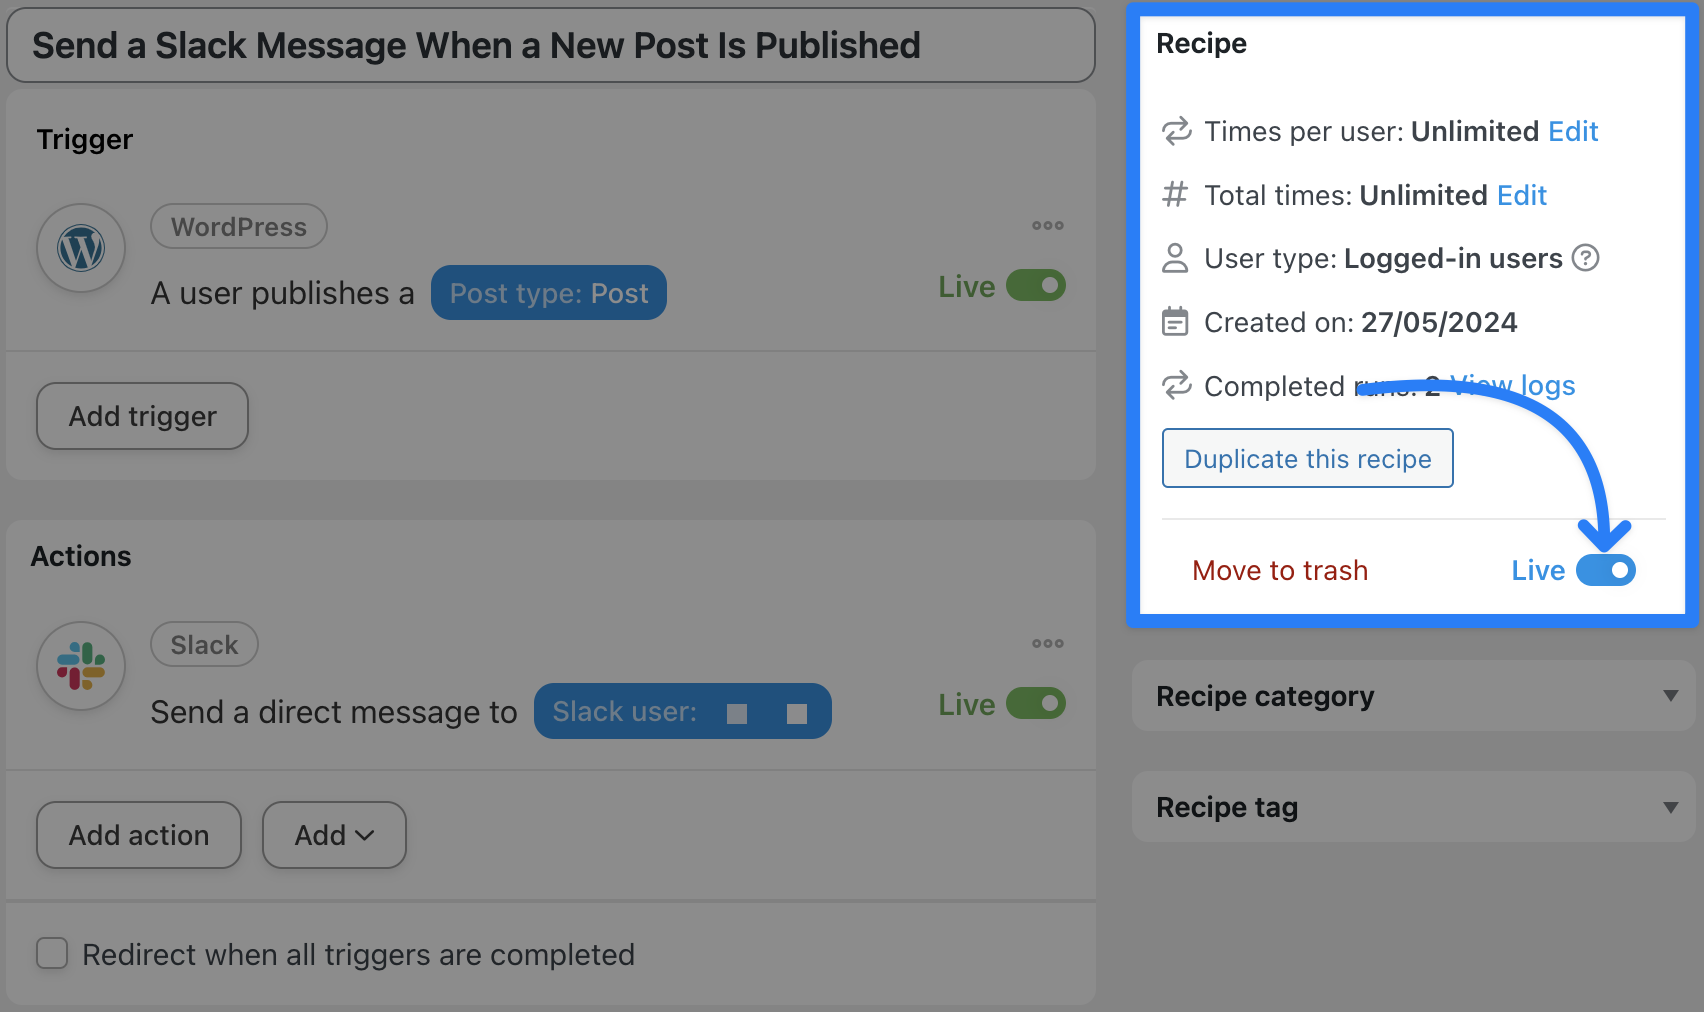
Step 1: Create a New Recipe
From your WordPress Admin Dashboard, navigate to Automator > Add new recipe. In the pop-up window that appears, select Logged-in user.

Step 2: Name Your Recipe
Give your recipe a name that makes it easy to recognize at a glance. For example, we’ve named this recipe “Send a Slack Message When a New Post Is Published”.
Step 3: Configure Your Trigger(s)
In the Trigger panel, from the menu of available integrations, select WordPress.
From the dropdown list that appears, select A user publishes a post.

Automator will prompt you to select a post type. Once you’re finished, click Save. Your completed trigger should look something like this:

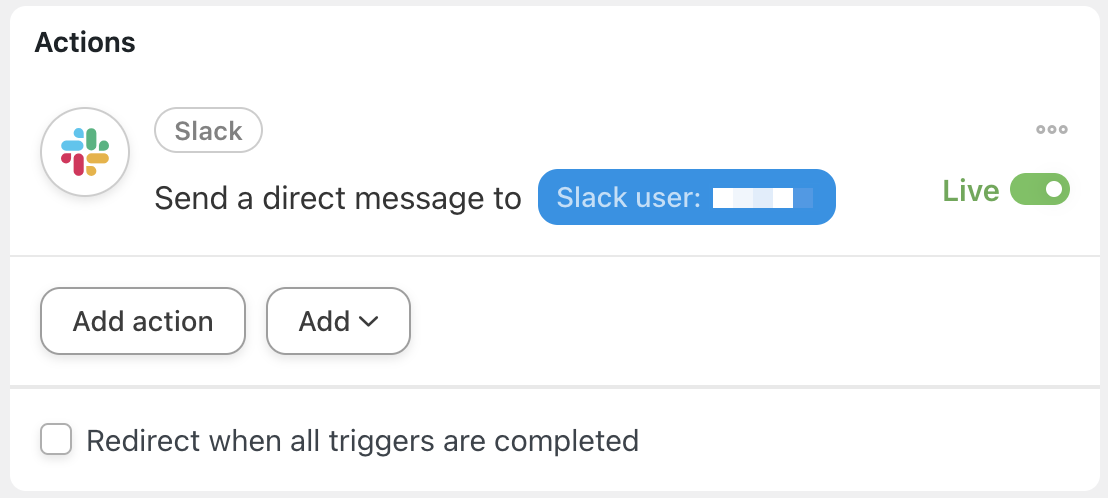
Step 4: Configure Your Action(s)
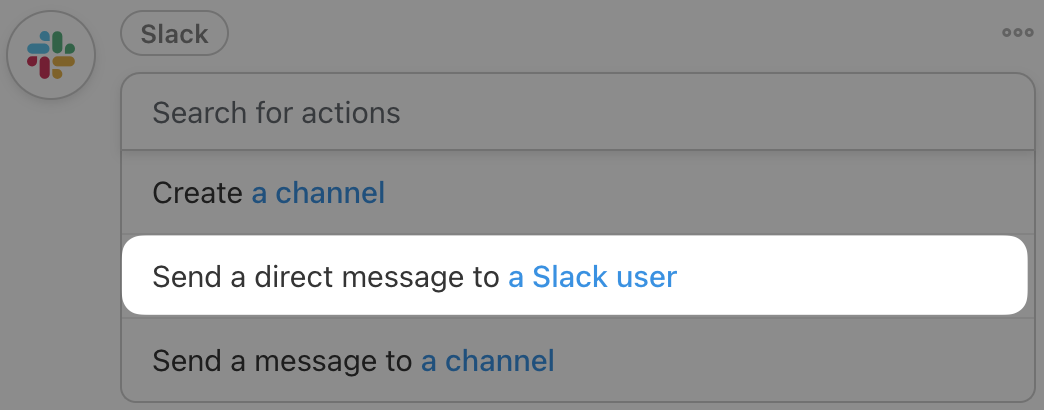
In the Actions panel, click Add action. From the menu of available integrations, select Slack.

From the dropdown list that appears, select Send a direct message to a Slack user.
Automator will present you with a form to select the Slack user, set the Bot name and icon and draft your message.
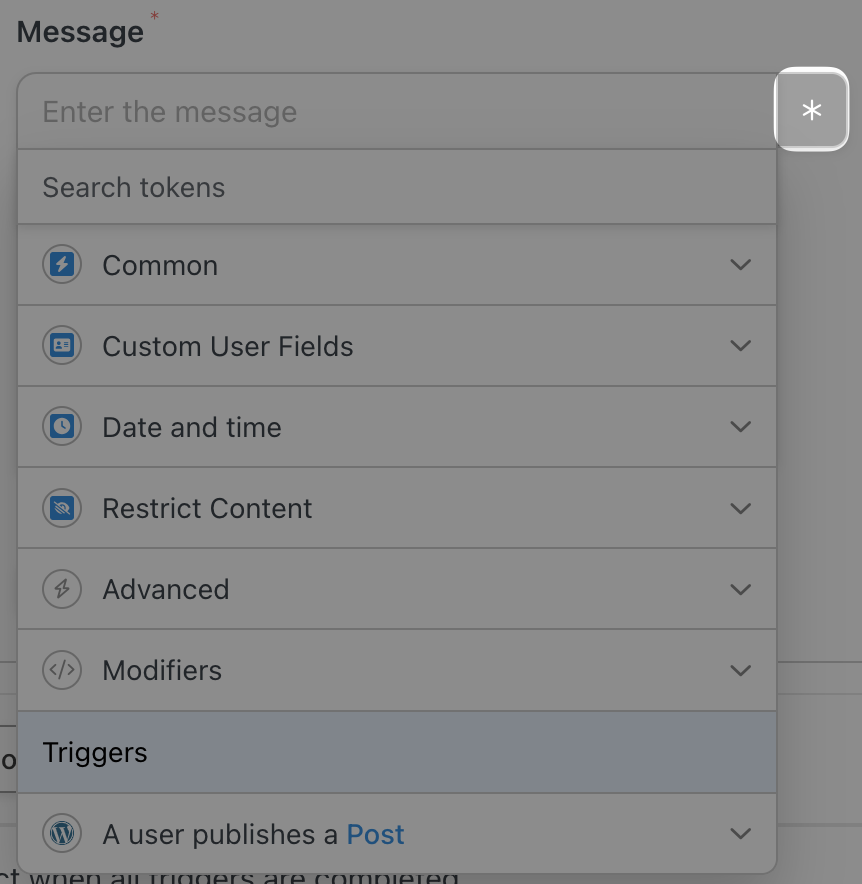
Remember when we told you that Automator tokens (i.e., dynamic data pulled from your WordPress website and from within recipes) can help you ensure the accuracy of your automated communications?
To select a token, click on the Asterisk.
For example, we have drafted our automated message using the Post title, Post excerpt, Post URL and Post featured image URL tokens.
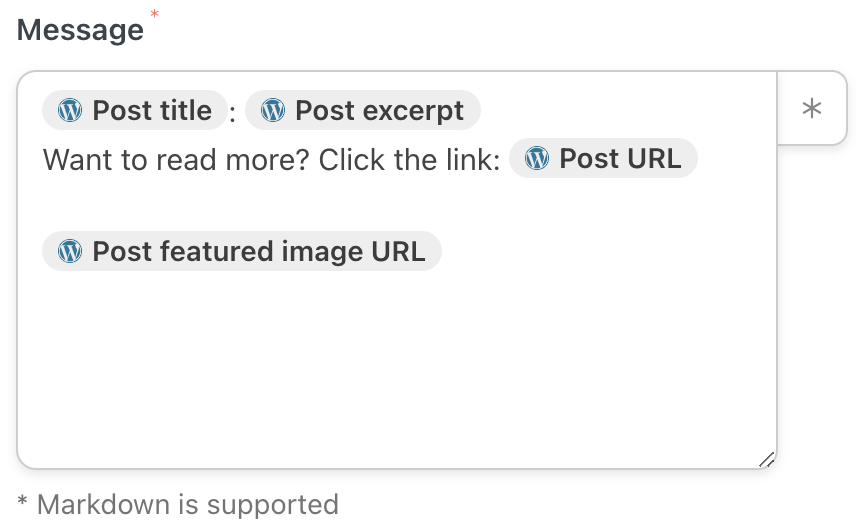
Once you’ve drafted your message, click Save. Your completed action should look like this:
Step 5: Go Live!
You’re just about ready to complete your first Automator recipe. All that’s left for you to do is toggle the recipe from Draft to Live.
Now that your recipe is Live, give it a try. Here’s what our message looked like in Slack.
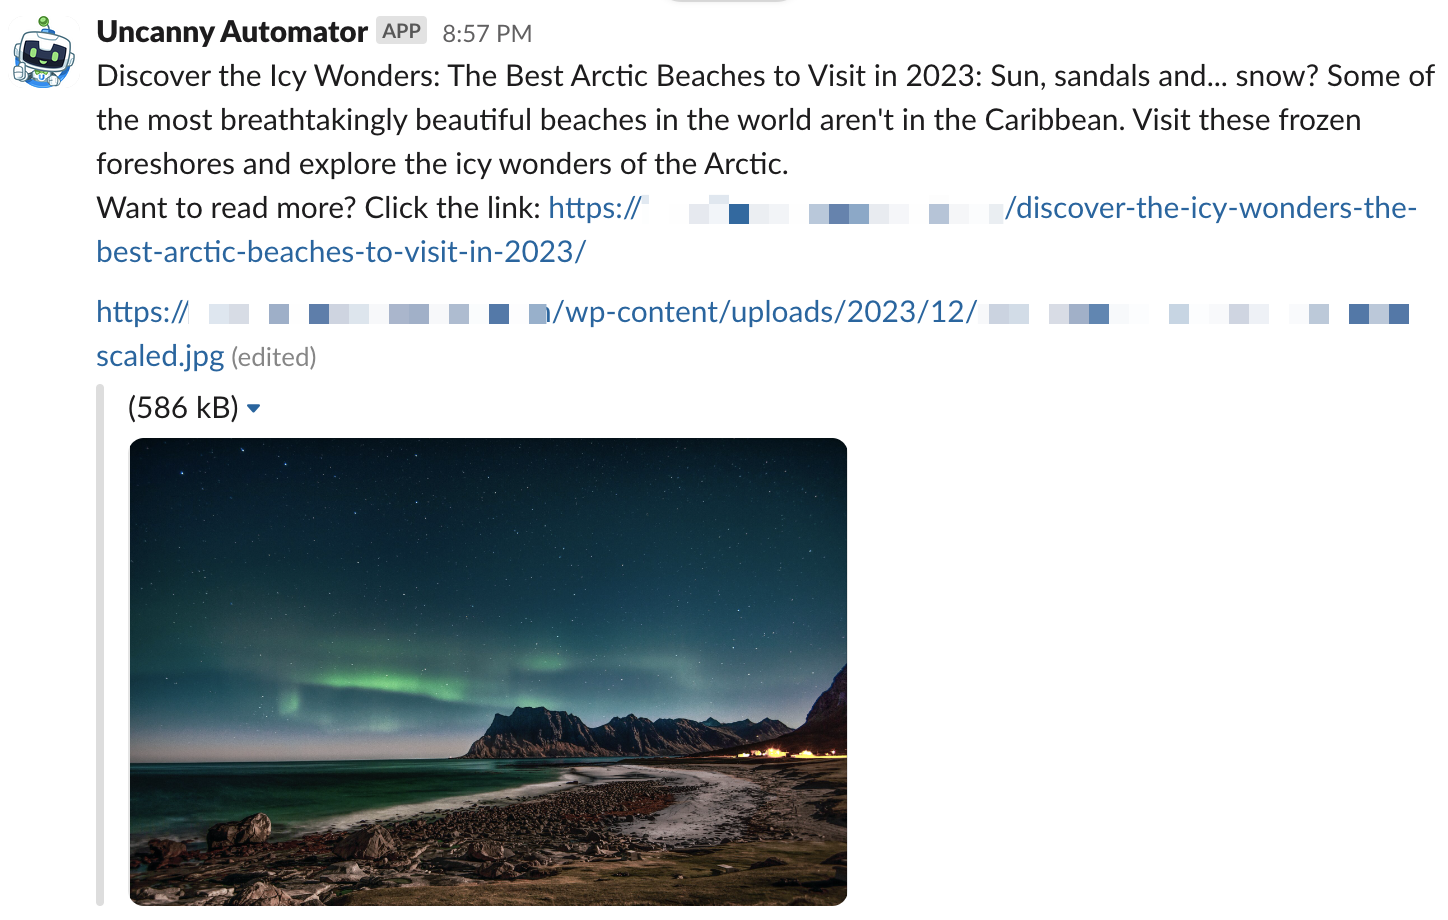
(Note: If you leave the Bot name and Bot icon fields empty, the default name and icon will appear in Slack as in the screenshot above.)
Want to create recipes like this one? Get Automator Pro now>>>.
Automate Team Notifications to Improve Collaboration
Now that you’ve gotten the hang of creating Automator recipes, in the next few sections, we’ll take a look at some collaboration-boosting automations.
As we’ve seen in the test recipe that we created, Automator can send direct messages to individual Slack users. But, more importantly for teamwork, it can also post to Slack channels.
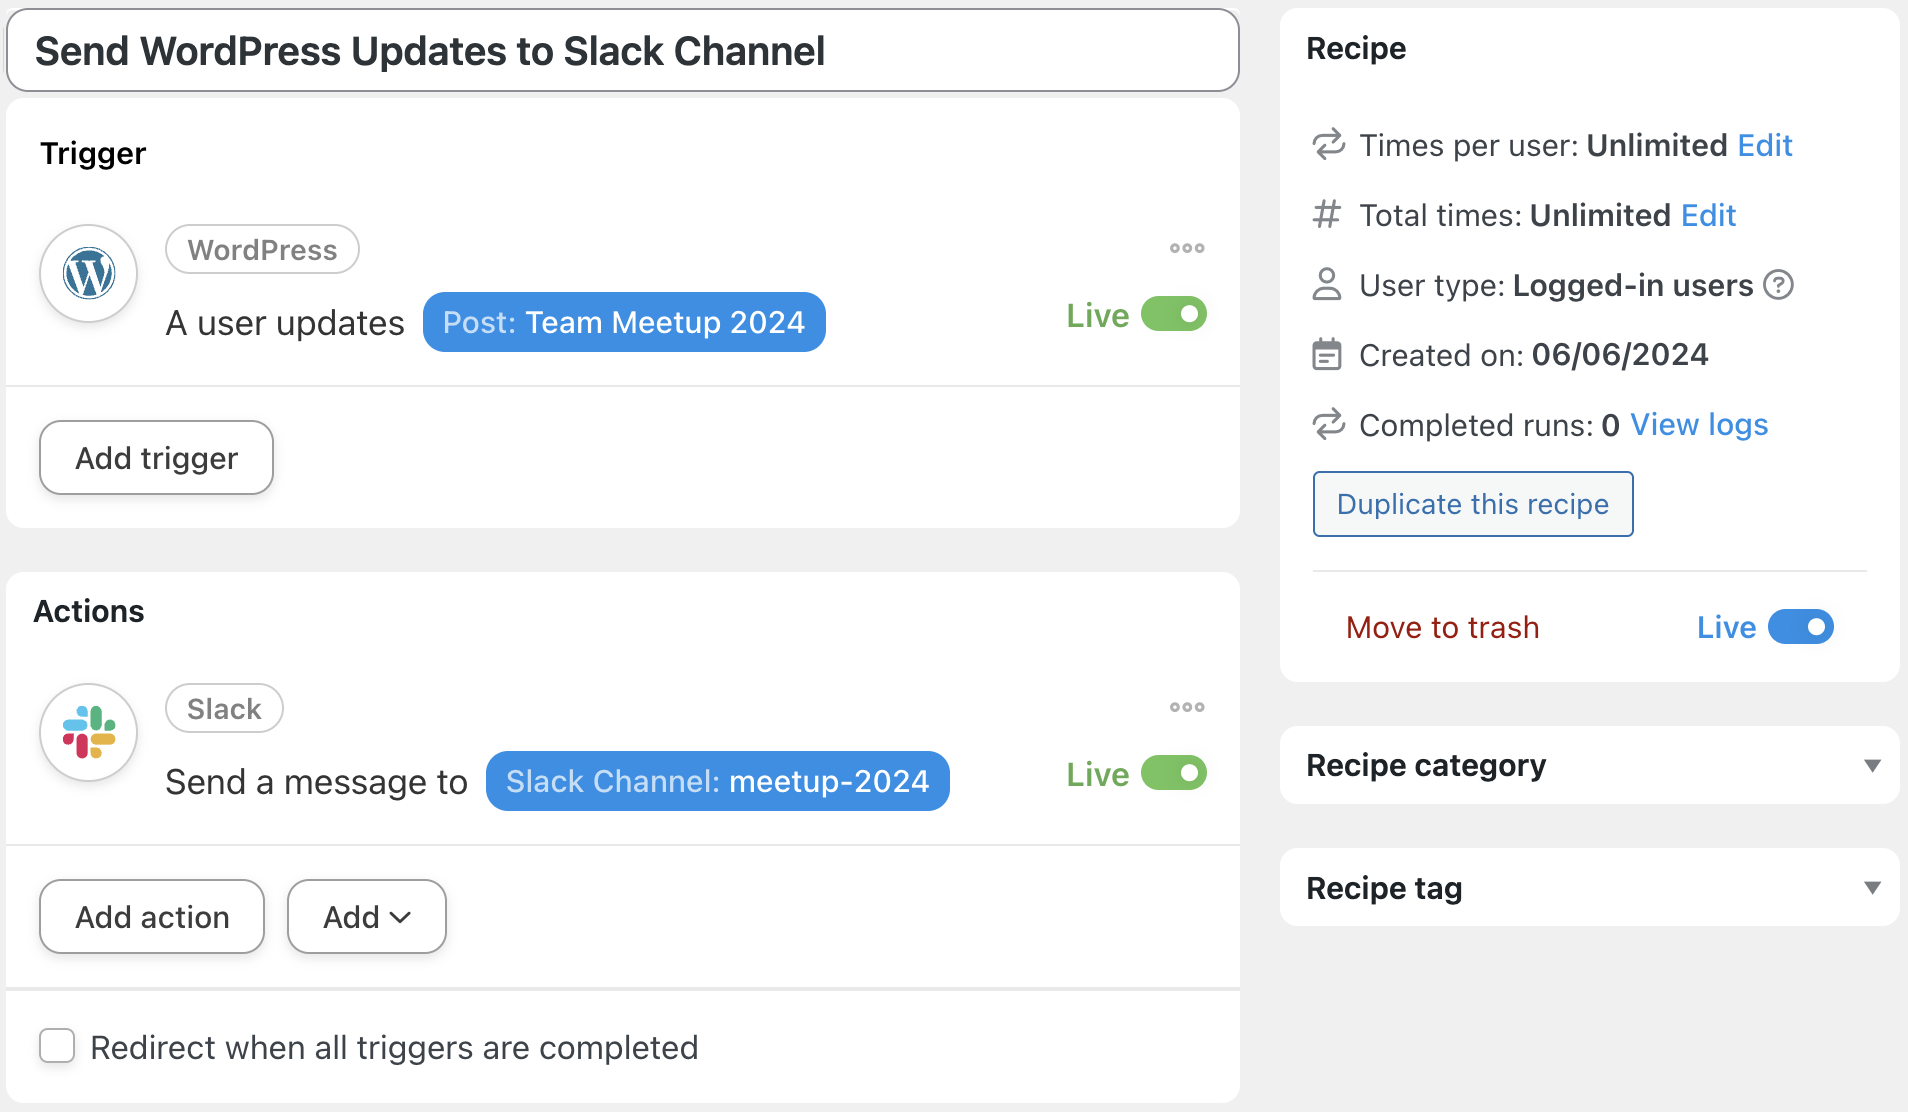
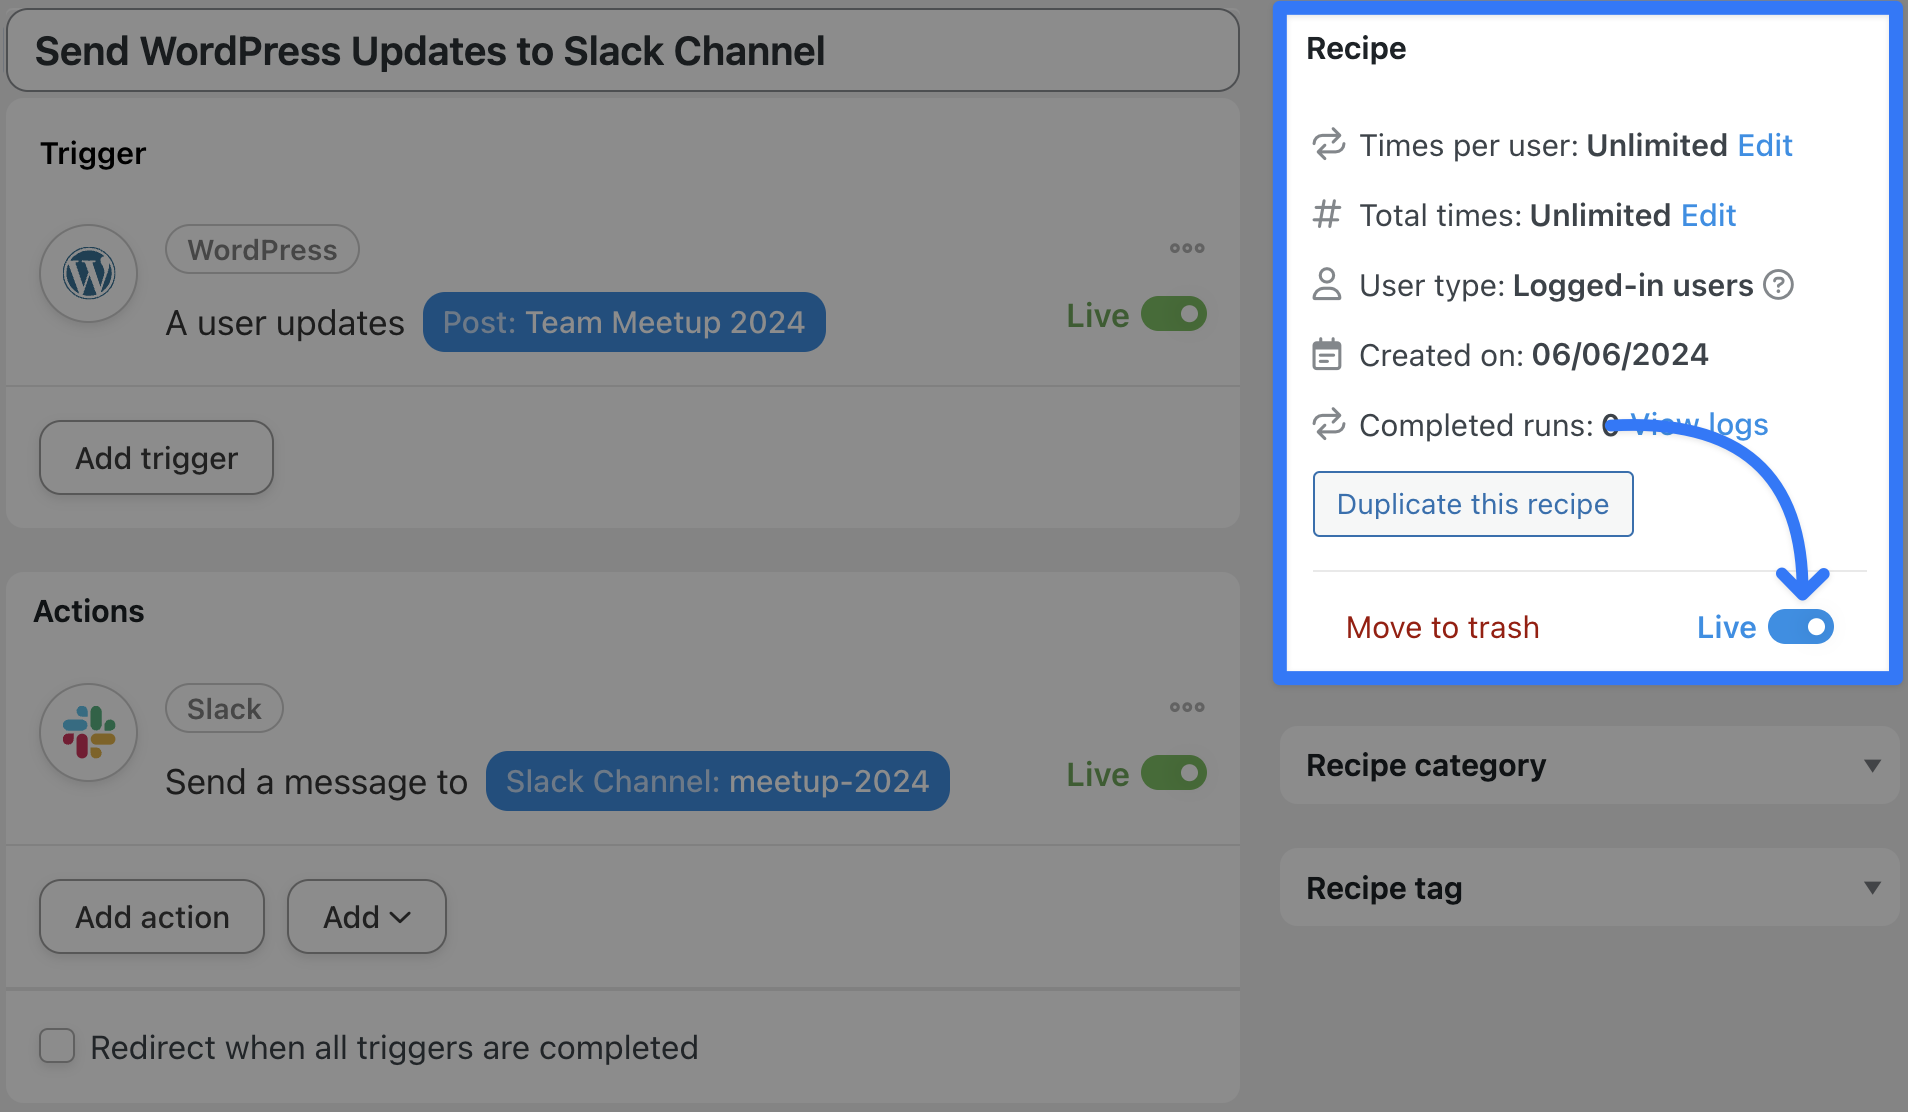
In the recipe pictured above, for example, we’re able to update the relevant Slack channel(s) whenever a WordPress post is updated. With a recipe like this one, you can keep your teams collaborating on everything from events and products to courses and pages.
Here’s how we did it.
Step 1: Create a New Recipe
From your WordPress Admin Dashboard, navigate to Automator > Add new recipe. In the pop-up window that appears, select Logged-in users.
Step 2: Name Your Recipe
We’ve named this recipe “Send WordPress Updates to Slack Channel”.
Step 3: Configure Your Trigger(s)
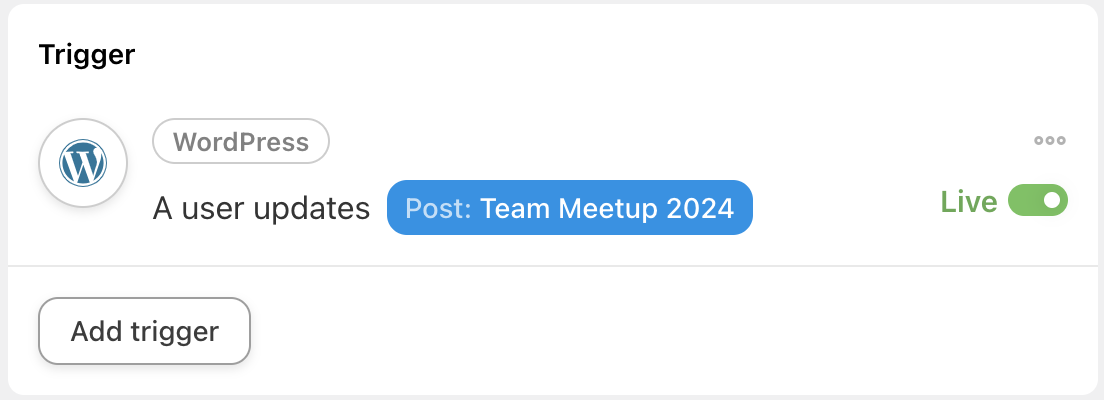
In the Trigger panel, from the menu of available integrations, select WordPress. From the dropdown list that appears, select A user updates a post.
Automator will prompt you to select the Post type and specific Post. For example, we have selected Event and Team Meetup 2024. When you’re finished, click Save.
Your completed trigger should look something like this:
Step 4: Configure Your Action(s)
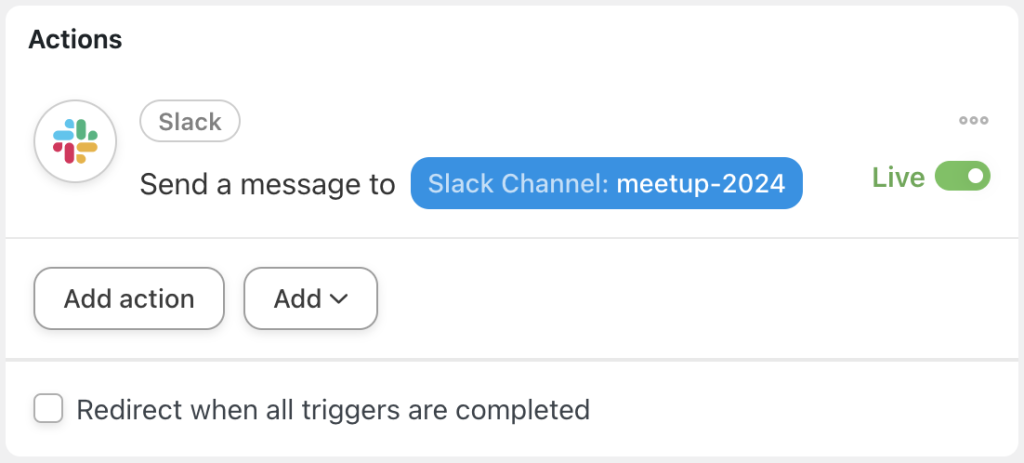
In the Actions panel, click Add action and select the Slack integration. From the dropdown list that appears, select Send a message to a channel.
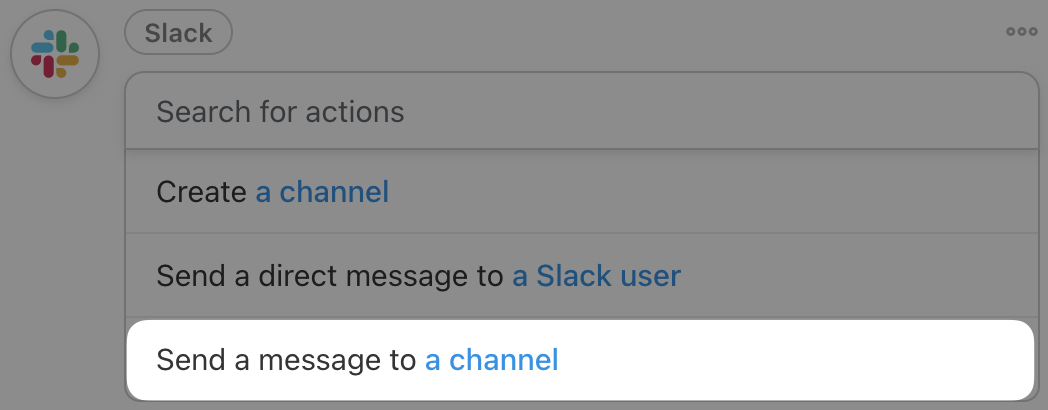
Automator will present you with a form. Select the Slack Channel, set the Bot name and Bot icon and draft your message. Once you’re finished, click Save.
Your completed action should look something like this:
Step 5: Go Live!
All that’s left for you to do now is to toggle your recipe from Draft to Live.
Want to create more recipes like this one? Get Automator Pro now>>>.
Streamline Task Assignments with Automated Notifications
So far, we’ve shown you how to connect Slack to some of your WordPress website’s core functionalities to boost team collaboration. But, Automator connects to a whole lot more than core WordPress features. In fact, Automator has 214 integrations, giving you endless ways to get your team working more closely together.
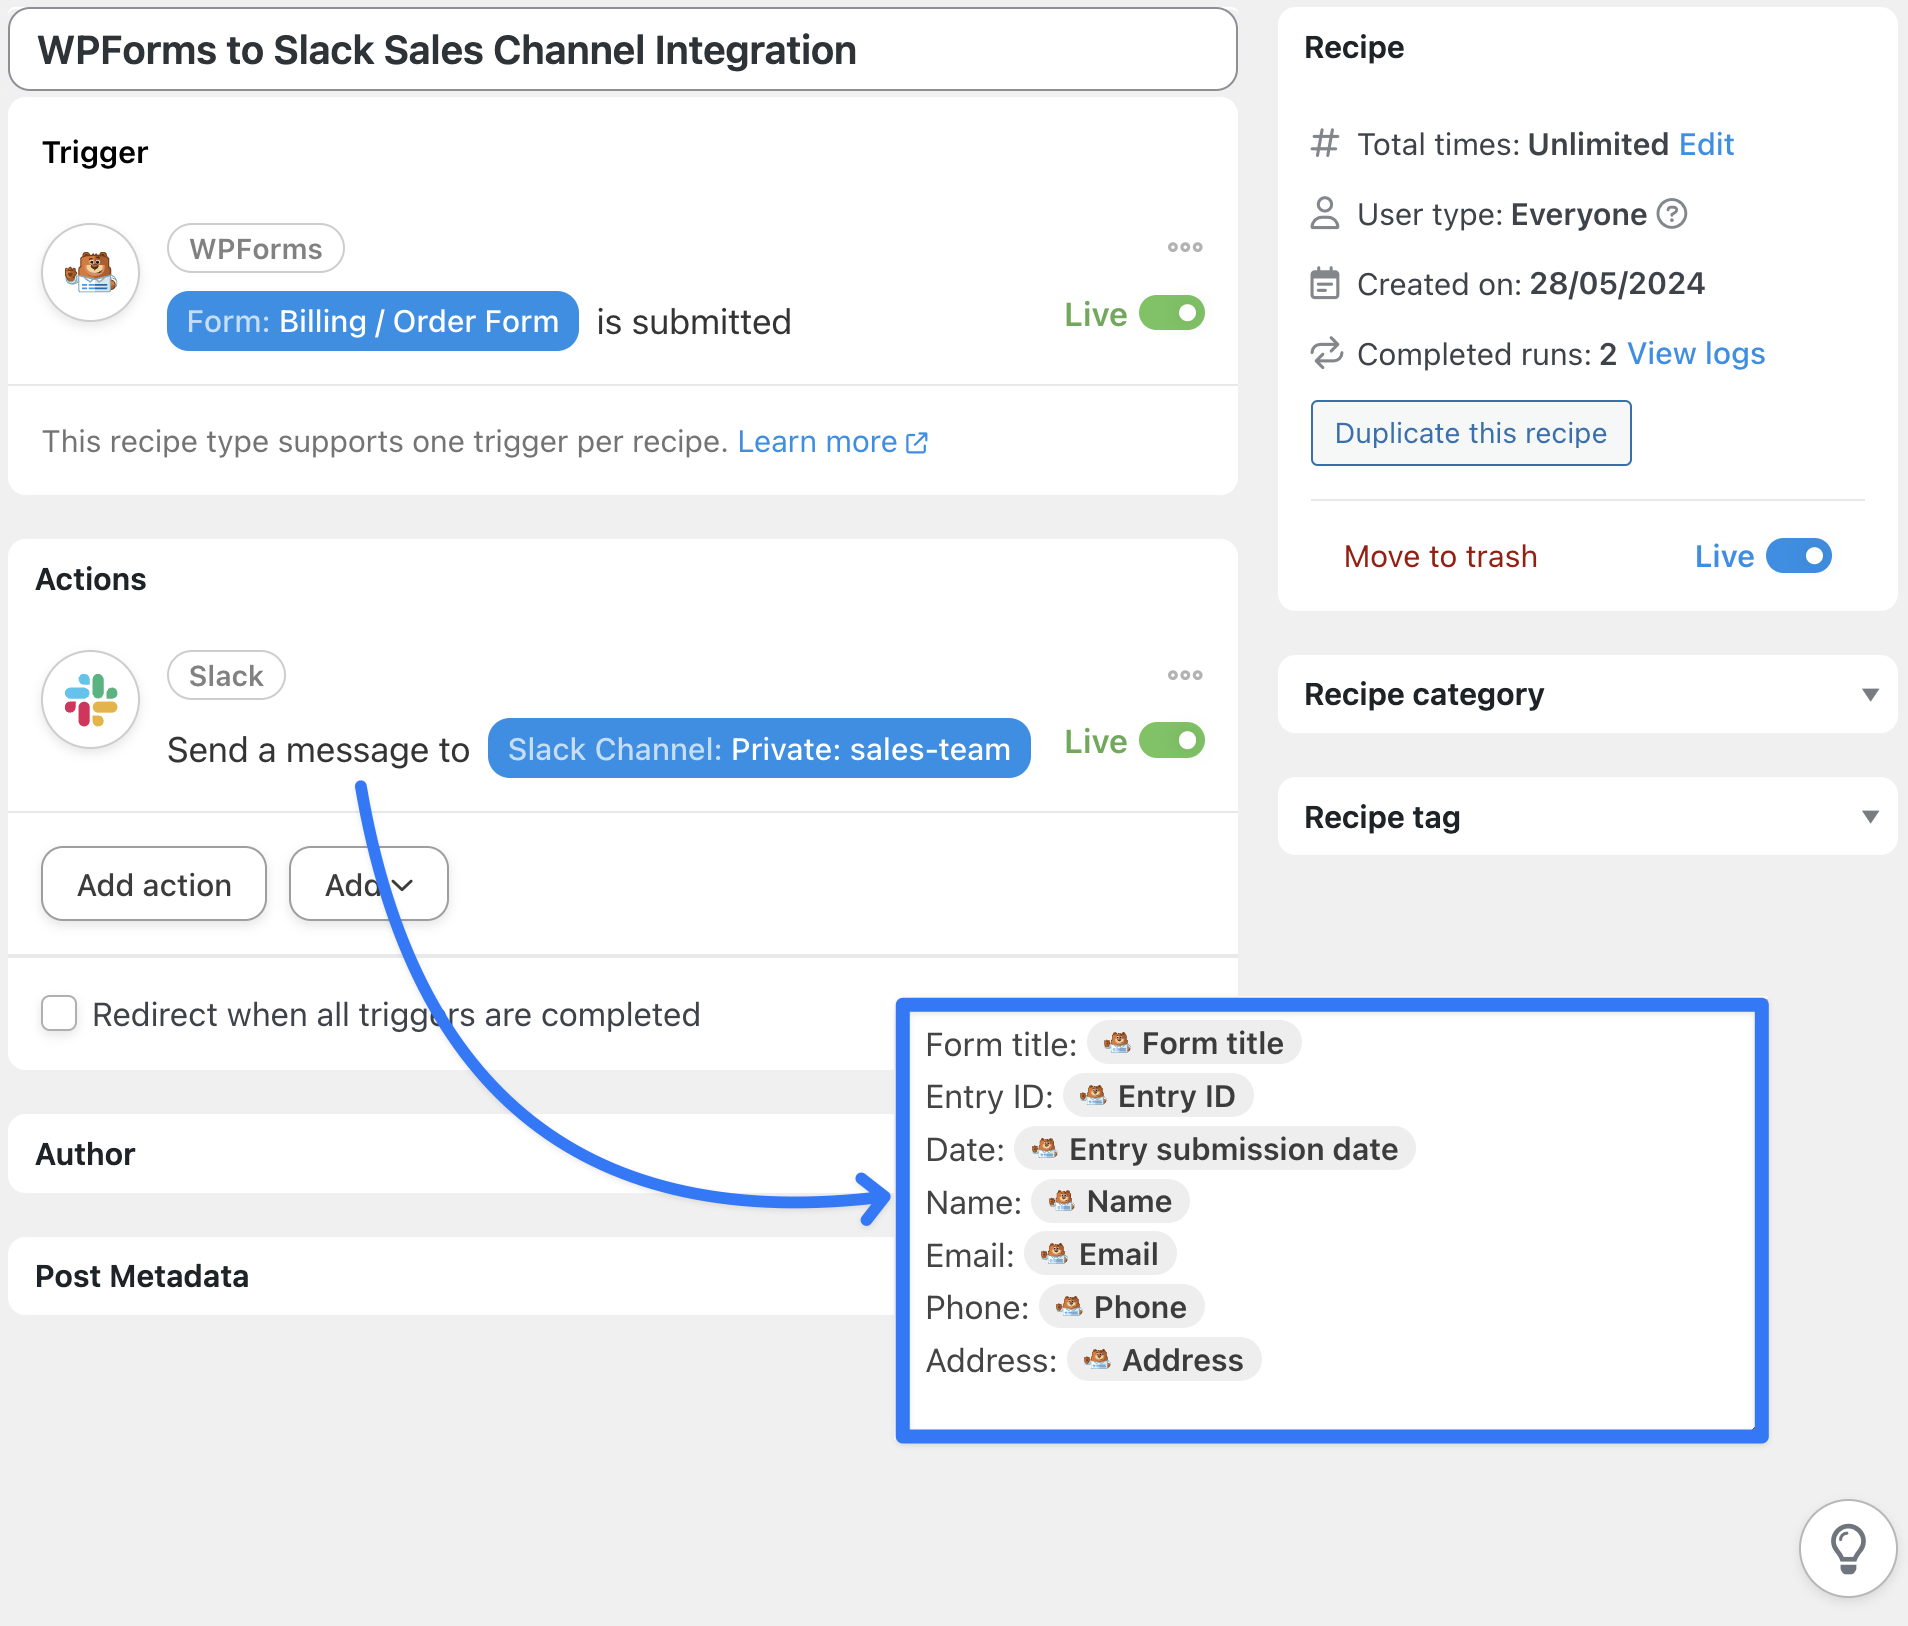
In the recipe pictured above, for example, we’re able to send a message to the appropriate Slack Channel after a WPForms submission. This helps our team reduce response times and ensures that no task falls through the cracks.
Here’s how we did it.
Step 1: Create a New Recipe
From your WordPress Admin Dashboard, navigate to Automator > Add new recipe. In the pop-up window that appears, select Everyone.
Step 2: Name Your Recipe
We’ve named this recipe “WPForms to Slack Sales Channel Integration”.
Step 3: Configure Your Trigger(s)
In the Trigger panel, from the menu of available integrations, select WPForms or another form integration of your choosing, such as Typeform.
From the dropdown list that appears, select A form is submitted.
Automator will prompt you to select a form from your published list of forms. For example, we selected our Billing/Order Form. Once you’re finished, click Save.
Step 4: Configure Your Action(s)
In the Actions panel, click Add action and select Slack. From the dropdown list that appears, select Send a message to a Slack channel.
Automator will present you with a form. Select the Slack Channel, set the Bot name and Bot icon and draft your message. Once you’re finished, click Save.
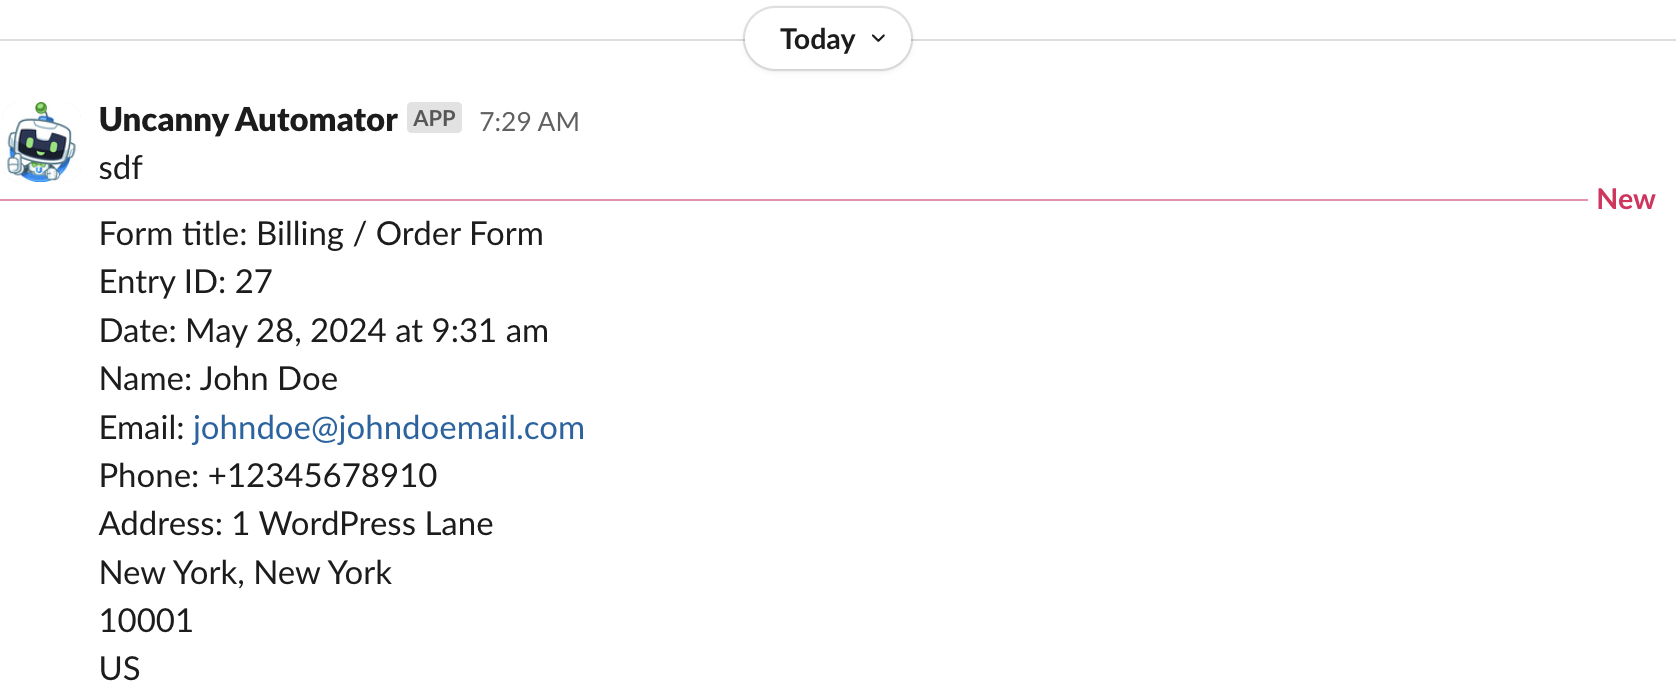
Step 5: Go Live
Toggle your recipe from Draft to Live. Here’s a preview of the message in Slack that our sales team received.
Want to create some recipes of your own? Get Automator Pro now>>>.
Advanced Automations and Customizations
After creating a few recipes of your own, we’re pretty sure that you’re ready to take on some more advanced automations that can really get your team working together.
But don’t worry. As complex as these automations might become, we’ll still create them using Automator’s click-and-play interface.
Step 6 (Optional): Add a Filter
Effective communication that facilitates better teamwork means getting the right message to the right people at the right time. To ensure that your automated communications always land where they should, you can take advantage of Automator’s filters feature.
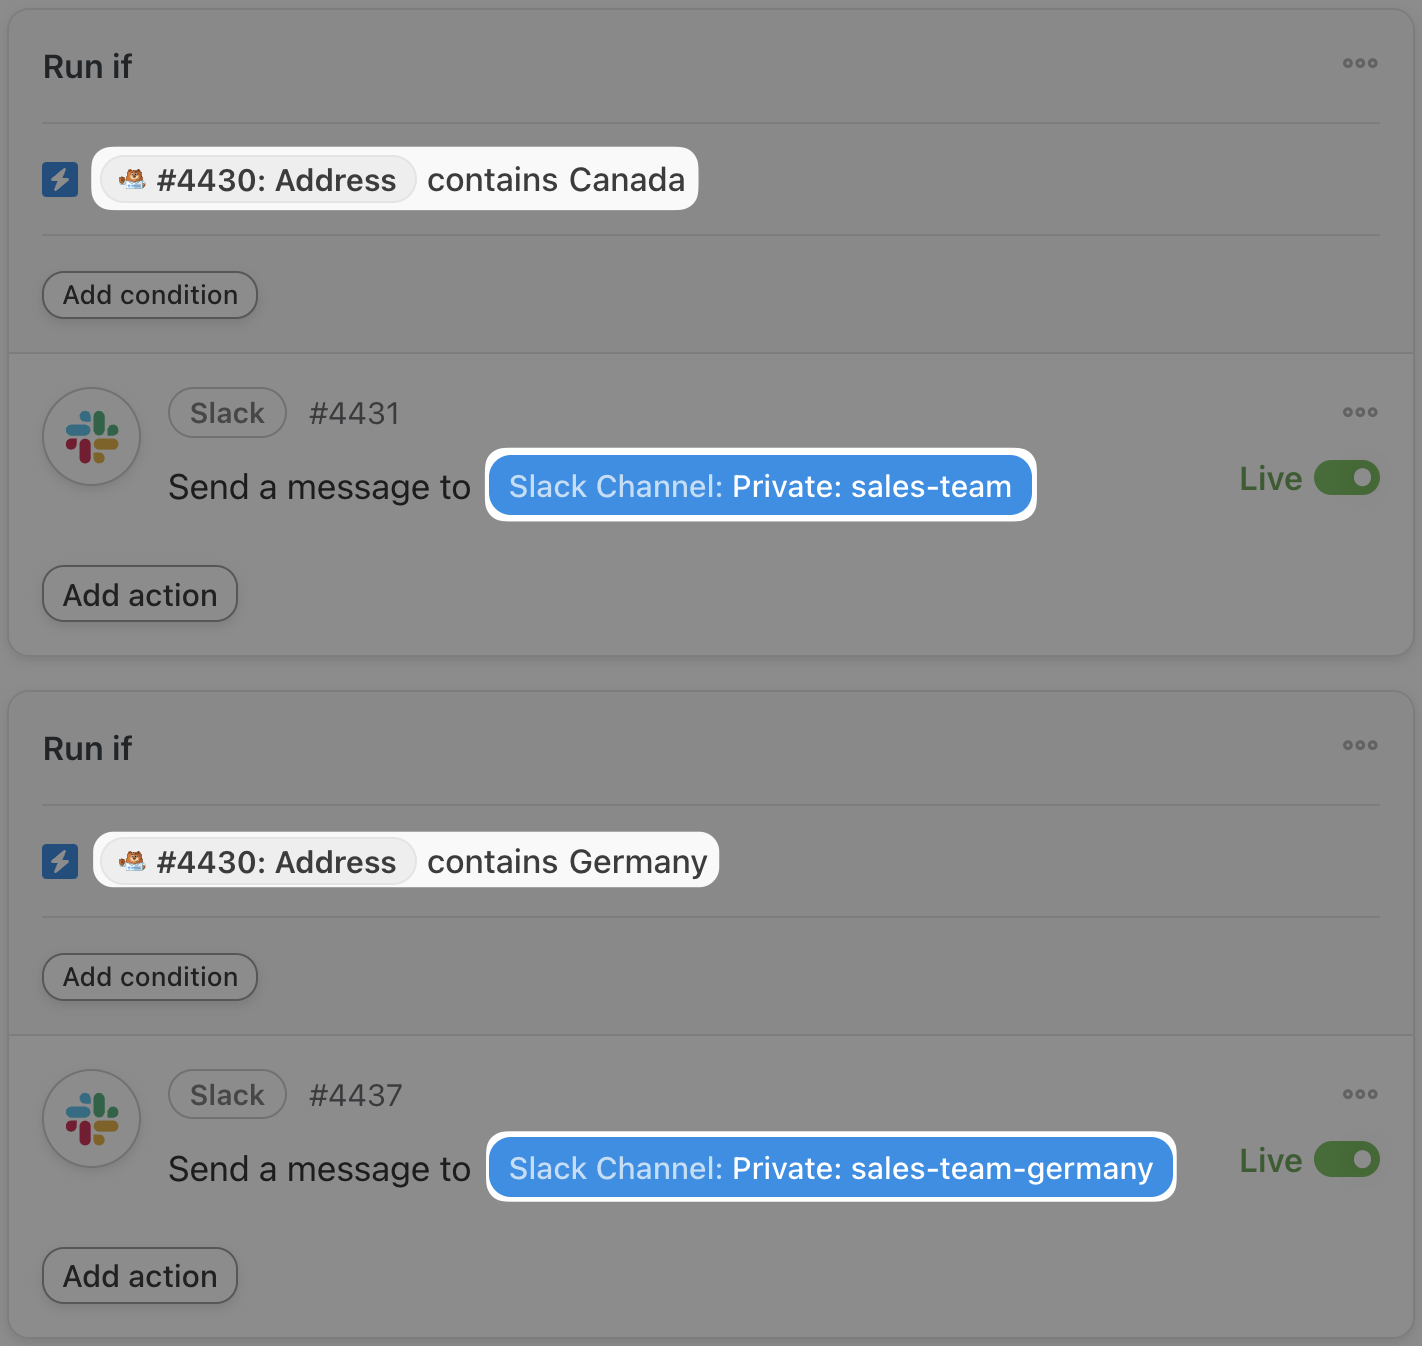
To add a filter to an action, simply hover over the action and click Filter. In the pop-up window that appears, select A token meets a condition.
A second window will appear where you can configure the conditions that a token of your choosing must satisfy for the action to run.
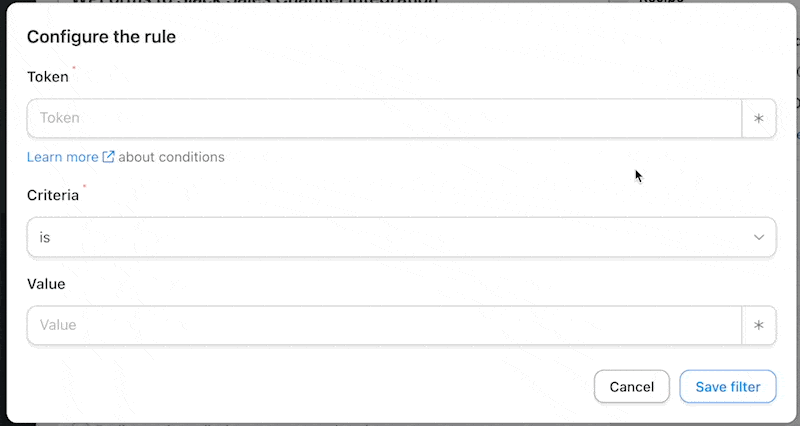
Once you’re finished, click Save filter.
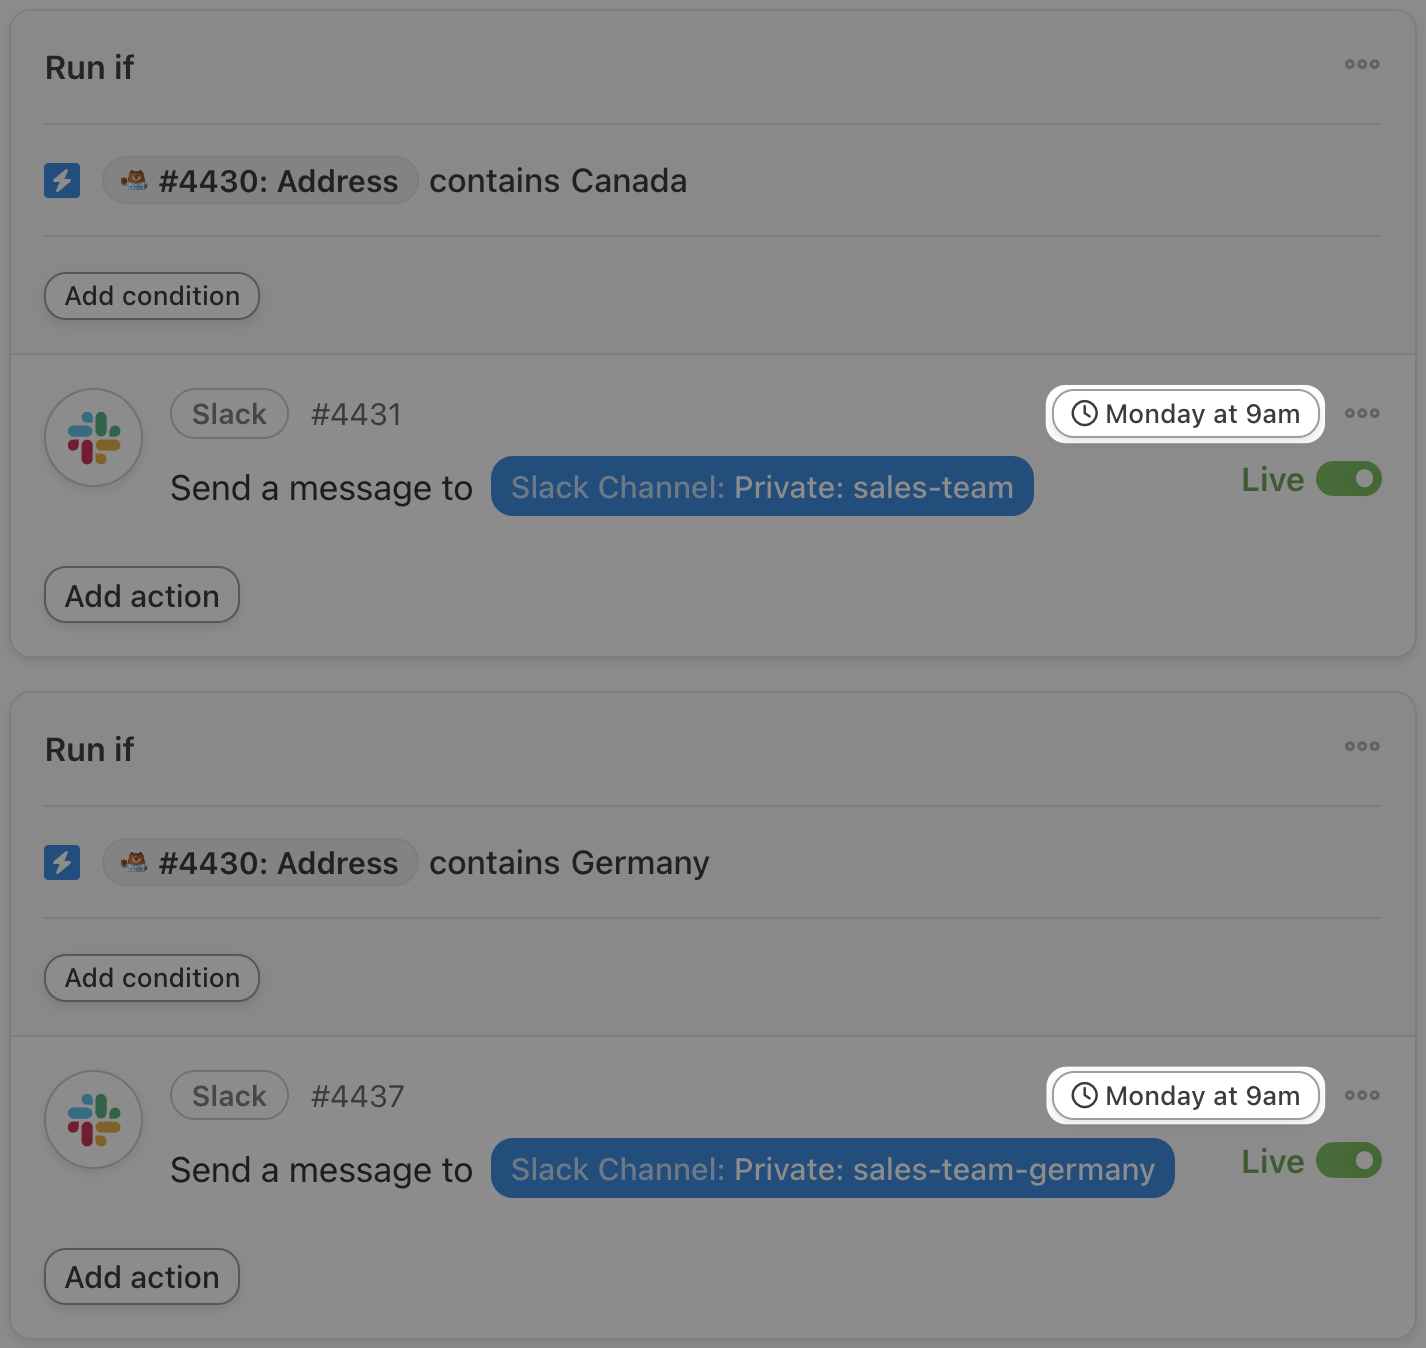
We then added a second action to the recipe along with another filter, allowing us to send the form submission data to the right team based on criteria that we define.
Step 7 (Optional): Add a Delay
Now that we’ve ensured that our Slack messages will go to the right team, we need to make sure that the messages will arrive at the right time. By taking advantage of Automator’s delay feature, we can schedule our communications so that our teams know when to expect new information.
To add a delay or to schedule an action, simply hover over the action and click Delay.
Automator will present you with a modal where you can use preset delays, schedules or custom schedules to time your communications to a tee.
Ready to boost your team’s collaborative efforts? Get Automator Pro now>>>.
Frequently Asked Questions
Conclusion
In this article, we’ve explored how integrating Slack with WordPress using Uncanny Automator can significantly enhance team collaboration and productivity. By automating updates, task assignments, and communications, you ensure your team stays informed and efficient.
We provided step-by-step instructions on setting up the integration and highlighted practical use cases to demonstrate its value.
Ready to take your team’s collaboration to the next level?
Get started with Uncanny Automator today and unlock the full potential of your WordPress site.
Until next time, happy automating!

Related Posts


This Post Has 0 Comments