Revive old WordPress posts with AI and Uncanny Automator. Learn how to reverse content decay…
Connect EDD to ActiveCampaign the Easy Way
Unlock advanced Easy Digital Downloads and ActiveCampaign integrations with Automator. Connect EDD to ActiveCampaign to segment contacts by purchases, downloads, discount codes and more.
Are you looking for an easy (yet advanced) way to connect Easy Digital Downloads to ActiveCampaign? Well, look no further.
In this post, we’ll show you what makes Uncanny Automator the best integration tool for EDD and ActiveCampaign.
Take your marketing automation to the next level with endless options for segmentation, including purchase and download history, discount code redemption and so much more. Enjoy the ease of seamless contact tagging and automatic list generation.
But that’s enough of an introduction for now. Let’s get into the good stuff.
Why Connect Easy Digital Downloads and ActiveCampaign with Automator
You may already know Uncanny Automator as the #1 automation and integration tool for WordPress websites. Using simple combinations of triggers and actions, you can connect any (or all) of your favorite apps and plugins.
While Automator is the best tool for integrating just about any two (or more) apps or plugins, there are some features that make it particularly effective for EDD and ActiveCampaign.
More Triggers and Actions: Uncanny Automator offers dozens of triggers and actions for EDD and its Recurring Payments and Software Licensing addons. This means that you can more seamlessly integrate EDD with ActiveCampaign. Whether a user cancels a subscription, uses a discount code at checkout or has a license expire before renewal, Automator has a trigger for it. Want a full list of Automator’s EDD-focused triggers and actions? Check out this list.
Filters and Conditions: Segmentation is all about filtration—and that’s exactly what Automator’s filters feature is all about. Segment your ActiveCampaign contacts based on whether or not they have an active EDD software license or subscription. Or target users based on their purchase and download history. Better yet, tap into your EDD and WordPress metadata for really granular segmentation. It’s entirely up to you.
User Loops and Lists: Sending out ActiveCampaign broadcasts has never been easier thanks to Automator’s User Loops feature. Populate entire ActiveCampaign lists with the click a button with whatever segment of your EDD customer base you choose. Want to make segmentation even easier? Check out Automator’s Custom User Fields Addon to learn how.
Integrations: Automator has 214 integrations with more constantly on the way. In other words, you can connect EDD and ActiveCampaign to your whole online ecosystem. Is your EDD platform part of your LearnDash LMS? Maybe you want to further segment your ActiveCampaign contacts based on their Events Calendar attendance? Whatever the integration, Automator can make it happen.
Ease-of-Use: You must be thinking, “An integration this powerful must be difficult to use.” While Automator is definitely a powerful integration tool, it packs all of its features and functions into a user-friendly click-and-play interface. In the next sections, we’ll show you how to connect EDD to ActiveCampaign in just a few clicks—and even fewer minutes.
Convinced that Automator is the best way to connect Easy Digital Downloads to ActiveCampaign?
Grab your Automator Pro license now >>>
Alternatively, you can install and activate the FREE version of Automator on your WordPress website. You’ll need to register your account to receive complimentary app credits so you can start using integrations like ActiveCampaign, OpenAI, Facebook, and more.
How to Connect EDD to ActiveCampaign (Quick Guide)
Looking for a fast and easy way to connect Easy Digital Downloads to ActiveCampaign? Follow these steps to create a seamless integration:
Step-by-Step Guide
- Install and activate Uncanny Automator. From your WordPress Admin Dashboard, navigate to Plugins > Add New, search for “Uncanny Automator,” and install the free plugin.
- Register your account to receive complimentary app credits so you can connect your WordPress website to Google Sheets.
- Create a new recipe. Navigate to Automator > Add New, select Logged-in users or Everyone, and name your recipe.
- Configure your trigger. Select Easy Digital Downloads > A user purchases a download.
- Configure your action. Click Add action, select ActiveCampaign > Add a contact to ActiveCampaign.
- Map EDD checkout fields to ActiveCampaign fields. Use tokens to match EDD checkout information to corresponding fields in your ActiveCampaign CRM.
- Save and activate the recipe. Toggle the recipe from Draft to Live. Your Easy Digital Downloads store is now connected to ActiveCampaign!
That’s it! Every time a customer purchases a download, Automator will add/update their contact information in ActiveCampaign.
Want a more detailed walkthrough? Keep reading for a step-by-step tutorial with screenshots along with some ideas for even more powerful EDD and ActiveCampaign integrations.
EDD and ActiveCampaign Integration: Add and Tag Contacts
One of the first things that you’re going to want to do now that you have your Automator Pro license is set up a recipe to add your new EDD customers to ActiveCampaign.
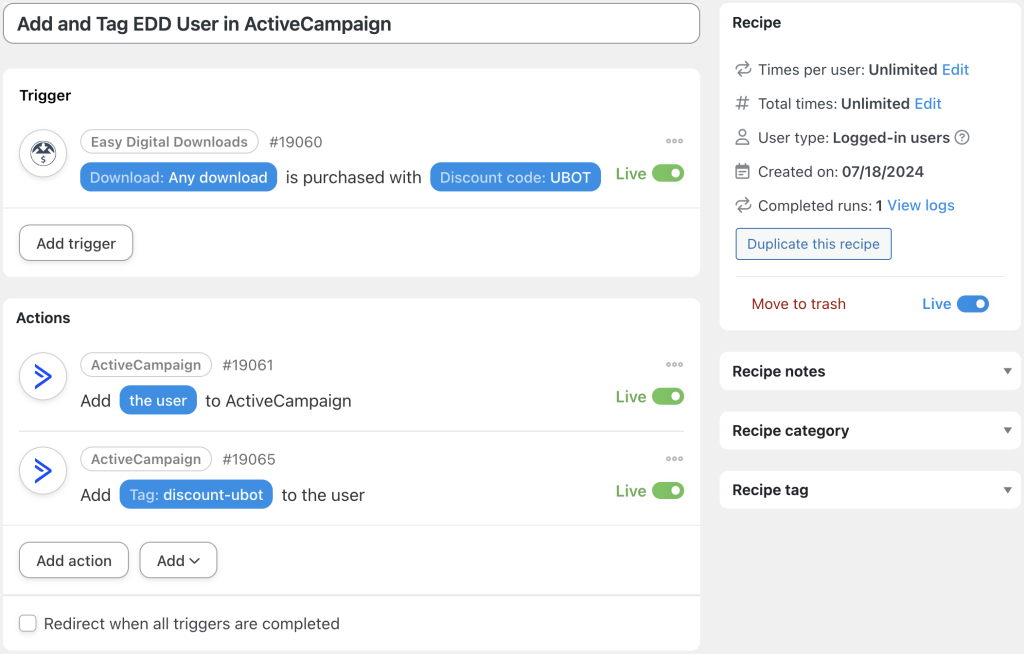
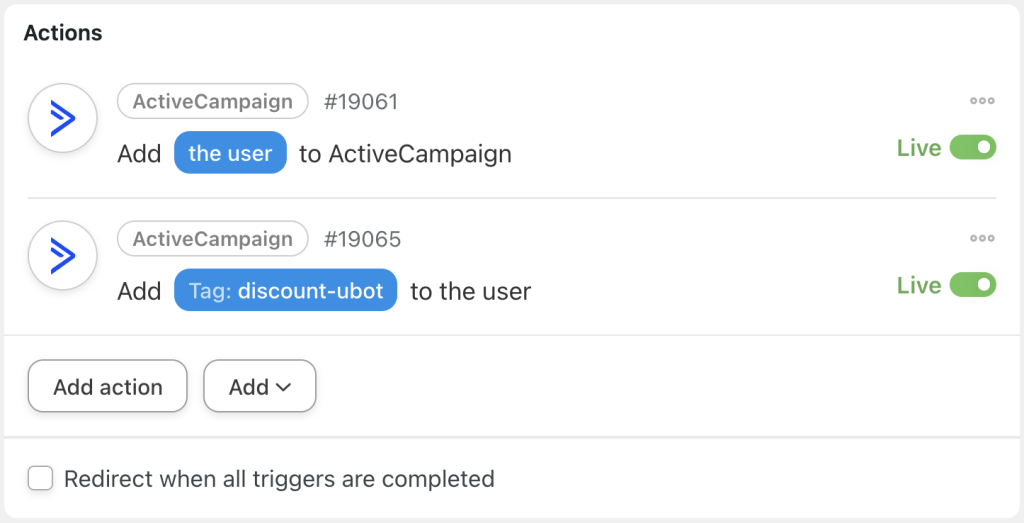
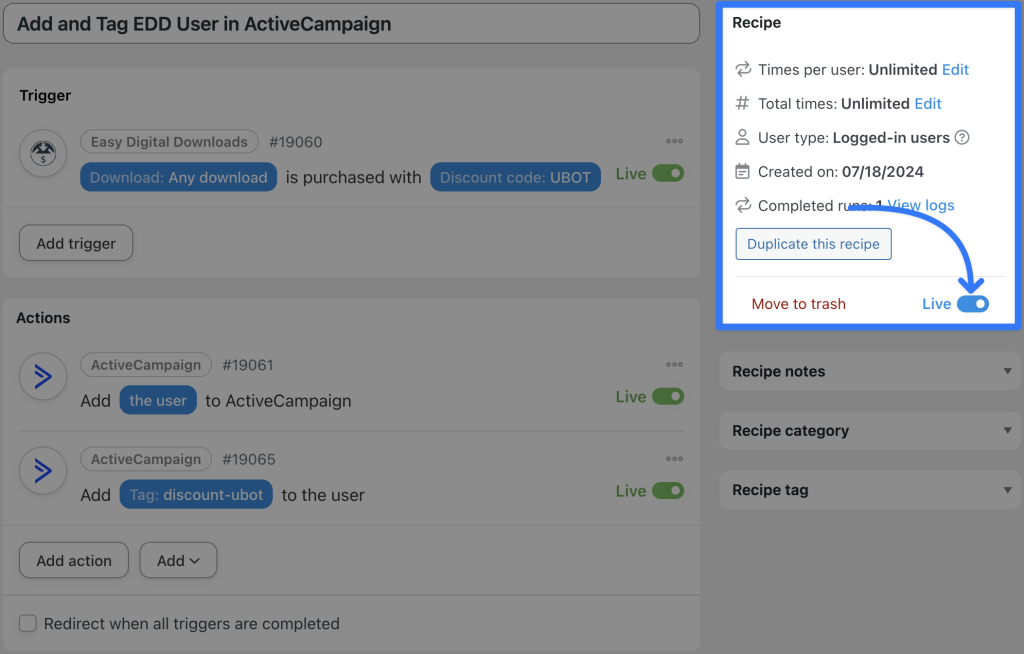
In the recipe pictured above, for example, we’re able to add a contact to ActiveCampaign whenever they purchase a download. We can then add a second action to tag that contact, indicating that they used a discount code at checkout.
Want to know how we did it? Let’s take a look.
Step 1: Create and Name a New Recipe
From your WordPress Admin Dashboard, navigate to Automator > Add new recipe. In the popup window that appears, select Logged-in users.
Give your recipe a name that makes it easy to recognize at a glance. For example, we’ve named this recipe “Add and Tag EDD User in ActiveCampaign”.
Step 2: Configure Your Trigger(s)
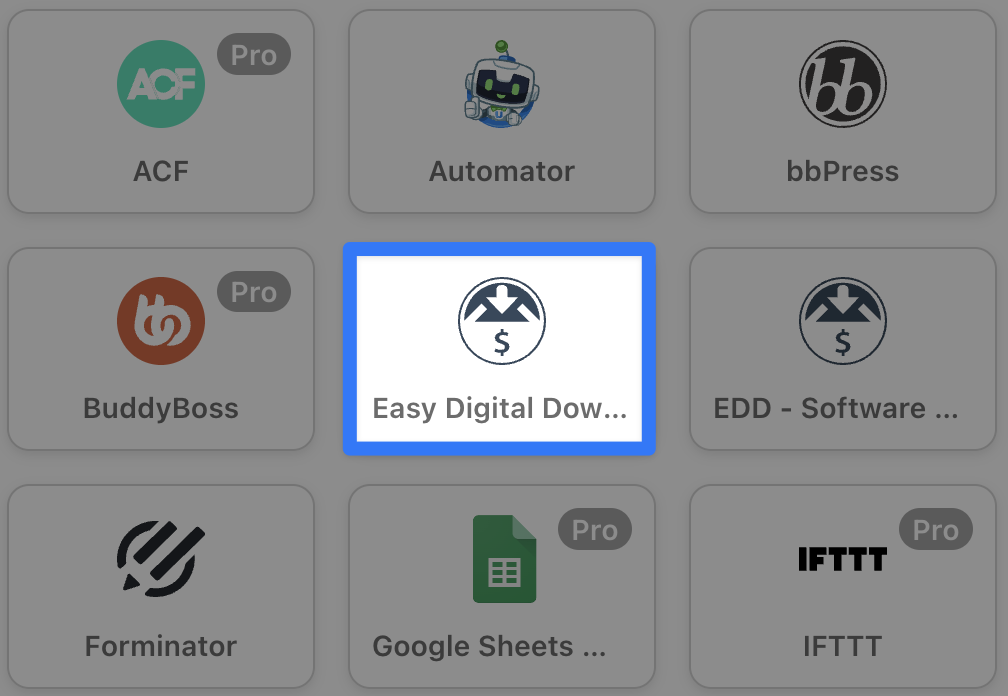
In the Trigger panel, from the menu of available integrations, select Easy Digital Downloads.
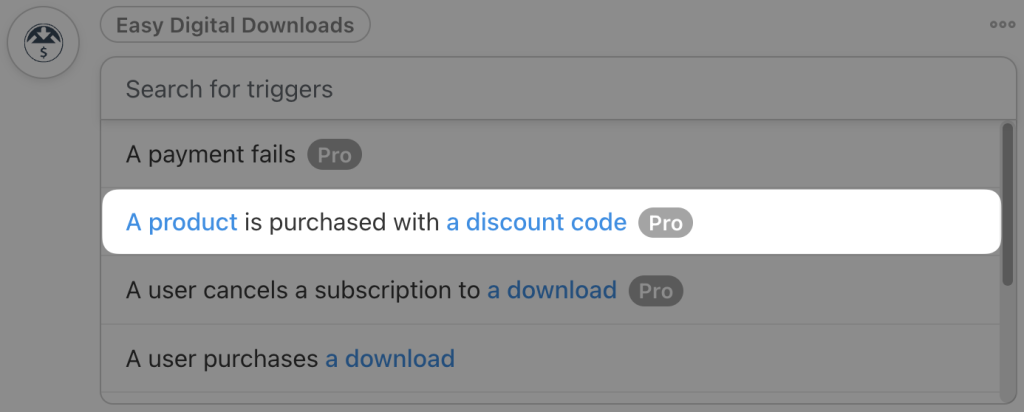
From the dropdown list that appears, select A product is purchased with a discount code.
Automator will prompt you to select a download. We have selected Any download but you can choose the download that best suits your workflows.
Automator will then prompt you to select a discount code. Once you’re finished, click Save. Your completed trigger should look something like this:
Step 3: Connect ActiveCampaign to WordPress
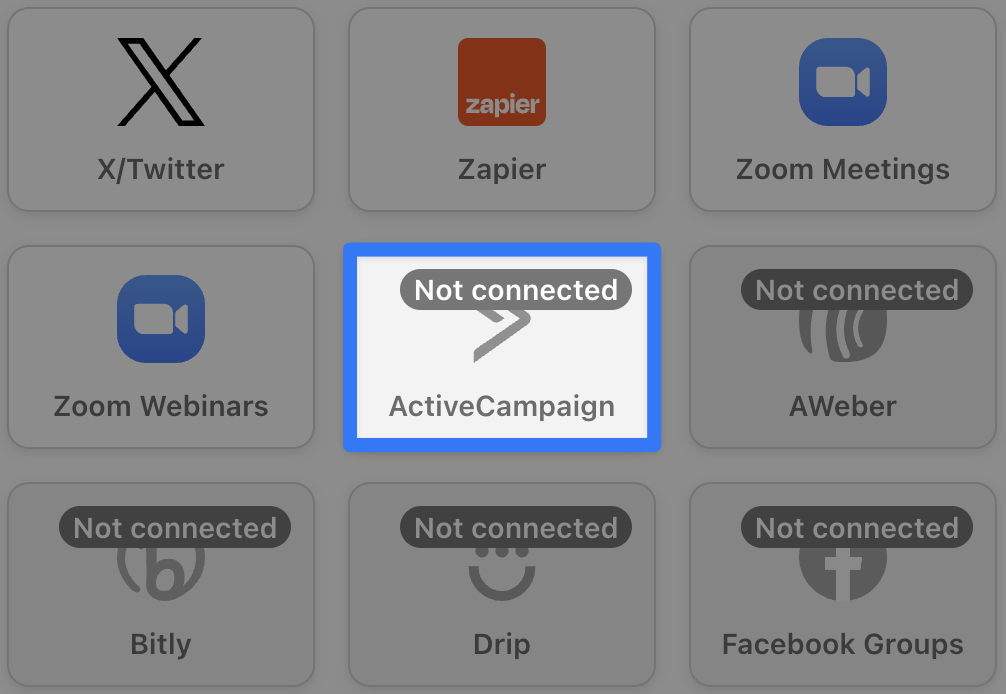
In the Actions panel, click Add action and select ActiveCampaign from the menu of available integrations.
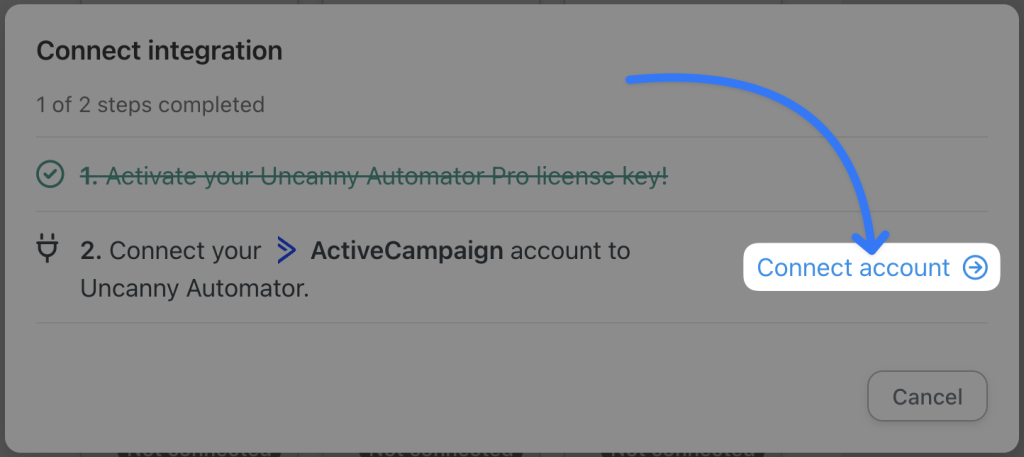
A pop-up window will appear. Click Connect account.
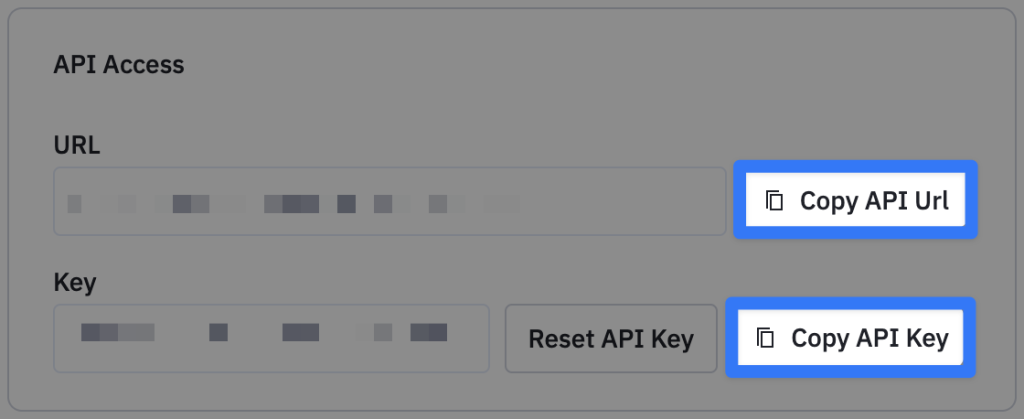
Another pop-up window will appear, prompting you to enter your Account URL and API key. To find these, go to your ActiveCampaign account and navigate to Settings > Developer. Copy the URL and API key.
Paste the information into the corresponding fields in the Automator pop-up window. When you’re finished, click Connect ActiveCampaign account.
Next, click Save Settings and return to the recipe editor.
Step 4: Configure Your Action(s)
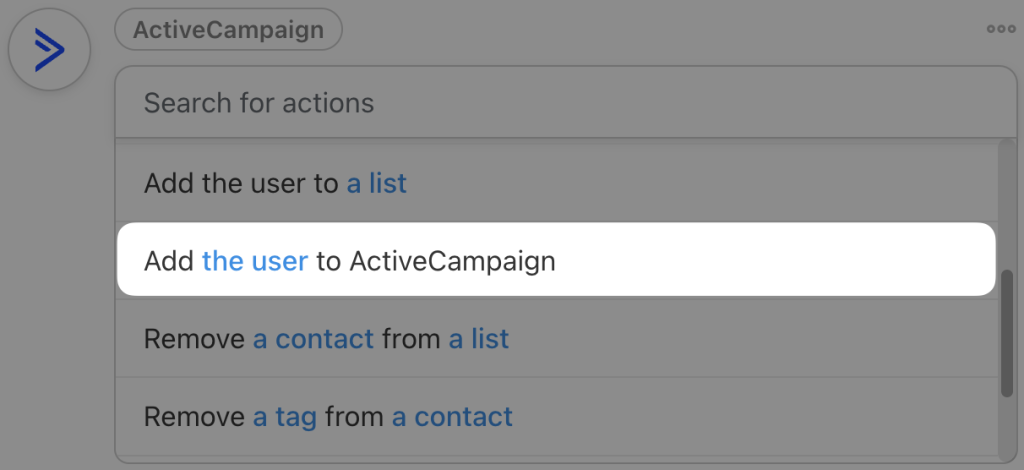
From the dropdown list that appears, select Add the user to ActiveCampaign.
Automator will use the user’s first name, last name and email to create the ActiveCampaign contact.
Next, we’re going to add a second action to tag the user, indicating which discount code they used at checkout.
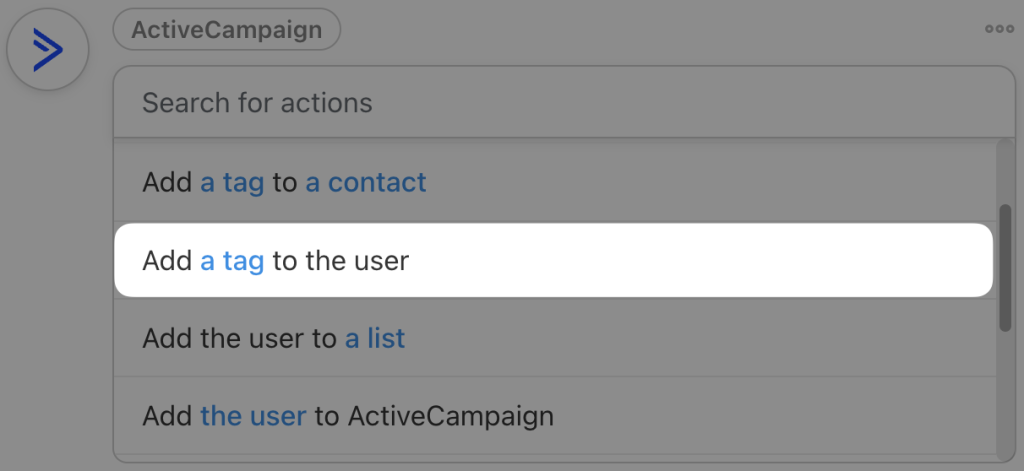
Click Add action and select ActiveCampaign. From the dropdown list that appears, select Add a tag to the user.
Automator will prompt you to select the tag. Once you’re finished, click Save. Your Actions panel should now look something like this:
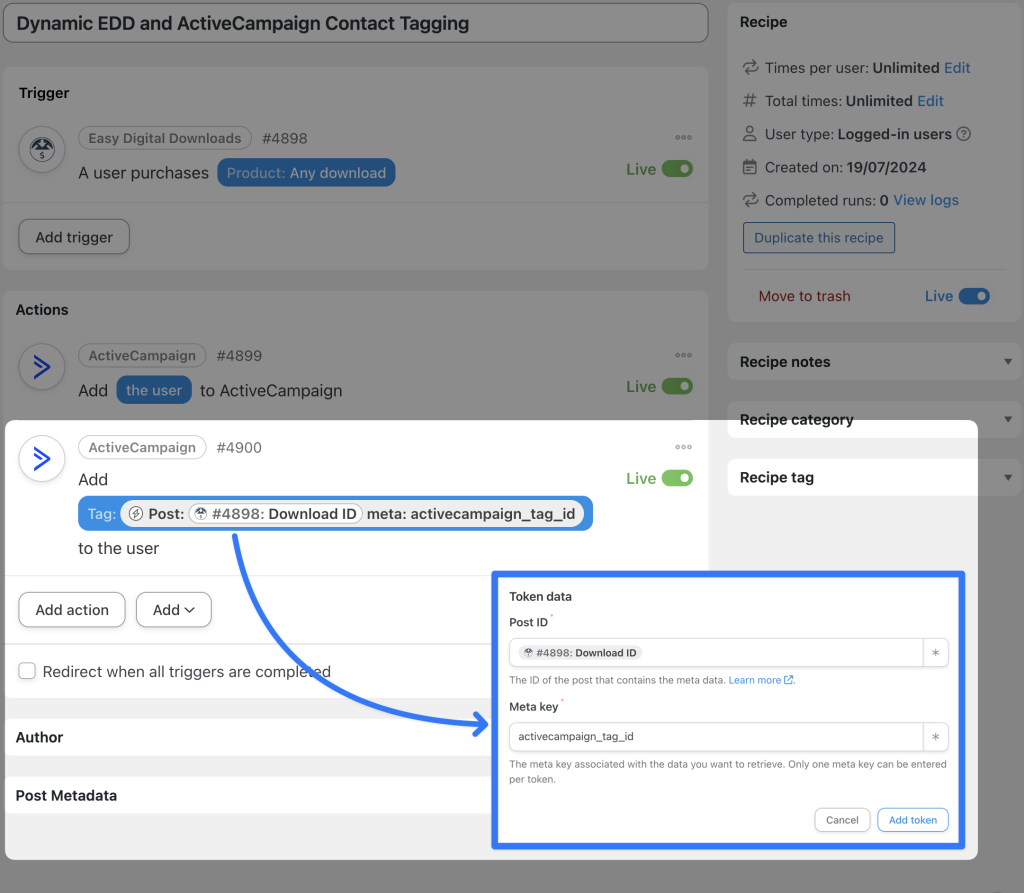
(Note: If you want to tag your EDD customers in ActiveCampaign dynamically, you can do this using the Advanced Custom Fields plugin. Add a custom field to your EDD downloads with a value that corresponds to a tag ID in ActiveCampaign. You can then retrieve this custom field value as post meta using Automator’s tokens feature. ACF does not support custom fields for discount codes.)
Step 5: Connect EDD and ActiveCampaign!
You’re just about ready to complete your first Easy Digital Downloads and ActiveCampaign integration. All that’s left for you to do is toggle your recipe from Draft to Live.
That’s it! You’ve just successfully connected EDD to ActiveCampaign!
Want more of these powerful integrations at your fingertips? Grab your Automator Pro license now if you haven’t already>>>.
(Note: The recipe that we just created will add our new EDD customers to ActiveCampaign when they make a purchase with a discount code. If you want to import your existing EDD customers to ActiveCampaign, you can run a User Loop to import different user roles. We’ll show how to set up these powerful automations in the next section. Alternatively, you can export a CSV of your customers then import that CSV file into ActiveCampaign.)
Generate ActiveCampaign Lists from EDD Customers
Building your ActiveCampaign mailing lists one EDD customer at a time has its uses. However, sometimes, you may need to populate an entire mailing list for a special broadcast or to retroactively target some of your EDD customers.
Enter User Loops.
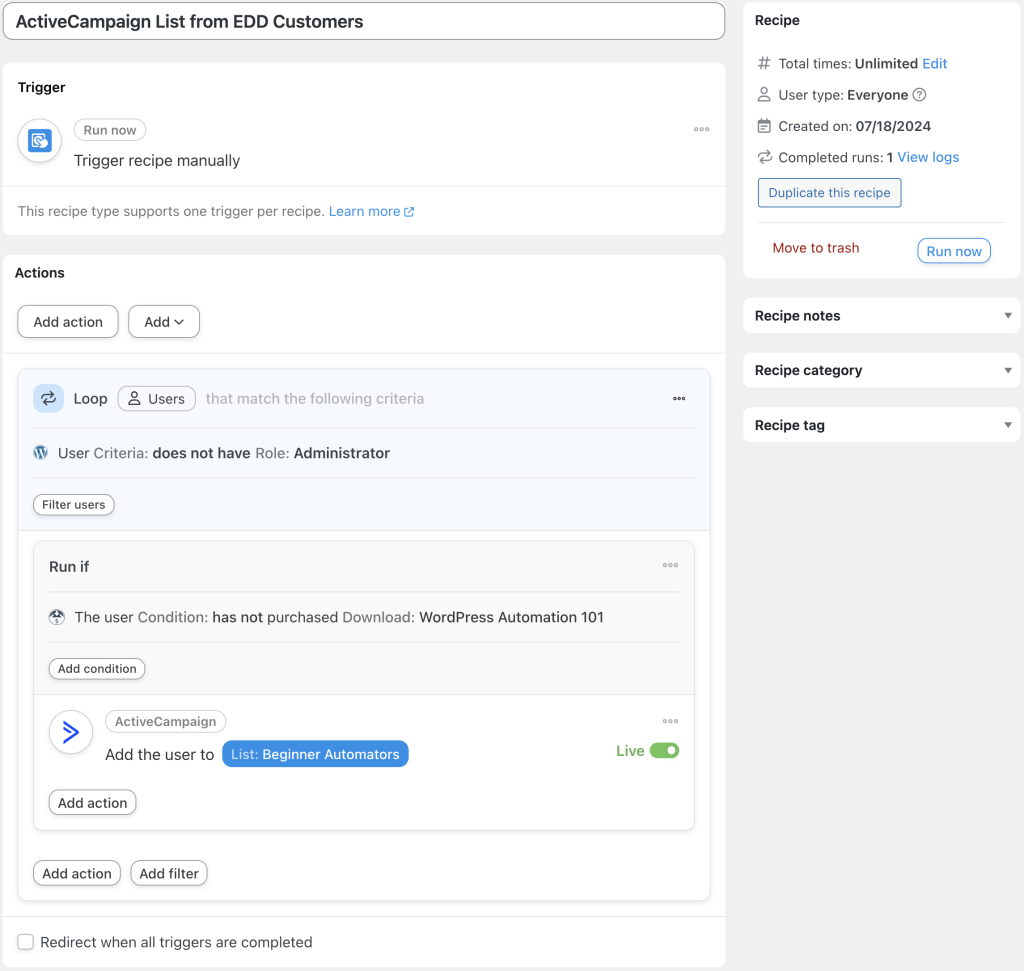
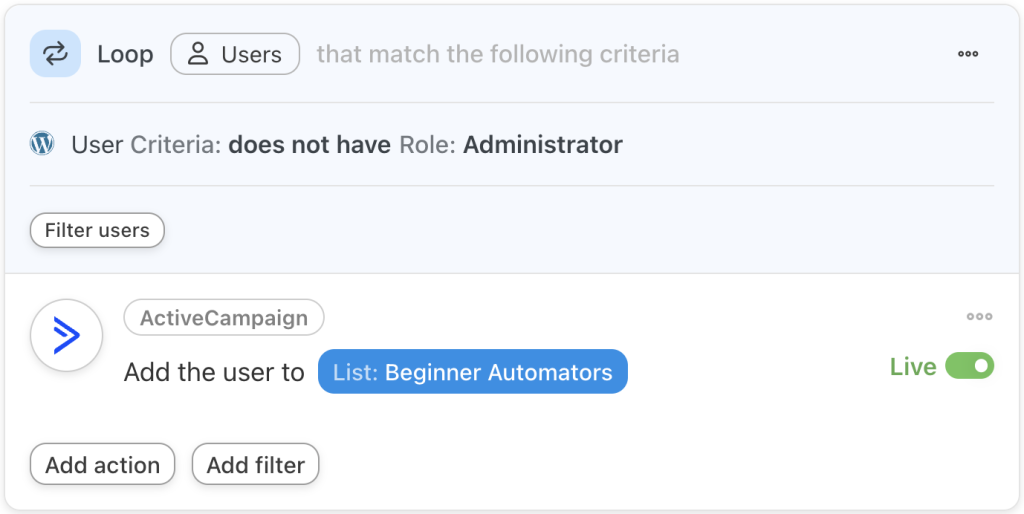
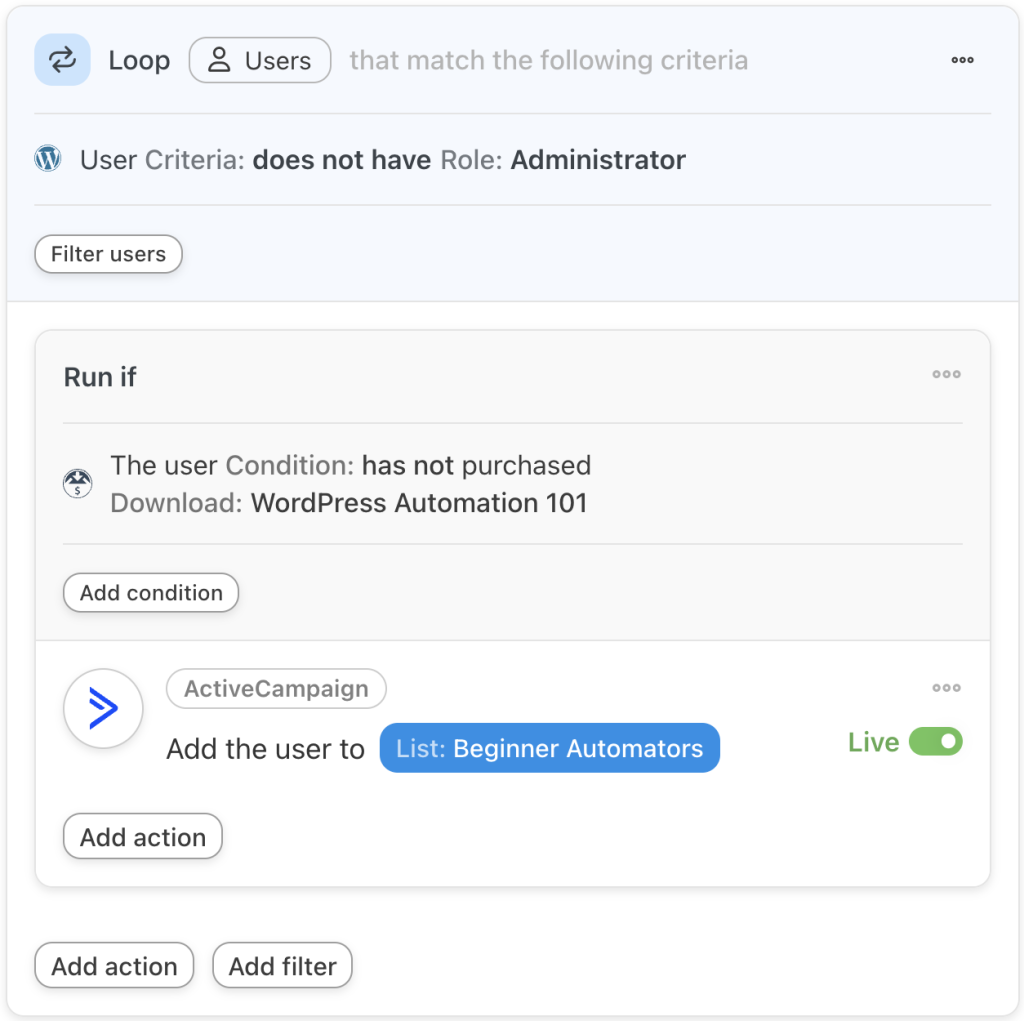
In the recipe pictured above we’re able to add all of our EDD customers who have not yet purchased a specific download to one of our ActiveCampaign mailing lists. Alternatively, by simply altering the filter, we could have targeted EDD customers with or without an active subscription, who have or have not downloaded specific products or more.
Here’s to set up powerful list segmentation with Uncanny Automator.
Step 1: Create a New Recipe
From your WordPress Admin Dashboard, navigate to Automator > Add new recipe. In the popup window that appears, select Everyone.
Give your recipe a name that makes it easy to recognize at a glance. For example, we’ve named this recipe “ActiveCampaign List from EDD Customers”.
Step 2: Configure Your Trigger(s)
In the Trigger panel, from the menu of available integrations, select Run now. From the dropdown list that appears, select Trigger recipe manually. Your completed trigger should look like this:
Step 3: Configure Your User Loop
In the Actions panel, click Add then select User loop.
In the Loop pane, click Add action and select ActiveCampaign. From the dropdown list that appears, select Add the user to a list.
Automator will prompt you to select a list. For example, we have selected our “Beginner Automators”. Once you’re finished, click Save.
Your Actions panel should now look something like this:
(Note: With the action we selected, Automator will not add users to ActiveCampaign. That is to say, if the email does not exist in ActiveCampaign, Automator will not add them to the list you have selected. If you are uncertain if all of your EDD customers have been added to ActiveCampaign, you can easily change the action to Add the user to ActiveCampaign then run another recipe to add different users to different lists.)
Step 4: Configure Your Action Filter(s)
As the recipe stands, Automator will take all of our users who are not Administrators and add them to our chosen ActiveCampaign list. Of course, we’re trying to be a bit more targeted than that.
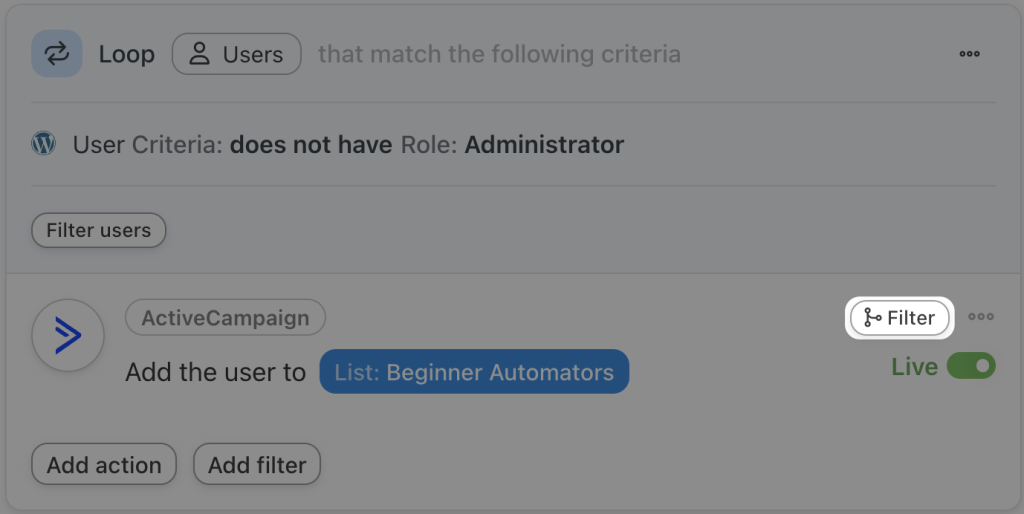
To zero in on specific EDD customers, we’re going to add an Action Filter. To add a filter, simply hover over the action and click Filter.
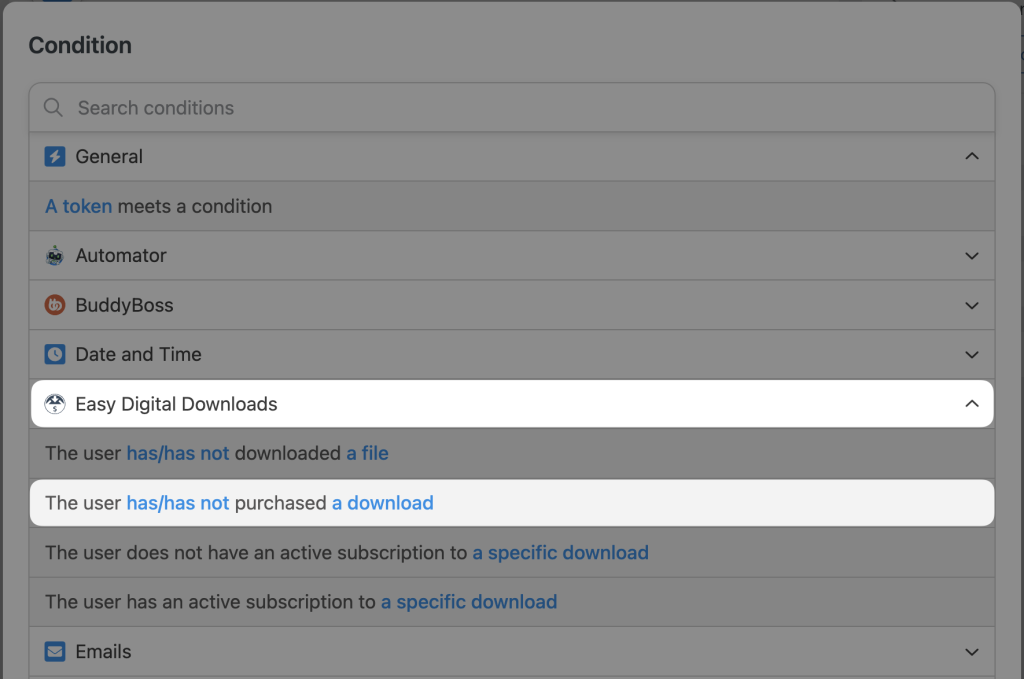
In the modal that appears, select Easy Digital Downloads > The user has/has not purchased a download or another EDD condition that suits your ActiveCampaign list.
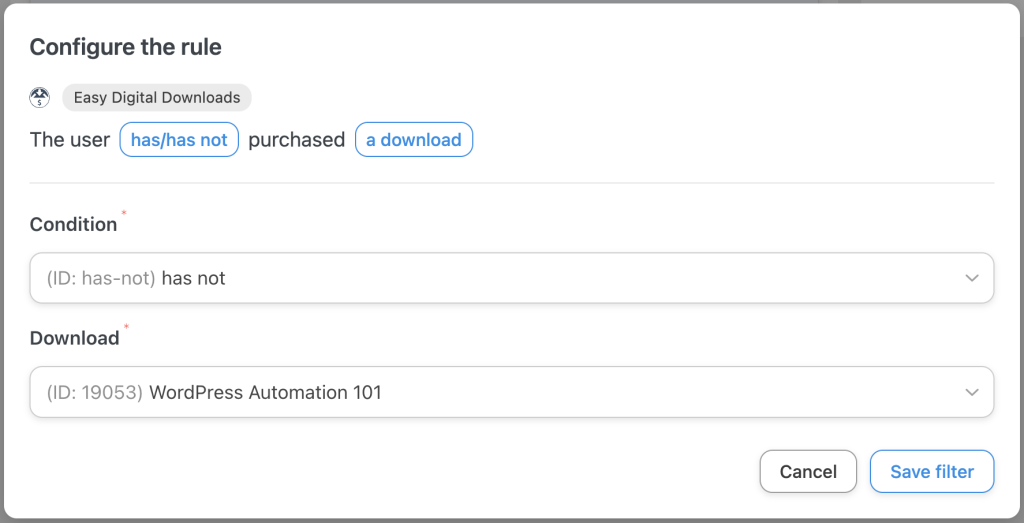
In a new modal, Automator will prompt you to configure the rule:
Once you’re finished, click Save filter. Your Actions panel should now look something like this:
Step 5: Get on the List!
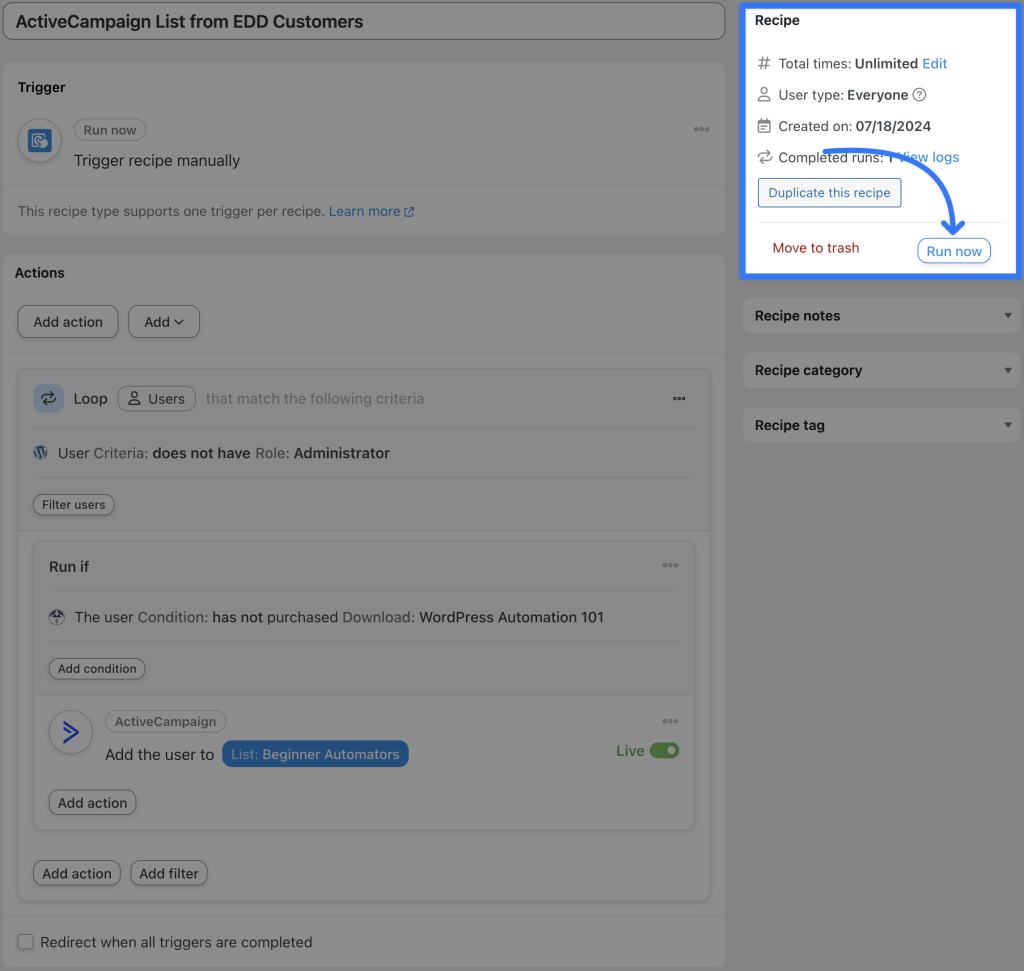
We promised you the ability to create entire ActiveCampaign lists with the click of a button. Now it’s time to deliver. Simply click Run now in the Recipe box and kick back as Automator segments your EDD customers for you.
Best Practices and Frequently Asked Questions
By now, you’re very well on your way to becoming a master automator. Nevertheless, here are some tips and tricks for improving your new Easy Digital Downloads and ActiveCampaign integration.
1. Leverage Detailed Segmentation
Use Uncanny Automator’s advanced filtering options to segment your ActiveCampaign lists based on detailed EDD data. Segment users by purchase history, specific product downloads, discount codes used, and more. Don’t forget, Automator taps directly into your WordPress metadata so you can segment your contacts any way you want.
2. Utilize User Loops for Bulk Actions
User Loops is one of Automator’s most powerful features. Upgrade your marketing automation efforts with bulk actions, such as adding multiple users to a list or tagging users en masse based on EDD criteria. Check out the Custom User Fields Addon for more ways to segment your contacts.
3. Update and Optimize Your Marketing Automations
As you retire discount codes, add and/or edit tags and create new mailing lists, don’t forget to update your automations and create new ones.
And don’t worry. Automator doesn’t charge per automation fees. That means that you can create as many automations as you want—the more you integrate, the more you save.
Conclusion
In this article, we explored the extensive capabilities of Uncanny Automator for integrating Easy Digital Downloads with ActiveCampaign.
By leveraging Automator, you can significantly enhance your marketing automation with advanced segmentation, automated tagging, and seamless list creation. We delved into the step-by-step process of setting up these powerful integrations, utilizing features such as User Loops and action filters.
Uncanny Automator stands out as the ultimate tool for connecting EDD to ActiveCampaign, offering ease of use, a wide range of triggers and actions, and the ability to connect with numerous other platforms.
Ready to transform your EDD and ActiveCampaign integration? Grab your Uncanny Automator Pro license today and start automating your workflows effortlessly>>>.
Until next time, happy automating!







This Post Has 0 Comments