Revive old WordPress posts with AI and Uncanny Automator. Learn how to reverse content decay…
Automator: The Best Mailchimp and WooCommerce Integration
Create a reliable and effortless Mailchimp to WooCommerce integration. Connect Mailchimp to WooCommerce with Automator and simplify the process of segmenting your contacts, tracking conversions and much more.
Are you looking for an easy way to connect your Mailchimp account to your WooCommerce store? If so, look no further!
Uncanny Automator is the simplest and most reliable way to create a seamless Mailchimp and WooCommerce integration.
Whether you want to segment your contacts based on their purchase history, location, lifetime spend or whatever else you choose, Automator is the tool for the job.
In this article, we’ll discuss the features that make Automator the best integration tool for Mailchimp and WooCommerce. Then we’ll take you through setting up your first few automations and give you some tips and tricks for setting up your own integrations.
Let’s get to it.
What Makes Automator the Best Mailchimp and WooCommerce Integration
You may already know Uncanny Automator as the #1 automation and integration tool for WordPress websites. But, in case you didn’t, it’s pretty straightforward: using simple combinations of triggers and actions called recipes, you can connect all of your favorite apps and plugins.
Including, of course, Mailchimp and WooCommerce.
There are tons of Automator features that make it the ideal Mailchimp and Woo integration tool. We could write a whole thesis on the subject—but you don’t have that much time and we don’t have that much ink.
Instead, here are the top reasons that you should consider Automator when trying to connect your Mailchimp account to your Woo store.
1. Seamless Integration
Automator has dozens upon dozens of triggers and actions for Mailchimp and WooCommerce alone. Whether you want to add one of your Woo customers to a Mailchimp audience, tag Woo customers based on their product purchases or page views, or remain GDPR compliant and unsubscribe a Woo customer, Automator does it all.
2. Customizable Connection
Unlike other integration tools, Automator lets you decide how you want your Mailchimp account to interact with your Woo-powered ecommerce store. You can opt for full integration, connecting all of your Woo customer data to your Mailchimp CRM or limit it to just a few key data points. Additionally, Automator allows two-way integration so you can make changes in your Woo store based on changes in your Mailchimp account.
3. Infinite Segmentation
Automator taps directly into your WordPress website’s metadata. This means that you can use any kind of information you want to segment your Mailchimp audience. Whether you want to tag users based on lifetime spend, last purchase date, birthday, company or even hair color. If you can gather the data in Woo, you can use it to segment your contacts.
4. Powerful Integrations
Mailchimp and WooCommerce are powerful tools all on their own. They’re even more powerful paired together or with any number of Automator’s 214 integrations. Want to use OpenAI to help you draft and optimize email copy based on a customer’s Woo purchase history? How about harnessing the analytical power of tools such as Google Sheets, Airtable or Notion to optimize your segmentation strategy? In all of those scenarios, and more, Automator has you covered.
5. Awesome Addons
Want to make the most out of your Mailchimp and WooCommerce integration? Uncanny Automator’s Custom User Fields Addon opens up the possibility of even greater segmentation. Track custom types of Woo customer data to create more detailed and personalized profiles that drive conversions.
Convinced yet? If you’re ready to connect Mailchimp to WooCommerce with #1 integration tool on the market, then grab your Automator Pro license now>>>.
Not sure that Automator is for you? No worries. Download the FREE FOREVER version of Automator then register your account. You’ll get a limited number of app credits to try out the Mailchimp and WooCommerce integration—and hundreds more!
Add Woo Customers to Mailchimp Audiences
Now that you have your Automator Pro license, let’s take a look at creating our first recipe.
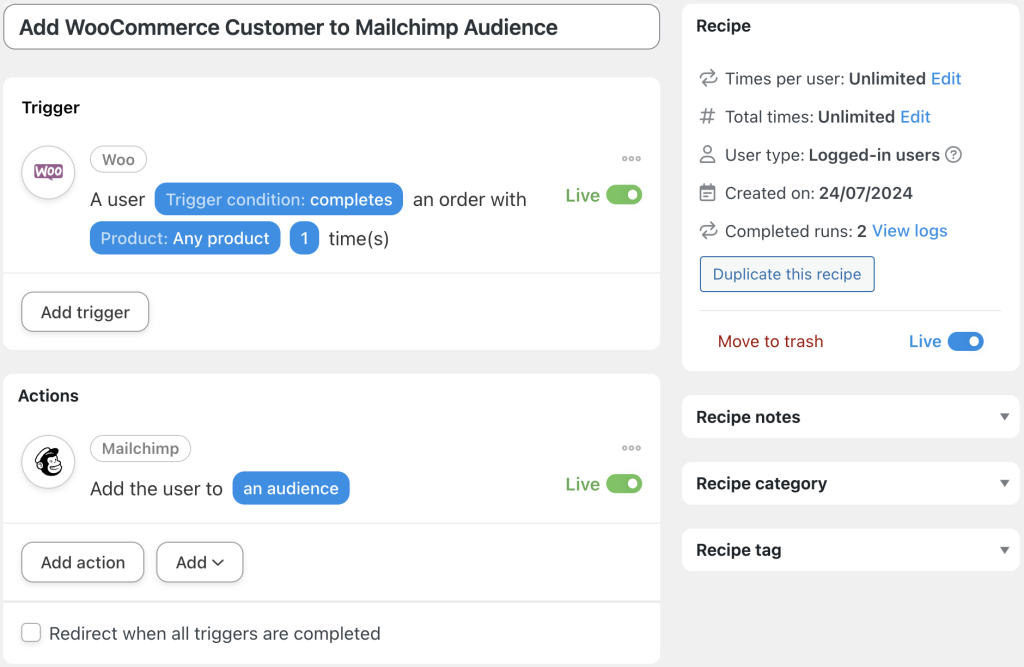
In the recipe pictured above, we’re able to automatically add our WooCommerce customers to our Mailchimp audience. Want to know how we did it? Follow the steps below.
P.S. Make sure to follow Step 6 to improve the integration.
Step 1: Create a New Recipe
From your WordPress Admin Dashboard, navigate to Automator > Add new recipe. In the popup window that appears, select Logged-in users.
(Note: We’re able to use Logged-in users because our Woo store settings require customers to create an account or login at checkout. If your Woo store settings allow customers to checkout without having an account, you can select Everyone and use tokens.)
Step 2: Name Your Recipe
Give your recipe a name that makes it easy to recognize at a glance. For example, we’ve named this recipe “Add WooCommerce Customers to Mailchimp Audiences”.
Step 3: Configure Your Trigger(s)
In the Trigger panel, from the menu of available integrations, select Woo.
From the dropdown list that appears, select A user completes, pays for, lands on a thank you page for an order with a product.
Automator will prompt you to select the Trigger condition and Product. We have selected completes and Any product to capture as many leads as possible. (Later on, we’ll show you how selecting Any product can make your contact tagging even simpler.)
Once you’re finished, your completed trigger should look like this:
Step 4: Configure Your Action(s)
In the Actions panel, click Add action and select Mailchimp.
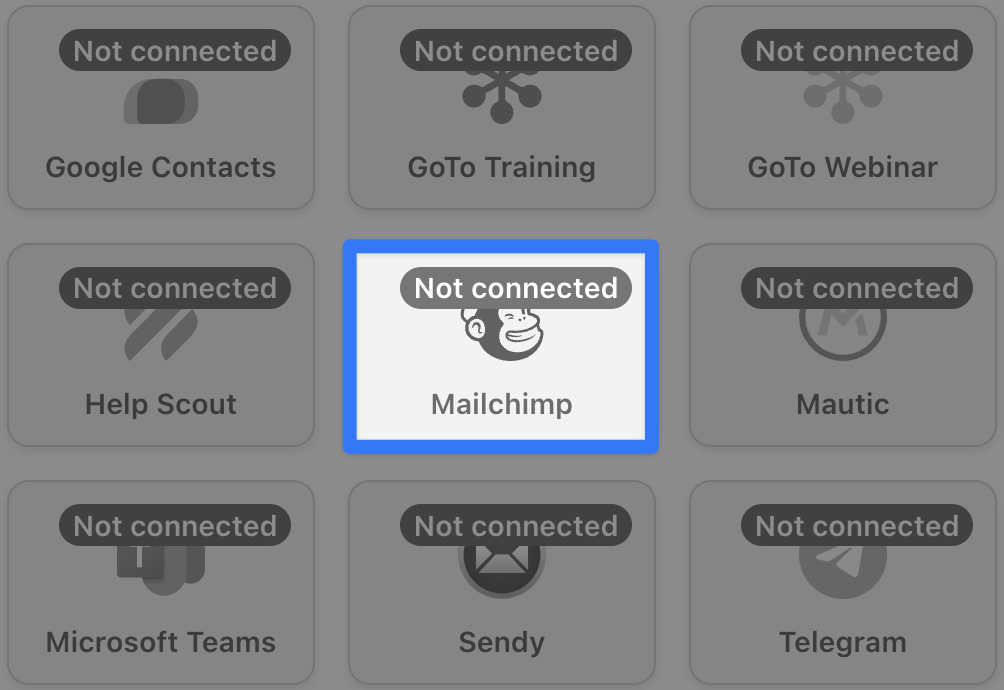
Follow the prompts to connect your Mailchimp account if you haven’t already. Once you’ve connected your account, return to the recipe editor.
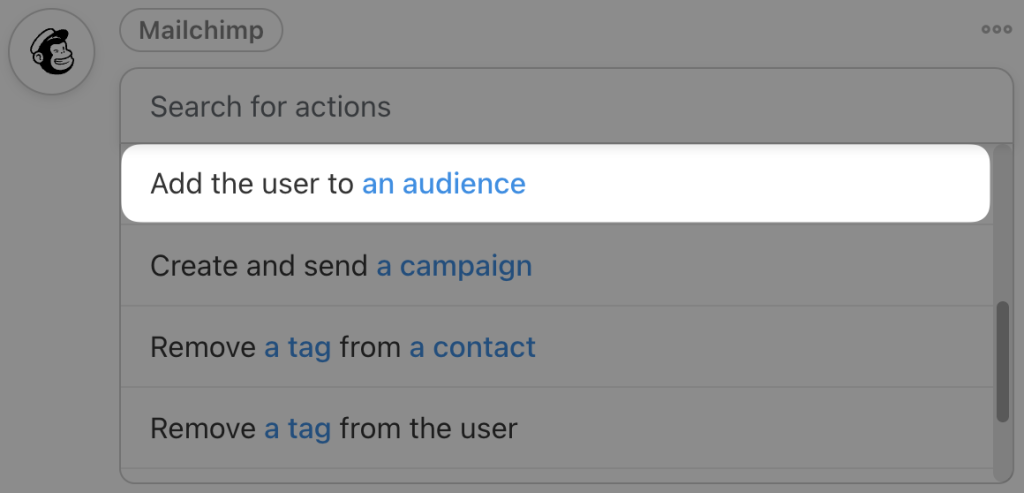
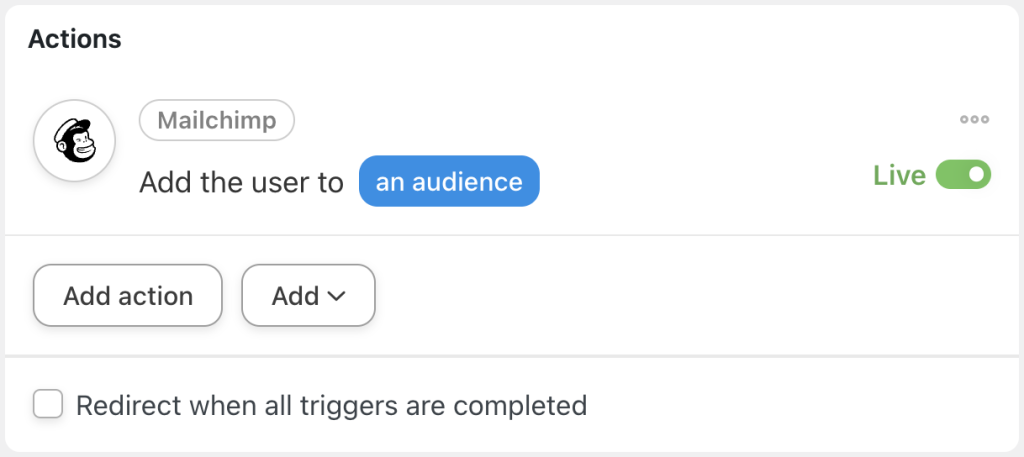
From the dropdown list that appears, select Add the user to an audience.
(Note: If you had selected the recipe type Everyone, then you can select the Mailchimp action Add a contact to an audience and use tokens to add the Woo customer’s Billing email.)
Automator will present you with a form to input your new contact’s information. Once you’ve selected the specifications such as Audience and Double opt-in, scroll down to Merge fields.
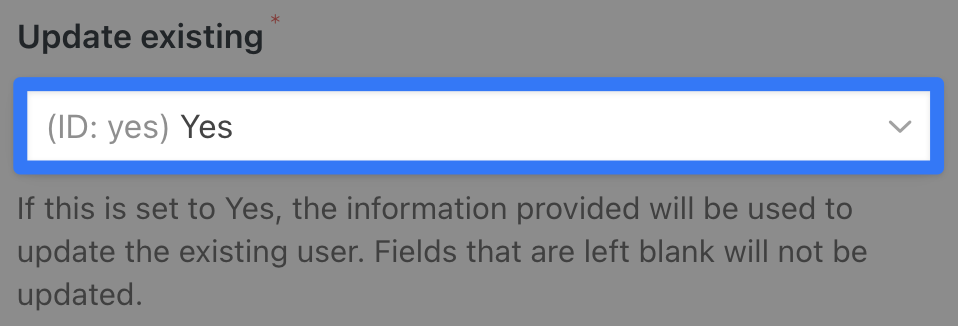
(Note: We recommend selecting “Yes” under the field Update existing. Not only will this keep your Mailchimp information up-to-date, but will also allow you to add/configure custom fields later on.)
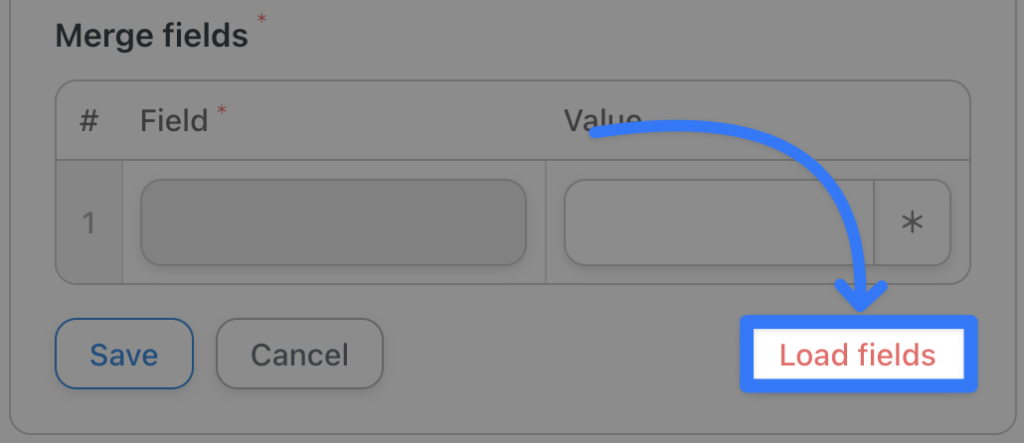
At the bottom of the form, click Load fields. Automator will then retrieve all of the contact information fields, including custom fields, from your Mailchimp account.
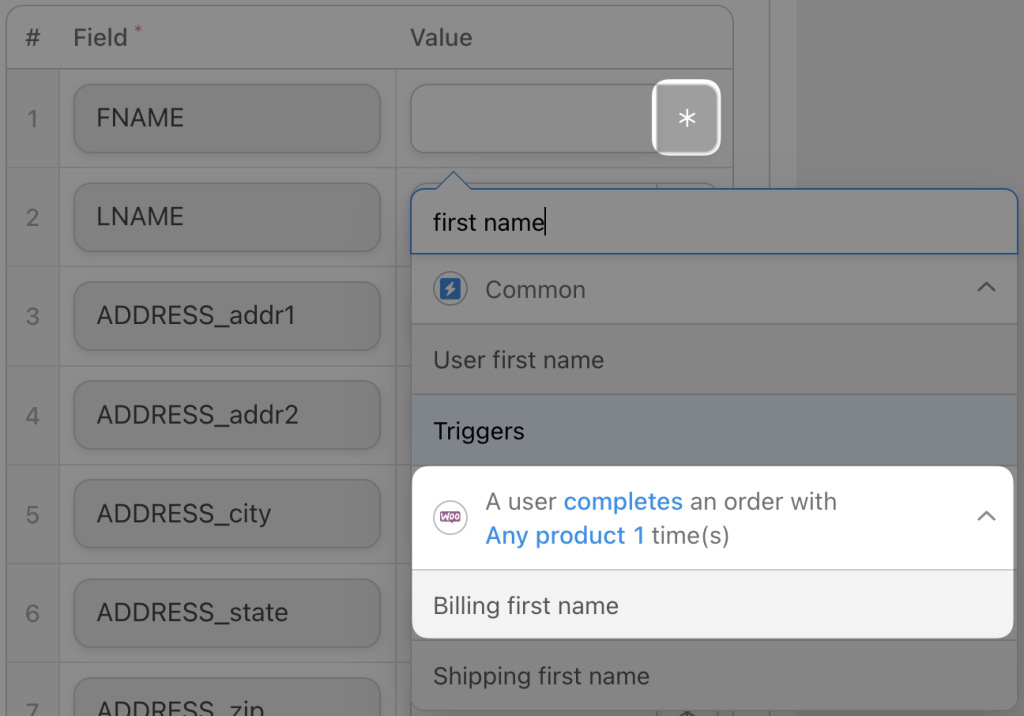
Once the fields have loaded, we’ll use tokens (i.e., dynamic data pulled from your WordPress website and from within recipes) to populate the Value fields.
To retrieve a token, click on the Asterisk and select the token that corresponds to the field.
For example, in the fields “FNAME”, “LNAME” and “ADDRESS_addr1”, you might select the Woo trigger tokens “Billing first name”, “Billing last name” and “Billing address line 1”.
(Note: If you had selected the recipe type Everyone, then there will be an Email field. Simply select the “Billing email” token to populate this field.)
Once you’re finished, click Save. Your completed action should look like this:
Step 5: Go Live!
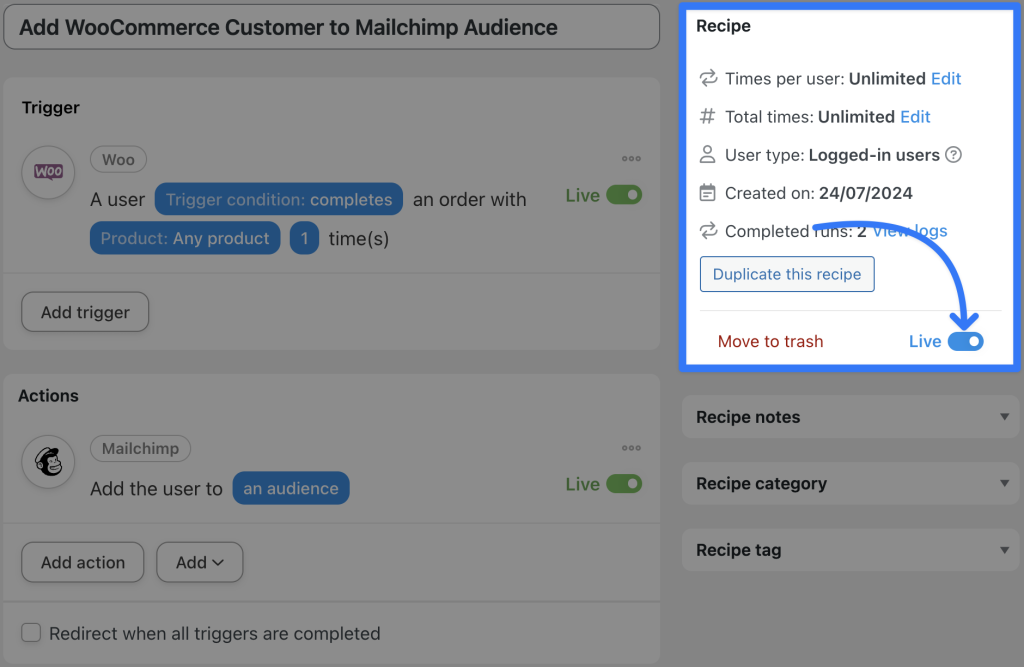
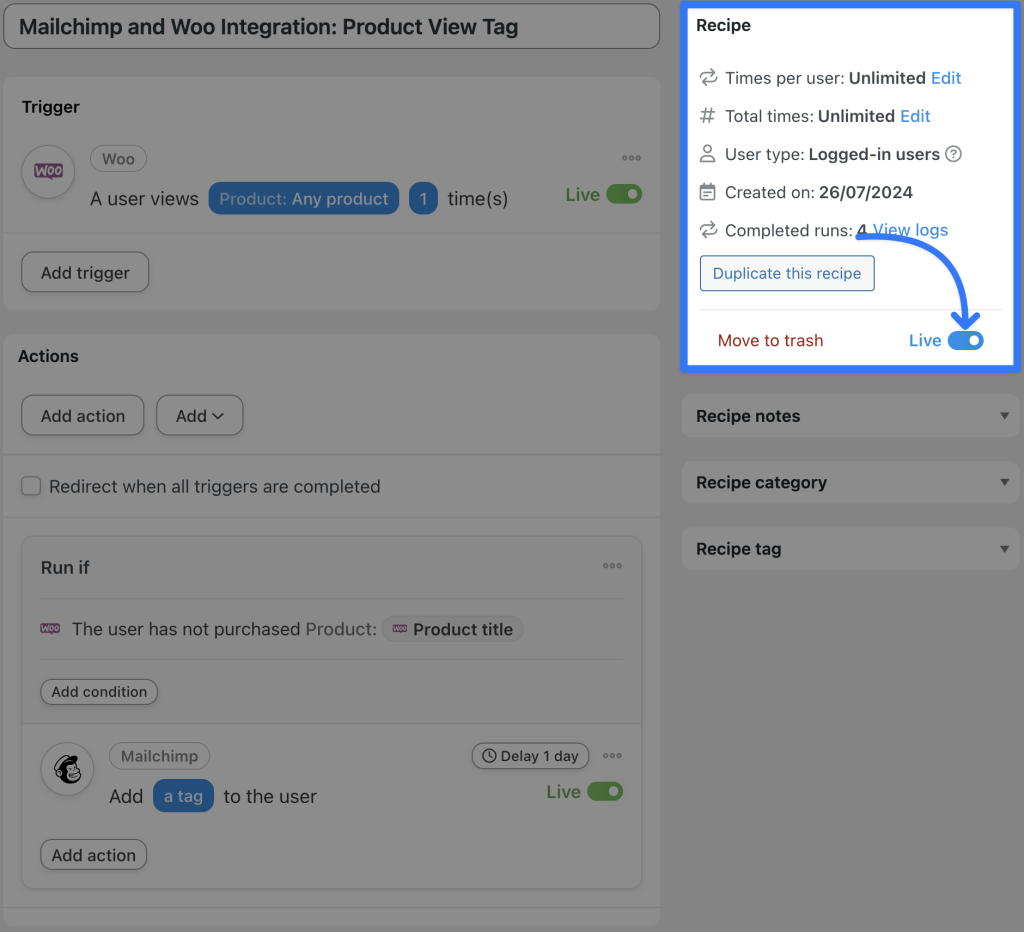
You’re just about to complete your first Mailchimp to WooCommerce integration. All that’s left for you to do is toggle the recipe from Draft to Live.
That’s it! You’ve just connected Mailchimp to your WooCommerce store.
Ready to make some Mailchimp and Woo integrations of your own? Grab your Automator license now and upgrade your email marketing>>>.
But what about tagging your Woo customers in Mailchimp? And how can you track a customer’s lifetime value? Let’s take a look.
Step 6: Tag Woo Customers in Mailchimp Dynamically
Now that we have an action to add (or update) our Woo customers to Mailchimp whenever they make a purchase, let’s take a look at segmenting them.
Using tokens, we can tag our customers dynamically. Here’s how we can do it.
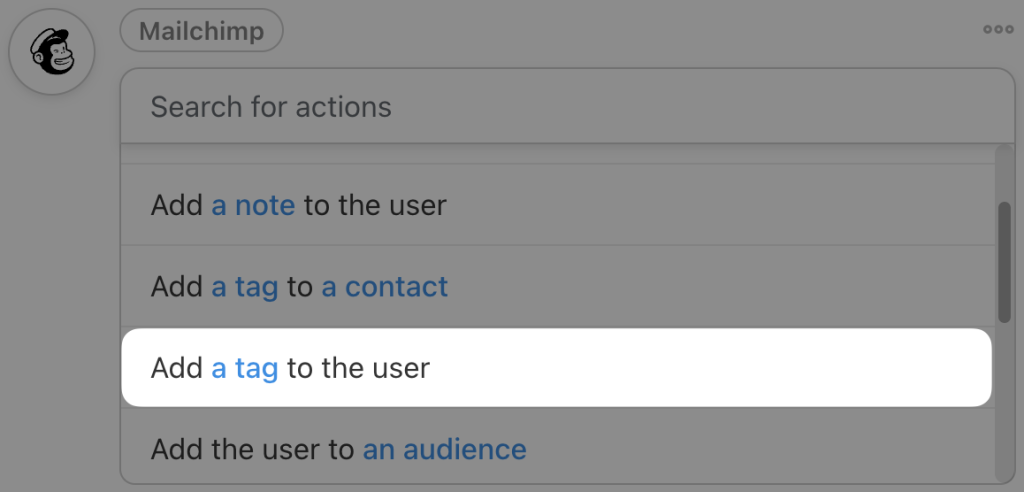
In the Actions panel, click Add action and select Mailchimp. From the dropdown list that appears, select Add a tag to the user.
Automator will ask you to select the Audience and the Tag that you want to add to the user.
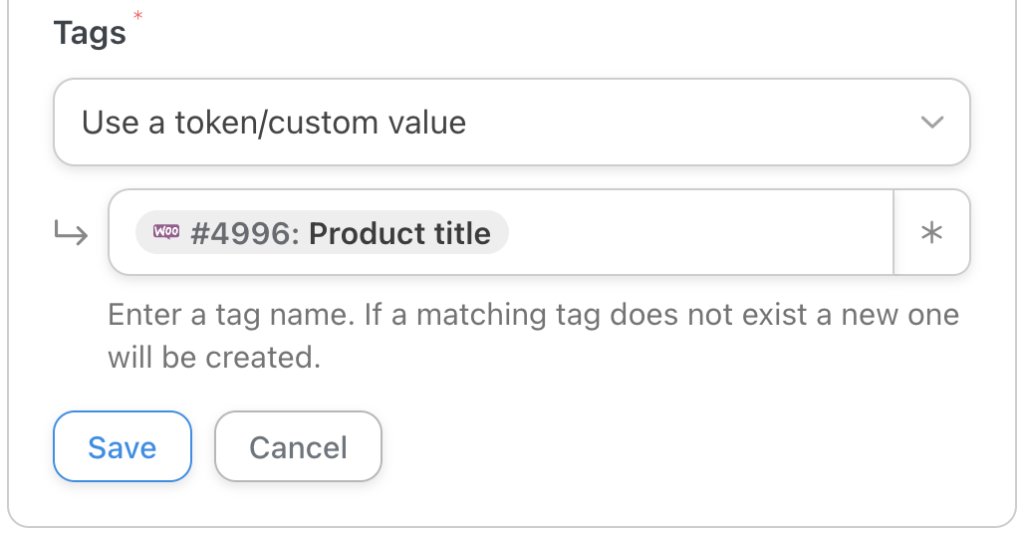
In the Tag field, from the dropdown list, select Use a token/custom value. Next, select the token “Product title” or whichever token represents the information you want to use to segment your contacts.
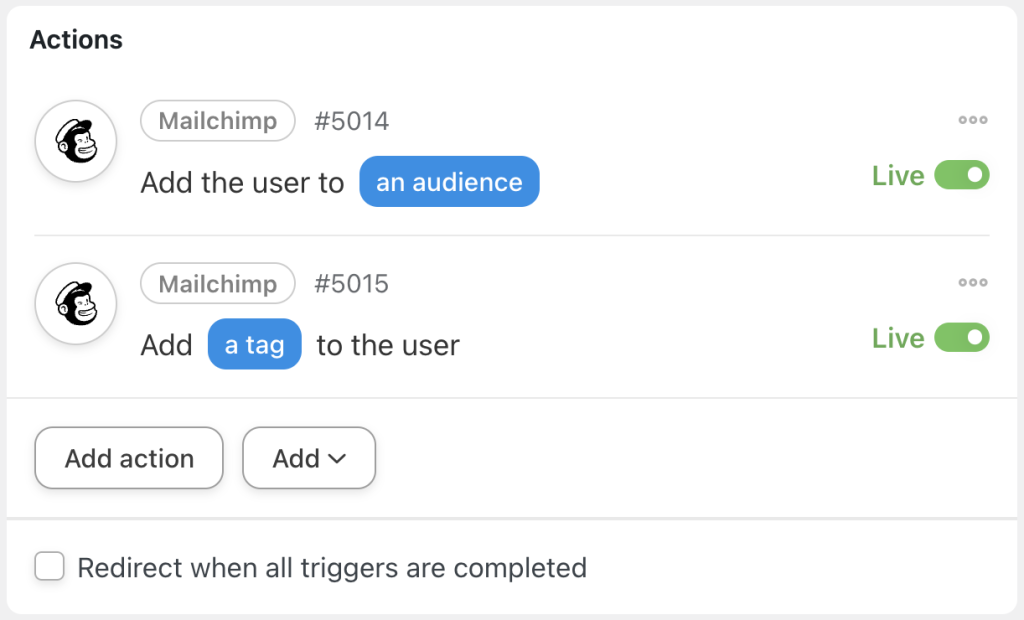
Once you’re finished, click Save. Your new Actions panel should look like this:
Want more segmentation? Add as many actions as you’d like, using tokens to tag your Woo customers with everything from locations to coupons and much more.
Want to create powerful integrations like this all on your own? Grab your Automator Pro license now and connect Mailchimp to WooCommerce with ease and confidence>>>.
More Ways to Tag Woo Customers
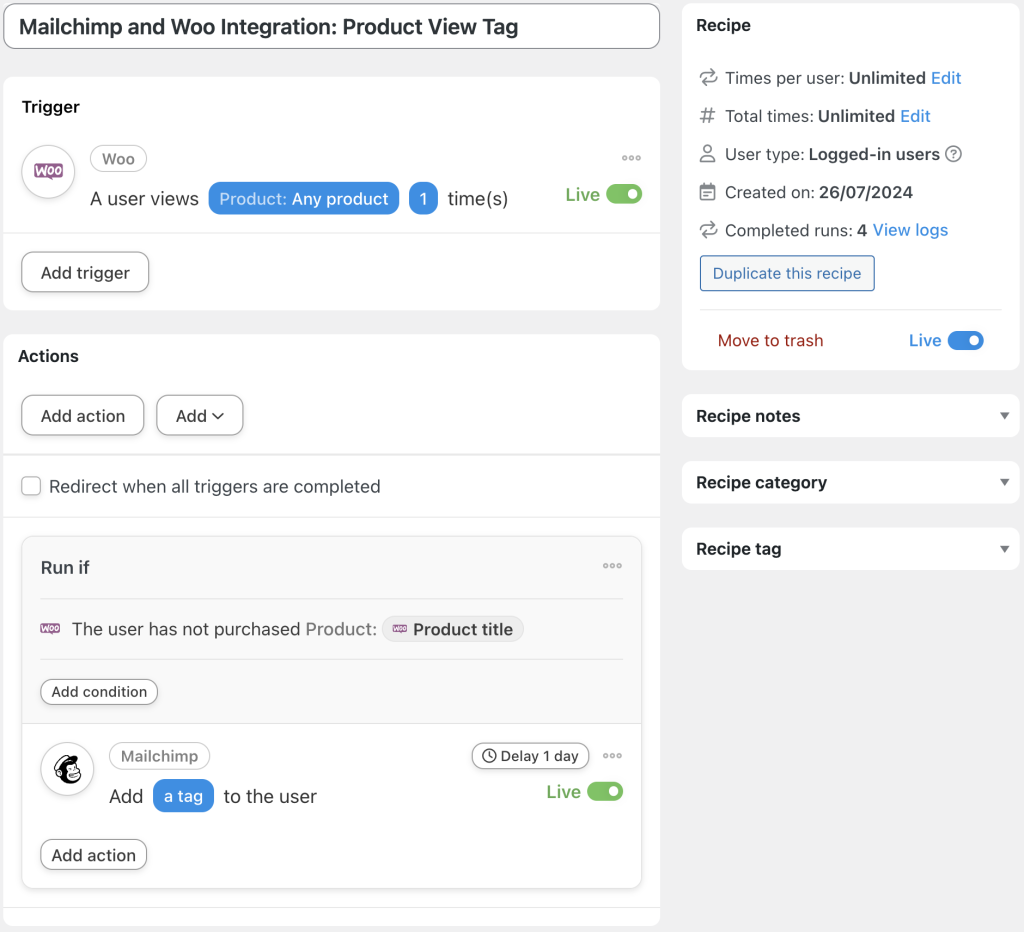
With so many triggers and actions, Automator offers countless ways for you to tag and segment your Woo customers in Mailchimp. Take the recipe below, for example.
We’re able to tag Woo customers in Mailchimp based on their product views. And, using some of Automator’s most powerful features (filters and delays) we can enhance the integration. Let’s take a look at recreating this recipe.
Step 1: Create and Name a New Recipe
From your WordPress Admin Dashboard, navigate to Automator > Add new recipe. In the popup window that appears, select Logged-in users.
Give your recipe a name that makes it easy to recognize at a glance. For example, we’ve named this recipe “Mailchimp and Woo Integration: Product View Tag”.
Step 2: Configure Your Trigger(s)
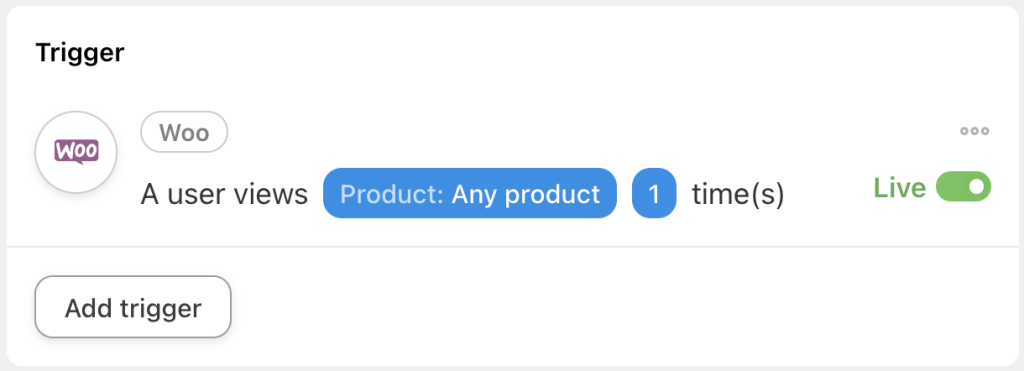
In the Trigger panel, from the menu of available integrations, select Woo. From the dropdown list that appears, select A user views a product. Automator will prompt you to select a product; you can select Any product for dynamic tagging.
Once you’re finished, click Save. Your completed trigger should look like this:
Step 3: Configure Your Action(s)
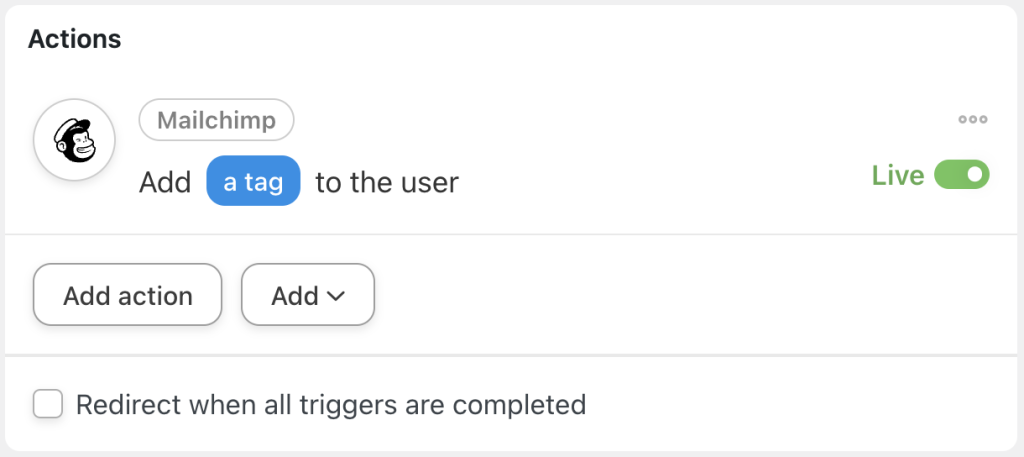
In the Actions panel, click Add action and select Mailchimp. From the dropdown list that appears, select Add a tag to the user. Just as in the previous recipe that we created, select the “Product title” token or “Product ID” token.
Once you’re finished, click Save. Your completed action should look like this:
Step 4: Configure Your Action Filter(s) and Delay
As our recipe stands, we will tag our Woo customers in Mailchimp with every product they view. However, that’s not exactly an efficient way to segment our contacts.
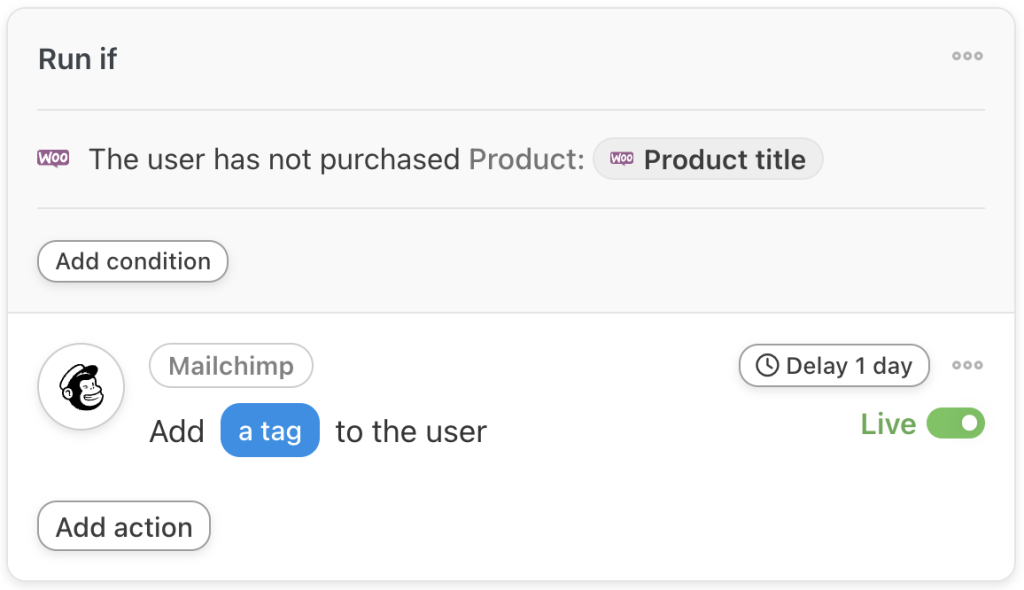
Using filters and delays, however, we can optimize this marketing automation to only tag customers who have viewed a product but haven’t yet purchased it.
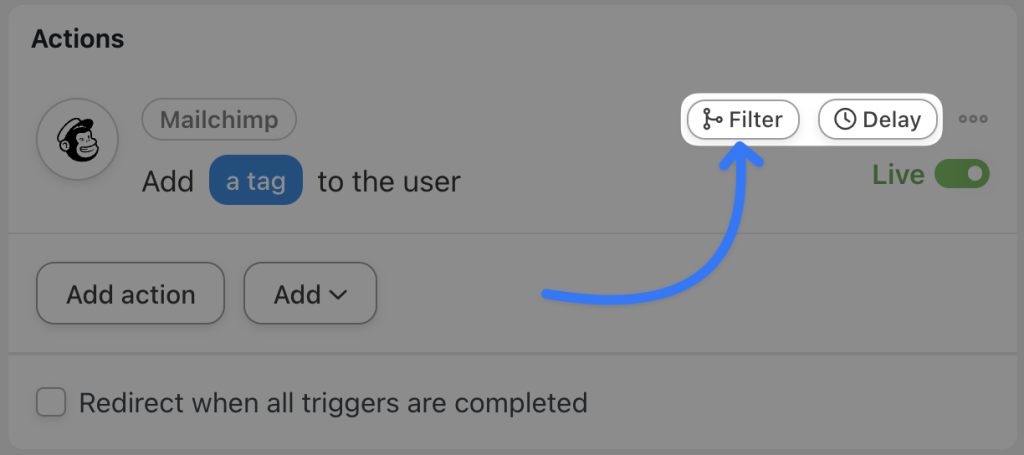
To add a filter, simply hover over the action and click Filter.
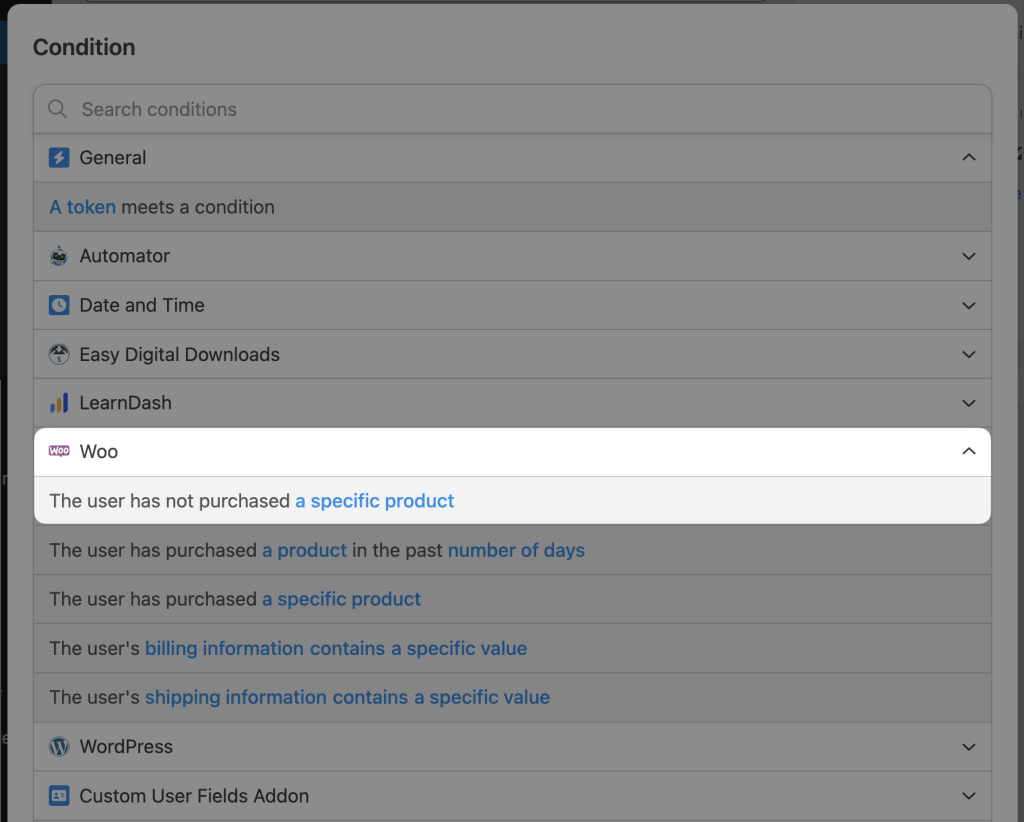
In the Condition modal that appears, select Woo > The user has not purchased a specific product.
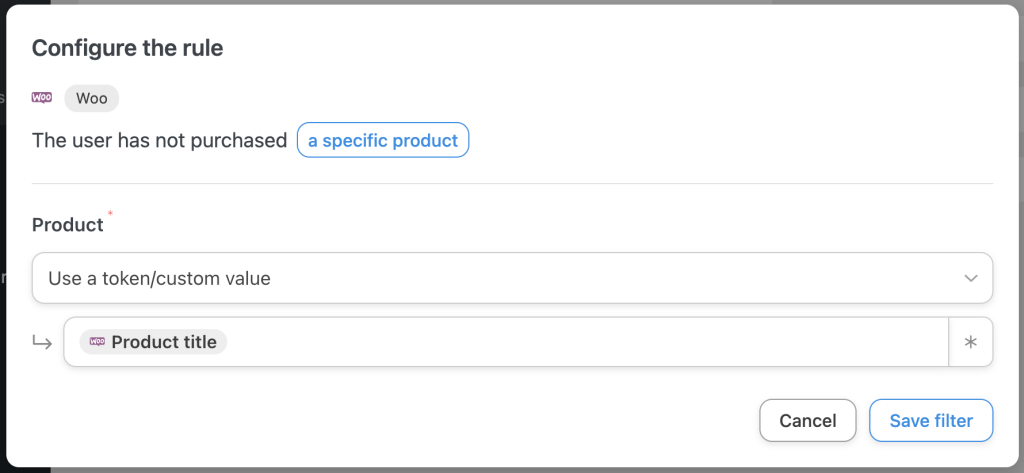
Next, Automator will prompt you to configure the rule. In this second modal, from the dropdown list in the Product field, select Use a token/custom value and select the “Product title” or “Product ID” token—whichever suits your workflows.
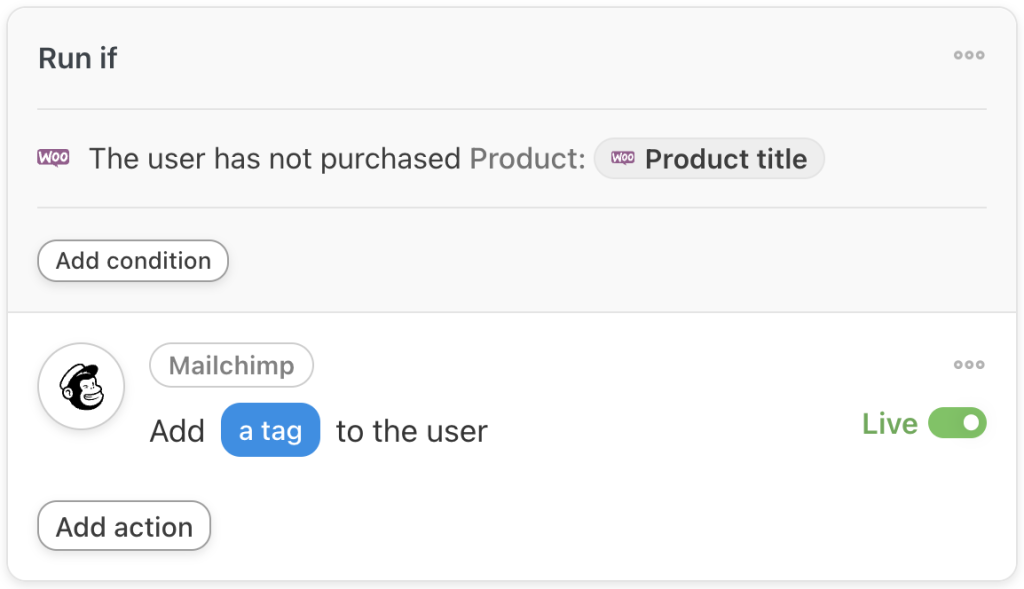
When you’re finished, click Save filter. Your action should now look like this:
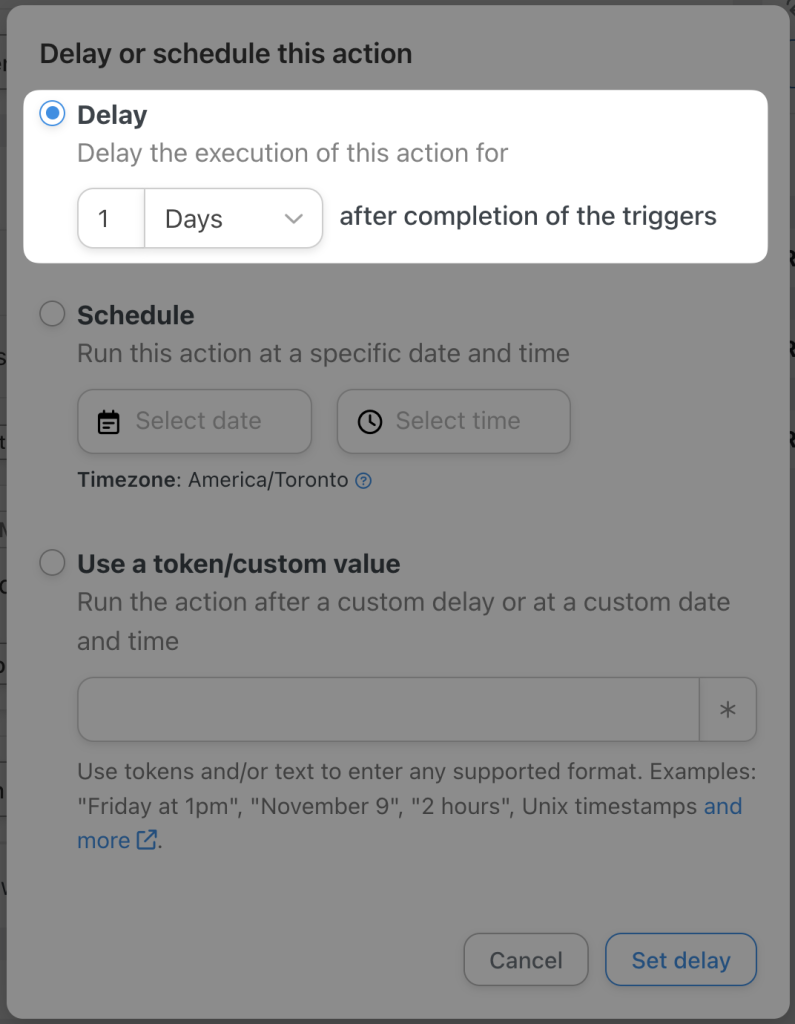
Of course, our user might already be in the process of purchasing the product they’ve just viewed, so we wouldn’t want to tag them for viewing it right away. For this, we can add a delay.
Again, hover over the action and click Delay. In the modal that appears, set an appropriate time delay for your checkout process. For example, we have set our delay to “1 day(s)”.
Once you’re finished, click Set delay. Your action should now look something like this:
Step 5: Tag ‘em!
You’re just about ready to add some powerful dynamic tagging to your marketing automation workflows. All that you need to do now is toggle the recipe from Draft to Live.
Track Lifetime Value, Last Purchase Date and… Basically Anything You Want
We previously mentioned Automator’s Custom User Fields Addon and how it can help you improve your segmentation and build customer profiles.
In this section, we’ll briefly take a look at how the CUF Addon can track customer metrics such as lifetime value, last purchase date and, well, basically anything you want.
Track Lifetime Value Using Calculations
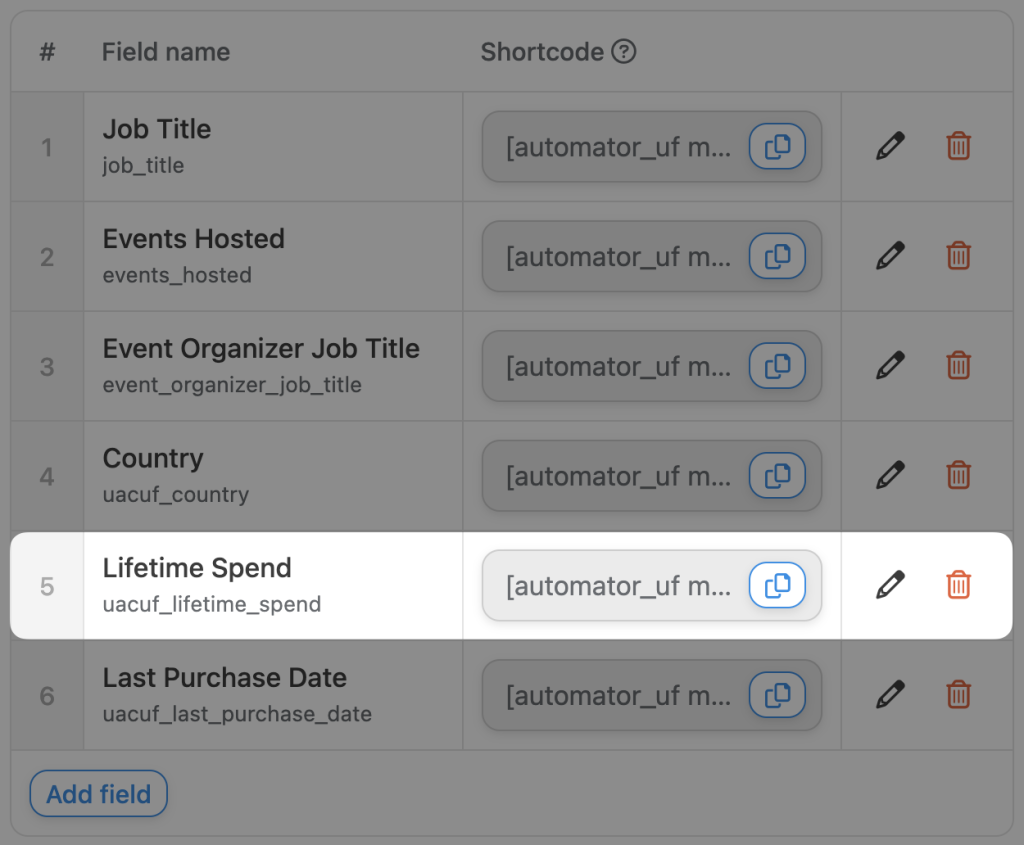
Once you’ve installed and activated the CUF Addon, create a user field for tracking a customer’s lifetime value.
Similarly, create a new audience field in Mailchimp. This new field will appear in Automator when you click Load fields in a Mailchimp action in the recipe editor.
Now, let’s take a look at tracking a customer’s lifetime value.
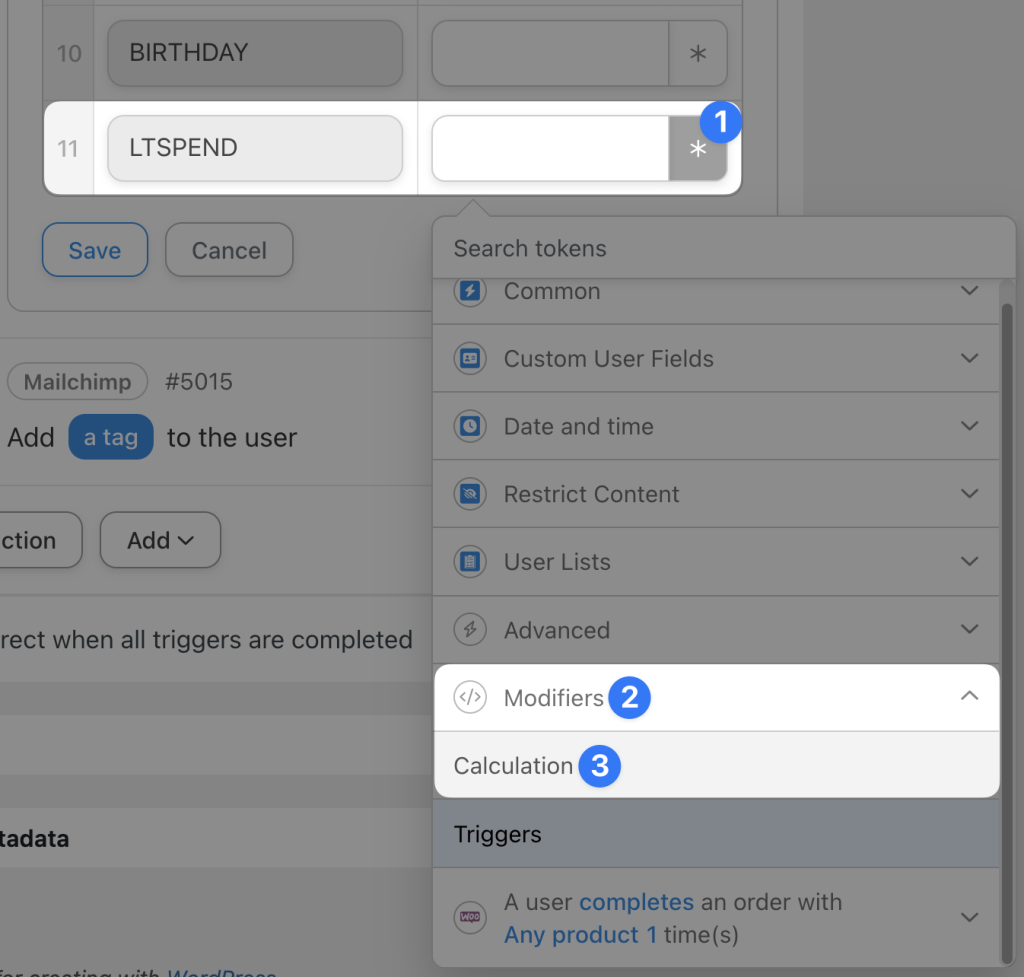
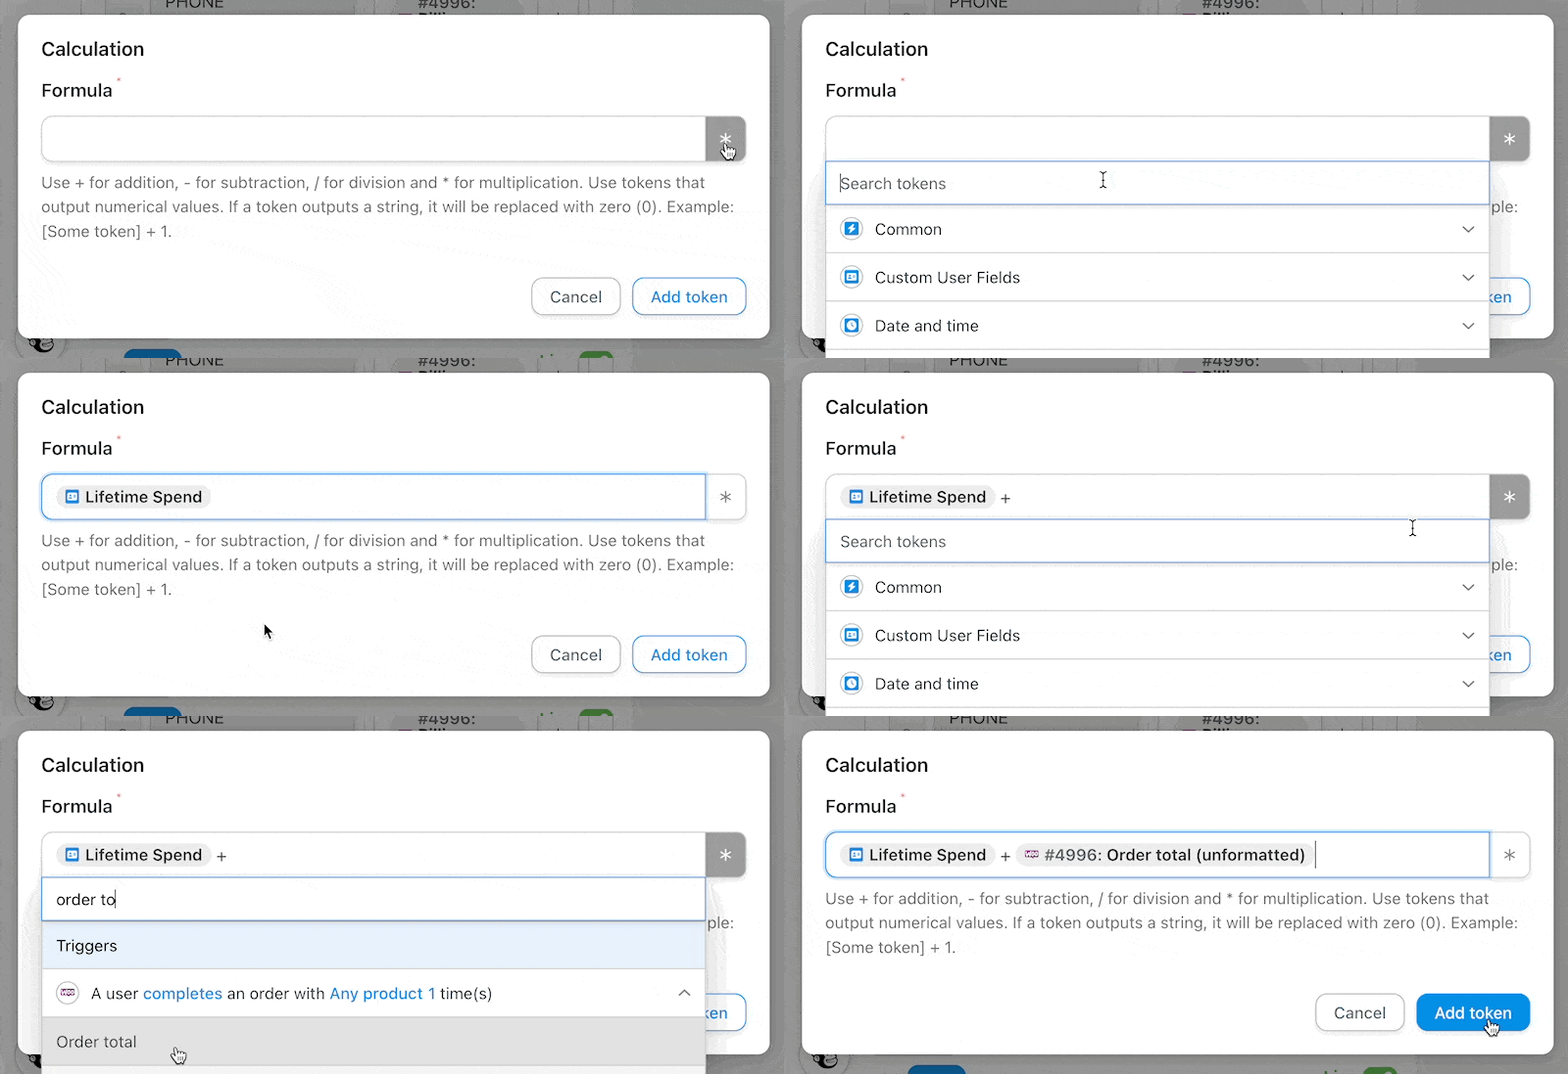
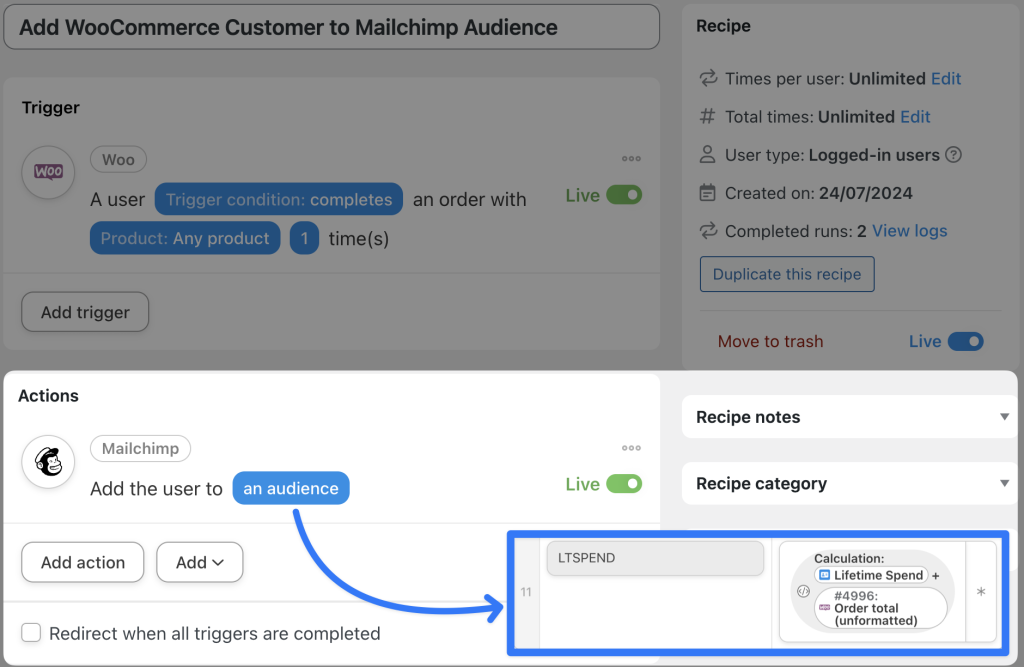
Returning to Step 4 of the first recipe that we created together, we now have a field labeled “LTSpend”. We can populate this field using a special kind of token called a Calculation that will add a customer’s order total to the CUF field that we created.
In the Calculation modal that appears, select the token “Lifetime Spend” from the CUF Addon. Next, add the WooCommerce token “Order total (unformatted)” to the custom field.
(Note: You must select the “unformatted” token to perform the calculation, as this token only contains numbers while the “Order total” token also contains symbols.)
Once you’re finished, click Add token. Now, whenever one of our Woo customers makes a purchase, we can update our custom field in Mailchimp as well.
Frequently Asked Questions
Conclusion
In this blog post, we looked at what makes Uncanny Automator the best tool for connecting Mailchimp to WooCommerce.
We walked you through setting up your first Mailchimp and WooCommerce integration then showed you some of Automator’s more powerful features for upgrading your marketing automation.
By now, we’re pretty confident that you’re ready to tackle making some delicious conversion-boosting recipes of your own. And don’t forget; Automator integrates with tons of other apps and plugins such as OpenAI, Google Sheets, Airtable and Notion—to name just a few.
Ready to harness the power of the #1 automation and integration tool? Grab your Automator Pro license if you haven’t already or upgrade to a Plus or Elite license to capitalize on must-have addons>>>.
Until next time, happy automating!







This Post Has 0 Comments