Revive old WordPress posts with AI and Uncanny Automator. Learn how to reverse content decay…
Change WordPress Date and Time Formats then Customize It All with Automator
Become a master in WordPress date and time formats after reading this comprehensive guide. Then learn how to create custom formats for all of your apps and plugins for seamless integrations.
Have you been trying to figure out how to change your WordPress date and time format? Maybe you want “dd/mm/yyyy” instead of “m/d/y”. Or, perhaps you want a 24-hour clock instead of the default 12-hour clock.
You might even be trying to figure out how to change the date and time format of your ecommerce platform to match that of your CRM. How do you convert WooCommerce order dates and times to a format that ActiveCampaign can read? Or what about converting Easy Digital Downloads order dates and times into a format that fits your HubSpot or ConvertKit settings.
Whatever the reason, if you have a query related to date and time formats in WordPress, then look no further. You’ve landed on the right page.
In this post, we’ll show you how to change the date and time formats on your WordPress website. Then we’ll introduce you to the ultimate WordPress plugin, Uncanny Automator, with the ability to fully customize and convert your date and time formats.
From converting standard dates into Unix timestamps or even creating timezone offsets, this is the ultimate guide to WordPress dates and times—the uncanny way.
Introduction to WordPress Date and Time Formatting
WordPress is a powerful content management system that offers a range of features to help you create and manage your website. One often overlooked but essential aspect of site management, however, is the date and time format.
Take, for example, a news website like the New York Times with the current date at the top of the homepage.
And compare that to a company’s blog page.
Where and how the date and time appears on your website impacts the user experience, your brand identity and your content organization. So, whether you’re running a blog, an e-commerce store or a corporate website, don’t overlook the importance of the simple date and time feature.
By default, WordPress provides several predefined date and time formats that you can select from in the general settings. These formats are often sufficient for basic needs, but they come with limitations. For instance, if you need a custom format to match your branding or work with your external apps, WordPress’ native options may fall short.
This is where a more customized approach becomes valuable.
In this post, we’ll guide you through the basics of changing your WordPress date and time settings. Then we’ll introduce you to Uncanny Automator, so you can customize your date and time formats however you’d like.
Let’s get started.
How to Change Date and Time Format in WordPress (Basic Guide)
Changing the date and time format in WordPress is simple. Whether you want to display dates in a more readable format or use a specific time structure, this step-by-step guide will walk you through the process.
Step 1: Access General Settings
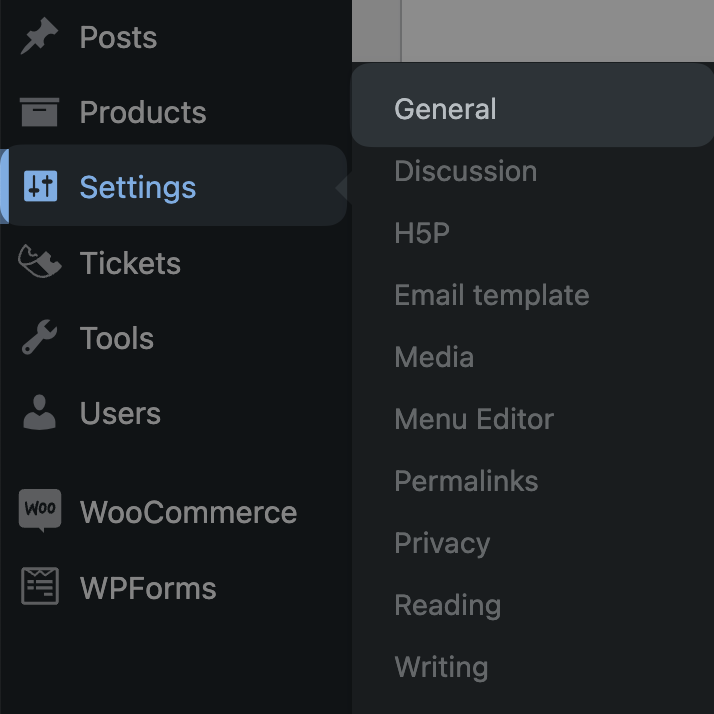
From your WordPress Admin Dashboard, navigate to Settings>General. This is where you can manage the basic configuration of your site, including date and time settings.
Step 2: Locate Date and Time Format Options
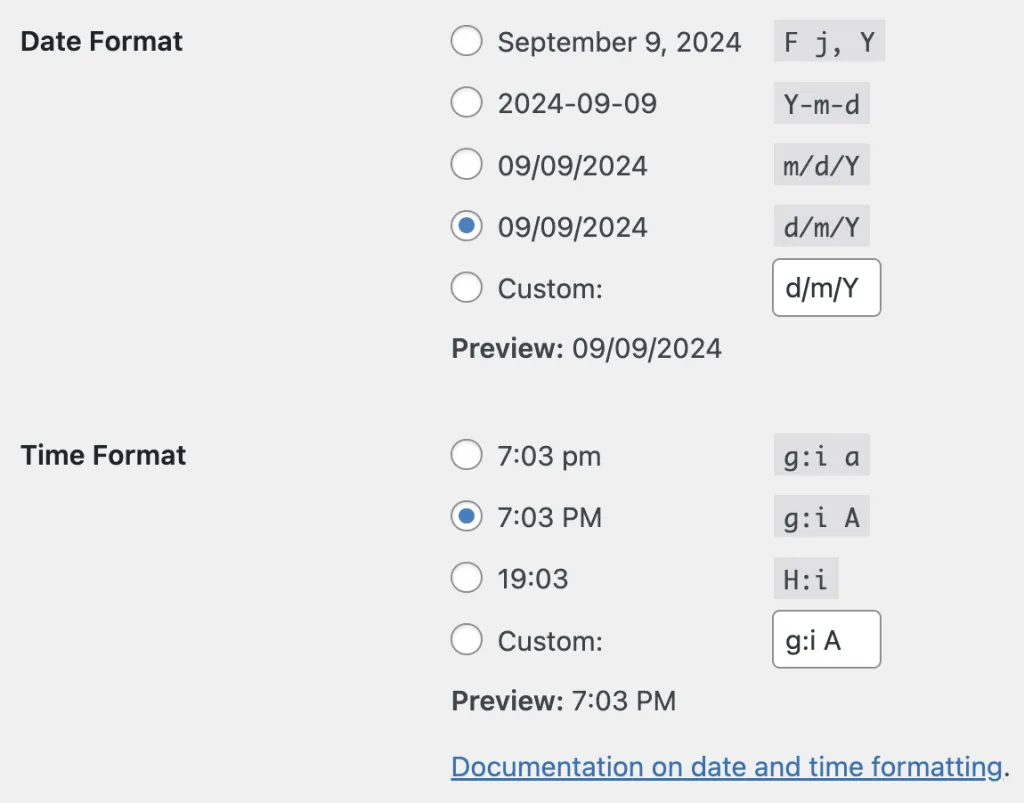
Scroll down to find the sections labeled Date Format and Time Format. WordPress provides several default options for both, but you can also customize your format.
Step 3: Select a Predefined Format or Customize
In the Date Format section, choose from one of the predefined options such as “F j, Y” (which would display the date as “August 29, 2024”) or “Y-m-d” (displayed as “2024-08-29”).
If none of the predefined options suits your needs, you can create your own custom format by selecting the Custom option and entering your preferred date structure.
Similarly, in the Time Format section, you can select predefined formats like “g:i a” (which shows time as “12:45 pm”) or use a custom format to define the way hours and minutes are displayed.
To customize your date and time formats, use these formatting codes:
- d: day of the month (01 to 31)
- m: numeric month (01 to 12)
- Y: four-digit year (for example., 2024)
- g: 12-hour time format (1 to 12)
- i: minutes with leading zeros (00 to 59)
- a: Lowercase ante meridiem and post meridiem (am/pm)
For a full list of format codes, refer to this document from WordPress.
Step 4: Save Changes
After selecting or entering your desired date and time formats, click Save Changes. Your WordPress site will now display the updated format.
And that’s it! You’ve successfully updated your WordPress date and time format.
If you’re looking for more advanced customization options, keep reading to learn how Uncanny Automator can provide even more flexibility.
Common Issues with WordPress Date and Time Formatting
While WordPress offers basic date and time formatting options, many users encounter issues when managing compatibility across plugins and apps.
For example, WooCommerce, the most popular e-commerce platform for WordPress, will adopt your WordPress website’s date and time settings. However, Mailchimp, the CRM of choice for countless WordPress businesses, will only accept date formats in a few, standard formats; “MM/DD/YYYY” and “DD/MM/YYYY”.
These inconsistencies can adversely impact the user experience, disrupt data synchronization and make managing your business and content more complex.
Fortunately, there is a solution to this common problem. In the next few sections, we’ll explore using the Uncanny Automator plugin to customize date and time formats.
Uncanny Automator: Convert WordPress Dates and Times
Uncanny Automator has already made a name for itself as the #1 automation and integration tool for WordPress websites.
But, pro WordPress users and developers alike know that Automator is capable of so much more. Namely, customizing date and time formats and converting them across your apps and plugins.
With simple combinations of triggers and actions, you can create fully automated workflows that don’t just save you time—they help you conquer it!
Automator’s Formatter integration is at the heart of its date and time management features. Here’s what you can do with this powerful tool:
- Convert Dates: Automatically convert date formats for compatibility and synchronization across your favorite apps and plugins. For example, you can automatically change the date format from WPForms submissions before sending that data to Google Sheets.
- Convert Times: Automatically convert time formats for readability and specificity. For example, you can change the simple 12-hour time timestamp from your WordPress website to a more detailed 24-hour timestamp complete with seconds.
- Create Timezone Offsets: Represent WordPress dates and times as offsets to the standard Greenwich Mean Time (GMT) in various formats. A feature like this gives WordPress business owners greater insights into their markets across various timezones.
- Use Unix Timestamps: Automatically convert dates and times into Unix time and vice versa. This feature gives WordPress users automated access to a universal date and time language. Additionally, you can perform arithmetic operations on dates in Unix time.
- Detect Daylight Savings: Return a binary value of “1” or “0” to determine whether a time falls within daylight savings.
- Numeric and Language Dates: Convert dates and times into numeric or language based outputs. For example, represent “05/09/2024” as “Wednesday/September/2024” and vice versa.
Want to try out these awesome features for yourself? Get your Automator Pro license now so you can follow along>>>.
In the next section, we’ll walk you through getting started with Automator and show you some use cases that are guaranteed to help you master time.
Use Cases: Custom Date and Time Formats with Automator
Now that you have your Automator Pro license, let’s take a look at customizing WordPress date and time formats. We’ll walk you through the steps of setting up your first recipe to convert dates and times then give you some great use cases to recreate yourself.
Let’s get started.
1. Convert WooCommerce Order Date to Unix Timestamp
WordPress businesses and developers often prefer to work with Unix time to reduce errors, store dates and perform simple time-based calculations.
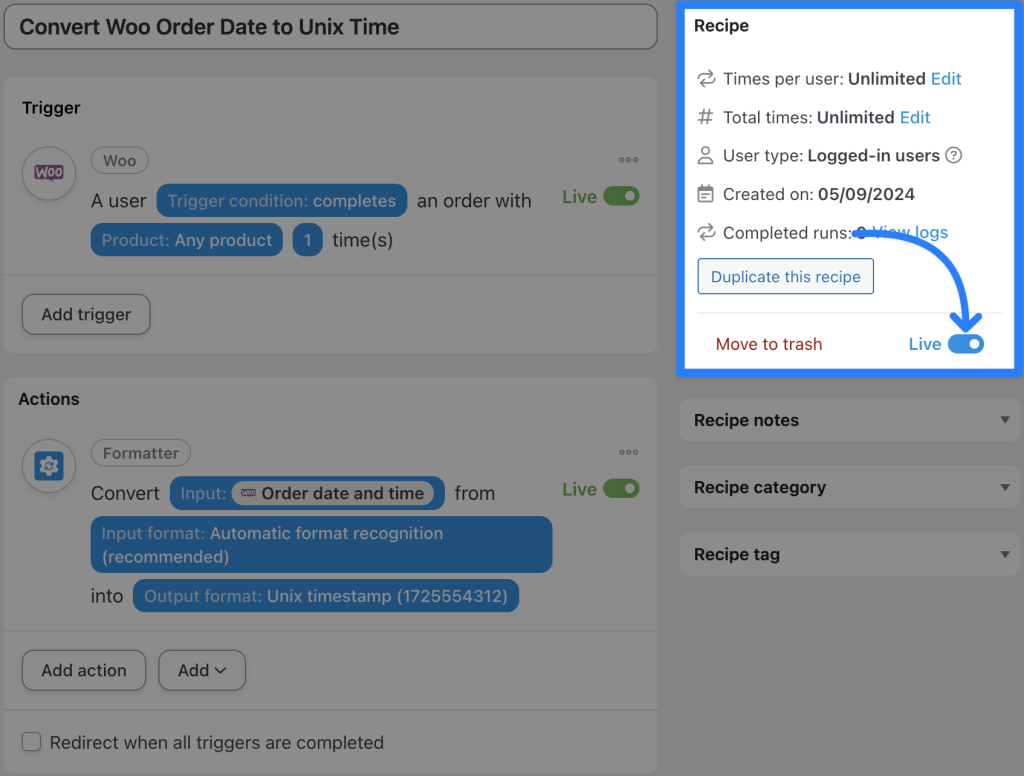
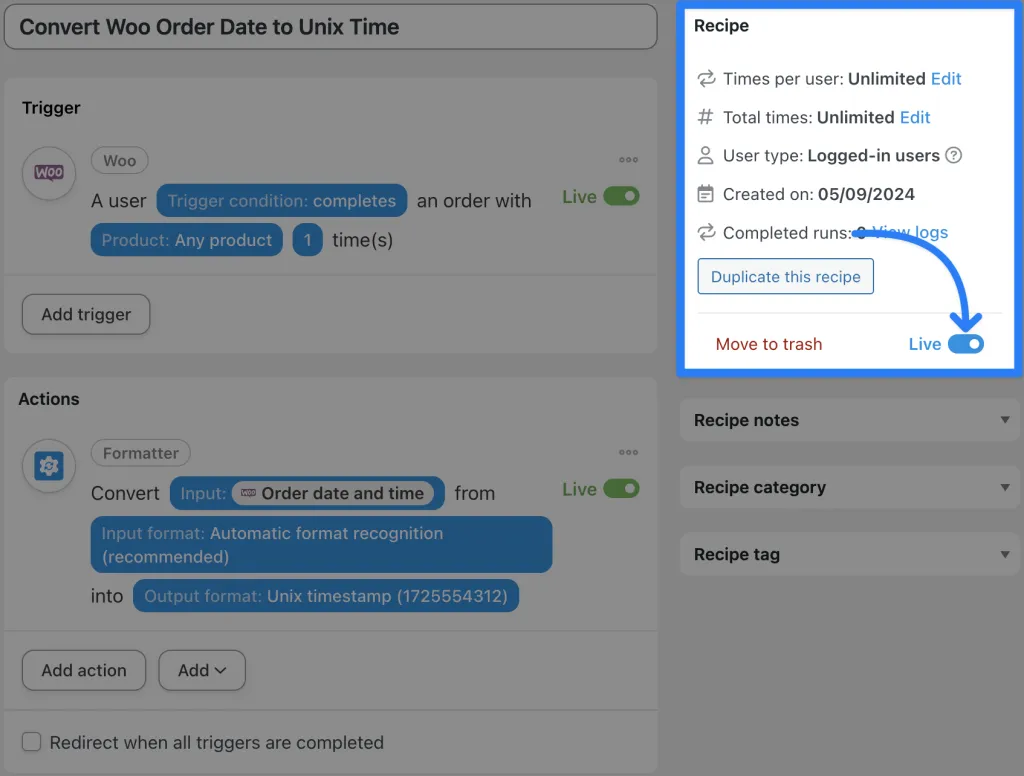
In the Automator recipe pictured above, for example, we’re able to automatically convert our WooCommerce order date and time into a Unix timestamp. We can then perform any number of secondary actions such as storing that information in Google Sheets or passing it along in a webhook.
Here’s how we did it.
Step 1: Create a New Recipe
From your WordPress Admin Dashboard, navigate to Automator > Add new recipe. In the popup window that appears, select Logged-in users.
Step 2: Name Your Recipe
Give your recipe a name that makes it easy to recognize at a glance. For example, we have named this recipe “Convert Woo Order Date to Unix Time”.
Step 3: Configure Your Trigger(s)
In the Trigger panel, from the menu of available integrations, select Woo.
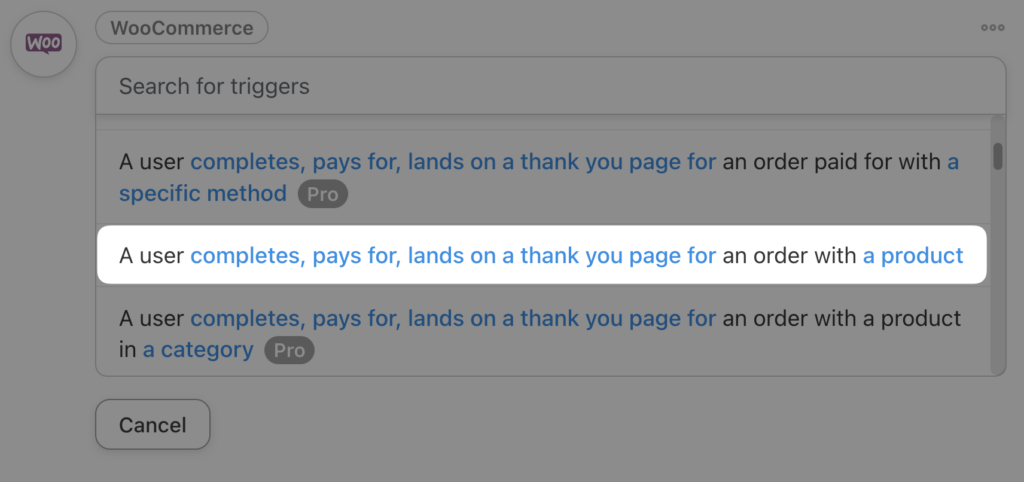
From the dropdown list that appears, select A user completes, pays for, lands on a thank you page for an order with a product.
Automator will prompt you to select the Trigger condition and Product. Once you’re finished, click Save. Your completed trigger should look something like this:
(Note: Automator has dozens of Woo specific triggers, including triggers pertaining to order status. If you want to use Unix time to track your fulfillment, delivery or payment schedules, you can select a different Trigger condition.)
Step 4: Configure Your Action(s)
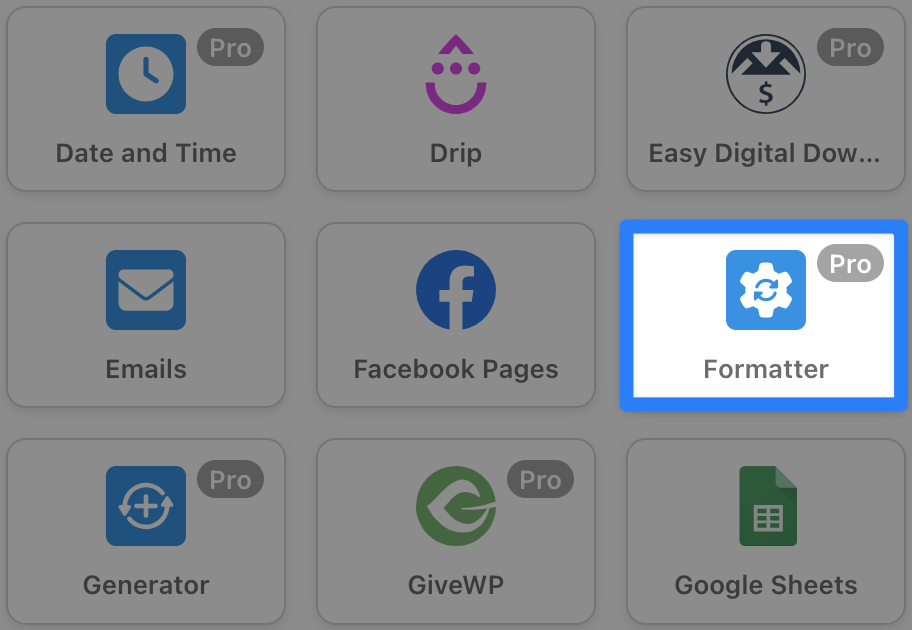
In the Actions panel, click Add action and select Formatter.
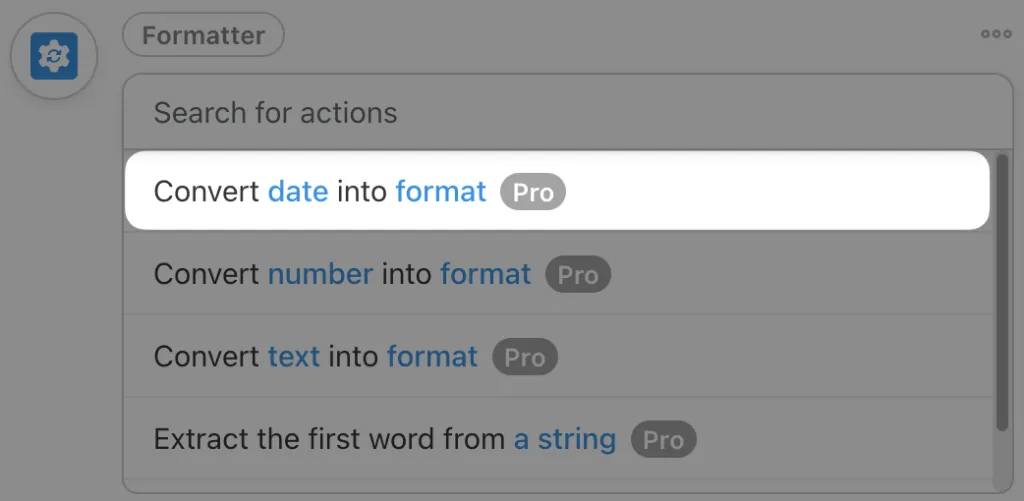
From the dropdown list that appears, select Convert date into format.
Automator will present you with three fields: Input, Input format and Output.
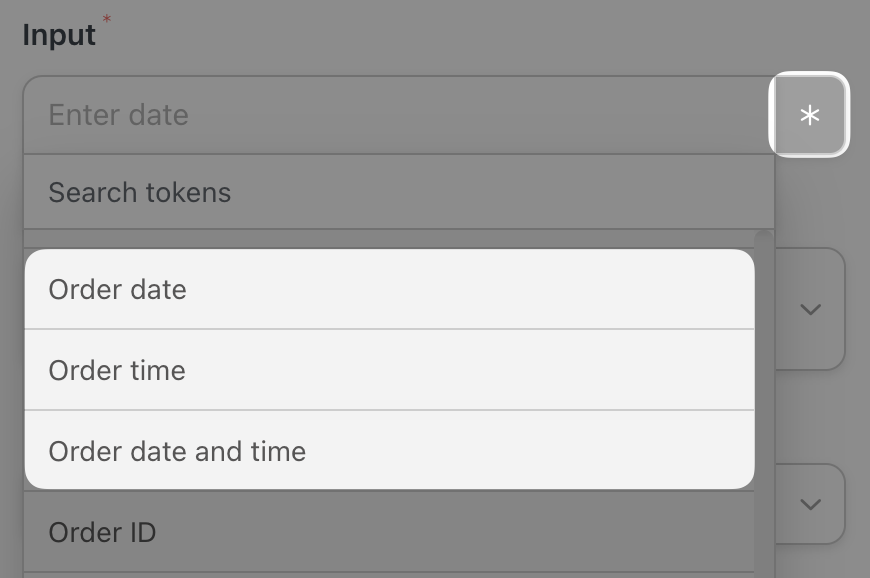
For the Input field, we’re going to use another great Automator feature called tokens (i.e., dynamic data pulled from your WordPress website and from within recipes).
To use a token, click the Asterisk. From the dropdown list, select one of the Woo date and time order tokens.
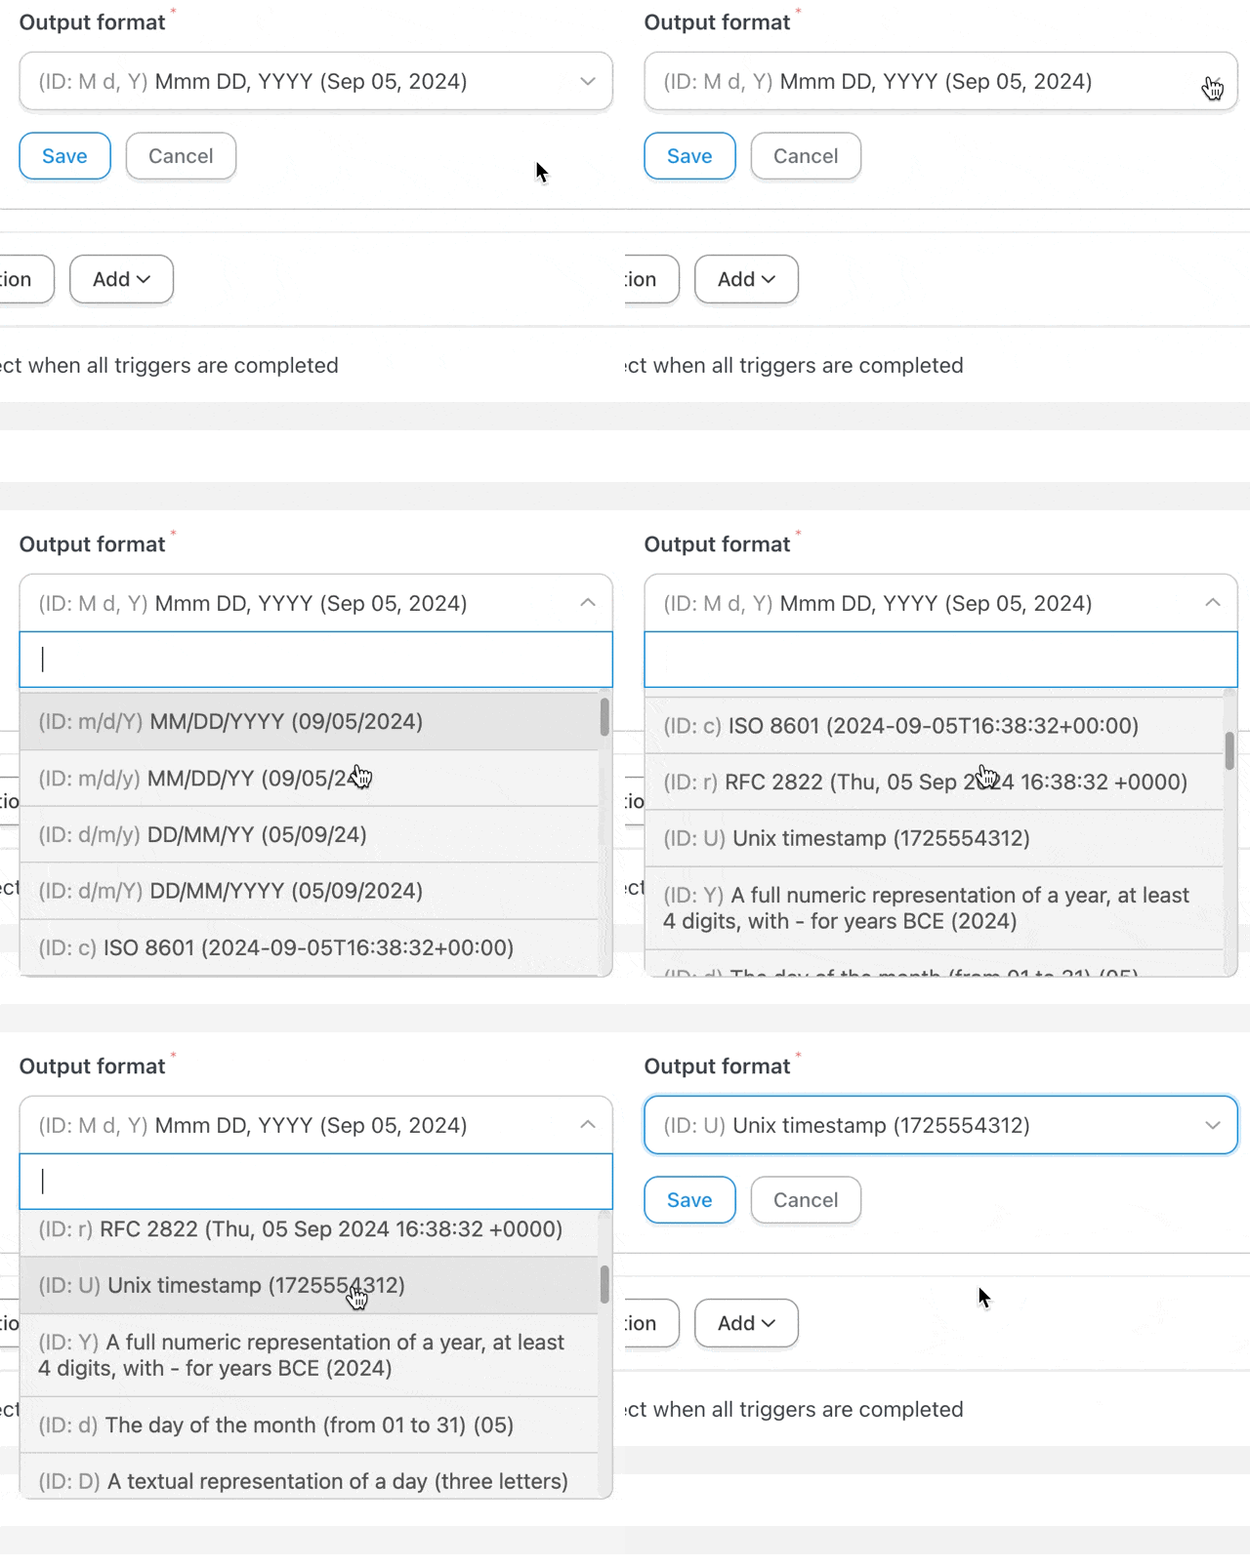
For the Input format, it is best to leave the recommended/default option. For the Output field, select from any number of formats. For this recipe, we have selected “Unix timestamp”.
Once you’re finished, click Save. Your completed action should look something like this:
Step 5: Configure a Second Action
Now that your primary action is all set up, you can add a secondary action that uses the newly converted Unix timestamp.
Regardless of the secondary action that you choose, to use the newly converted Unix timestamp, select the “Output” token from the Formatter action.
Once you’ve configured your second action, click Save.
Step 5: Go Live!
You’re just about ready to master WordPress date and time formats. All that’s left for you to do is toggle the recipe from Draft to Live.
That’s it! This Automator recipe will change our Woo order dates into Unix timestamps. We can then add as many actions as we want after that to use the new format.
Create more recipes like this one with an Automator Pro license>>>.
2. Reformat Dates for an Events/Bookings Plugin
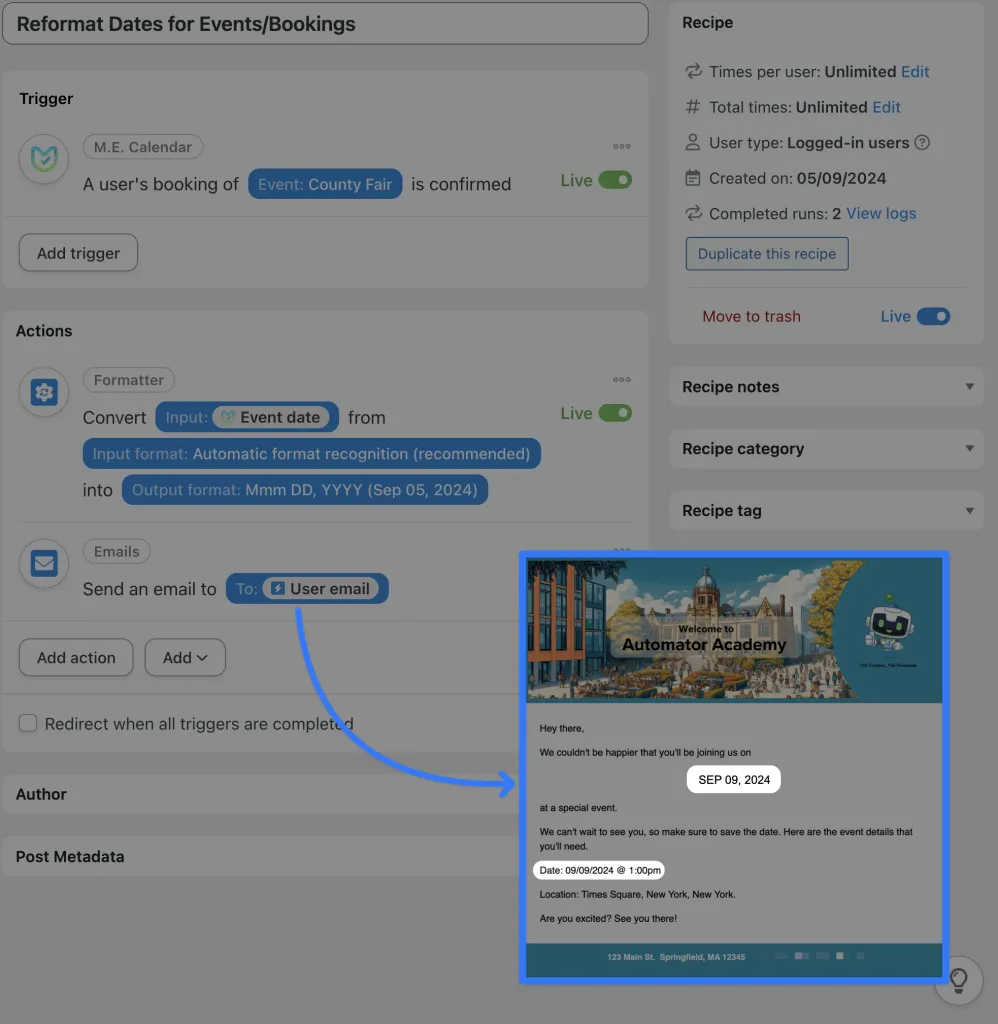
If you’re using an event and/or booking plugin like Modern Events Calendar or Amelia, Automator gives you the ability to reformat dates as you go.
For example, once a customer makes a booking, you can reformat the date in an email for clarity. This way, your event attendees can see the date listed in several locations in the email. Certain email readers will even detect the date in different formats, allowing them to save the event in their calendar with a click.
3. Syncing Dates Between Sites and External Apps
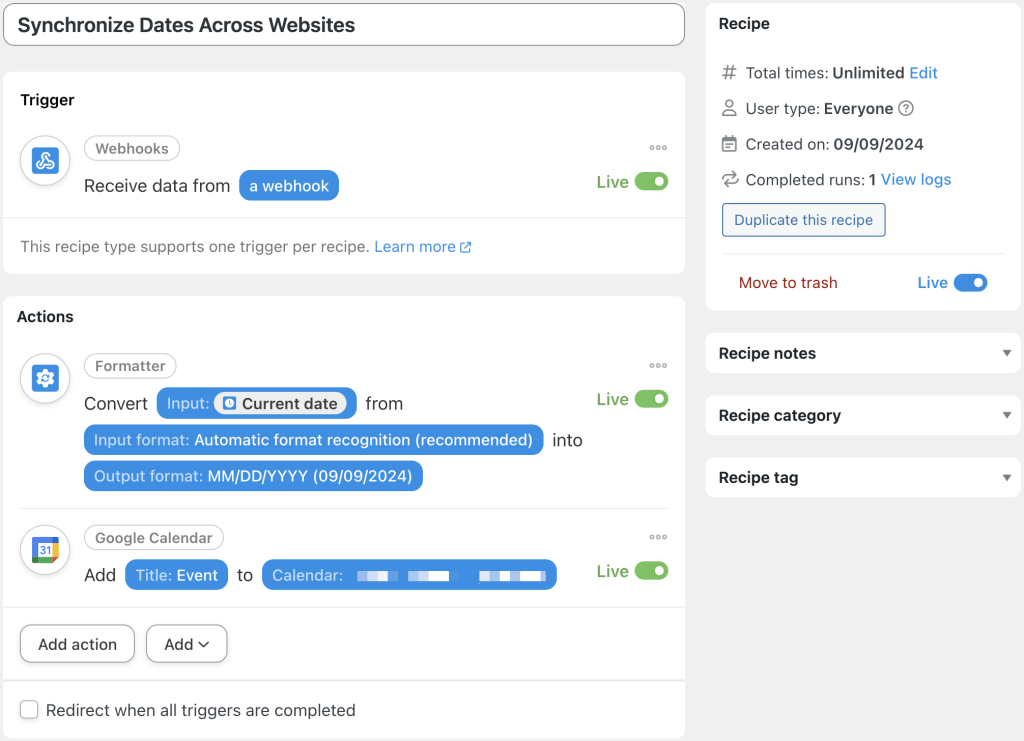
If you’re trying to sync dates across multiple websites or external apps, date formats might not always be in sync. Using Automator’s Formatter, however, you can easily synchronize date formats across sites and apps without having to change those external settings.
In the recipe pictured above, for example, we’re able to receive date information using a webhook then convert that into our native WordPress format. We can then use the “Output” token to make events in Google Calendar, update user and/or post meta, and much more.
4. Perform Calculations in Unix Time
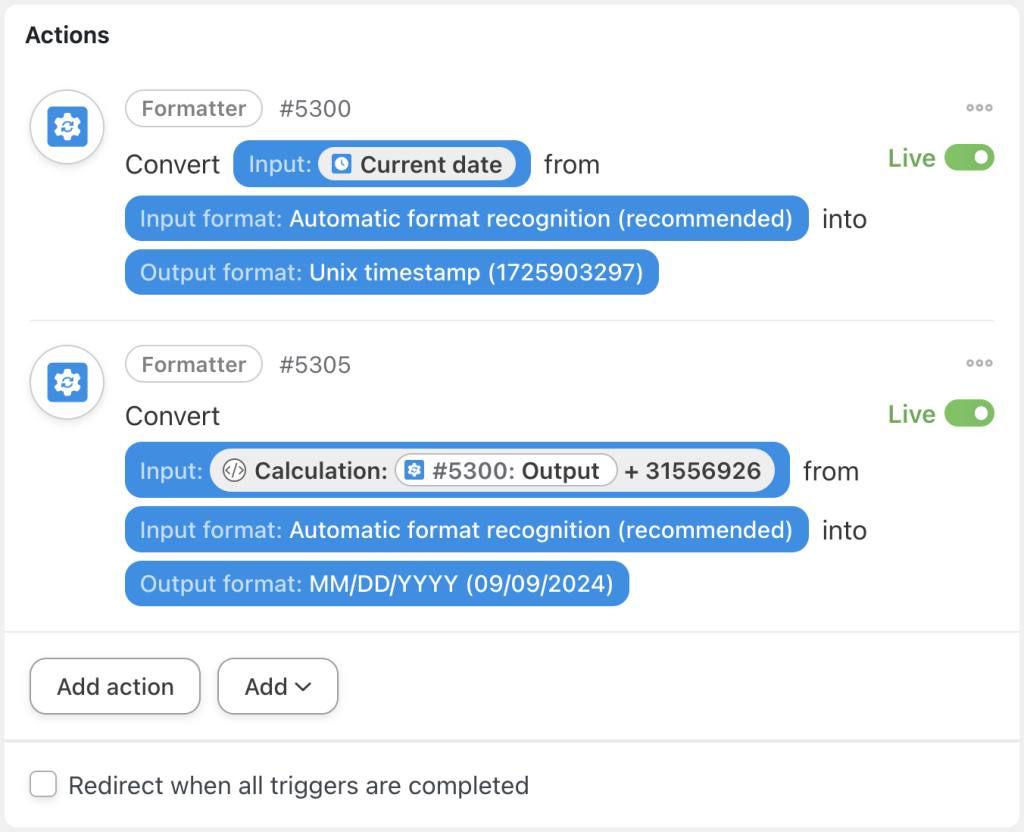
One of the key advantages of Unix time is the ability to perform simple calculations. Instead of using modular numbers, Unix timestamps allow you to add, subtract, multiply and divide seconds, minutes and hours with ease.
Using two actions, as pictured above, we’re able to convert a date into a Unix timestamp, add a specified amount of time and then convert the output back into our WordPress site’s native format.
You can use recipes like this to grant user’s temporary access to content, automate content publication, and manage your dates and times down to the second.
Frequently Asked Questions
Conclusion
In this post, we’ve covered the essential steps for changing and customizing date and time formats in WordPress.
We started with the basics, showing how to adjust formats through WordPress settings, and then explored more advanced solutions using Uncanny Automator. With Automator’s powerful Formatter integration, you can automate and standardize date and time formats across your plugins and apps, ensuring seamless integration and user experience.
Whether you’re managing WooCommerce orders, event bookings, or syncing with external tools like Google Sheets, Automator makes it easy to handle any date and time customization you need.
Ready to master time? Get started with Uncanny Automator Pro today and unlock the full potential of your WordPress workflows!
Until next time, happy automating!










This Post Has 0 Comments