Revive old WordPress posts with AI and Uncanny Automator. Learn how to reverse content decay…
Gravity Forms BuddyBoss Integration: A Comprehensive Guide
Create a seamless Gravity Forms BuddyBoss integration with Uncanny Automator for custom group registration, payment processing and much more.
We probably don’t have to tell you that connecting Gravity Forms to BuddyBoss opens up a whole new set of features for your course and community website.
Whether you want to create custom registration forms or restrict group admission to paying users, a BuddyBoss and Gravity Forms integration is the solution you’re looking for. And, while there are several options for connecting these two powerful tools together, only one solution offers a truly simple and seamless experience: Uncanny Automator.
In this comprehensive guide, we’ll show you how to integrate BuddyBoss and Gravity Forms using Automator. By the end of this walkthrough, you’ll be able to:
- register users for BuddyBoss groups from Gravity Forms submissions,
- unregister users from BuddyBoss groups from Gravity Forms submissions,
- subscribe and unsubscribe users from forums based on Gravity Forms submissions,
- integrate BuddyBoss and Gravity Forms with 214 other integrations,
- and much, much more.
But that’s enough of an introduction for now. Let’s get started.
Automator: The Best BuddyBoss and Gravity Forms Integration
When it comes to connecting Gravity Forms to BuddyBoss, WordPress users have plenty of options. However, there is only one integration solution that is as seamless as it is simple: Uncanny Automator.
Whether you’re trying to create a paywall for your BuddyBoss groups, or customize registration forms for groups and forums, Automator is the tool you’re looking for.
Whatever your reason for creating a Gravity Forms and BuddyBoss integration, these are the features that make Automator the best tool for the job:
- Affordability: Unlike other automation and integration tools, Automator doesn’t charge per automation fees. This means that you can register dozens, hundreds or even thousands of WordPress users from Gravity Forms submissions for the same cost. The more you automate and integrate, the more you save!
- Integrations and Addons: Automator has 214 integrations with more on the way all of the time. This means that you can connect Gravity Forms to BuddyBoss and a whole lot more such as Slack, Notion, OpenAI, LearnDash and WooCommerce, just to name a few of our favorites. In case that wasn’t enough, Automator’s Custom User Fields, Restrict Content and User Lists addons makes creating and managing your WordPress users that much easier and more flexible.
- Ease-of-Use: Automator’s user-friendly click-and-play interface means that you can automate complex workflows in just a few clicks—and even fewer minutes. Simply select the integrations you want in your automated workflow, choose a few triggers and actions and let Automator do the work.
- Seamlessness: Automator integrates fully with your WordPress website and your chosen apps and plugins. Using tokens, you can register new users from Gravity Forms with as much or as little custom meta as you choose.
- Scalability: Need to create thousands of form entries for BuddyBoss group members? Automator’s Post Loops and User Loops features give you the ability to create and manage your BuddyBoss members and Gravity Forms entries with the click of a button.
Ready to create a BuddyBoss and Gravity Forms integration? Get your Automator Pro license now so you can follow along>>>.
We’ll be showing Automator Pro features in this walkthrough. But if you aren’t yet certain that Automator is for you, you can still download the FREE FOREVER version of Automator then register your account for a limited number of app credits. You can test out basic Gravity Forms and BuddyBoss integrations before deciding to upgrade.
Register Users for BuddyBoss Groups and Forums
Now that you have your Automator Pro license, let’s take a look at creating our first Gravity Forms and BuddyBoss integration.
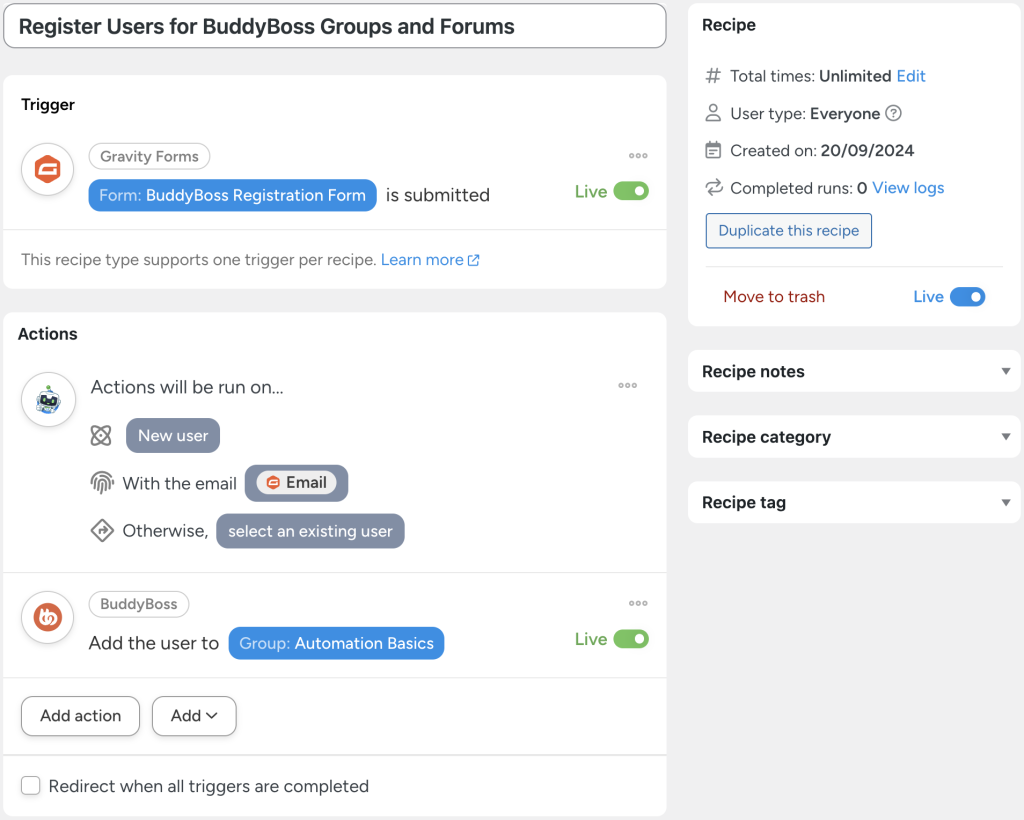
In the Automator recipe pictured above, we’re able to create a new WordPress user and register them for a BuddyBoss group and/or forum from a Gravity Forms form submission. Then, using filters, we can automatically sort new users into the right group(s) and/or forum(s).
Here’s how we did it.
Step 1: Create a New Recipe
From your WordPress Admin Dashboard, navigate to Automator > Add new recipes. In the popup window that appears, select Everyone.
Step 2: Name Your Recipe
Give your recipe a name that makes it easy to recognize at a glance. For example, we have named this recipe “Register Users for BuddyBoss Groups and Forums”.
Step 3: Configure Your Trigger(s)
In the Trigger panel, from the menu of available integrations, select Gravity Forms.
From the dropdown list that appears, select A form is submitted.
Automator will prompt you to select a form. For example, we have configured a custom registration form titled “BuddyBoss Registration Form”. Once you’ve selected your custom form, click Save.
Your completed trigger should look something like this:
Step 4: Configure Your Action(s)
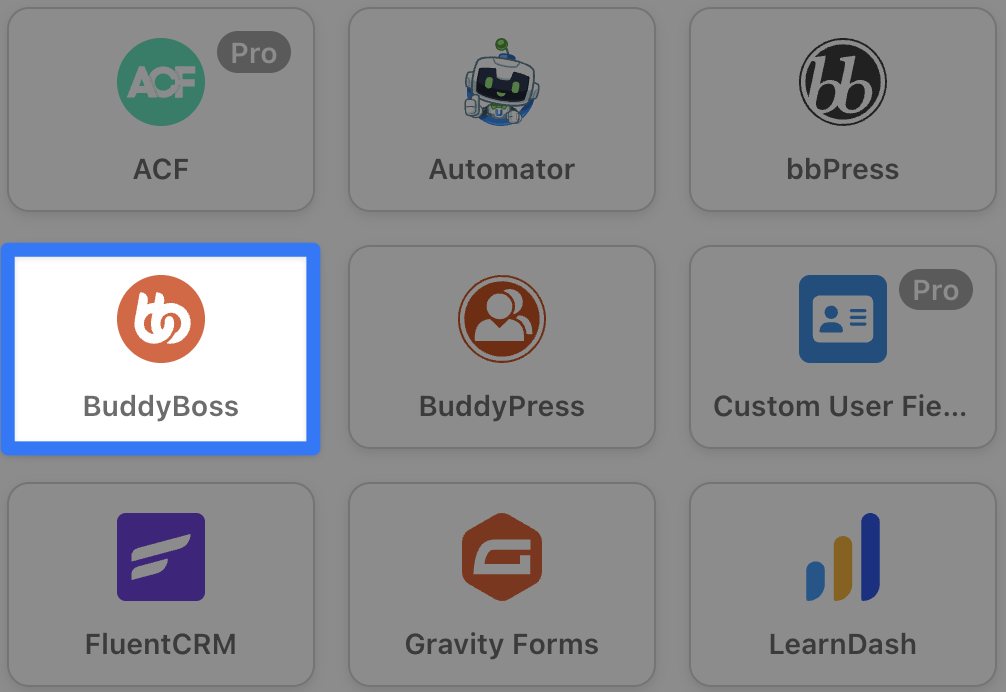
In the Actions panel, click Add action and select BuddyBoss.
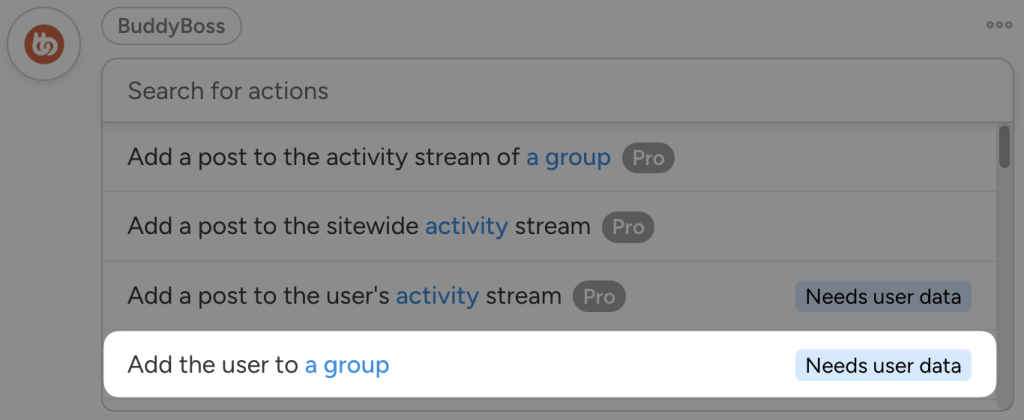
From the dropdown list that appears, select Add the user to a group.
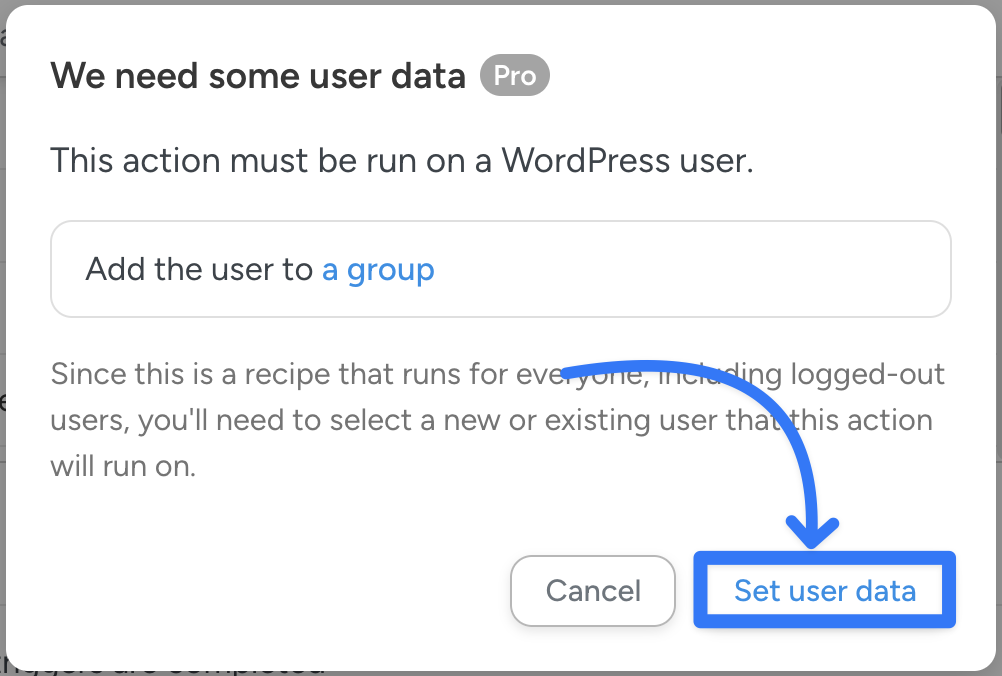
A modal will appear, informing you that Automator will need to either select an existing user or create a new one to complete the action. In the modal, click Set user data.
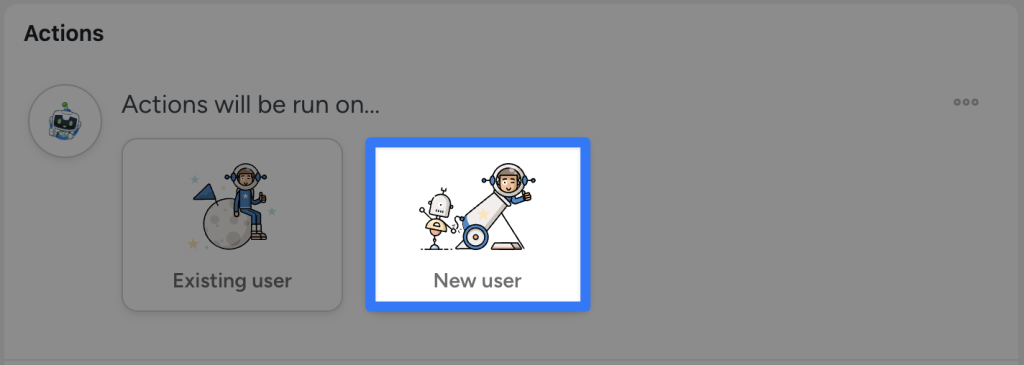
At the top of the Actions panel, you will have the option to run the action(s) on new or existing WordPress users. Select New user.
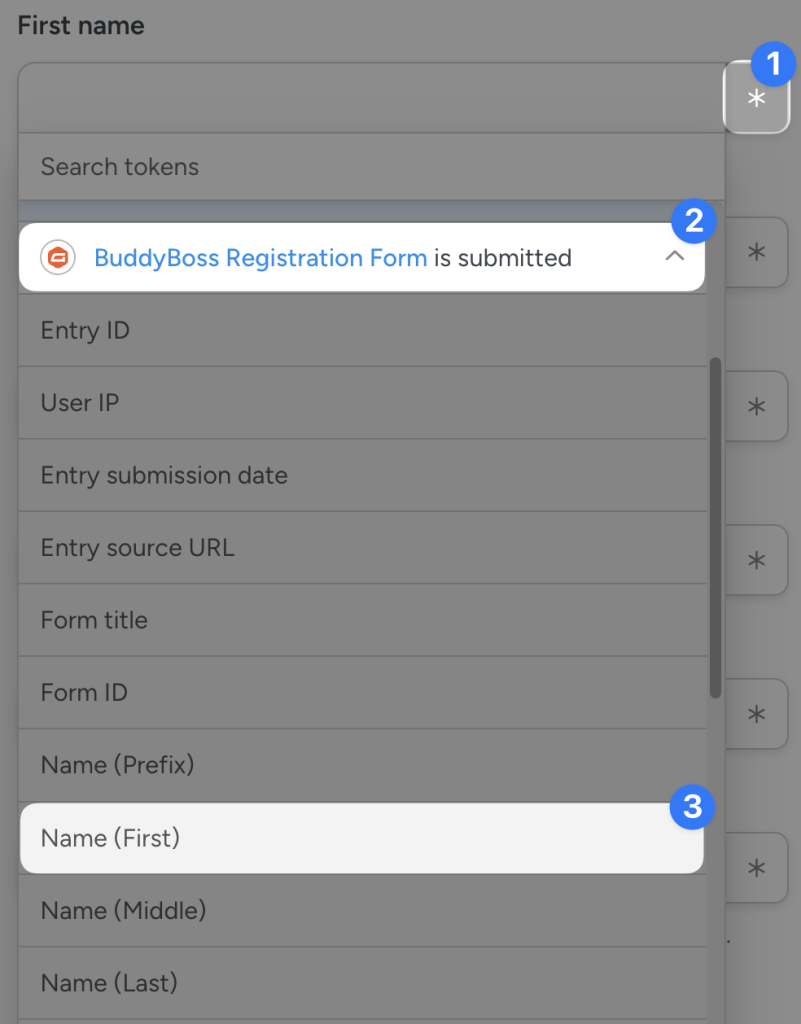
Automator will present you with a form to set the data for the new user. You can fill out these form fields using tokens (i.e., dynamic data pulled from your WordPress website and from within recipes).
To use a token, click the Asterisk in any given field and select the corresponding token. For example, we have selected the token “Name (First)” from our Gravity Forms trigger for the First Name field.
Fill out the remaining fields using tokens and/or static data.
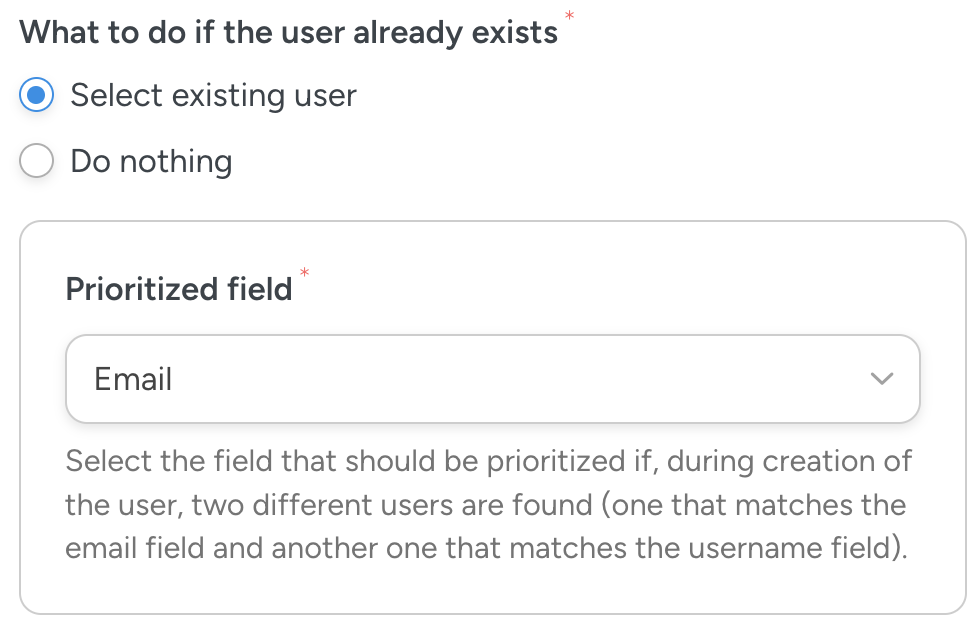
At the bottom of the form, Automator will ask you what to do if the user already exists. You can either choose “Do nothing” or “Select an existing user”. If you choose to select an existing user, select a field such as “Email” for Automator to use to identify an existing user.
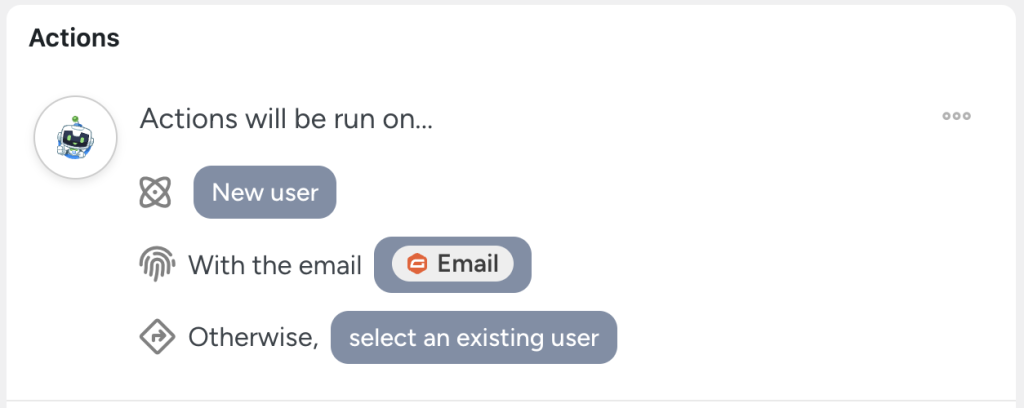
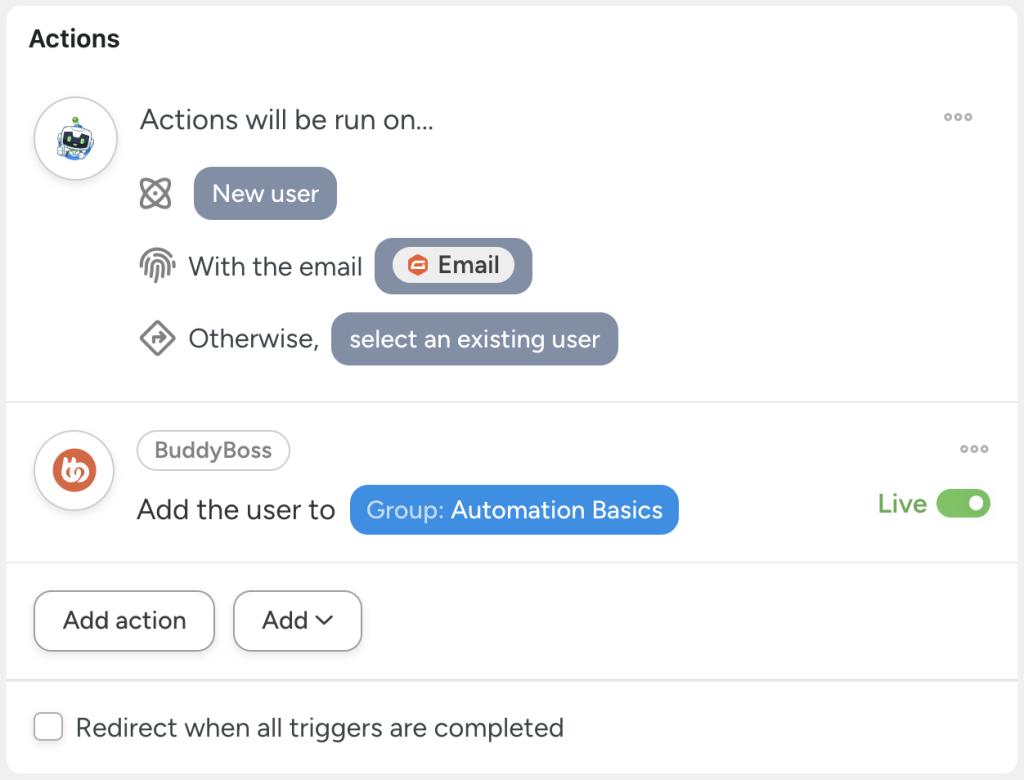
Once you’re finished, click Save. The top of your Actions panel should look something like this:
Return to your BuddyBoss action and select the group to which you would like to register the new user. Once you’re finished, click Save.
Your Actions panel should look something like this:
Step 5: Go Live!
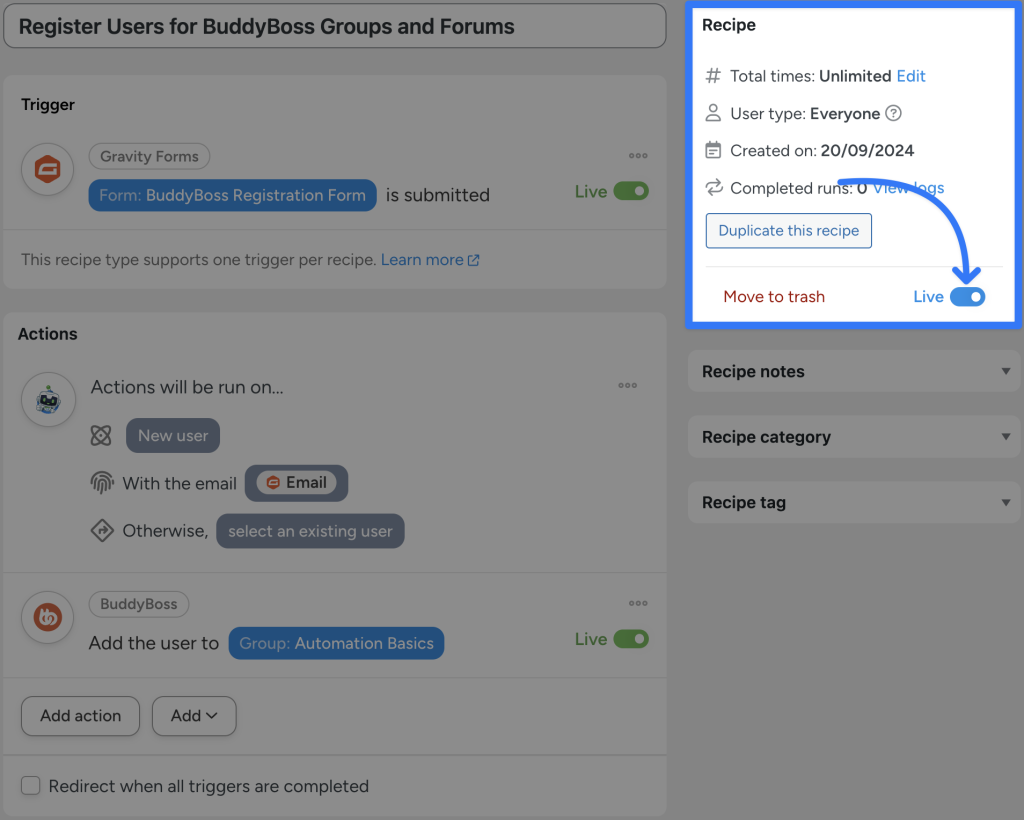
You’re just about ready to complete your first Gravity Forms BuddyBoss integration. All that’s left for you to do is toggle the recipe from Draft to Live.
That’s it! Now you can customize and automate your BuddyBoss group registration process with Gravity Forms and Automator!
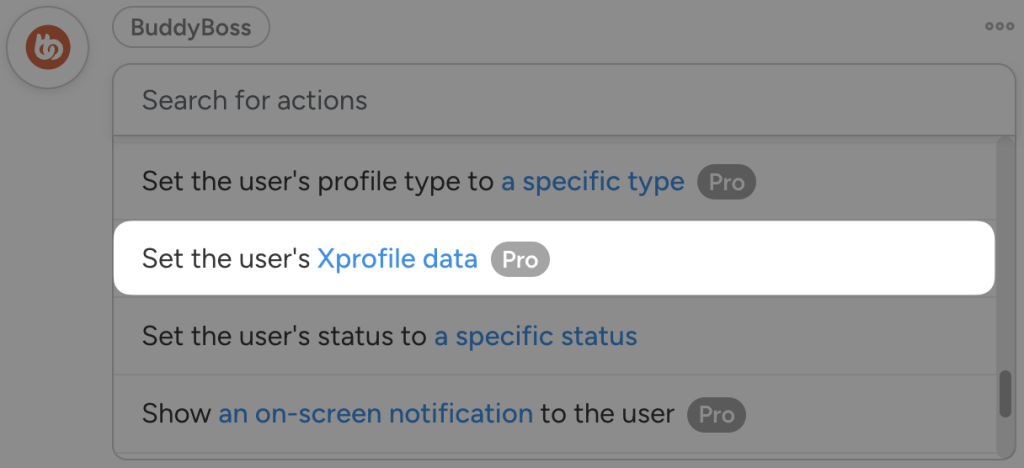
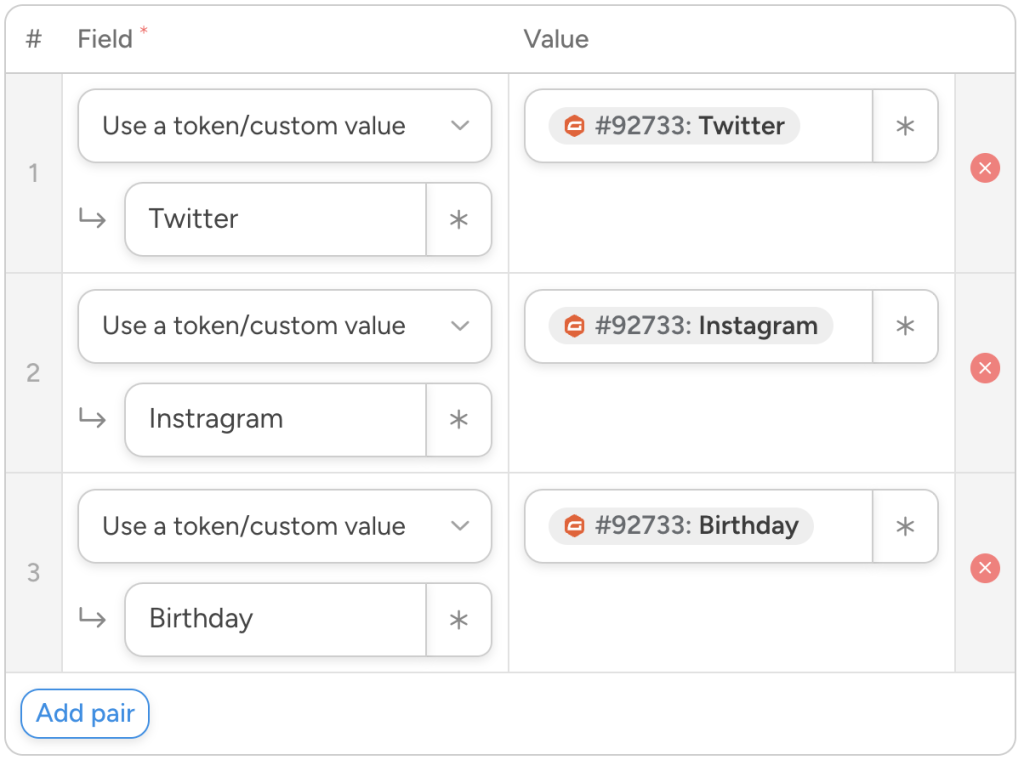
But, why stop there? Add a secondary action to the recipe to fill out the new member’s profile with all of the data from your Gravity Forms registration form.
For example, you could include your new user’s social media profile links, birthday and even have them upload profile photos.
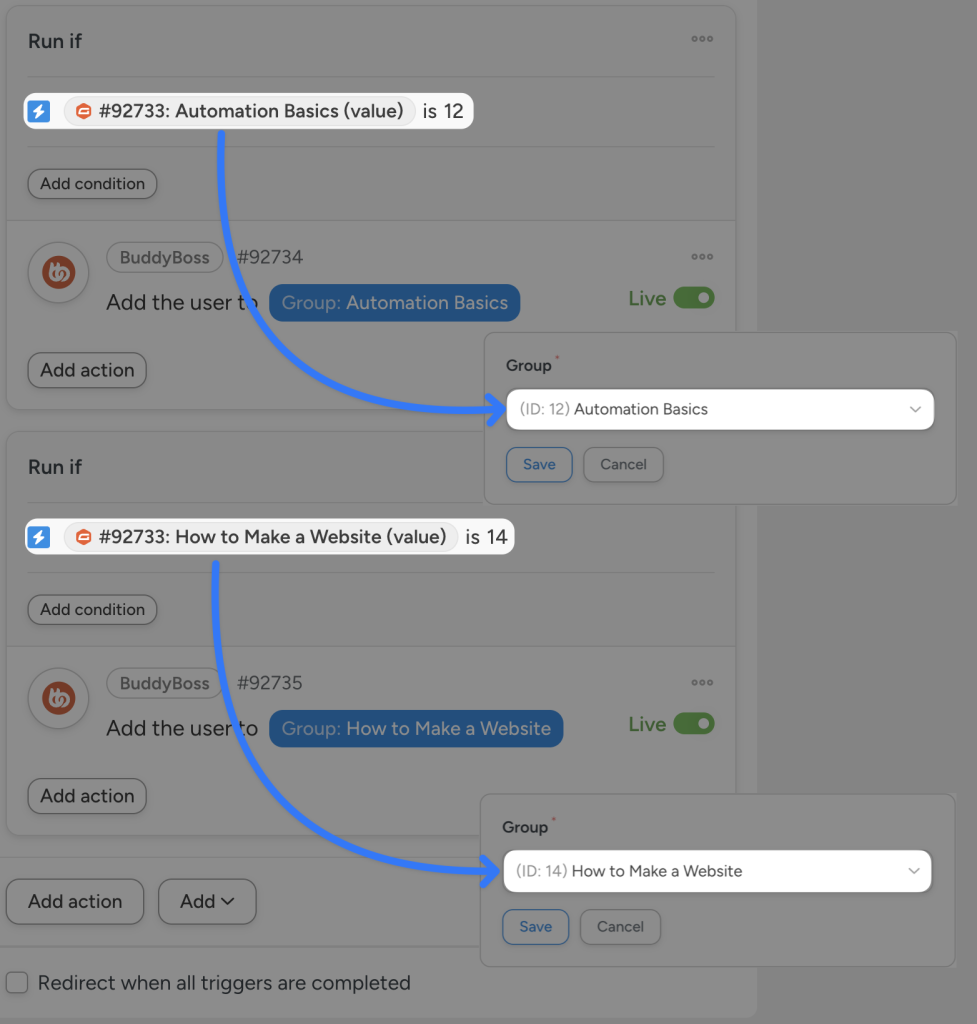
And that’s still not the end of the customization process with Automator! Try out Automator’s filters feature to automatically sort new users into different groups and forums.
(Note: BuddyBoss uses group and forum IDs, not titles, to identify groups and forums. You can configure your custom Gravity Forms registration form to return group and forum IDs instead of titles to automatically sort new users into their desired groups and forums upon registration.)
Want to unlock even more integration features? Upgrade to an Automator Pro – Plus or Elite license today and get powerful addons for free>>>.
Create BuddyBoss Paywall with Gravity Forms
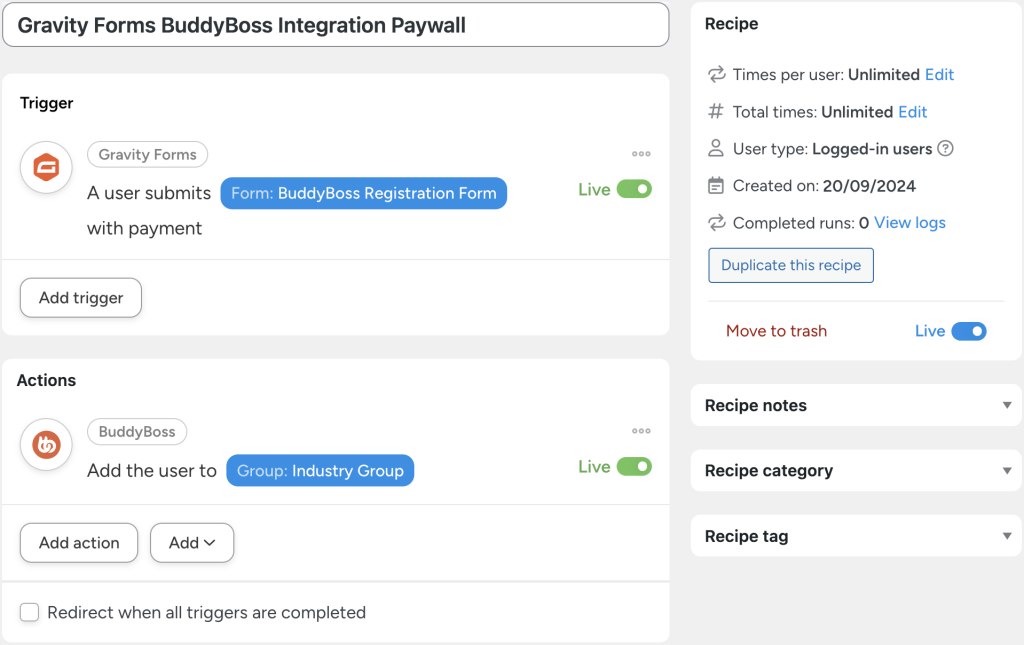
One of the key advantages of using Gravity Forms to customize your BuddyBoss registration process is the ability to process payments.
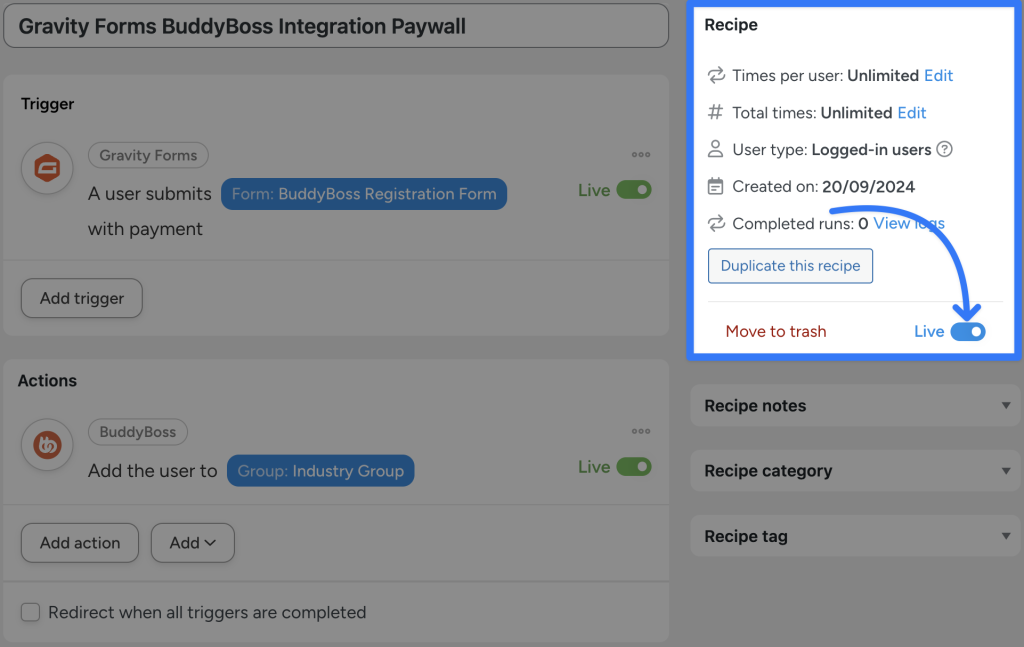
If you have the Gravity Forms Stripe Add-on, you can easily recreate the recipe pictured above to put access to your BuddyBoss community behind a paywall.
Here’s how we did it.
Step 1: Create a New Recipe
From your WordPress Admin Dashboard, navigate to Automator > Add new recipe. In the popup window that appears, select Logged-in users.

(Note: You can also select Everyone. You will simply have to recreate the user registration process from the previous recipe.)
Step 2: Name Your Recipe
We’ve named this recipe “Gravity Forms BuddyBoss Integration Paywall”.
Step 3: Configure Your Trigger(s)
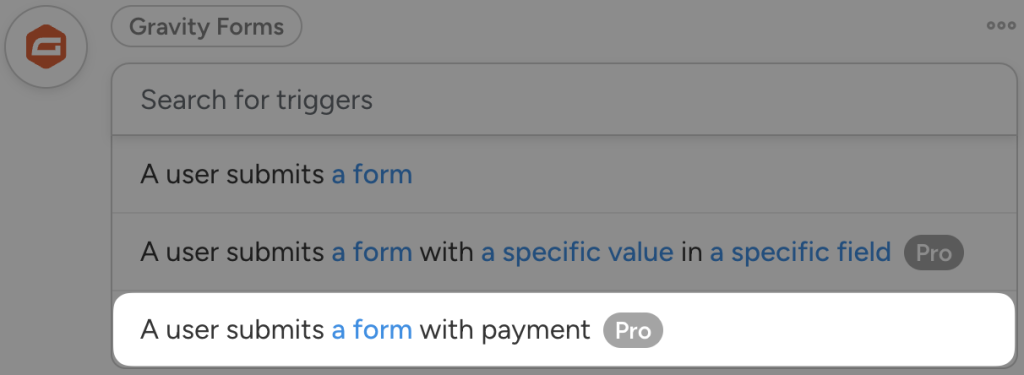
In the Trigger panel, from the menu of available integrations, select Gravity Forms. From the dropdown list that appears, select A user submits a form with payment.
Automator will prompt you to select a form. Once you’re finished, click Save.
Step 4: Configure Your Action(s)
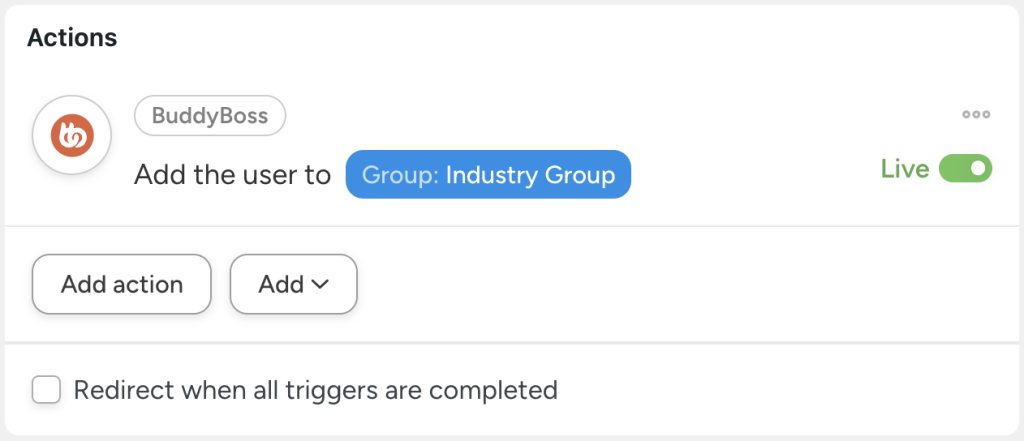
In the Actions panel, click Add action and select BuddyBoss. From the dropdown list that appears, select Add the user to a group. Automator will prompt you to select a group.Once you’re finished, click Save. Your completed action should look something like this:
Step 5: Go Live!
Toggle your recipe from Draft to Live.
More Exciting Gravity Forms and BuddyBoss Integrations
By now, we’re pretty confident that you’ve mastered the basics of creating Automator recipes to connect Gravity Forms to BuddyBoss. Nevertheless, Automator’s list of BuddyBoss and Gravity forms triggers and actions is pretty extensive.
So, here are some additional recipe ideas that you could try out to further customize the registration process, monetize your community and improve engagement.
Monetize Group Creation
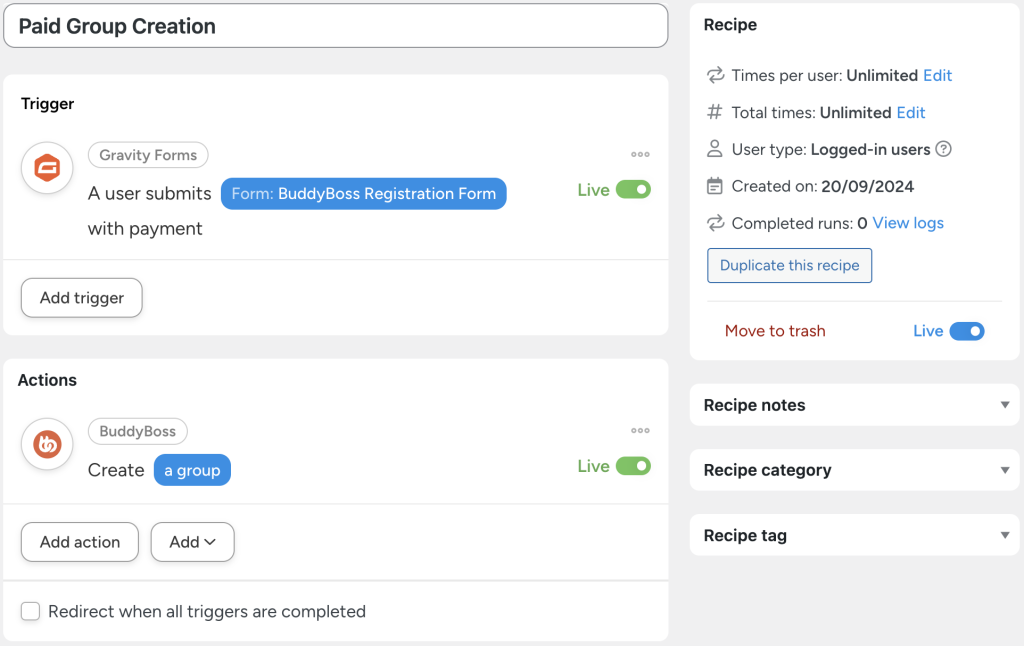
By integrating Gravity Forms to BuddyBoss with Automator, you can open up an additional revenue stream by giving your BuddyBoss members the opportunity to create groups of their own.
In the recipe pictured above, we’re able to create a new group whenever a user submits a particular form with payment. You can even use tokens to allow the member submitting the group to select the other members they’d like to add to the group.
Create Gravity Forms Entries for BuddyBoss Members
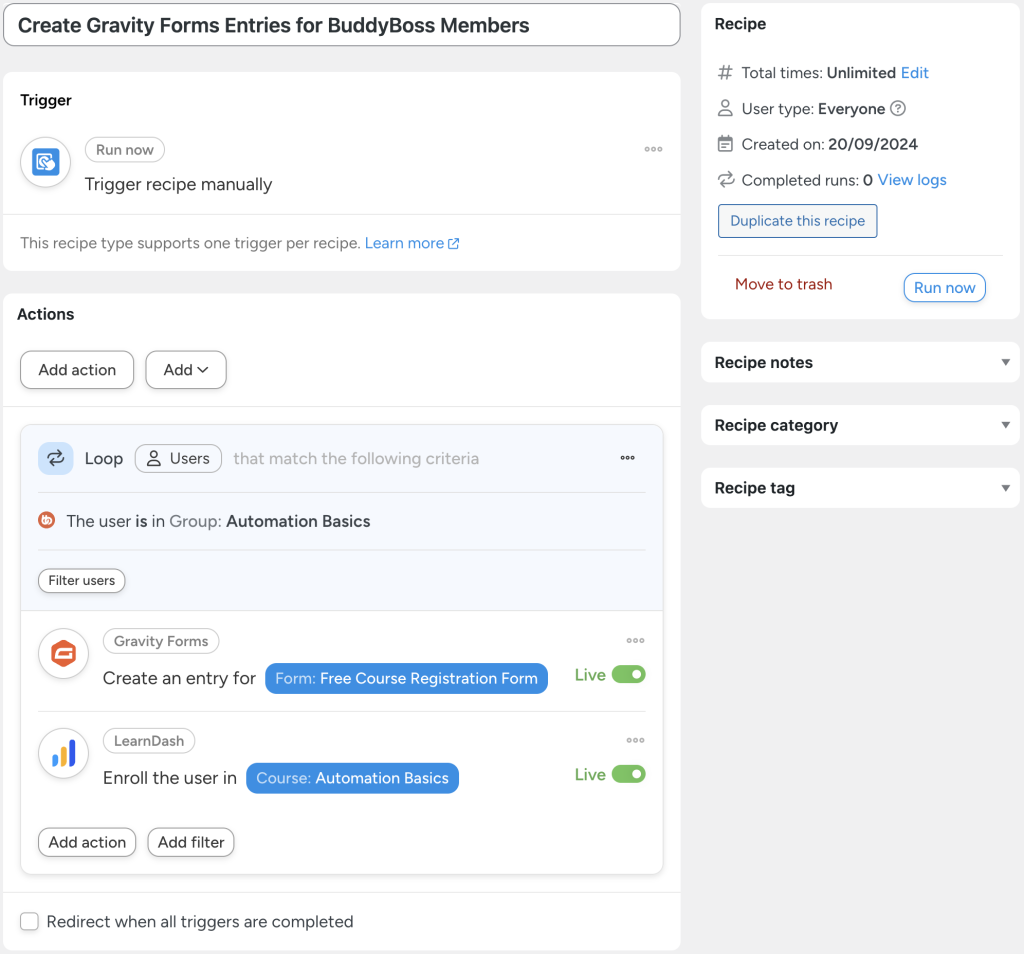
So far, we’ve looked at carrying out BuddyBoss actions based on Gravity Forms triggers. But what about the other way around?
With the recipe pictured above, we’re able to create Gravity Forms entries for all of the members of a BuddyBoss group then register them for a LearnDash course with the simple click of a button.
Unlock the full potential of your Gravity Forms BuddyBoss integration with an Automator Pro – Plus or Elite license today>>>.
Frequently Asked Questions
Conclusion
In this comprehensive guide, we explored Automator’s Gravity Forms and BuddyBoss integration.
We showed you how to automate tasks such as group registration, membership payments, and forum participation. Whether you’re monetizing your community or customizing the user experience, Automator simplifies the process without requiring any coding knowledge.
Ready to unlock the full potential of Gravity Forms and BuddyBoss? Get started with Uncanny Automator today and transform your workflows with ease.
Until next time, happy automating!






This Post Has 0 Comments