Revive old WordPress posts with AI and Uncanny Automator. Learn how to reverse content decay…
How to Connect OpenAI to WooCommerce and 4+ Smart eCommerce Automations
Connect OpenAI to WooCommerce with Uncanny Automator to generate AI-powered product descriptions and automate your store—no coding needed.
Artificial intelligence is no longer a hope for a distant future, or an unaffordable advantage available to big businesses alone. Today, in eCommerce, AI is the new normal.
In fact, almost 90% of companies are already either using or exploring ways to use AI in their business. And it’s not hard to understand why. For all eCommerce tasks, from marketing personalization to real-time analytics, AI is a game-changer.
In this article, we’ll show you how to connect OpenAI to WooCommerce using Uncanny Automator—no code, no upfront costs, just smarter eCommerce. By the end, you’ll be ready to auto-generate SEO-friendly product descriptions, enhance customer engagement, and unlock AI-powered workflows that grow your store. We’ll even show you how to set up a basic virtual shopping assistant!
Let’s dive in.
Why Automator is the Best OpenAI WooCommerce Plugin Integration
Uncanny Automator is the #1 automation and integration tool for WordPress websites. Using simple combinations of triggers and actions called recipes, Automator allows you to connect all of your favorite apps and plugins.
When it comes to creating an OpenAI WooCommerce integration, Automator stands out for a few reasons:
- Affordability: Unlike other automation and integration tools, Automator doesn’t charge per automation fees. That means you can connect OpenAI to WooCommerce for free and generate content for less than $0.01!
- Ease-of-Use: Automator’s click-and-play interface gives users the ability to harness the power of AI without having to write a single line of code. Simply select the integrations you want in your automated workflow, choose a few triggers and actions and let Automator do the work.
- Deep integration: Unlike other OpenAI WooCommerce integration plugins, Automator is fully integrated with both OpenAI and Woo. In other words, Automator allows you to use all of OpenAI’s features for your eCommerce business, from text and images to analysis and translation.
Here are just some of the AI-powered eCommerce tasks you can perform with Automator:
- Create unique, SEO-optimized content using GPT-4, tailored to each product.
- Automatically promote new products on social media with compelling AI-written posts.
- Respond to customer reviews or questions with helpful, on-brand replies powered by GPT.
- Offer personalized recommendations with AI-powered logic based on purchase behavior, form submissions, or subscription status.
Whether you sell five products or five thousand, connecting OpenAI to WooCommerce lets you work smarter, not harder—and Automator makes it effortless.
Get intelligent eCommerce with an Automator Pro license >>>
Not ready to get Automator Pro yet? No worries. You can still connect OpenAI to WooCommerce with Automator for FREE! Simply install and activate the free version of Automator and register your account to receive a limited number of app credits. Once your credits run out, you can upgrade to Automator Pro for unlimited credits and even more automation features.
How to Connect OpenAI to WooCommerce
Creating an OpenAI WooCommerce integration only takes a few minutes (and no code) with Uncanny Automator.
- Purchase an Automator Pro license or install and activate Automator on your WordPress website. (Note: If you install the free version of Automator, you’ll need to register your account to receive limited complimentary app credits.)
- From your OpenAI Platform, create and copy a new secret API key.
- From your WordPress Admin Dashboard, navigate to Automator > Settings > App Integrations and paste your secret API key in the corresponding field.
(Note: If you would like a detailed guide on connecting OpenAI to your WordPress website, you can find our Knowledge Base article here.)
That’s it! You’re now ready to create your first Automator recipe connecting OpenAI to WooCommerce.
In the next section, we’ll walk you through setting up your first Automator recipes.
4+ OpenAI WooCommerce Integrations for Smarter eCommerce
Now that you have Automator installed and activated on your WordPress website, it’s time to power up your Woo business with AI.
From product descriptions to virtual shopping assistants, these Automator recipes will have your eCommerce business running smoothly—and smartly.
1. Auto-Generate Product Descriptions
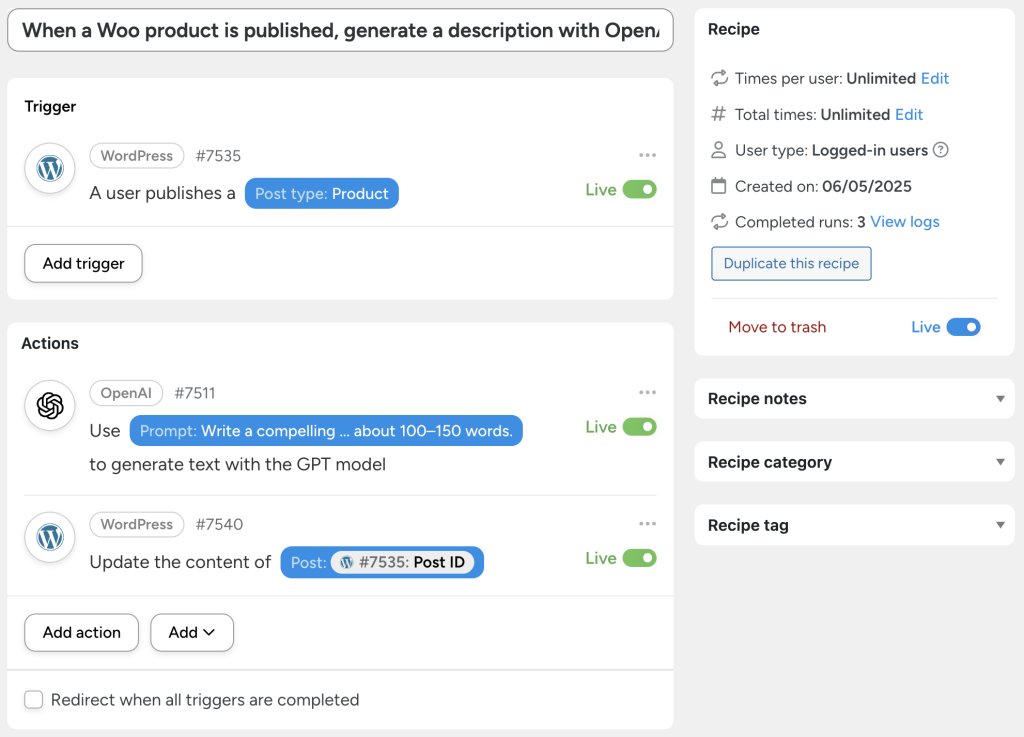
In the recipe pictured above, we’re able to use OpenAI’s GPT model to write a product description whenever a new product hits our shelves. We can use this recipe to cut back on the time we spend writing product descriptions and optimize our descriptions using AI’s broad knowledge of marketing strategies.
Later, we’ll show you variations of this recipe to update and optimize the product description for our entire catalog with the click of a button.
Here’s how we did it:
Step 1: Create and Name a New Recipe
From your WordPress Admin Dashboard, navigate to Automator > Add new recipe. In the modal that appears, select Logged-in users.
Give your recipe a name that makes it easy to recognize at a glance. For example, we have named this recipe “When a Woo product is set to “pending”, generate an OpenAI description”.
Step 2: Configure Your Trigger(s)
In the Triggers panel, from the menu of available integrations, select WordPress. (Woo products act like WordPress “posts”, that’s why you’ll need to select WordPress even though this automation integrates OpenAI with Woo.)
From the dropdown list that appears, select A user publishes a post.
Automator will then prompt you to select a Post type. From the dropdown list, select “Product”. Once you’re finished, click Save.
Step 3: Configure Your Primary Action
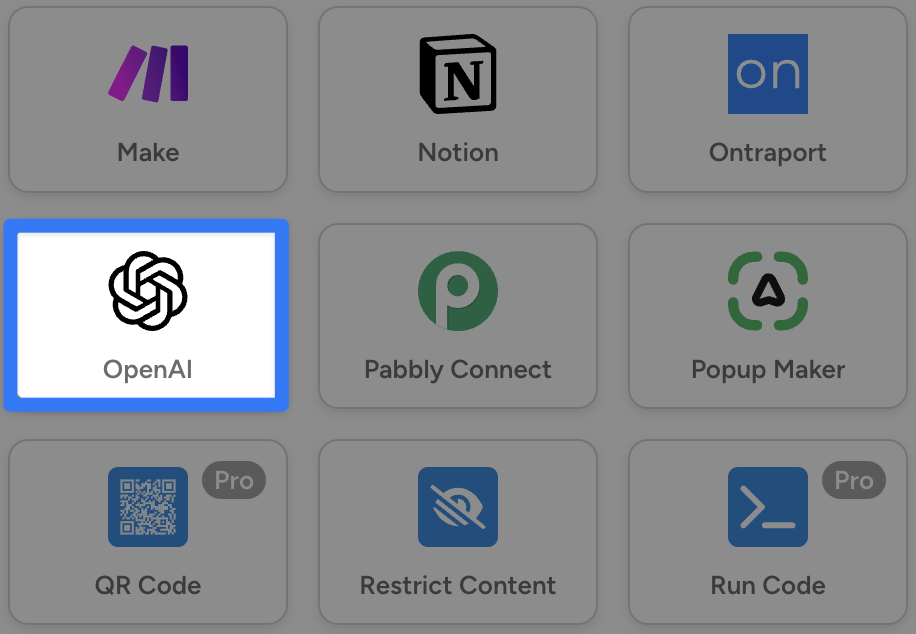
In the Actions panel, click Add and select OpenAI.
From the dropdown list that appears, select Use a prompt to generate text with the GPT model.
Automator will present you with a form to configure your prompt. After selecting a Model, Temperature, and Maximum length, you can then craft your System Message and Prompt. Use Automator’s tokens to give the GPT model more information about your eCommerce business and the specific product for which you want a product description.
To select a token, click on the Asterisk in any given field. For example, in the System Message field, we might include the “Site name” and/or “Site tagline” tokens to help the GPT understand our brand’s voice and identity.
Next, in the Prompt field, use tokens from your trigger to tell the GPT more about the product it will be describing. You can also use Automator’s “Post meta” token to retrieve even more information about the product. (Pro tip: Combine Automator with Advanced Custom Fields to create your own meta data for your Woo products. Find out how here >>>.)
For example, a detailed prompt that includes tokens for context might look something like this:
Once you’re finished, click Save.
Step 4: Configure Your Secondary Action
With the trigger and action that we’ve configured thus far, GPT will write our product description. Now, we just have to update our product with the new description.
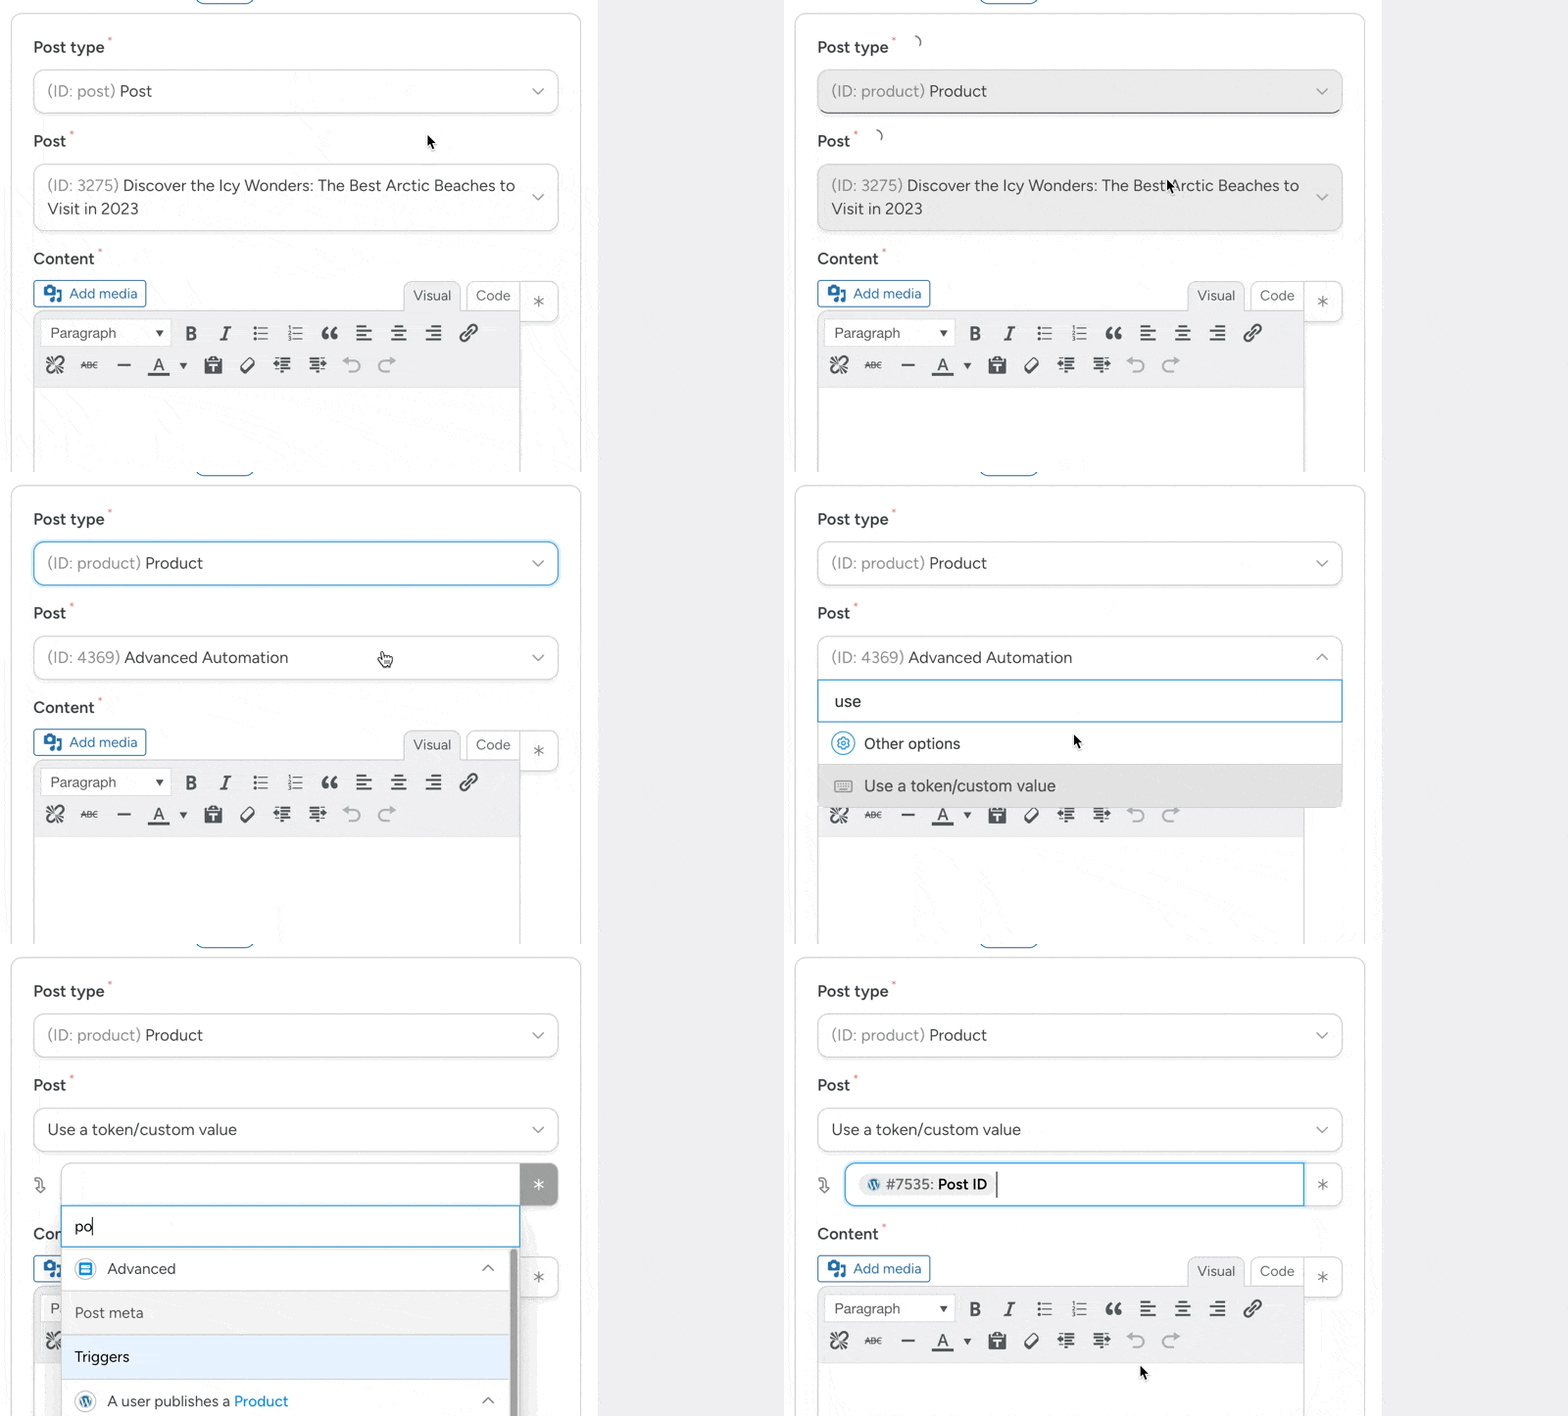
In the Actions panel, click Add action and select WordPres. From the dropdown list that appears, Update the content of a post.
Automator will prompt you to select a Post type and then the specific post that you want to update. First, under Post type, select “Product”. Next, under Post select Use a token/custom value > Post ID.
In the Content field, enter the “Response” token from the OpenAI action.
Once you’re finished, click Save.
Step 5: Go Live!
You’re just about ready to power your Woo store with AI. All you have to do is toggle the recipe from Draft to Live.
That’s it! You have successfully integrated AI into your WooCommerce business. But why stop there?
If you’re ready to generate and optimize all of your product descriptions with the click of a button, try the Automator recipe pictured below.
Using Automator’s Post Loops feature, we can update some or all of our Woo product descriptions with AI simply clicking one big, blue button. Features such as Post Loops, Data Formatter, and unlimited app credits are available with Automator Pro.
Do the intelligent thing—upgrade to Automator Pro >>>
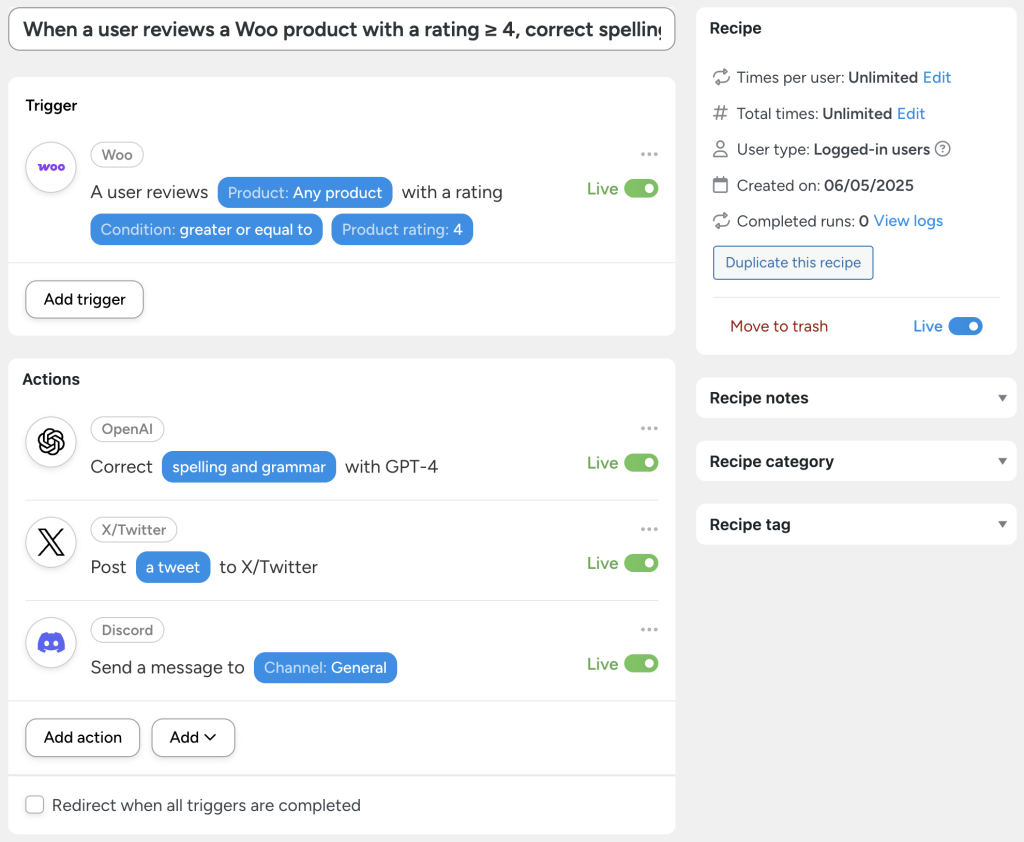
2. Use AI to Enhance Social Proof
In the world of eCommerce, you’re only as good as your best review—so make sure it’s grammatically correct!
Using OpenAI’s GPT-4 and Automator, you can simplify the process of creating social proof by correcting the spelling and grammar of your top reviews. Then, with Automator’s social media integrations for WordPress, you can boost your digital word-of-mouth marketing with posts to X, Discord, Bluesky, Facebook, and more.
3. Perform Sentiment Analysis
Sentiment analysis gives eCommerce business owners a powerful way to get valuable insights and collect feedback from customers. However, it can also be a tedious process—unless you’re using the recipe pictured above.
Automatically forward your latest product reviews to OpenAI’s GPT-4 for sentiment analysis. Then, using Automator’s Google Sheets integration for WordPress, you can add the results to a spreadsheet for real-time analysis.
4. Create a Virtual Shopping Assistant With AI
If you really want to be at the cutting edge of AI technology in eCommerce, implement this recipe in your Woo store.
Using Automator’s Dynamic Content Blocks addon (available with Automator Pro – Elite licenses), you can create personal virtual shopping assistants for users with an account on your WordPress website.
You can even use this recipe as a lead magnet, encouraging new site visitors to create an account with their email address so they can unlock a totally free (totally awesome) virtual shopping assistant.
After a user submits a form detailing their needs and preferences, Automator can submit their form to GPT-4 that will generate a list of recommended products. Instead of emailing the list to users or sending it to them via WhatsApp, you can display the results in a Dynamic Block that updates immediately for that user with GPT-4’s recommendations.
Seamless, hassle-free, no code virtual shopping assistant!
Upgrade to Automator Pro – Elite >>>
More Ways to Connect OpenAI to WooCommerce
Looking for more ways to integrate AI into your Woo store? Of course you are—it’s the intelligent thing to do!
With OpenAI, Woo, and Automator working together, there really isn’t anything you can’t do. To identify more opportunities within your eCommerce business that are ripe for AI-driven automation, apply Automator’s R.I.C.H framework.
Tasks that you can start automating now are:
- Repetitive: Tasks, particularly unavoidable ones, that you perform over and over again.
- Iterative: Tasks that you can and/or do perform across any measurable number of customers, products, posts, pages, etc. or a subset thereof.
- Costly: Tasks that consume significant resources, namely time and money.
- Hard: Tasks that are complex and prone to human error.
If a task satisfies one or more of these criteria, it’s a strong candidate for automation. You can try generating images, translating text, and much more.
Remember, when it comes to automation, think RICH!
Frequently Asked Questions
Conclusion
AI in eCommerce isn’t just the future—it’s happening right now. And, with Uncanny Automator, you don’t need to hire a developer, learn to code, or pay enterprise-level fees to start benefiting from it.
In this post, we showed you how to connect OpenAI to WooCommerce using Automator’s no-code recipe builder. From auto-generating product descriptions and analyzing sentiment to building personal shopping assistants, you now have everything you need to automate faster and sell smarter.
Whether you’re managing a handful of products or running a full-scale Woo store, Automator puts the power of GPT into your hands—without the overhead. So go ahead: save time, boost conversions, and deliver personalized shopping experiences powered by AI.
Ready for intelligent automations?
Upgrade to Automator Pro today >>>
Until next time, happy automating!









This Post Has 0 Comments