Revive old WordPress posts with AI and Uncanny Automator. Learn how to reverse content decay…
How to Automate New Customer and User Onboarding in WordPress
Uncanny Automator is the free, user onboarding tool that helps your customers, affiliates, and associates get started on the right foot. This guide shows you how it’s done.
Well, shiver me timbers! Congratulations on landing a new customer! Take a second to open those sails and enjoy the high-selling seas—but only a second. The real work is about to begin. Or is it?
According to the consulting firm McKinsey & Company, onboarding new clients takes an average of 100 days. And those 100 days matter. A lot. Over 80% of customers are more likely to stick with a company that has strong onboarding content.
So, if you don’t want your customers to walk the plank, you need an onboarding journey. And with almost 30% of customers deciding whether to stay with a product or service within the first week, acting fast is important.
That’s why having an automated customer and client onboarding journey is crucial. It’s also why we’re going to show you exactly how to create one.
Whether your WordPress business is the equivalent of a small rowboat or a multi-site cruiseliner, you can offer your customers a first-class onboarding experience with Uncanny Automator.
In this guide, you’ll learn how:
- Connect your CRM to your ecommerce store,
- Automate popups to deliver timely information,
- Create personalized onboarding journeys,
- Segment your onboarding emails by product, order amount, location, and more.
Weigh anchor and hoist the mizzen! It’s time to get your customers onboarded.
What Is a New User Onboarding Journey?
Think of a new user onboarding journey as the maiden voyage for your customers. It’s the map, the compass, and the calm seas that guide them from curious first-timers to confident, long-term passengers on your ship.
In practice, onboarding is the process of helping users understand your product or service, set it up properly, and see value—fast. That might mean sending a friendly welcome email, showing them how to use a key feature, or nudging them toward their first purchase.
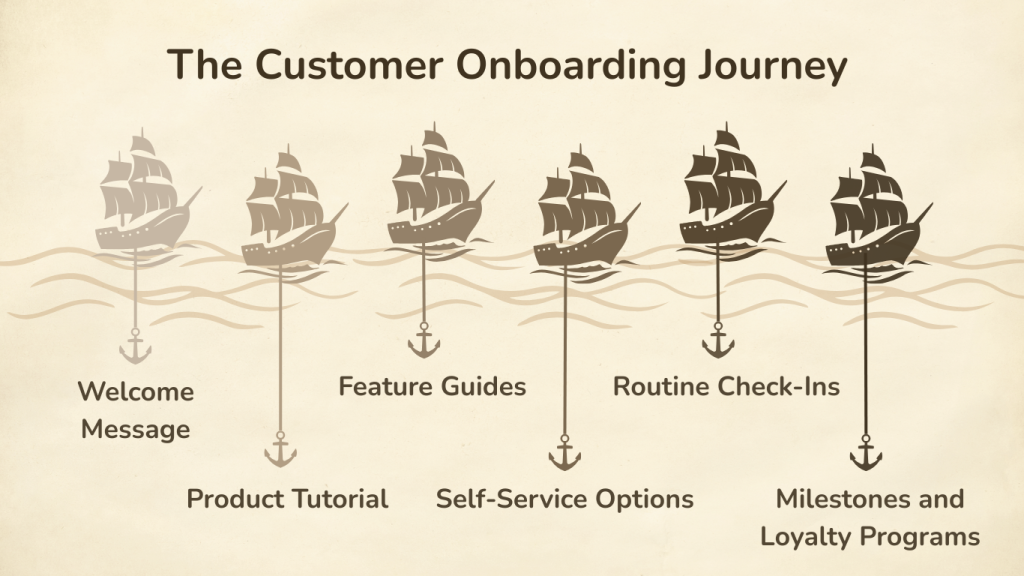
The typical onboarding journey consists of six steps:
- Welcome Message: An email and/or onsite notification, acknowledging the action the customer took (purchase, newsletter sign-up, etc.). Welcome emails typically include an introduction and important links and/or resources.
- Product Tutorial: Blog posts, videos, checklists, and other types of content that teach your new users the basics. These typically include links like, “Your account page” and videos like, “Getting started with…”.
- Product Feature Guides/Highlights: Once new users have learned the basics, highlight key features or advanced use cases. Think “Tips and Tricks”, “Best Practices”, or “Did you know…”.
- Self-service Options and Continuing Education: Knowledge Base, links to forums, contact for customer support, etc.
- Routine Check-ins: Emails and push notifications meant to maintain or increase engagement.
- Milestones and Loyalty Programs: Mark important dates and/or accomplishments with your customers to keep them engaged to continue using your product or service.
A strong onboarding journey removes friction, builds trust, and keeps your passengers from jumping ship. Done right, it transforms “just another signup” into a loyal customer who’s eager to keep sailing with you.
Why You Need an Automated Onboarding Process
When it comes to onboarding, time is of the essence. Here’s why automating the process keeps you ahead of the tide:
- Set sail faster. Automated workflows ensure that every new customer gets the right message at the right time, without you rowing yourself ragged.
- Keep the crew happy. Studies show that customers who experience smooth onboarding are more likely to stay loyal and spend more over time.
- Trim the sails, cut the costs. Instead of repeating the same manual steps, automation frees your team to focus on the bigger journey ahead.
- Navigate with confidence. Automation keeps the process consistent, so no customer feels left adrift.
An automated onboarding journey doesn’t just save you effort—it sets the course for lasting relationships. The sooner your customers feel at home on deck, the more likely they are to keep the voyage going.
Uncanny Automator: Customer Onboarding Navigator
If onboarding is the voyage, Uncanny Automator is the sturdy vessel that gets your customers safely from shore to shore. It’s not just another plugin—it’s the WordPress automation tool built to make onboarding effortless.
Automator connects all of your favorite apps and plugins, from ecommerce platforms to event management and membership plugins. Whatever your onboarding needs, Automator can help you and your customers navigate those waters.
Here’s how Automator helps you chart the perfect onboarding journey:
- CRM integration for emails: Send personalized welcome messages, product walkthroughs, and follow-ups directly from your CRM. Automator integrates with all of the most popular email marketing platforms such as Mailchimp, HubSpot, and dozens more.
- Twilio & WhatsApp integrations for text messages: Reach new customers instantly with SMS or WhatsApp messages that keep them engaged and on track.
- Dynamic Content Addon for onsite messages: Display targeted popups, banners, and notifications right on your site—like a lighthouse guiding your users to their next step.
- Filters for personalization: Segment onboarding by product, order value, location, or almost any condition you can imagine. No two journeys have to be the same.
- AI integrations for smarter support: Enhance your onboarding with AI-powered workflows. Generate personalized tips, answer FAQs, and help your crew attend to your passengers.
Together, these features transform onboarding from a one-size-fits-all process into a smooth, personalized voyage that keeps your customers coming back for more.
Set sail with Automator Pro >>>
Not ready to go Pro? No problem—we can stick to the shores for now. We’ll be using both Automator Lite and Pro features in this guide, and you can always get started with Automator for free.
To get Automator Lite:
- From your WordPress Admin Dashboard, navigate to Plugins > Add plugin.
- In the search bar, enter “uncanny automator”.
- Click Install then click Activate.
- Register your account to receive complimentary app credits. (It’s free loot!)
How to: Automated User Onboarding Emails
Now that you’ve got your vessel—Uncanny Automator—it’s time to chart the course. Let’s start with the anchor of every great onboarding journey: automated emails.
Step 1: Create a New Recipe
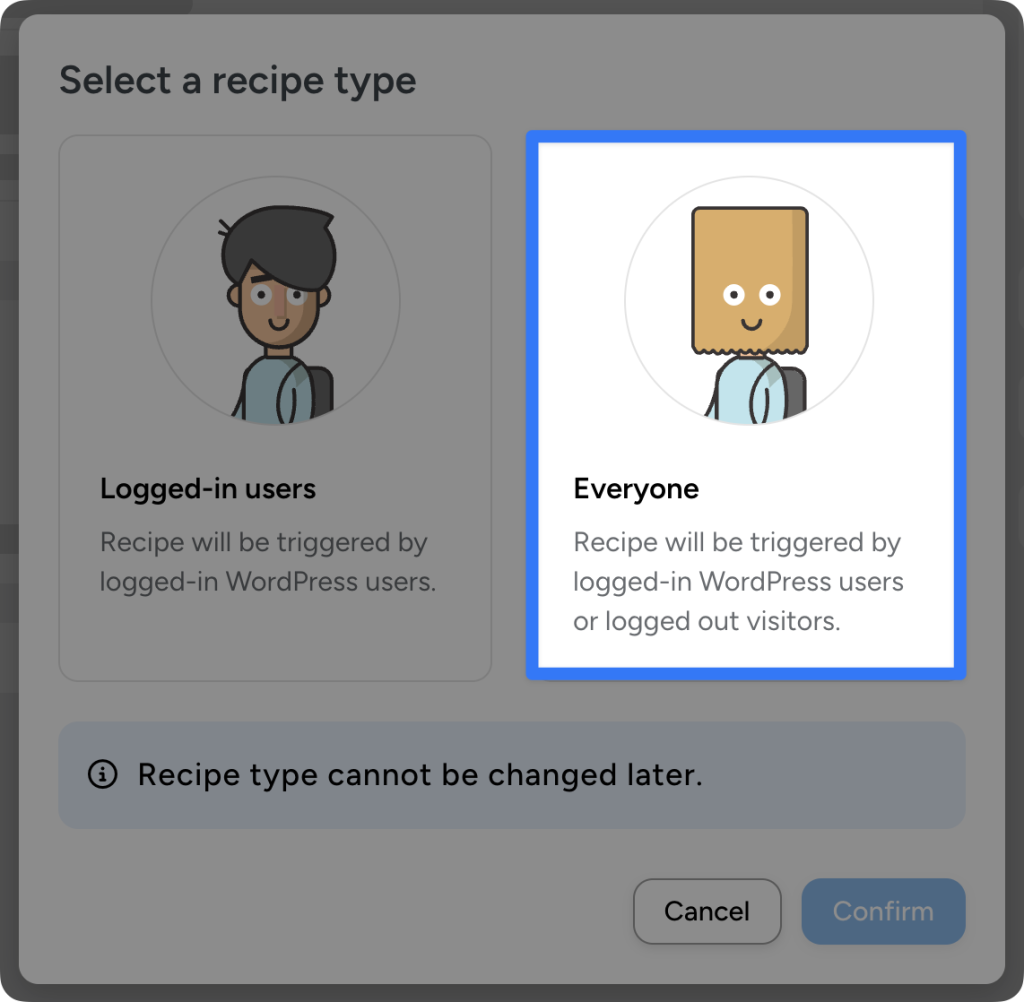
From your WordPress Admin Dashboard, navigate to Automator > Add new recipe. In the pop-up window that appears, select Everyone and click Confirm.
Step 2: Name Your Recipe
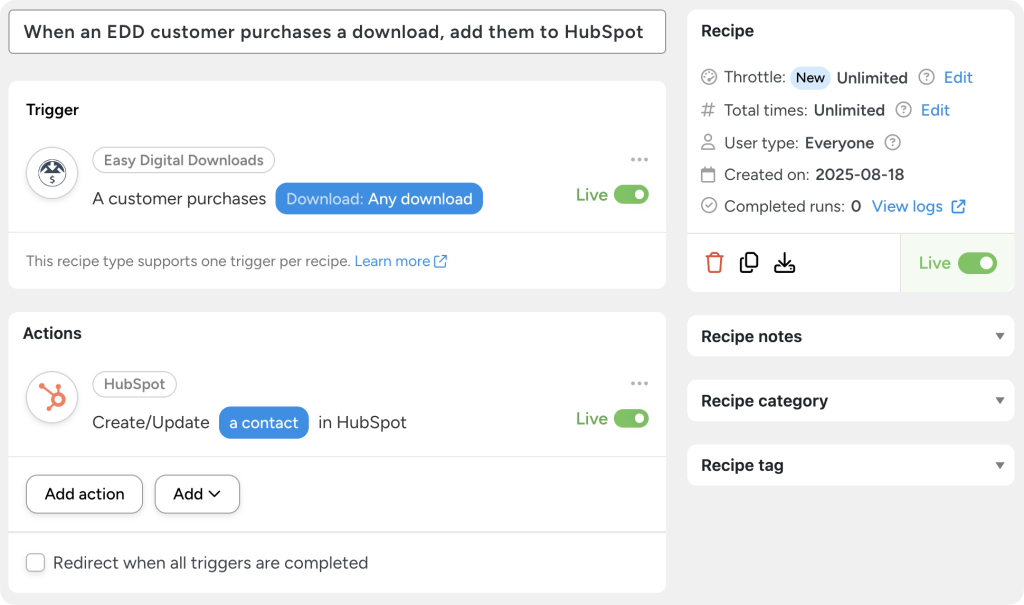
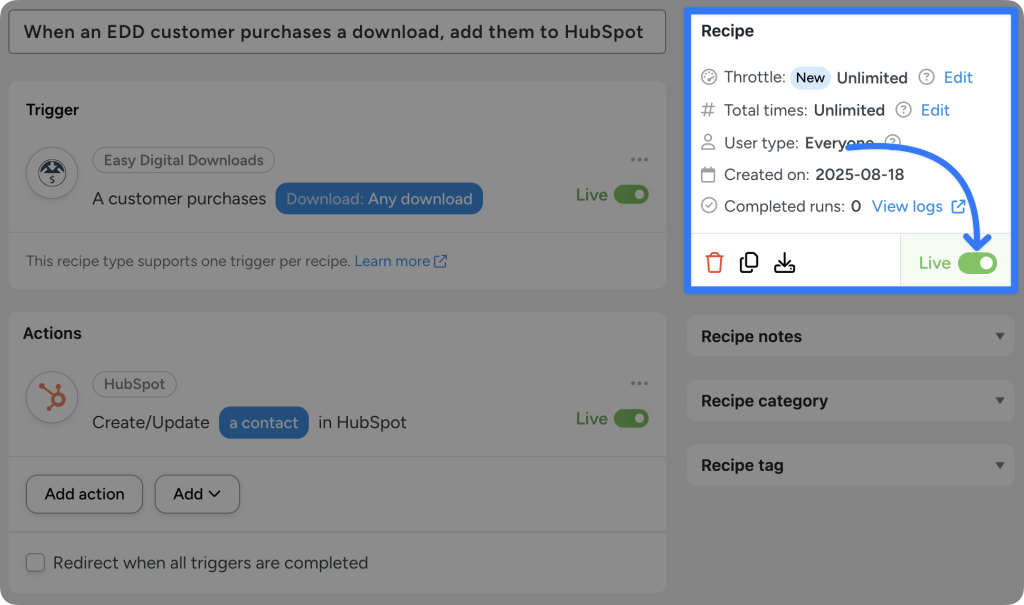
Give your recipe a name that makes it easy to recognize at a glance. For example, we’ve named this recipe “When an EDD customer purchases a download, add them to HubSpot”.
Step 3: Configure Your Trigger(s)
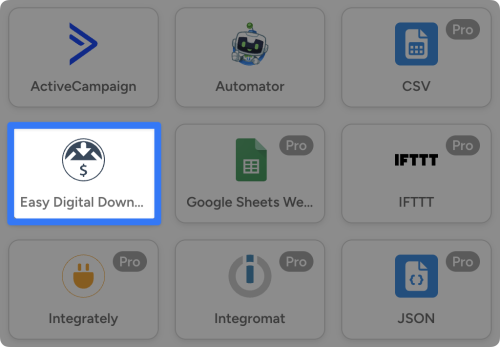
In the Triggers panel, select Easy Digital Downloads or your preferred ecommerce plugin.
From the drop-down list that appears, select A customer purchases a download.
Automator will prompt you to select a download. For simplicity, we’ve chosen Any download. When you’re finished, click Save.
Step 4: Configure Your Action(s)
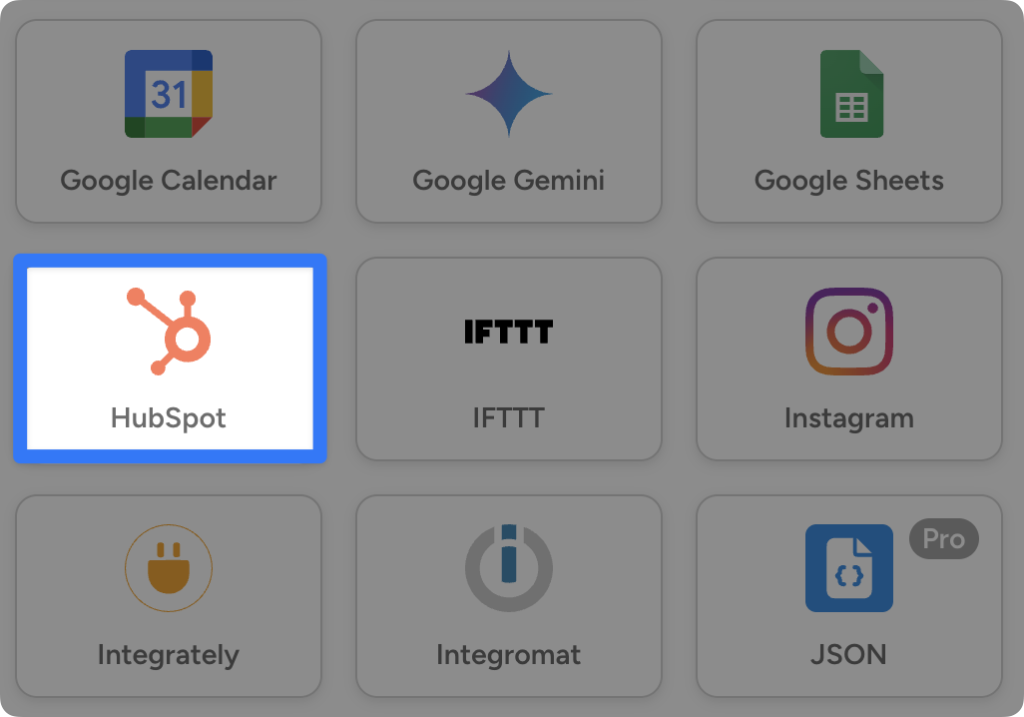
In the Actions panel, click Add action. From the menu of available integrations, click HubSpot or your preferred CRM.
(Note: If you haven’t already connected your HubSpot account, you can find a detailed walkthrough here. If you’re not using HubSpot, you can find more tutorials and guides in the Knowledge Base.)
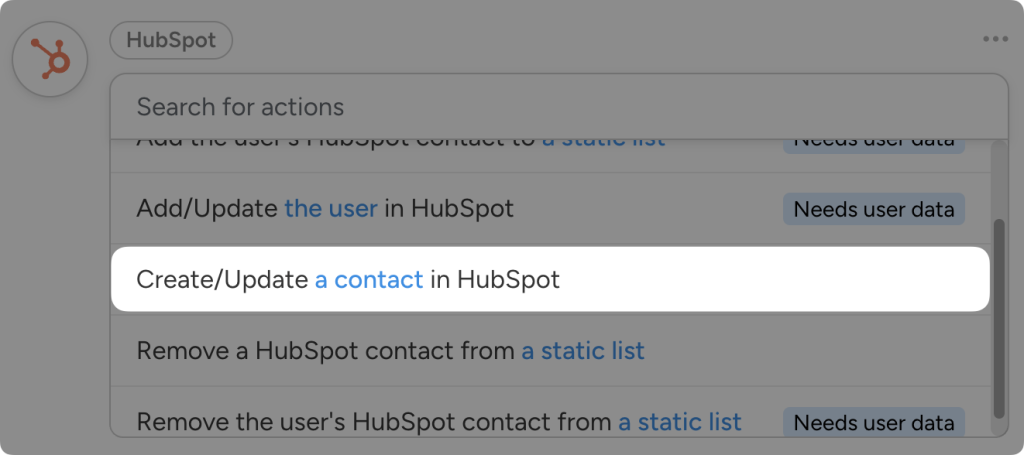
From the drop-down list that appears, select Create/Update a contact in HubSpot.
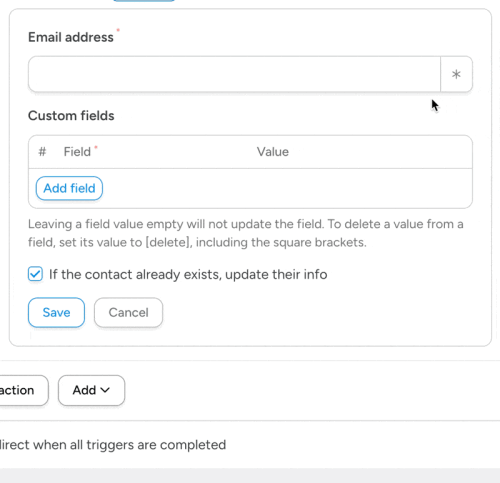
Automator will then present you with a form to fill out the new contact’s details.
We’ll do this using tokens (i.e., dynamic data from your website and triggers and actions within recipes).
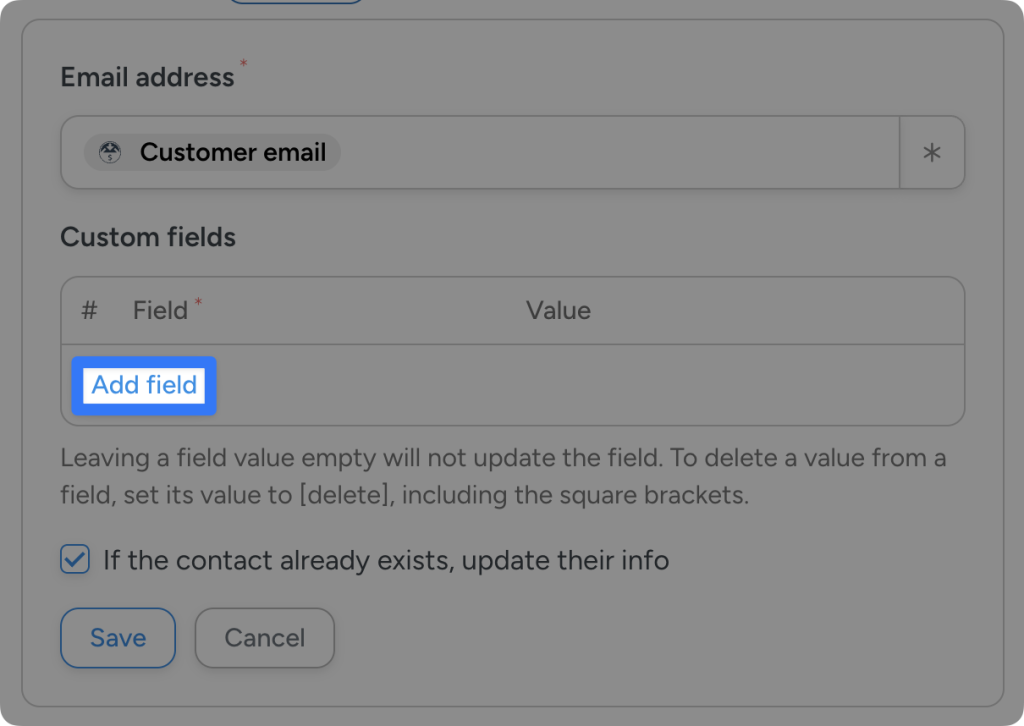
To use a token, click the Asterisk in any field and select the corresponding token from the dropdown list. For example, in the Email address field, we selected the “Customer email” token from the EDD trigger.
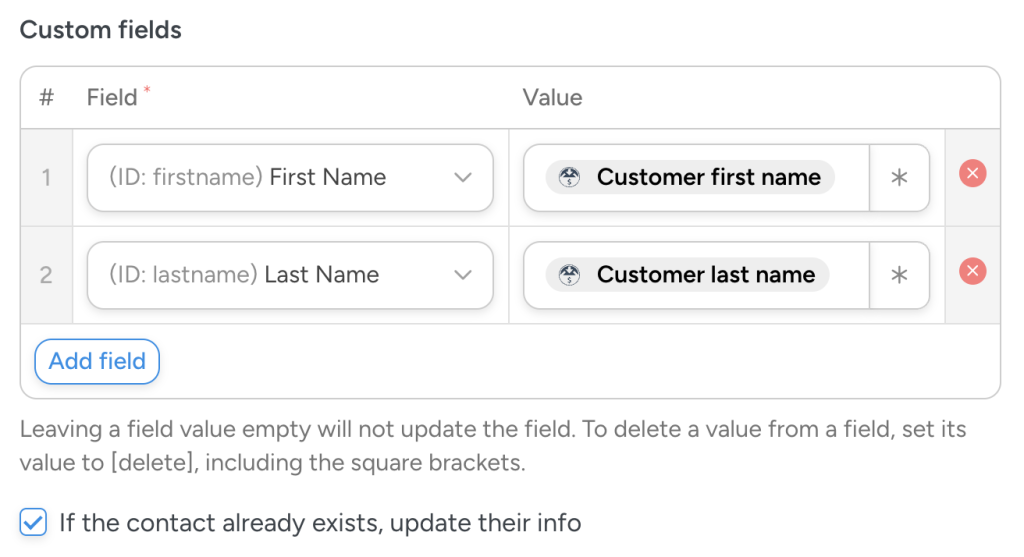
Automator is fully integrated with your HubSpot account. This means that you can include custom fields when creating new or updating new contacts.
To add a custom field, such as “First Name”, “Last Name”, or even “Phone Number”, click Add field.
Fill in the custom fields using tokens from the EDD trigger and/or your WordPress site.
Make sure to select the checkbox below Custom fields to prevent duplication and ensure that your contacts remain up-to-date.
When you’re finished, click Save.
Step 5: Go Live
You’re just about ready to leave the docks. All you need to do is toggle the recipe from Draft to Live.
That’s it! It’s all smooth sailing from here.
New user onboarding really is that easy with Automator Lite. However, upgrading to Automator Pro comes with even more powerful navigational tools for your customers.
Let’s take a closer look.
Step 6 (Optional): Add a Second Action
With the trigger and action that we’ve set up, Automator will add your new contacts to HubSpot. But, with a second action, you can also segment your new contacts.
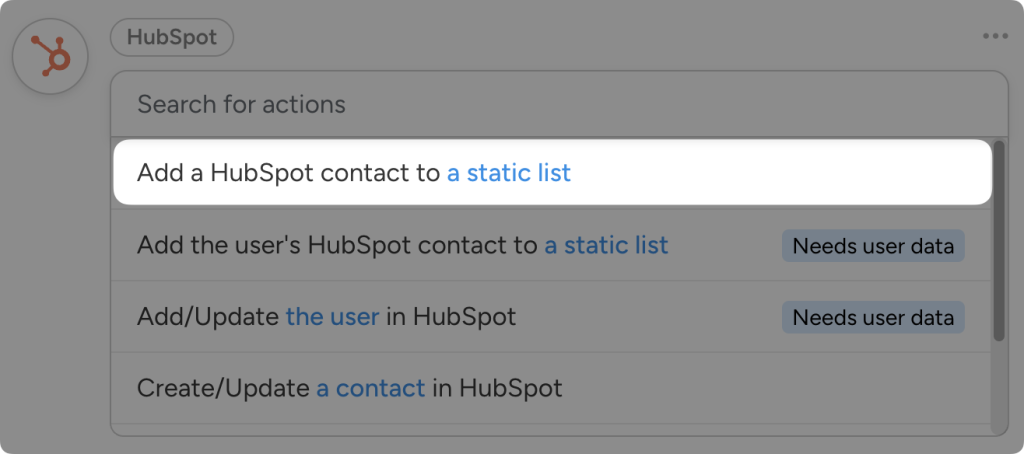
In the Actions panel, click Add action and select HubSpot. From the dropdown list that appears, select Add a HubSpot contact to a static list.
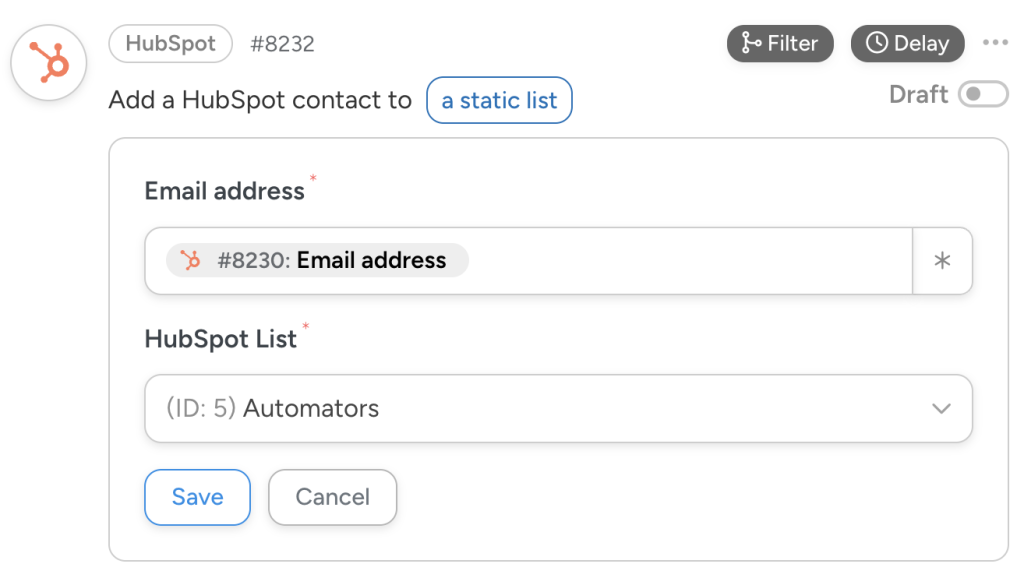
Automator will present you with a simple form with two fields: Email address and HubSpot List.
Fill out the email field with the email token from either the EDD trigger or the first HubSpot action.
Select the HubSpot list from the dropdown.
Once you’re finished, click Save.
Step 7: Add Filters and More Actions
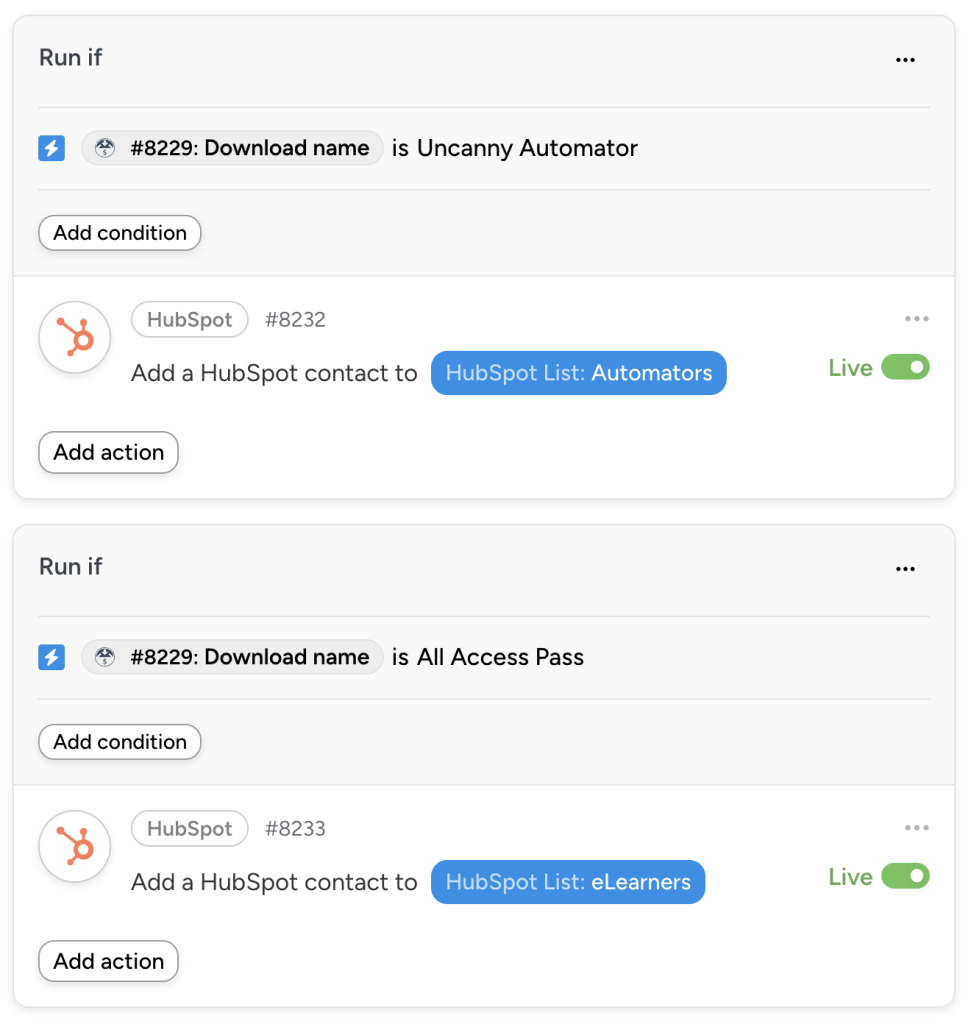
Of course, you don’t want to add all of your contacts to the same list. To segment your new contacts, you can use Automator’s filters feature.
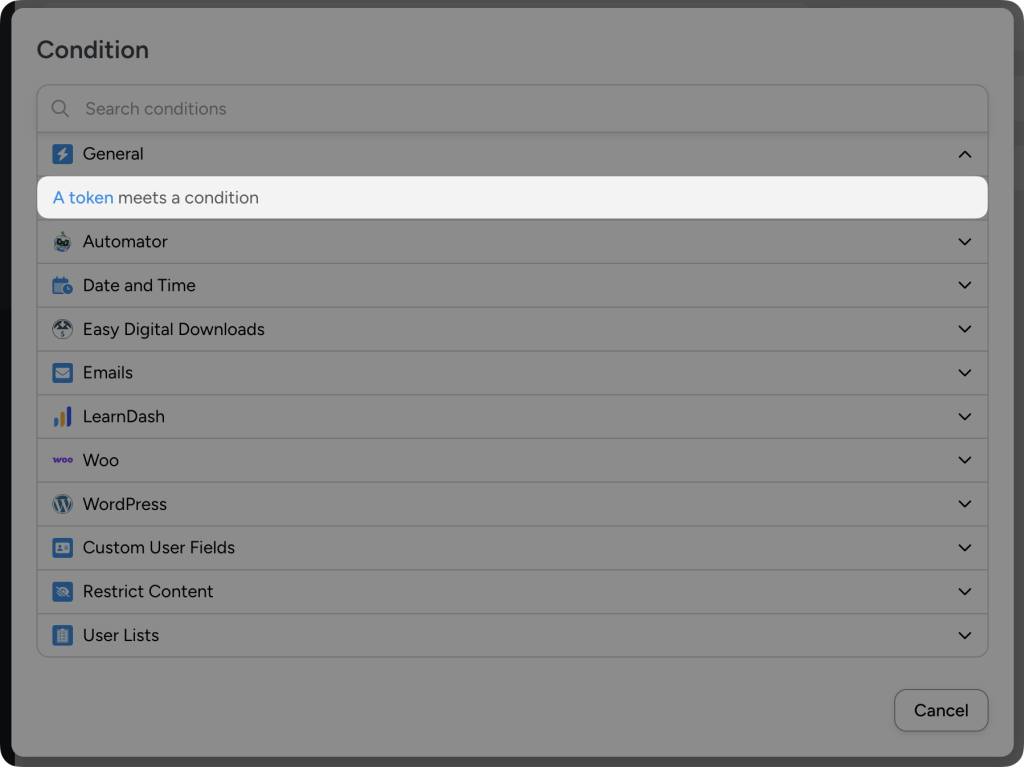
To add a filter to an action, hover over the action and click Filter. In the modal that appears, select A token meets a condition.
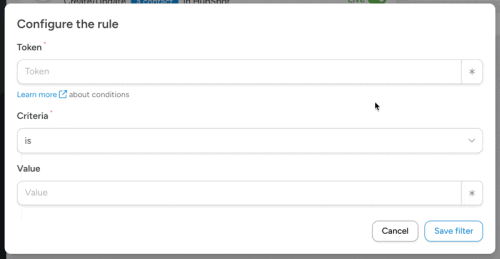
A secondary modal will appear.
In the Token field, select the token that you want to use to segment your contacts. For example, we have selected the “Download name” to segment our contacts based on their purchase.
In the Criteria field, select “is”.
In the Value field, enter the value that the token must have for the action to run.
Once you’re finished, click Save filter.
Add as many actions with filters as you want to automatically segment your contacts.
See how much more you can do with Automator Pro? And that’s not even half of it.
More Ways to Onboard New Users
So far, we’ve just skimmed the surface of automating onboarding processes. But, like we said before, Automator is a powerful user onboarding tool.
Let’s dive a little deeper into those depths.
Product Tutorial Onboarding Automation
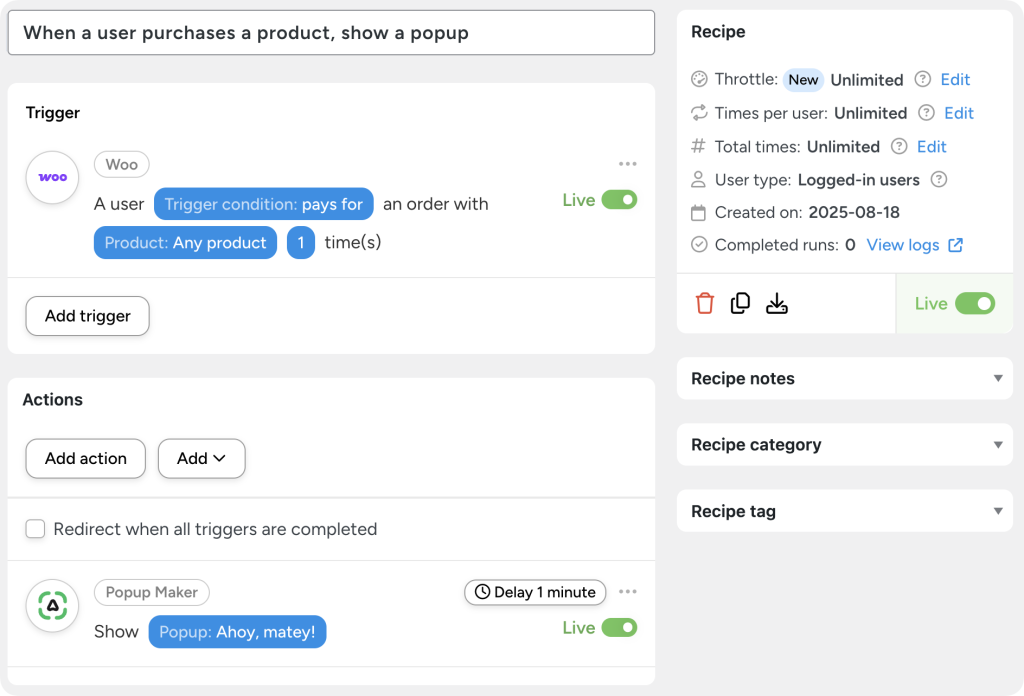
Popups are a great way to help your users get started with your product right after purchase.
With Automator and a popup plugin like Popup Maker, you can display relevant popups for just about anything. And just about anywhere.
Popup Maker already has essential triggers for displaying your popups. However, with Automator, you unlock hundreds more triggers for your popups.
Additionally, you can use the Dynamic Content Addon to personalize the popup based on any token in your recipe. With Automator, you can dynamically personalize the popup content based on:
- Location,
- Product,
- Order amount,
- Etc.
Automated Routine Check-Ins
Product follow-ups and reviews are an essential part of the onboarding process. After all, you don’t want a surprise mutiny on your hands!
Automator helps you get more (and better) reviews with a few simple recipes. Check out this blog post and see for yourself:
Get Better Sales with WooCommerce Product Reviews & Automator >>>
Milestones and Loyalty Programs
The onboarding process (just like our beloved deep blue sea) never truly ends. As long as your products and offerings keep evolving, you’ll always be onboarding new and existing customers.
That’s where loyalty programs come in. And Automator can help there, too. Whether it’s awarding store credit, offering exclusive discounts, or restricting content, Automator does it all.
Find out how to create a fully-automated loyalty program with Automator:
Build Customer Loyalty with Automator >>>
Keep Automating
Every business’ onboarding needs and journeys will look a little different. However, you can always find ways to automate those onboarding steps.
If you’re looking for more tasks to automate, apply Automator’s R.I.C.H framework.
Tasks that are ripe for automation are:
- Repetitive: Tasks, particularly unavoidable ones, that you perform over and over again.
- Iterative: Tasks that you can and/or do perform across any measurable number of customers, products, posts, pages, etc. or a subset thereof.
- Costly: Tasks that consume significant resources, namely time and money.
- Hard: Tasks that are complex and prone to human error.
If a task satisfies one or more of these criteria, it’s a strong candidate for automation.
Frequently Asked Questions
Conclusion: Onboard and Onward
From the first “ahoy” to lifelong loyalty, user onboarding is the voyage that turns sign-ups into steady customers.
You’ve seen how to chart that course with Uncanny Automator. Send timely emails, light up on-site prompts with Dynamic Content, and segment with filters. You can even reach users by SMS or WhatsApp, and enlist AI to guide and support them in real-time.
Keep it simple at first: a purchase triggers a welcome email and a short tutorial. Then add segments, check-ins, and milestone rewards as you gather wind in your sails.
Remember, great onboarding feels personal, predictable, and fast. Trim friction, keep messages clear, and let automation do the heavy lifting while you steer the ship.
Whether your operation is a nimble skiff or a full-blown cruiseliner, Automator helps every passenger find their cabin—and their reason to stay aboard.
Ready to turn every new user into a loyal voyager? Upgrade to Automator Pro >>>
Until next time, happy automating!





This Post Has 0 Comments