Revive old WordPress posts with AI and Uncanny Automator. Learn how to reverse content decay…
Best QuickBooks Plugin for WordPress (And How to Automate Your Accounting)
Uncanny Automator is the #1 no-code, low-cost QuickBooks plugin for WordPress. Automate and integrate invoices, payments, customers, and more between your WooCommerce store and your QuickBooks Online account.
Looking for the perfect QuickBooks plugin for WordPress? You’re in excellent company. Millions of business owners have already ditched manual data entry and embraced the magic of automation.
Whether you’re running a bustling WooCommerce store or managing client projects, accounting automation software is a must-have for competitive WordPress businesses.
But, here’s the scoop: Not all QuickBooks plugins for WordPress are created equal. Some limit the number of orders you can sync or don’t offer customizability to match your unique accounting needs. A true QuickBooks integration for WordPress should have unlimited, sophisticated automation features that transform the way you do accounting. Bye, bye T account!
If you’ve ever found yourself copying and pasting customer information from WordPress to QuickBooks moments before your tax or reporting deadlines (we’ve all been there), you’re about to discover some game-changing solutions.
In this article, we’ll walk you through what QuickBooks integrations with WordPress actually do, why your sanity depends on having one, how different solutions compare, and exactly how to get started, today, with the best of the bunch: Uncanny Automator.
Ready to turn your WordPress site into a financial powerhouse? Let’s dive in!
TLDR?
Uncanny Automator is the only two-way, no-code QuickBooks plugin for WordPress that won’t charge you any per-automation fees. Create payments, products, sync taxes, update customers, and more with the #1 automation and integration plugin for WordPress websites.
Try Automator Pro – Elite risk-free for 14 days and start automating your accounting now.
What Is a QuickBooks Plugin for WordPress (And What Should It Do)?
Think of a QuickBooks plugin for WordPress as your personal data assistant—one that never takes coffee breaks or forgets to update your financial records. These clever tools create a bridge between your WordPress website and QuickBooks Online, automatically transferring information so you don’t have to.
But in practical, real-world terms, what do they actually do? Various QuickBooks integration tools for WordPress have different features, but here’s a list of what you should be looking for:
In essence, a QuickBooks plugin for WordPress with all of these features will:
- eliminate the need for manual data entry,
- eliminate human-error (which, along with manual entry, is costing you more than you think),
- synchronize financials across platforms,
- customize accounting workflows without code.
And this now brings us to the next question: Which QuickBooks plugin is right for you?
Why Connect QuickBooks to WordPress With Automator
Here’s where things get exciting!
Uncanny Automator is the #1 automation and integration tool for WordPress websites. That means that it’s more than just an accounting automation tool or a data synchronization integration. Instead, Automator is a game-changer for your WordPress site—one that will revolutionize the way you work.
What makes Automator so special?
- Unlimited automations: Unlike other sophisticated workflow automation tools, Automator doesn’t charge per-automation fees.
- Essential integrations: With 214 integrations and counting, Automator connects all of the plugins and apps in your WordPress tech stack.
- No-code interface: Not a developer? (Here’s a secret; neither am I!) Automator is built for WordPress users of all types and experience levels, so you’ll never have to see a line of code.
- Addon ecosystem (for free): With the Pro – Elite license, you’ll have (free) access to Automator’s powerful addons for content restriction, custom fields, dynamic content, and user lists.
- White glove support: Get 24/7, priority access to the very same experienced developers who built the plugin you’re using.
Specific QuickBooks Capabilities: Automator offers five powerful QuickBooks Online actions that can be triggered from any event on your WordPress site to cover all of your accounting needs:
- Create a payment
- Create a product
- Create an expense
- Create an invoice
- Create or update a customer
Remember that list of essential features we told you to look for in a QuickBooks plugin for WordPress? Here’s how Automator stacks up.
| Feature | Automator | Description |
|---|---|---|
| Real-time updates | ✅ | Recipes (automations) that run in the background. |
| Batch processing | ✅ | Post Loops, User Loops, Token Loops. |
| Two-way communication | ✅ | Incoming webhooks*. |
| Logging and reporting | ✅ | Detailed, automatically generated logs. |
| Data mapping customization | ✅ | Select which WordPress fields to map onto QuickBooks fields using tokens. |
| Custom field mapping | ✅ | Access to your site’s metadata, including custom fields. |
| Conditional logic and filters | ✅ | Powerful, customizable action filters and conditions. |
| Support for multiple websites | ✅ | Pro – Elite 50-site license to connect a single QuickBooks account to multiple sites. |
| WooCommerce compatibility | ✅ | Deep Woo integration with dozens of triggers, actions, and conditions. |
| EDD compatibility | ✅ | EDD, EDD – Recurring Payments, and EDD – Software Licensing for digital product stores. |
| Form-plugin integrations | ✅ | WPForms, Contact Form 7, Gravity Forms, and others. |
| Membership-plugin integrations | ✅ | MemberPress, Ultimate Member, Woo Memberships, and others. |
| LMS-plugin integrations | ✅ | LearnDash, TutorLMS, and others. |
| Events-plugin integrations | ✅ | The Events Calendar, Modern Events Calendar, and others. |
*Two-way communication involves the use of QuickBooks webhooks.
Accounting doesn’t need to be a headache—it doesn’t even need to be a hassle. Automator is the fully-automated, fully-integrated accounting pro you’ve been looking for.
Try Automator Pro – Elite risk-free for 14 days and start automating your accounting now.
In the next section, we’ll show you how to get started with your Automator Pro – Elite license and give you some tips and tricks for getting your “COGS” in gear!
Step-by-Step Guide: QuickBooks + Uncanny Automator
Uncanny Automator’s QuickBooks Online integration is part of the Elite Integrations Addon, included in every Automator Pro – Elite license. Follow these steps to activate your Automator Pro – Elite license, activate the Elite Integrations Addon, and connect QuickBooks to Automator.
Prerequisites:
- WordPress website with admin access.
- QuickBooks Online account.
- Uncanny Automator Pro – Elite license (with Elite Integrations Addon activated)
Install Uncanny Automator
Step 1: Purchase Automator Pro – Elite
Purchase an Automator Pro – Elite license from https://automatorplugin.com/pricing. You will receive a purchase confirmation email and a Welcome email. You can follow the installation and activation instructions in your Welcome email or follow the instructions below.
Step 2: Install and Activate Automator Lite
Automator Lite is the free version of Uncanny Automator—you will need to install and activate it on your WordPress site to use Automator Pro.From your WordPress Admin Dashboard, navigate to Plugins > Add plugin. In the search bar, enter “uncanny automator”. Uncanny Automator will be the first search result. Click Install and Activate.
Step 3: Activate Automator Pro – Elite License
Download Uncanny Automator Pro from your purchase confirmation email or from your Uncanny Automator account.
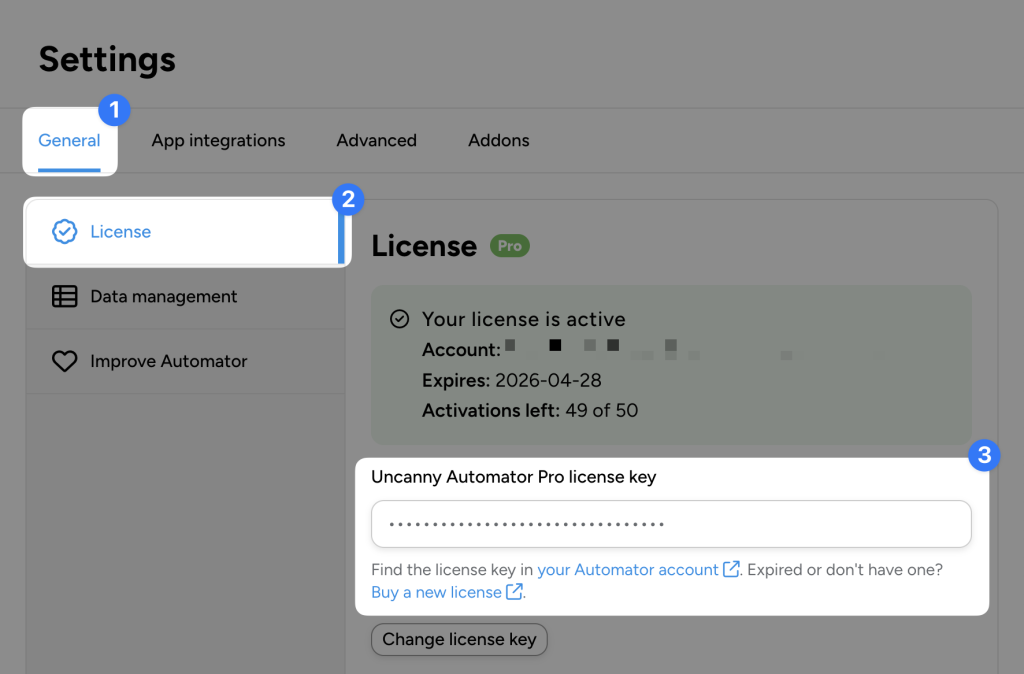
Next, upload the Automator Pro plugin by navigating to Plugins > Add New from your WordPress Admin Dashboard. Click the Upload Plugin button at the top and complete the upload process.Activate the Pro plugin after uploading it and activate your license key by visiting Automator > Settings > General > License and entering the key from your email or account page.
Step 4: Activate Elite Integrations Addon
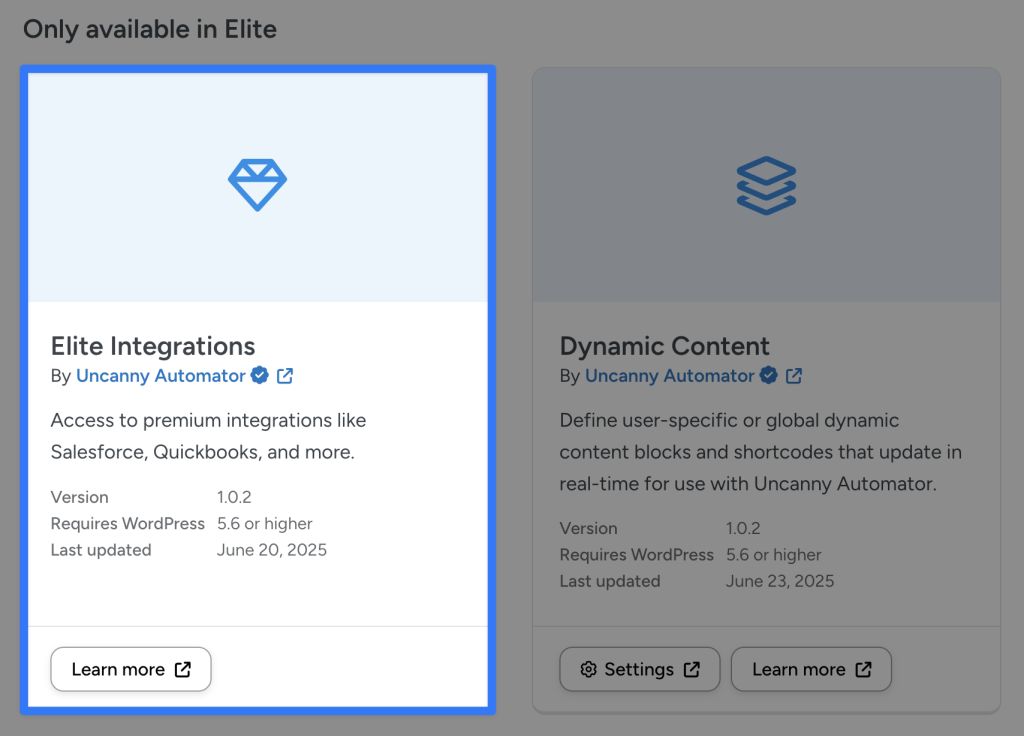
Your Automator Pro – Elite license gives you access to the Elite Integrations Addon which has the QuickBooks Online integration. Before you can connect QuicksBooks Online to WordPress, you will need to activate the Elite Integrations Addon.
To activate the addon, simply navigate to Automator > Addons and ensure that “Elite Integrations” is activated.
Connect QuickBooks Online to WordPress
With Uncanny Automator Pro – Elite installed and activated on your WordPress website, you can connect your QuickBooks Online account to your WordPress site.
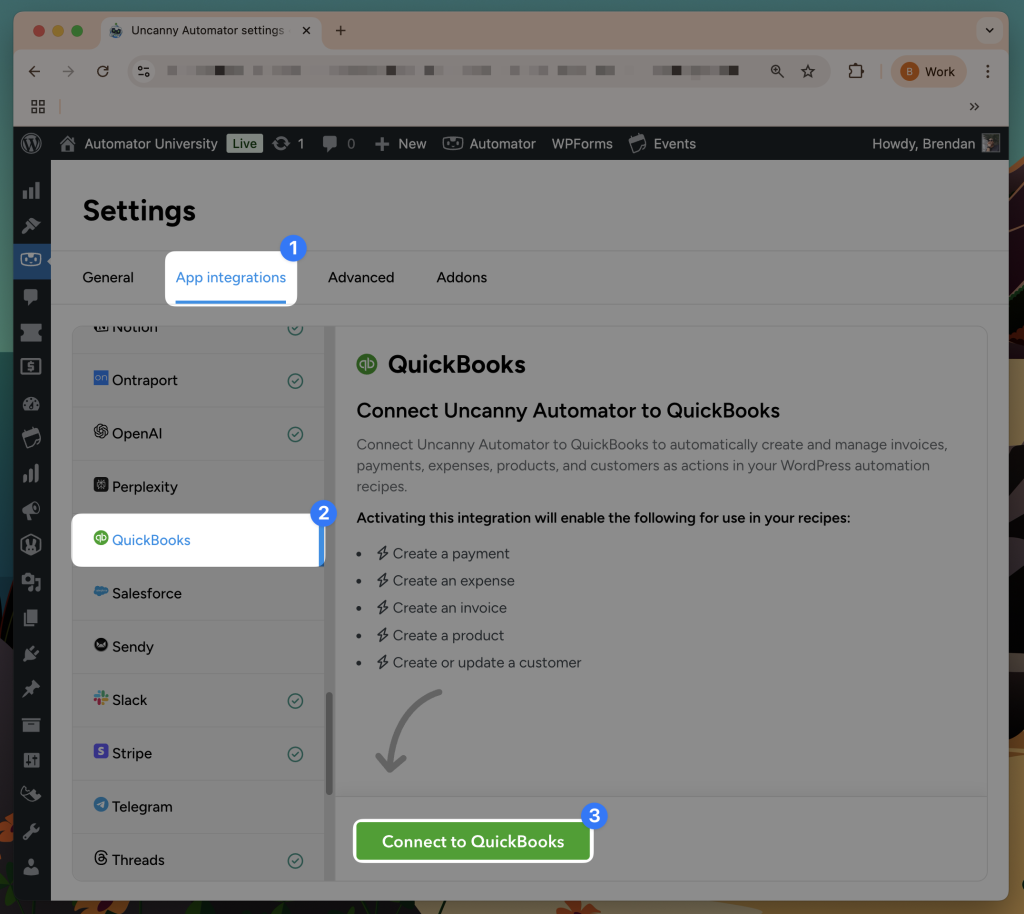
From your WordPress Admin Dashboard, navigate to Automator > App integrations > QuickBooks.
(Note: If you do not see QuickBooks in the left sidebar of app integrations, navigate to Automator > Addons and ensure that “Elite Integrations” is activated. Refer to “Step 4” above.)
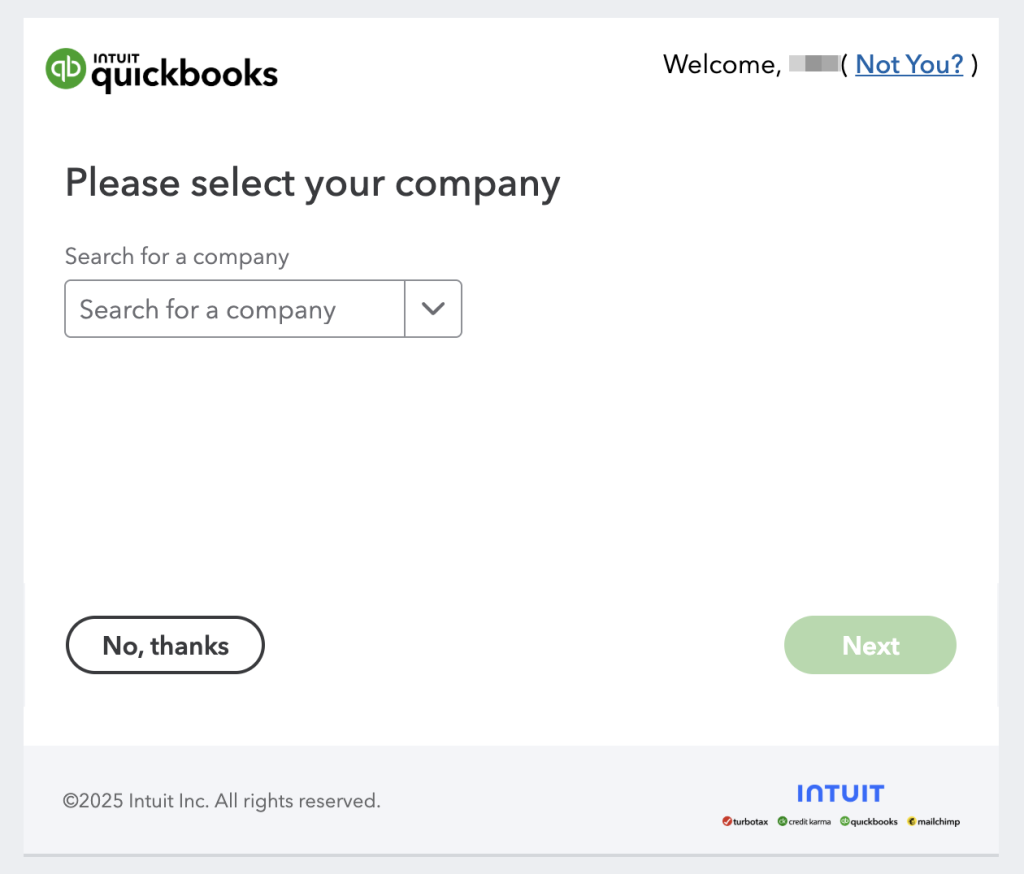
Automator will prompt you to log into your QuickBooks account if you haven’t already. After logging in, select your QuickBooks company and click Next.
Automator will present you with a modal to complete the QuickBooks integration. Click Connect.
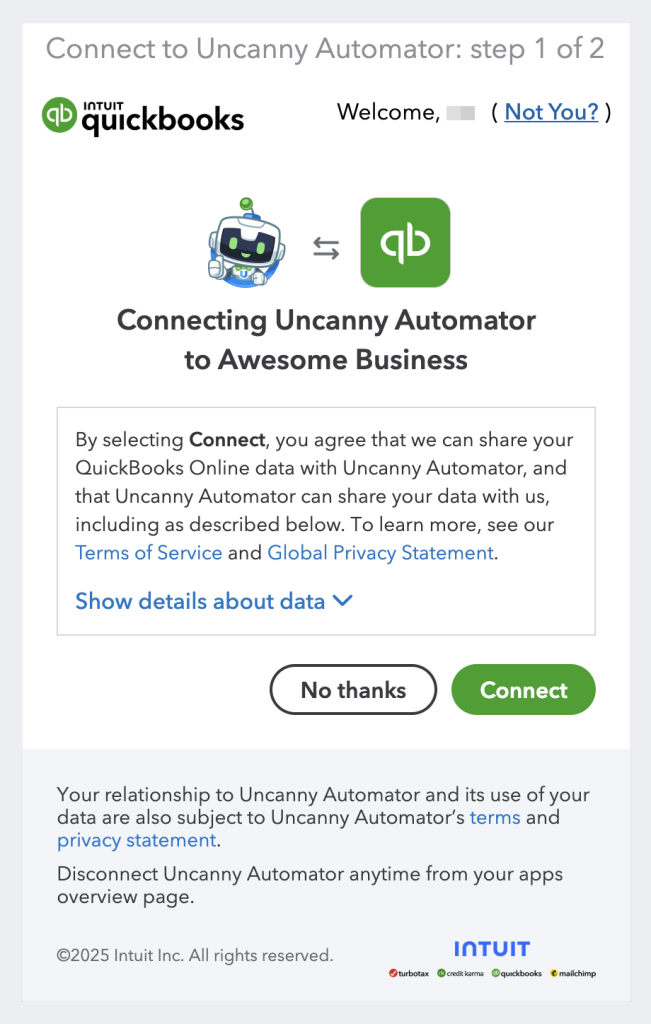
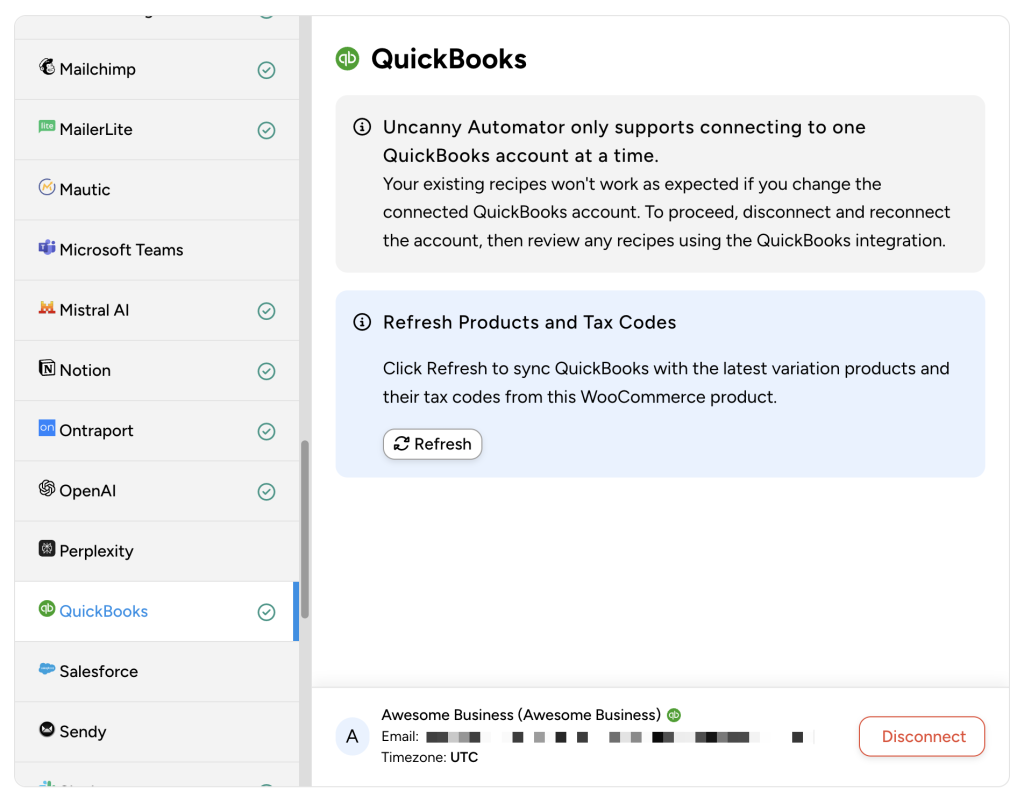
Once you have successfully connected your QuickBooks Online account, Automator will return you to the App integrations screen.
To help keep your QuickBooks account and WordPress website synchronized, Automator provides you with a “Refresh” button.
Syncing WooCommerce and QuickBooks Products
Now that you have connected your QuickBooks Online account to WordPress using Uncanny Automator, you can synchronize your WooCommerce and QuickBooks products.
Automator’s Loops feature (running actions in bulk) will allow you to synchronize your existing products with the click of a button.
Step 1: Create and Name a New Recipe
From your WordPress Admin Dashboard, navigate to Automator > Add new recipe. In the modal that appears, select Everyone.
Give your recipe a name that makes it easy to recognize at a glance. For example, we have named this recipe “Synchronize WooCommerce and QuickBooks products”.
Step 2: Configure Your Trigger(s)
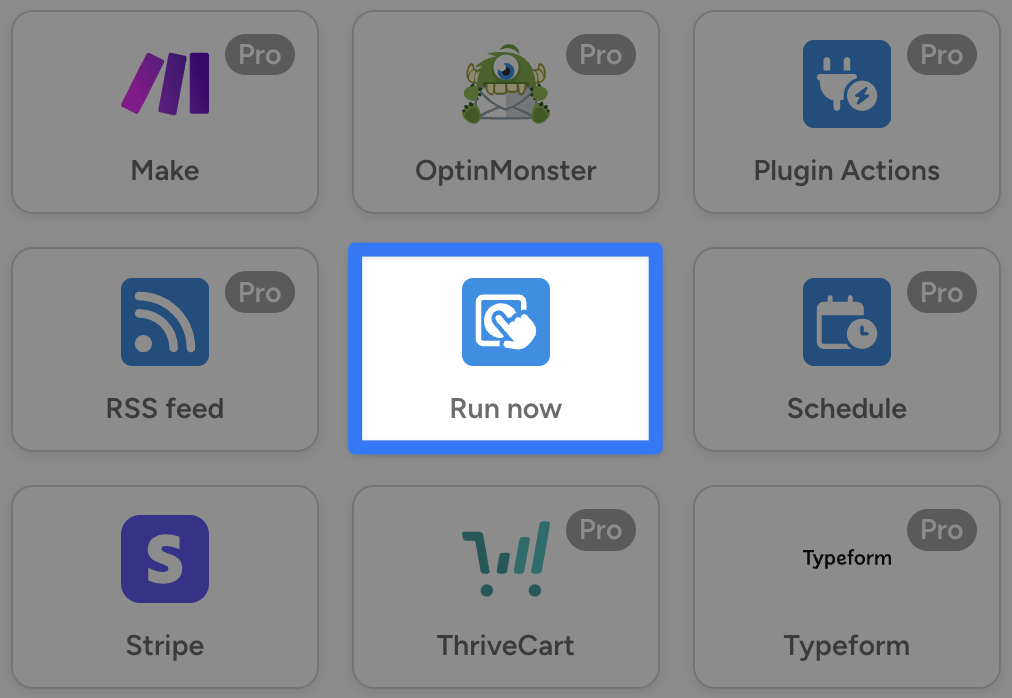
In the Trigger panel, from the menu of available integrations, select Run now.
From the dropdown list that appears, select “Trigger recipe manually”.
Step 3: Configure Your Post Loop
In the Actions panel, click Add and select Post loop.
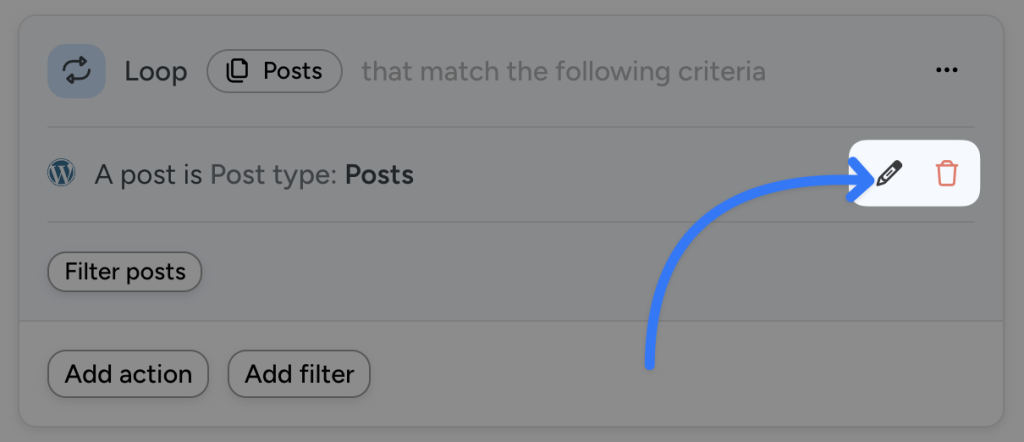
First, you want to edit the loop filter, as this will determine the types of posts upon which your actions, when selected, will be performed. To edit a loop filter, hover over it and click the Edit (pencil) icon.
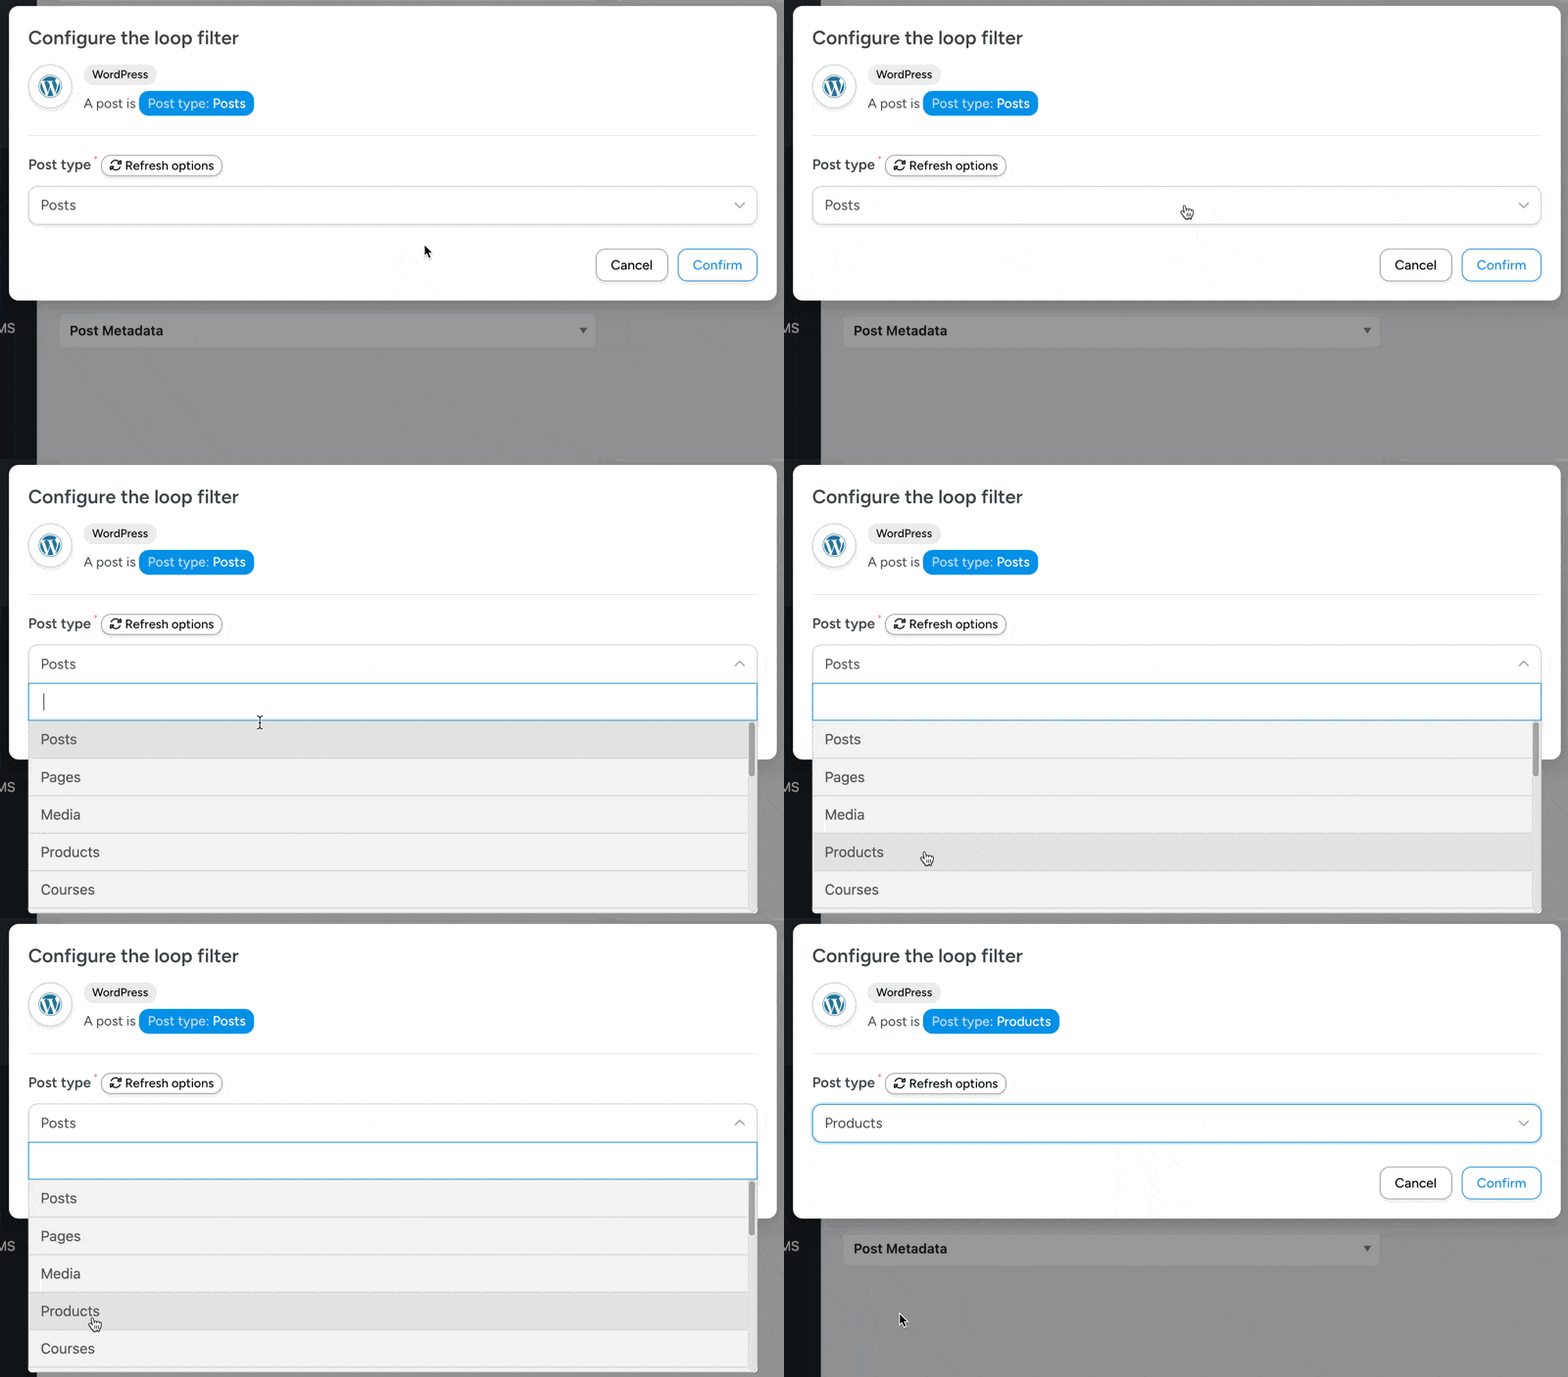
In the modal that appears, in the dropdown menu, select “Products” and click Save.
Step 4: Configure Your Post Loop Action(s)
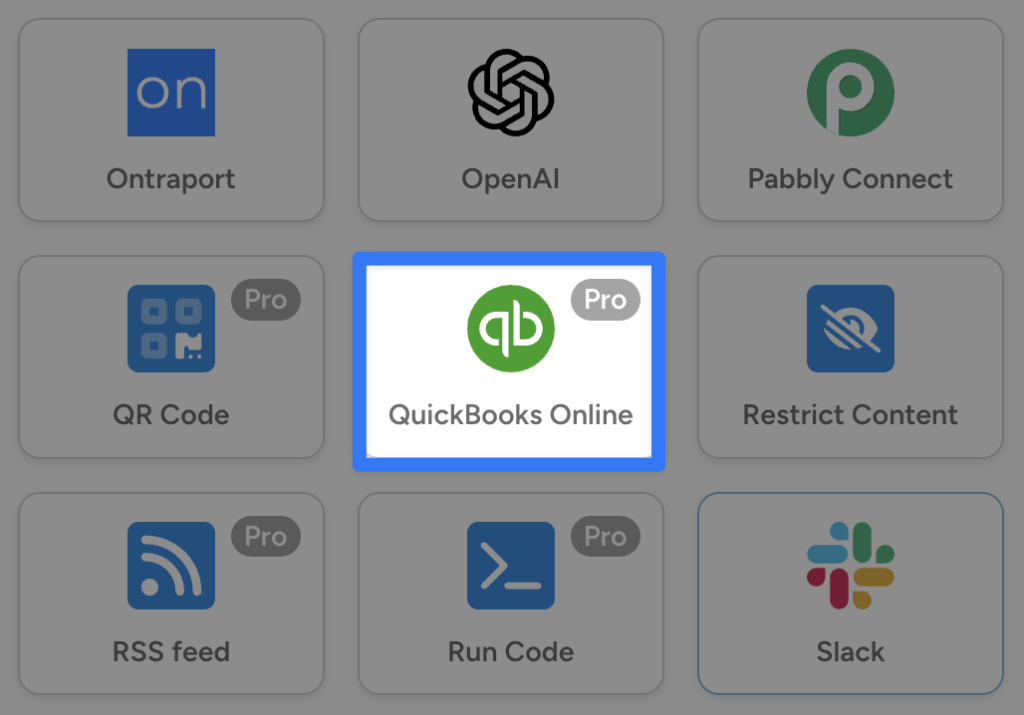
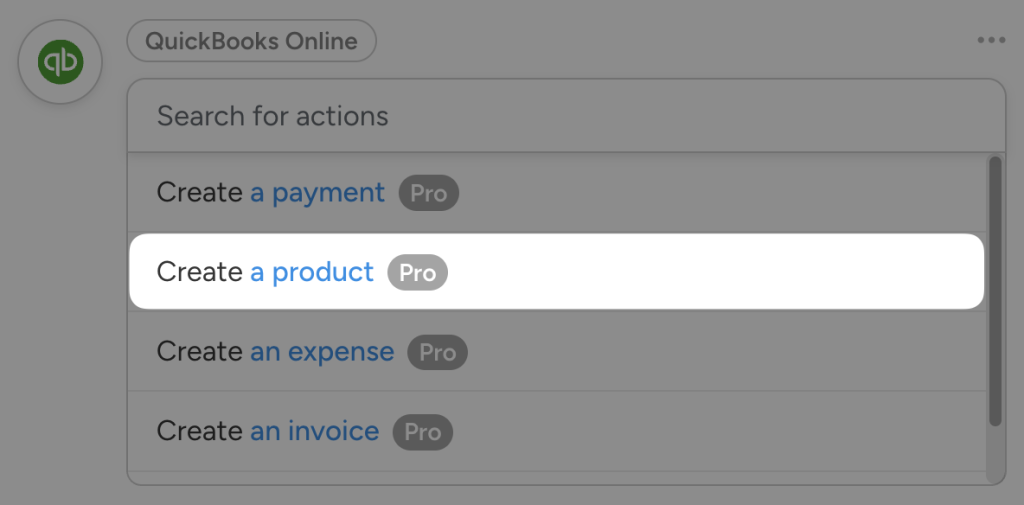
In the Loop panel, click Add action and select the QuickBooks integration.
From the dropdown list that appears, select “Create a product”.
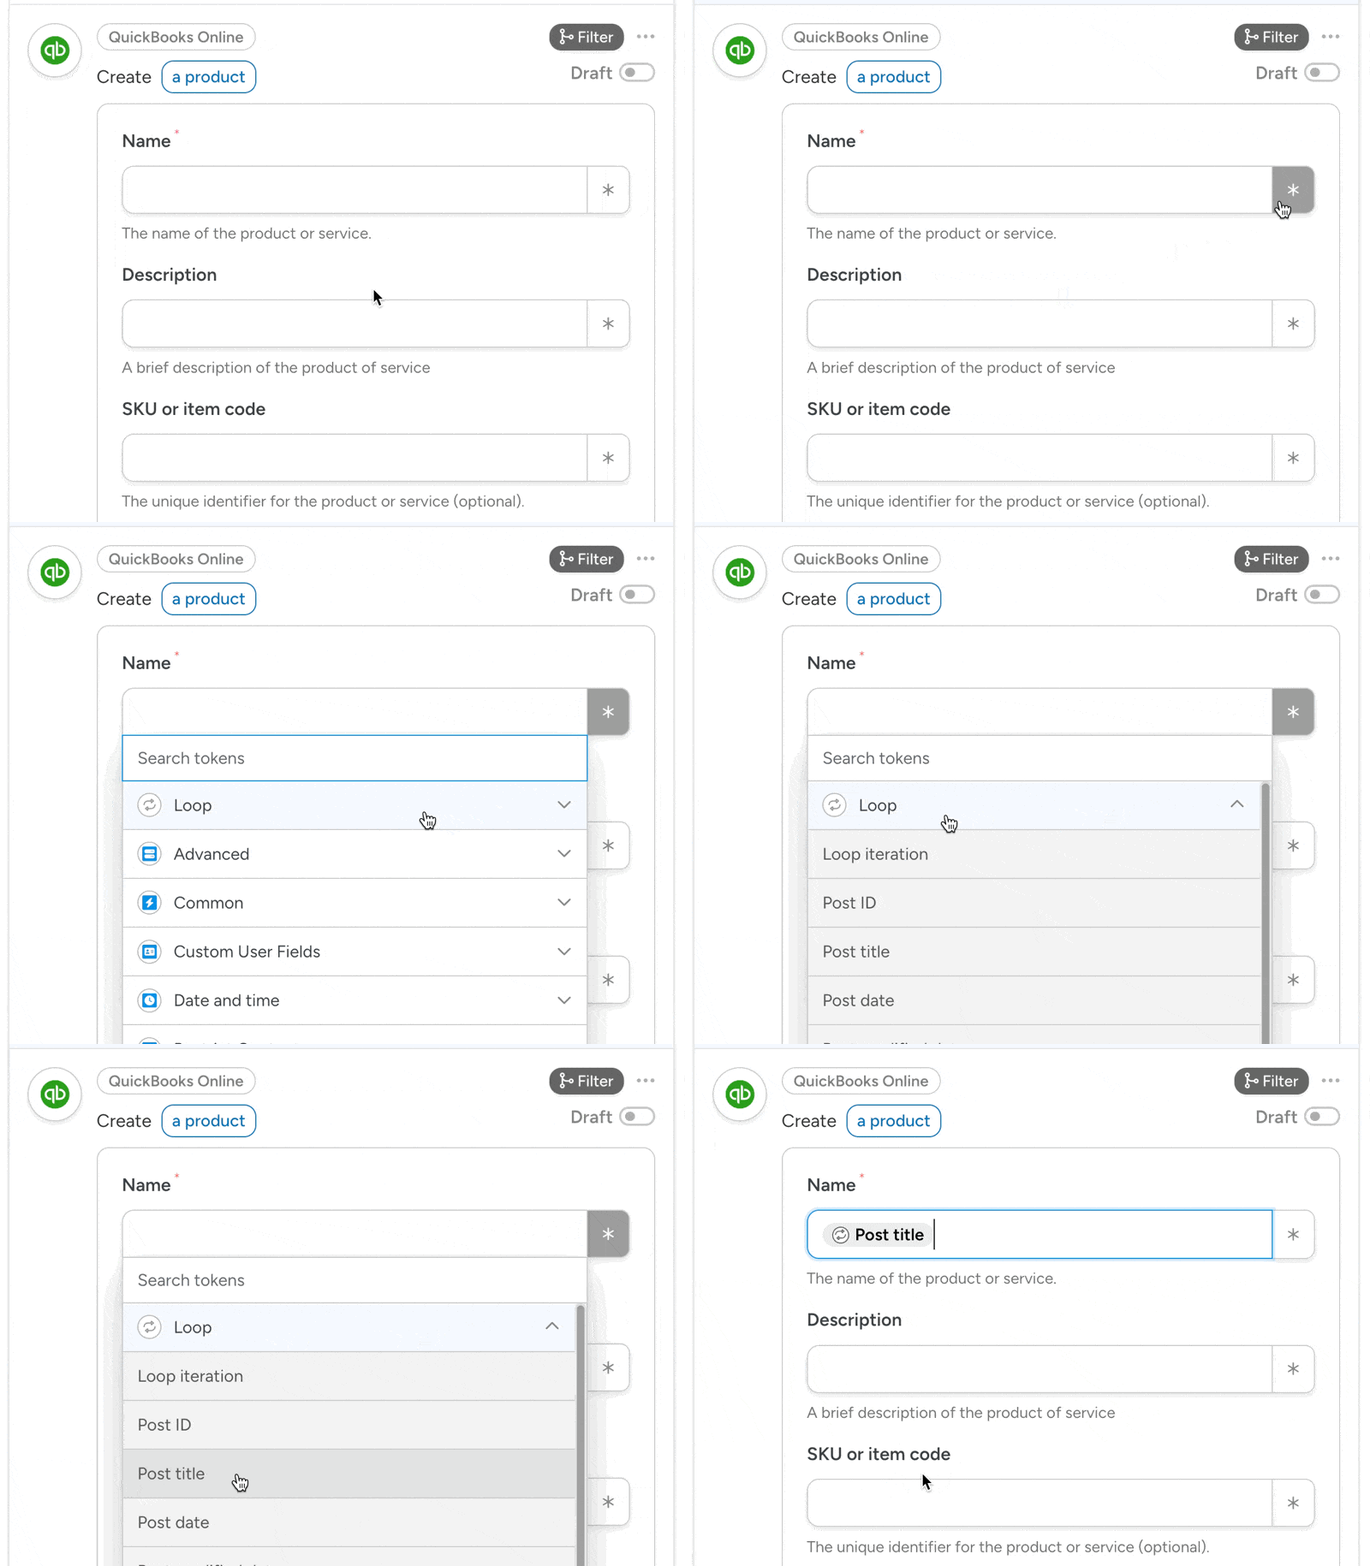
Automator will present you with a form to fill out the product details. You can fill in the fields using a combination of dynamic data in the form of tokens and static data.
To use a token, click the Asterisk in any given field and select the corresponding token. For example, in the Name field, click the Asterisk and select Loop > Post title.
Fill out the remaining fields using tokens and/or static data. Once you’re finished, click Save and toggle the action from Draft to Live.
Step 5: Sync Your Products
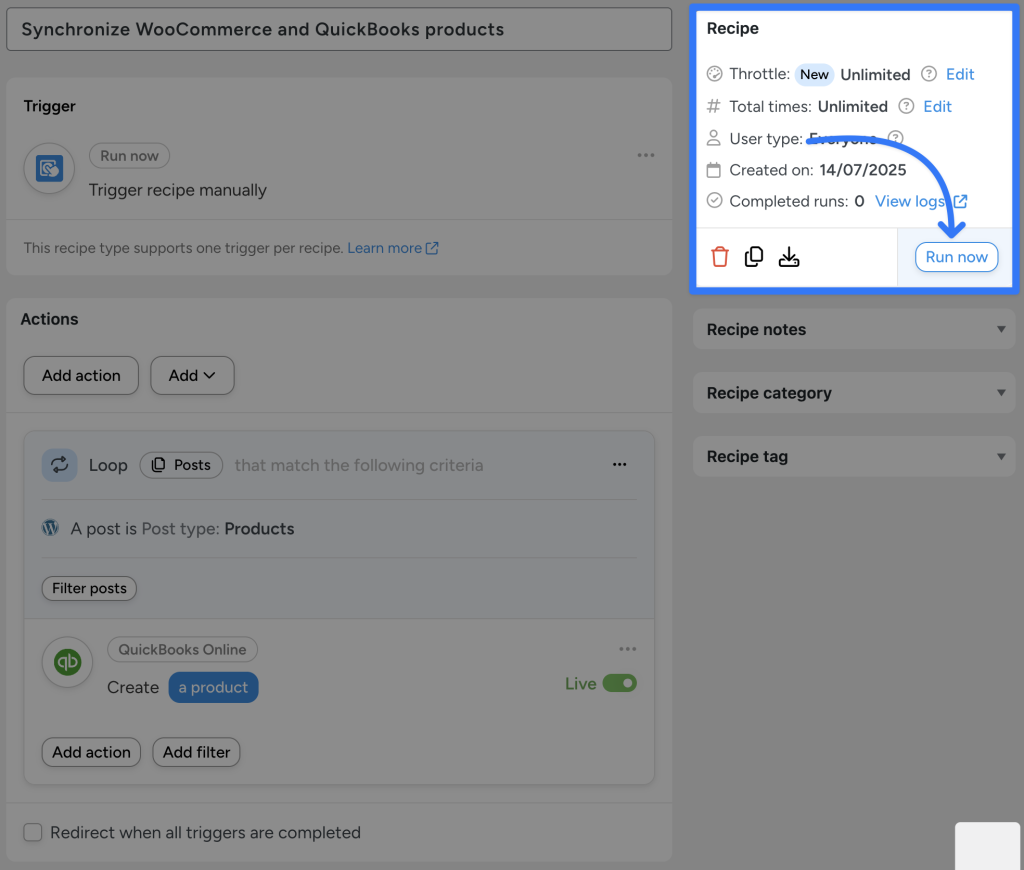
You’re just about ready to synchronize your WooCommerce and QuickBooks products. All you have to do is click Run now and let Automator handle the rest.
The recipe that we just created will synchronize your existing WooCommerce products with QuickBooks. But what about your new products? Automator has that handled as well.
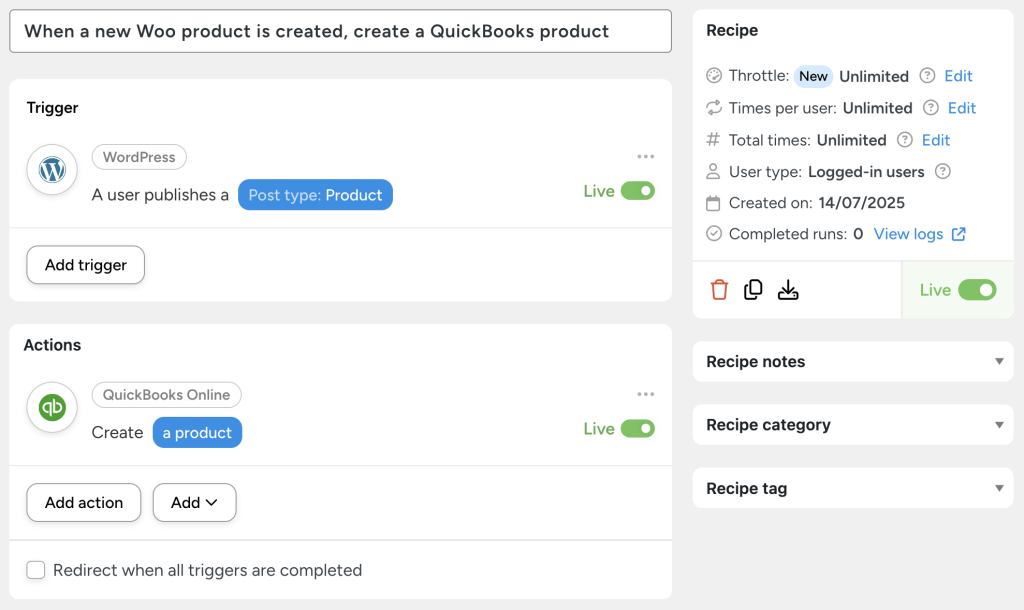
Step 1: Create a Recipe
The recipe pictured above will create a new product in QuickBooks whenever a user publishes a product in WooCommerce.
Step 2: Create WooCommerce and QuickBooks Product Associations
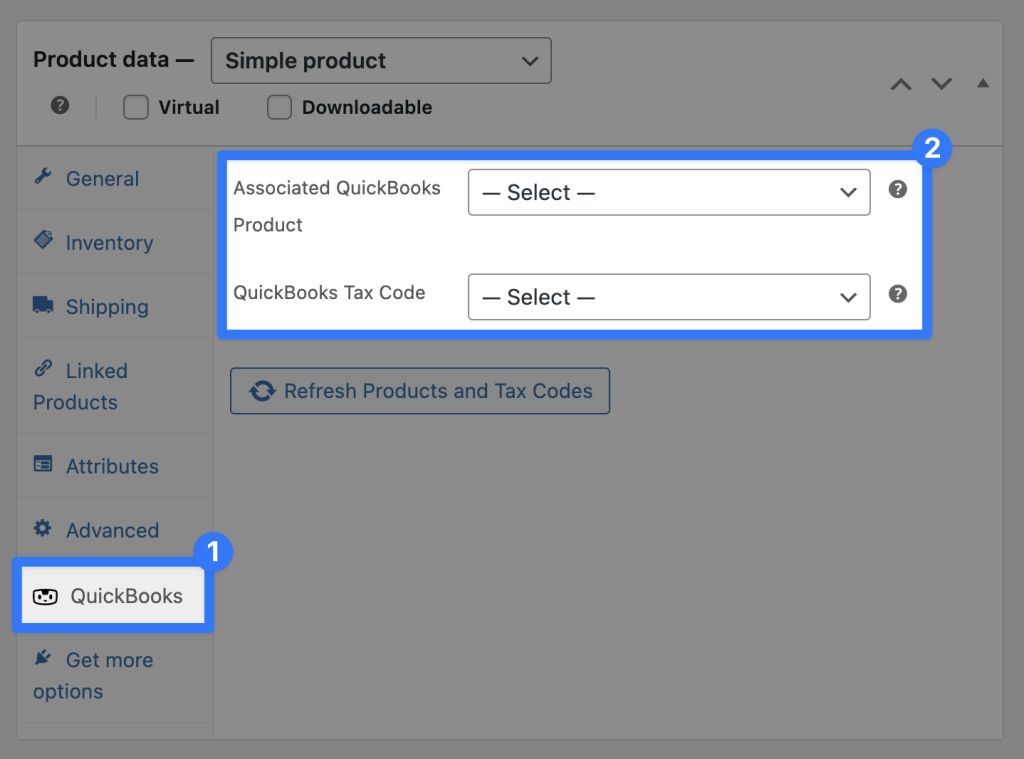
After the new product is created, or when creating a new product, from within the WooCommerce product editor, you can associate products together.
From within the product editor, in the Product data panel, click QuickBooks. You can now select an “Associated QuickBooks product” and “QuickBooks Tax Code” for the WooCommerce product.
That’s it! Now your WooCommerce and QuickBooks products are perfectly synchronized.
Syncing WordPress and QuickBooks Customers
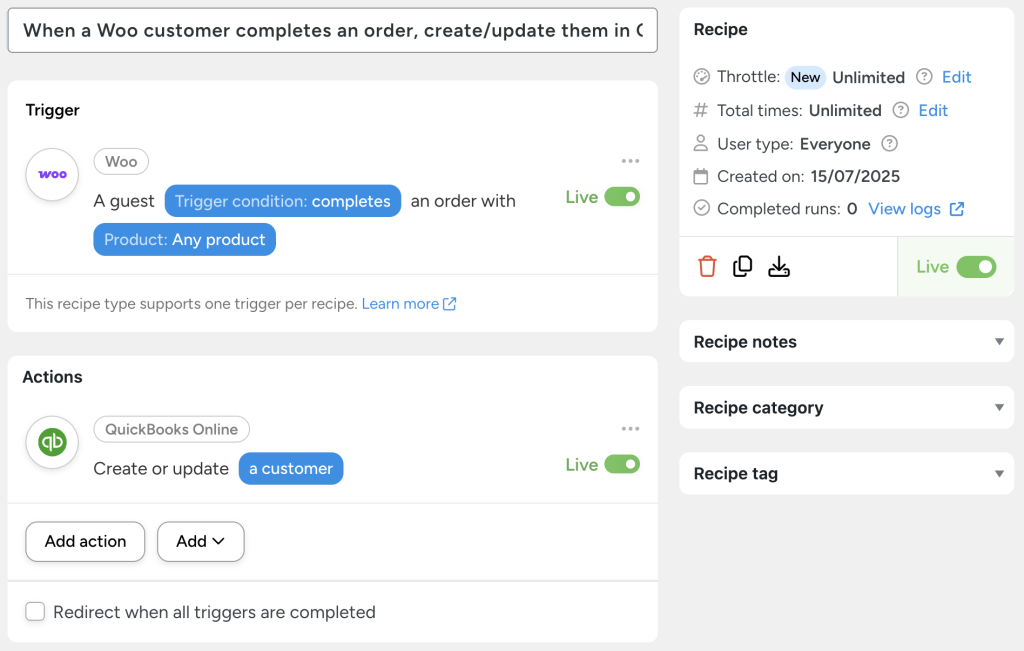
A large part of keeping good accounting records is being able to tie orders, invoices, and payments back to specific customers. This Automator recipe does just that.
Whenever a customer places an order in WooCommerce, Automator will either create or update the customer in QuickBooks.
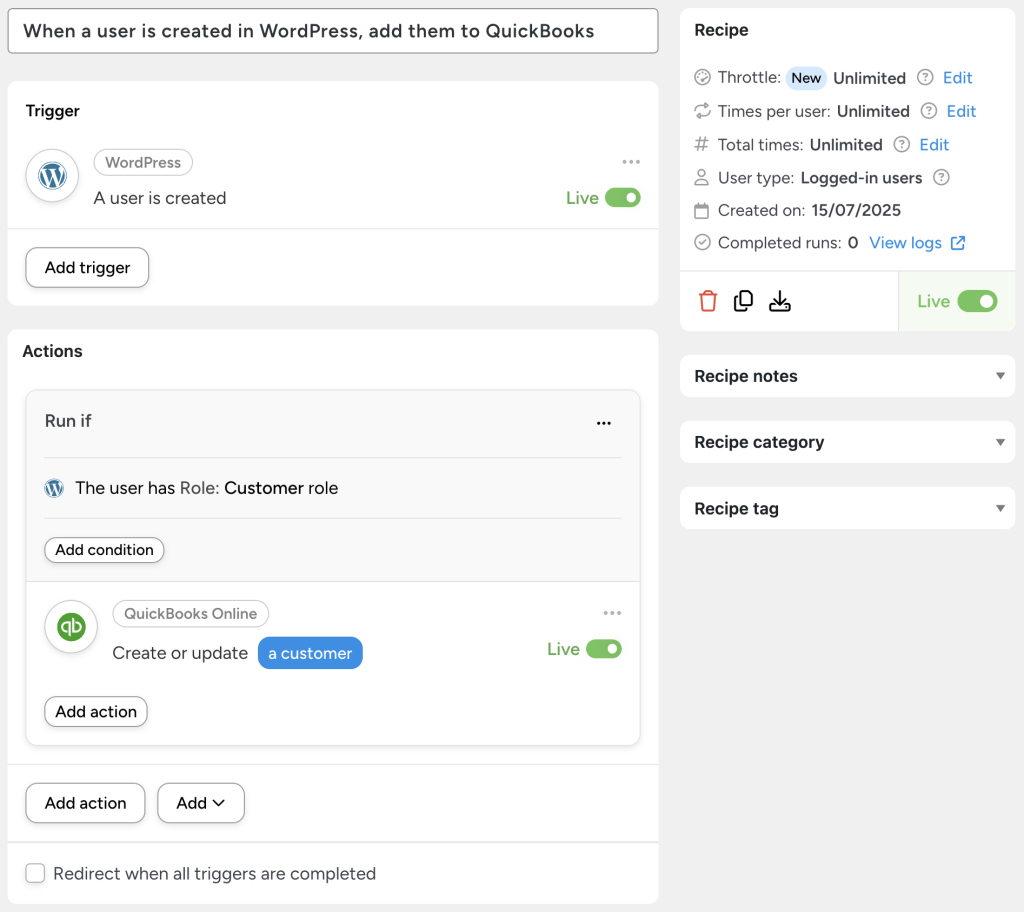
Alternatively, if you don’t want to wait for a customer to place an order, try this recipe:
Whenever a new user is created, Automator will create or update their information in QuickBooks. Adding a filter for user roles ensures that only specific types of WordPress users end up in our QuickBooks customer rolls.
Syncing WordPress and QuickBooks Invoices
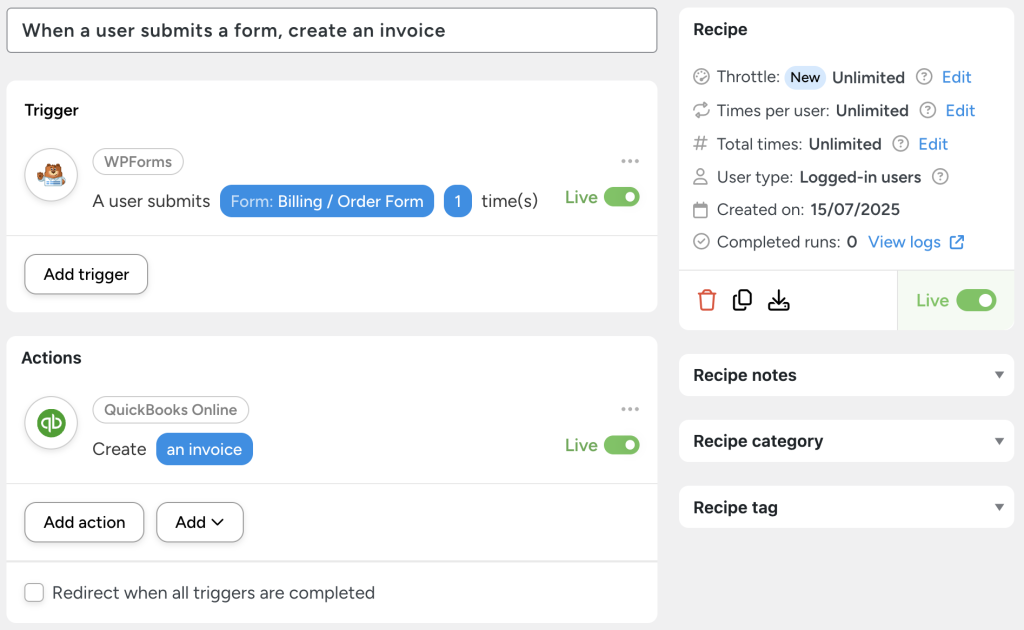
If you’re one of the many WordPress business owners using their form-plugin to create estimates and invoices for customers, this Automator recipe is for you.
Whenever a customer submits a form, either placing an order or requesting a quote, you can easily generate a corresponding invoice in QuickBooks.
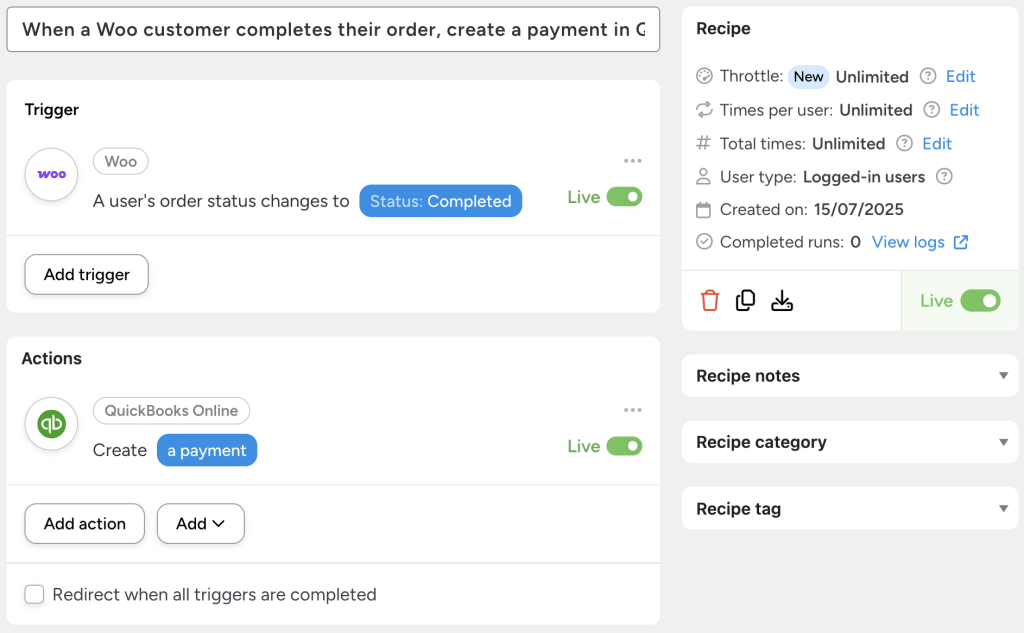
Syncing WordPress and QuickBooks Payments
Keep track of payments as they come in—not as your filing deadline approaches.
With the recipe pictured above, you can create QuickBooks payments and tie them to specific orders whenever that order’s status changes in WooCommerce.
Best Practices, Tips & Tricks
With the Automator recipes that we’ve created and explored together, you’re well on your way to creating a fully-automated and integrated accounting system.
As you continue to build more Automator recipes (and take in more orders), here are some tips and tricks for keeping things organized:
1. Keep WooCommerce and QuickBooks IDs Synchronized
Keep IDs for orders, products, and customers synchronized between platforms. This will not only make creating recipes easier, but also simplify reconciliation later on. If that’s not possible, use WooCommerce’s native custom field feature for products or a plugin like Advanced Custom Fields to create custom fields in WordPress to match IDs in QuickBooks.
2. Set Up Error Notifications and Monitoring
Automations are designed to work—but even the best automation tools can run into problems. Whether it’s missing or mismatched field data, busy servers, or something else, automations sometimes don’t behave as expected. That’s why setting up error notification messages is crucial for ensuring that your accounts continue to run smoothly.
3. Use Conditional Logic for Smart Invoice Creation
We explored some simple uses for filters in Automator recipes. However, once you get more comfortable with these conditional logic tools, you can begin to create more sophisticated automations with multiple actions and triggers.
4. Create Backup Workflows for Critical Data
Set up secondary recipes that log important transactions to a Google Sheet or Airtable database. Not only will this give you the ability to automatically create backups of your financial records, but it will also allow you to restrict access to your primary accounting tools.
5. Leverage Custom Fields for Business Intelligence
Map custom WordPress fields (like marketing source, customer type, or product category) to QuickBooks custom fields. This enriches your financial data and enables better reporting and business insights directly from your accounting software.
6. Schedule Non-Critical Automations During Off-Peak Hours
Use Automator’s delay and scheduling features to process updates, inventory syncs, or report generation during low-traffic periods. This improves site performance and reduces the risk of rate limiting from QuickBooks for particularly busy sites.
Frequently Asked Questions
Conclusion
Connecting QuickBooks Online to your WordPress site doesn’t have to be a technical headache—or a budget breaker.
With the right plugin, like Uncanny Automator, you can eliminate manual data entry, reduce accounting errors, and finally get your WooCommerce, form, membership, and LMS data flowing exactly where it belongs: straight into QuickBooks.
We’ve explored what a QuickBooks plugin for WordPress should do, compared the most important features, and walked you through step-by-step instructions to get everything set up with Automator. From syncing products and customers to automating payments and invoices, you now have everything you need to build a fully integrated, no-code accounting system—one that runs quietly (and efficiently) in the background.
Whether you’re a small business owner, online store operator, or agency managing multiple sites, Uncanny Automator offers the power, flexibility, and ease-of-use to take your accounting workflows to the next level.
Ready to stop copying and pasting—and start automating your accounting instead?
Try Uncanny Automator risk-free for 14 days >>>
Until next time, happy automating!





This Post Has 0 Comments