Revive old WordPress posts with AI and Uncanny Automator. Learn how to reverse content decay…
Connect Shopify to WordPress
Integrate Shopify with WordPress using Uncanny Automator to enhance your ecommerce store with immersive courses, exclusive memberships and more.
Are you looking for a way to connect Shopify to WordPress? We certainly hope so!
In this post, we’ll show you how to easily and effortlessly connect your Shopify store to your WordPress website.
Want to create WordPress users from a Shopify order? How about enrolling Shopify customers in LearnDash courses? What about registering Shopify customers as members in your content-rich MemberPress website?
Whatever the reason, Uncanny Automator can help you create a seamless Shopify and WordPress integration—and we’ll show you how!
But that’s enough of an introduction for now. Let’s get started.
Introduction
If you’re ready to upgrade your Shopify-powered ecommerce business with the content and community rich features of WordPress, then this is the post you’ve been looking for.
In this step-by-step guide, we’ll show you how to integrate Shopify and WordPress with the Uncanny Automator plugin. We’ll be using webhooks to create the integration, but don’t worry—there’s no code required!
By the end of this tutorial, you’ll be able to harness the power of WordPress for your Shopify store.
Let’s dive in.
Why Connect Shopify to WordPress with Automator
As one of the leading ecommerce and online retail POS systems, Shopify hardly needs any introduction. If you’ve ever wanted to sell your products online, you can get started with Shopify in just a few minutes.
Likewise, WordPress is the most capable and versatile CMS available, putting the content and community building power of the web right at your fingertips.
While Shopify and WordPress have limited overlapping functionality, there’s plenty of opportunity to leverage the strengths of one with the other. You just need a way to connect your Shopify store to your WordPress website.Enter Uncanny Automator!

As the automation and integration tool of choice for WordPress websites, Automator can easily connect Shopify to WordPress—and much, much more.
Do you want to sell memberships on Shopify and manage your content on WordPress? Automator can help you. Is Shopify the storefront for your WordPress-powered LMS? Automator can connect the two together. Maybe Shopify is the ticket counter for your event-centered WordPress website? Automator is your ticketmaster.
There are plenty of reasons why Automator is the best option for connecting Shopify and WordPress, but we’ll let Automator’s first-in-class features do the talking:
- Affordability: Unlike other automation and integration solutions, Automator won’t charge you each time you run an automation. In other words, the more you automate and integrate, the more you save!
- Ease-of-Use: Automator is a seriously powerful plugin. But don’t worry. All of that power is packed into a user-friendly click-and-play interface with a learning curve so gentle that it’s barely a mound.
- Versatility: How many plugins do you know that can function as a workflow automator, app integrator, custom fields editor, metadata manager, content restrictor and, well, you get the idea? We’re willing to bet that this is the first one. However you choose to integrate Shopify and WordPress, Automator has you covered.
- Integrations: Automator has 214 integrations with more on the way all of the time. Even if you don’t see a direct integration, Automator has a seamless and user-friendly webhook integration (that we’ll be showing off in this post) so you can connect to the whole web!
- Support: Unparalleled support has made Automator one of the highest-rated plugins in the WordPress ecosystem. Is there a feature that would make your life easier? Maybe you need some help setting up a time-saving recipe. Whatever your automation and integration needs might be, the Automator support team is never more than a help request away.
Convinced yet? Get your Automator Pro license today so you can follow along.>>>
Getting Started: Creating Your First Shopify and WordPress Integration with Automator Webhooks
Now that you have your Automator Pro license, it’s time to create your first Shopify and WordPress integration.
Automator works using recipes, i.e., combinations of triggers and actions across two or more integrations. To connect Shopify to WordPress, we’ll be using Automator’s Webhooks integration.
It’s a powerful and versatile tool that allows you to connect your WordPress website to, well, basically the entire internet. But don’t worry. It’s easy to use.
Let’s take a look at creating our first Shopify and WordPress integration with an Automator recipe.
Creating WordPress Users from Shopify Customers
Whether you’re managing courses, memberships, events or listings, the fundamental building block of any WordPress community is its users.
As such, the first Shopify and WordPress integration that we’ll make together will automatically turn our Shopify customers into WordPress users. We’ll send these newest members of our community a password reset link via email so they can jump into the WordPress world that we’ve created for them.
Let’s get started.
Step 1: Create a New Recipe
From your WordPress Admin Dashboard, navigate to Automator > Add new recipe. In the pop-up window that appears, select Everyone.

Step 2: Name Your Recipe
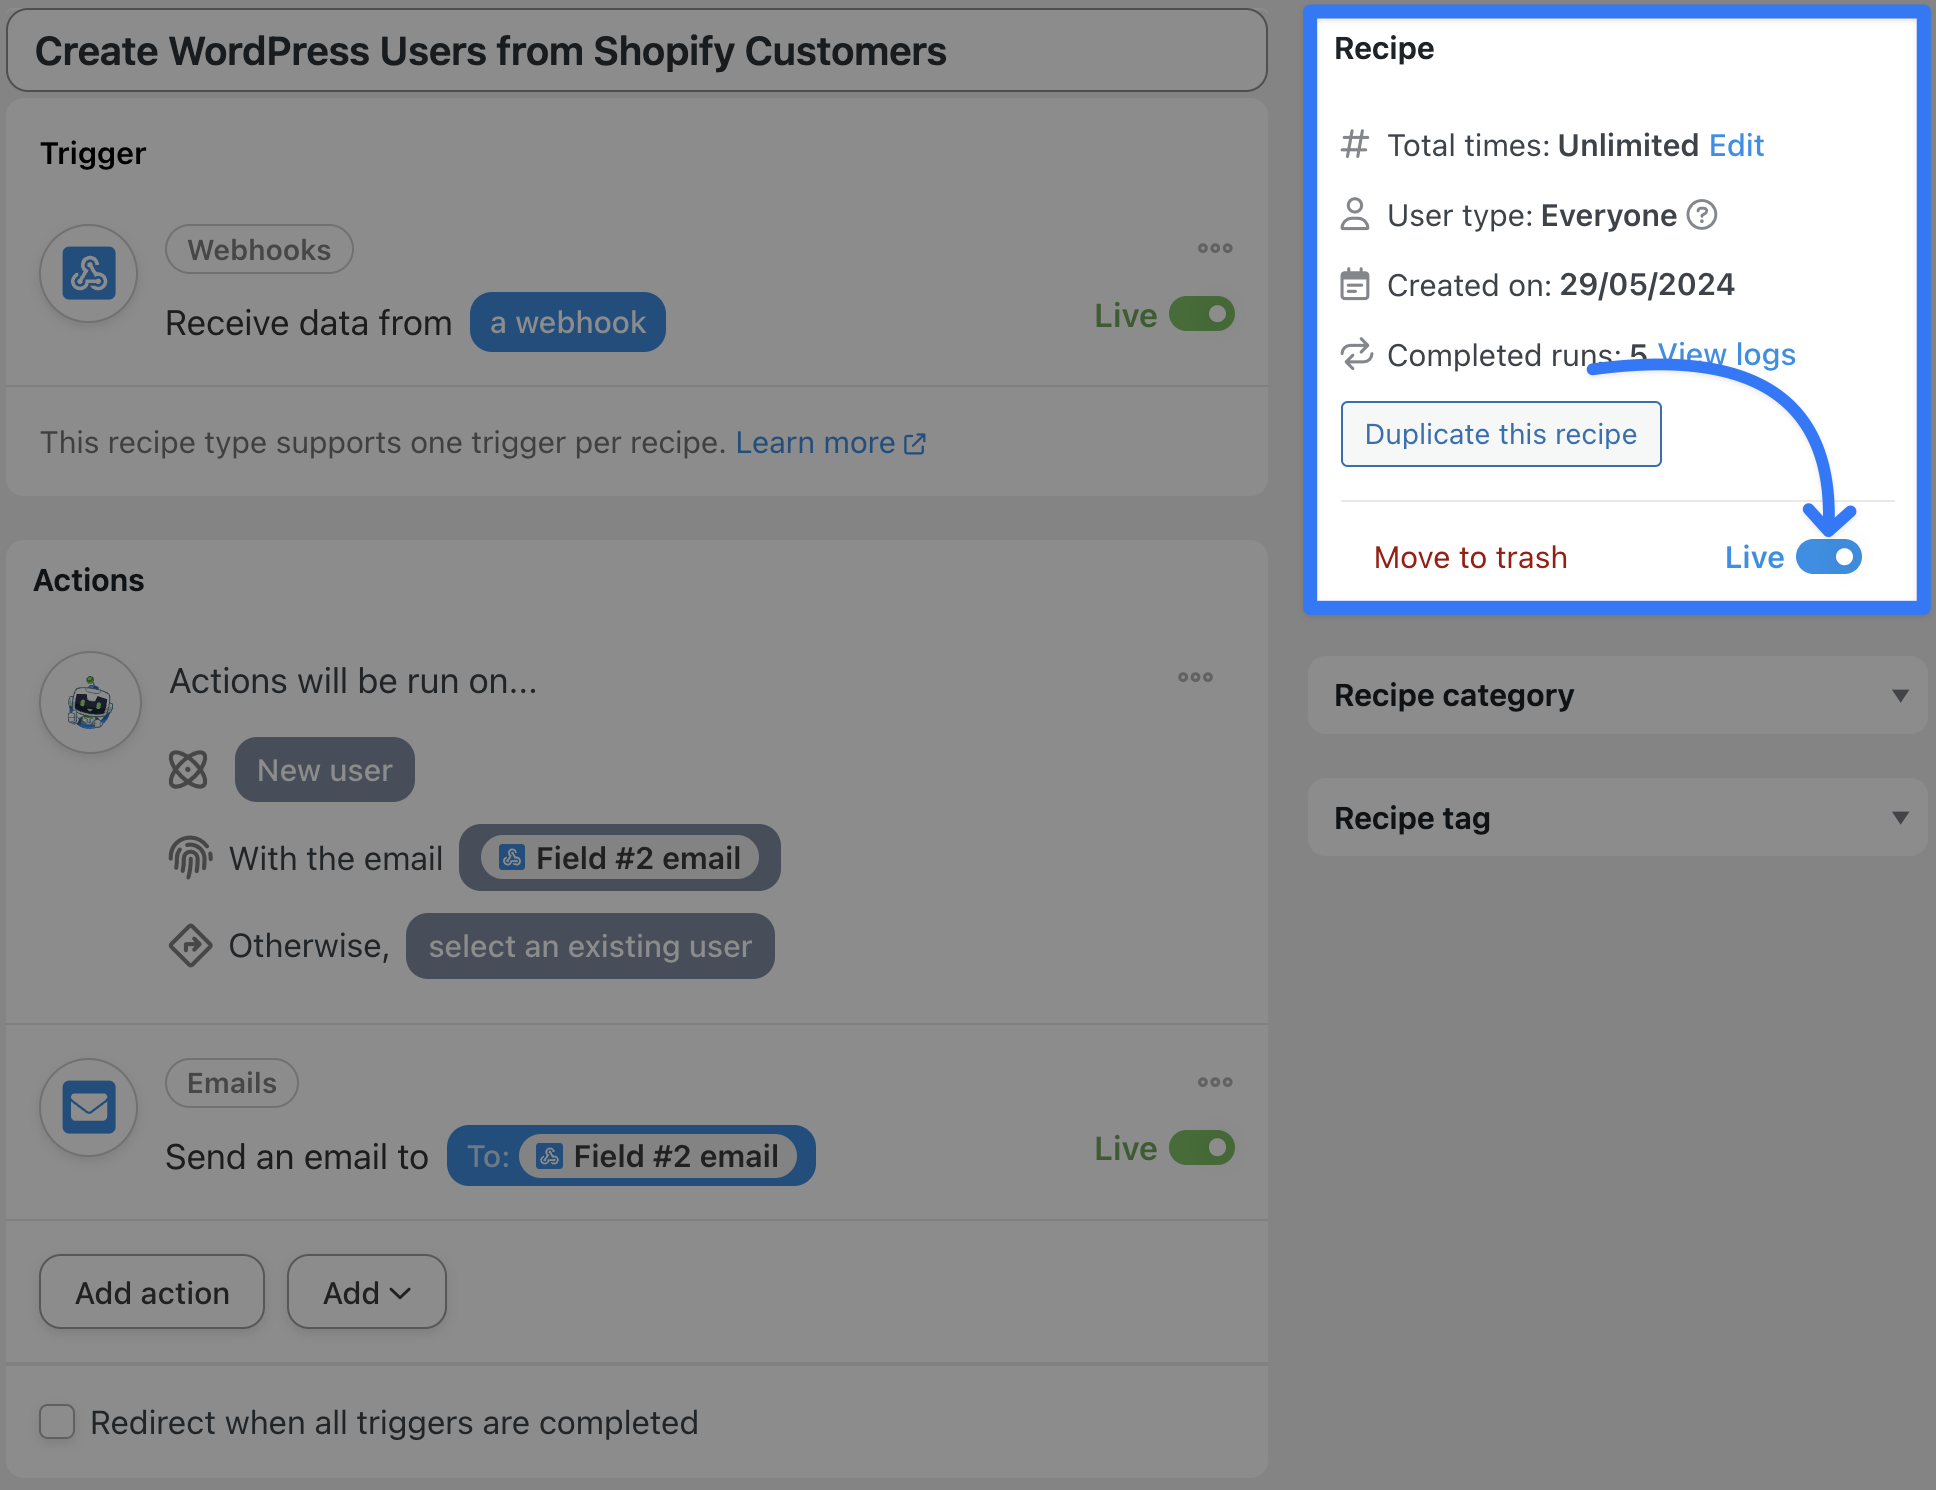
Give your new recipe a name that makes it easy to recognize at a glance. For example, we’ve named this recipe “Create WordPress Users from Shopify Customers”.
Step 3: Configure Your Trigger(s)
In the Trigger panel, from the menu of available integrations, select Webhooks.
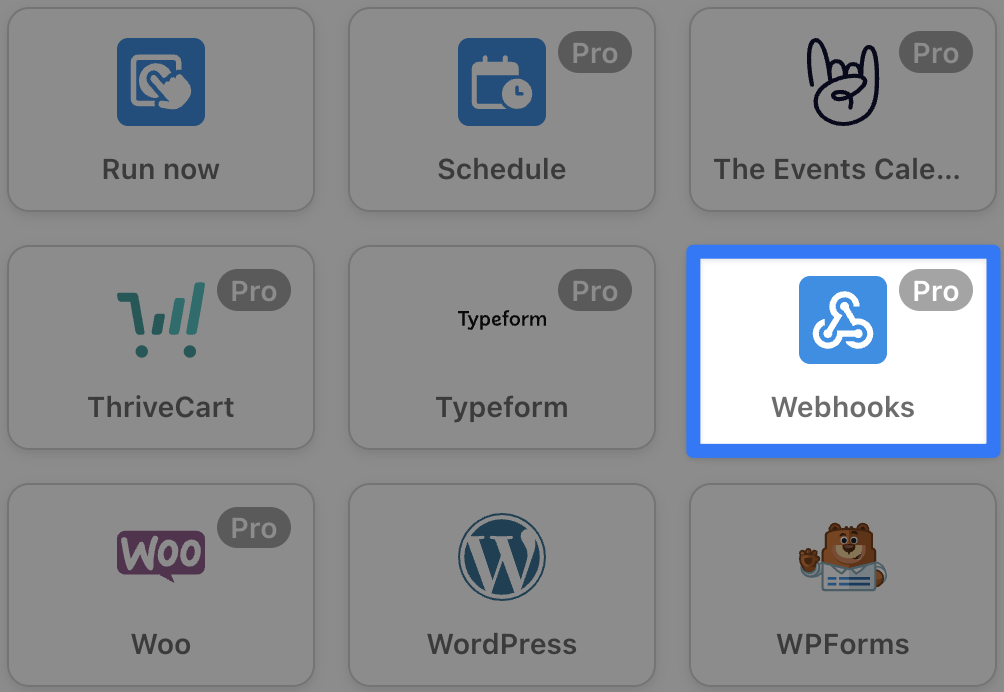
From the dropdown list that appears, select Receive data from a webhook.
Automator will present you with a webhook form that contains several fields. Copy the Webhook URL to your clipboard.

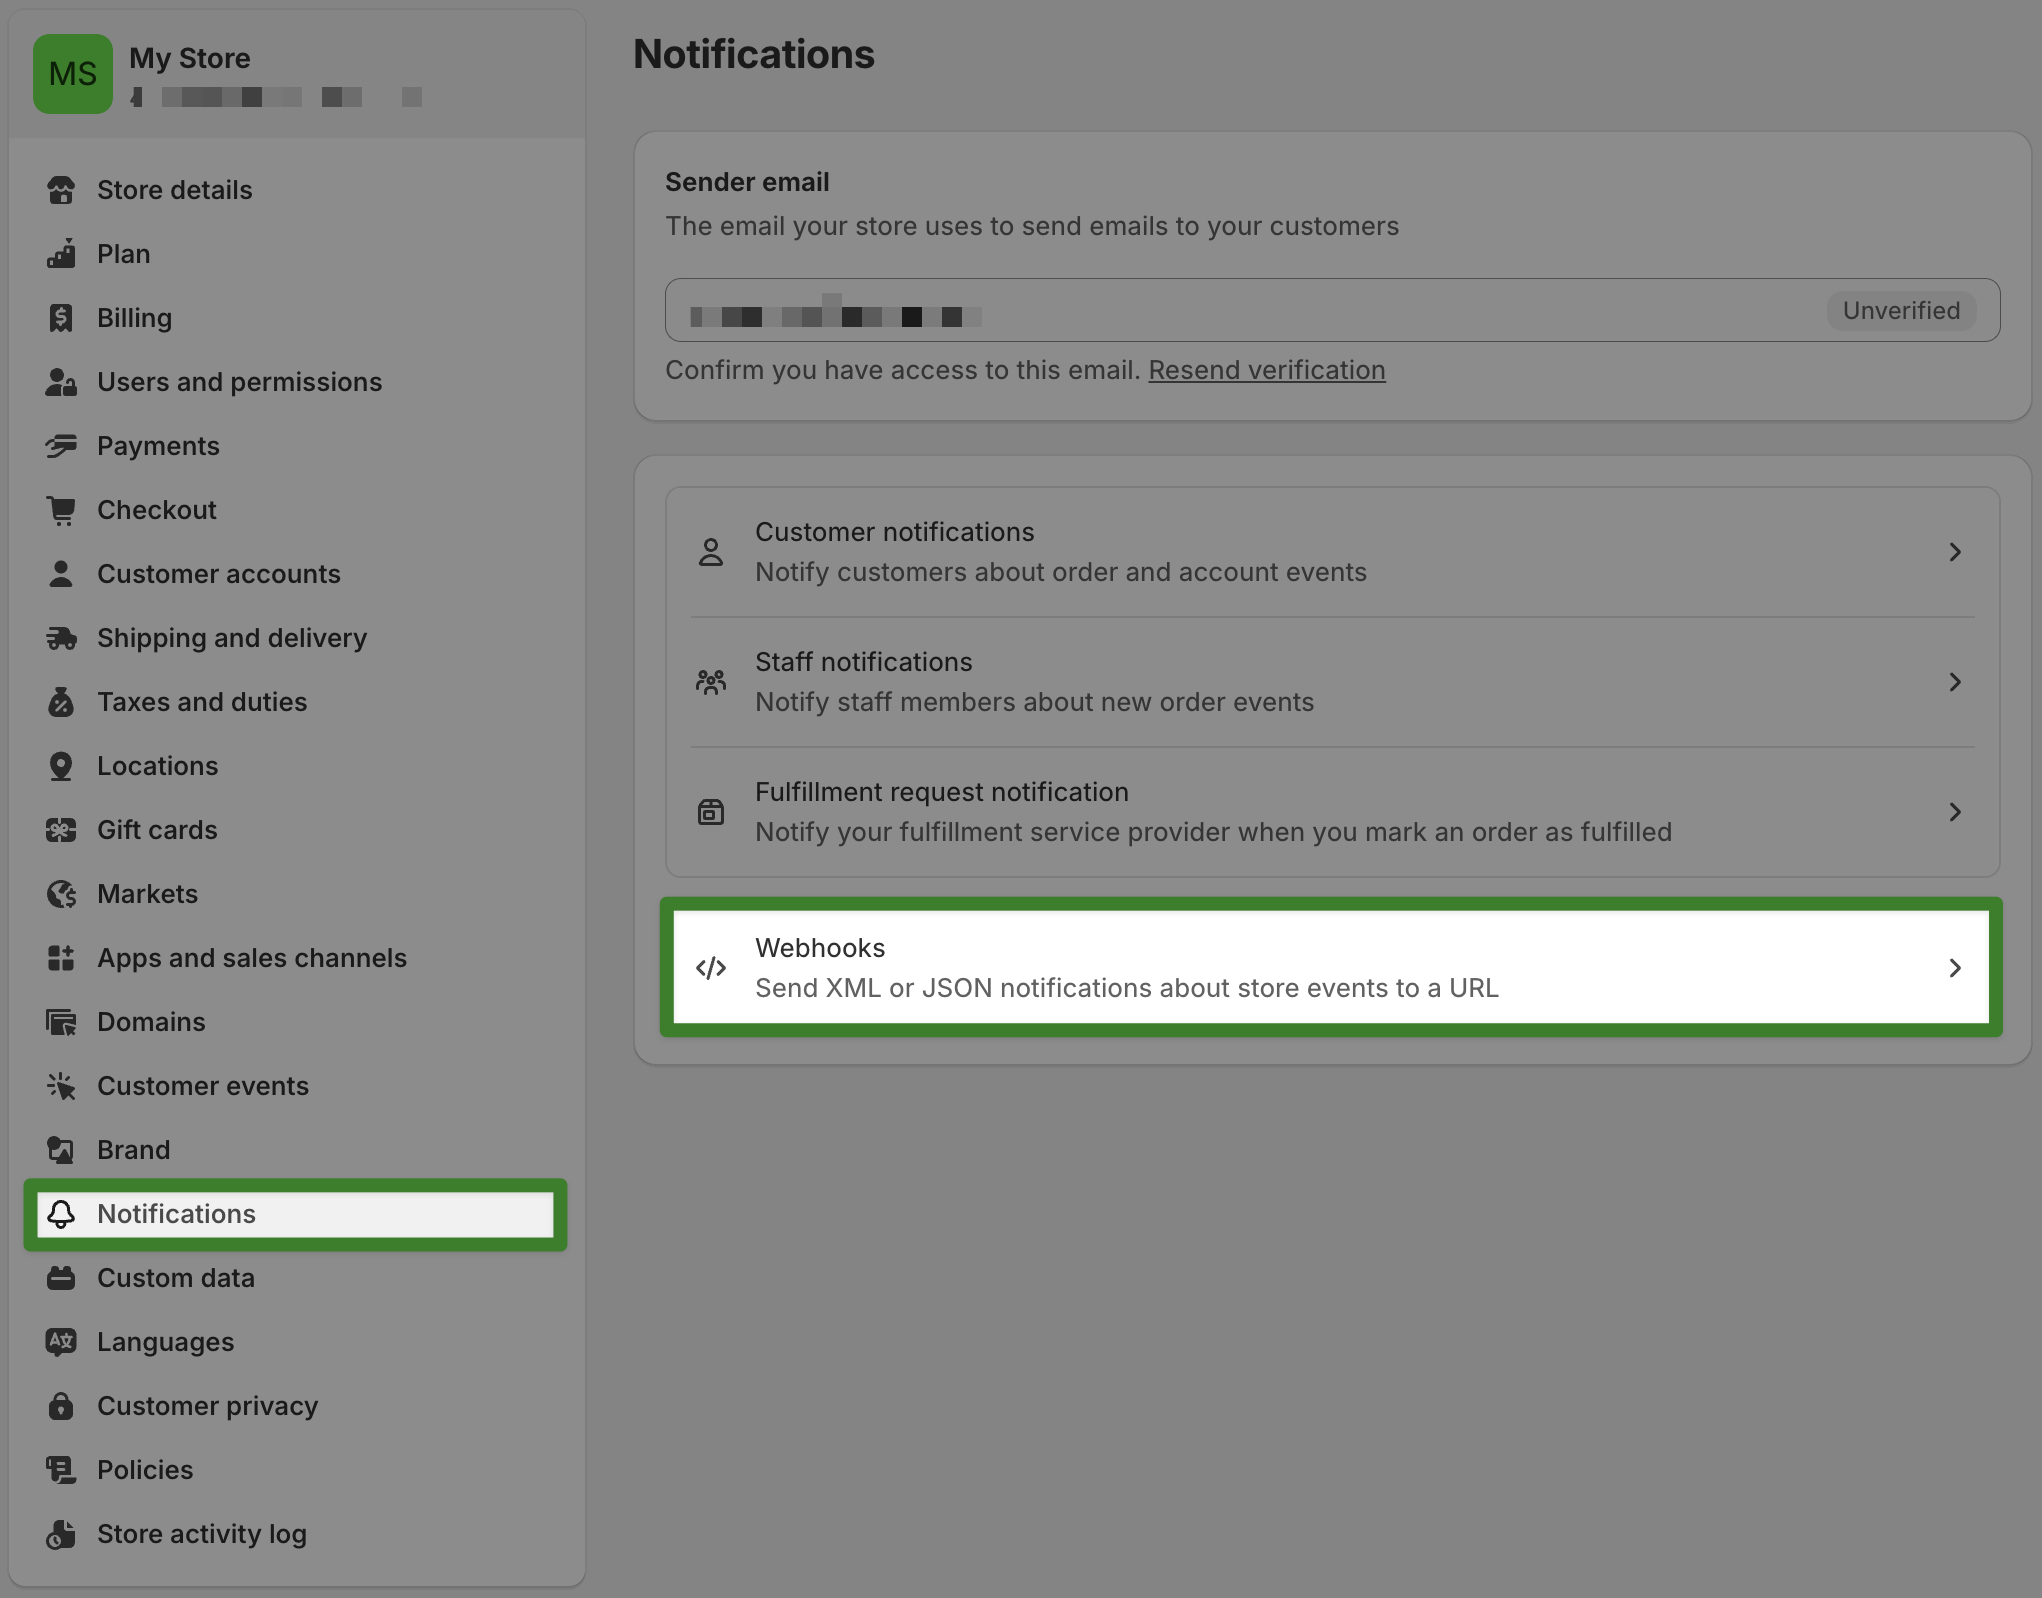
In a new tab in your browser, navigate to your Shopify Store Admin page and click on Settings in the bottom left corner. In the modal that appears, select Notifications and click on Webhooks.
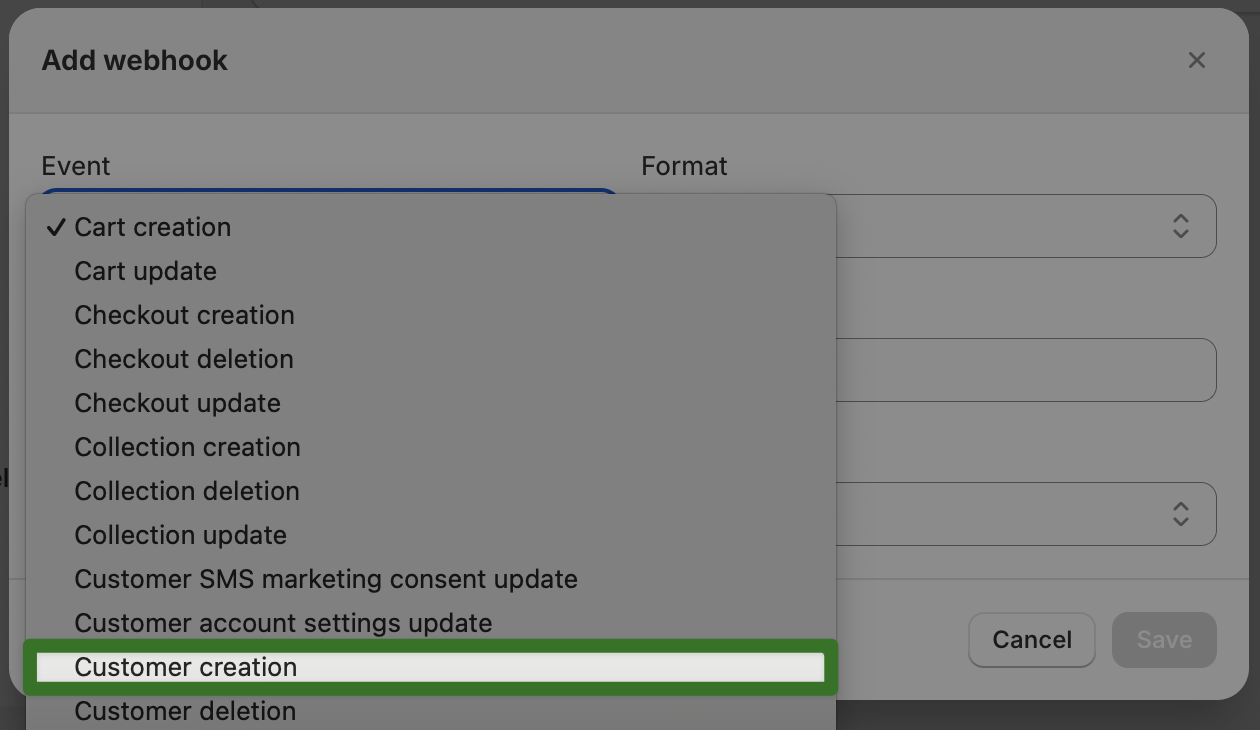
In the new modal screen, click Create webhook.

In the new modal, select Customer creation from the dropdown list in the Event field.
Now Paste the webhook URL that you copied to your clipboard from Automator into the URL field.
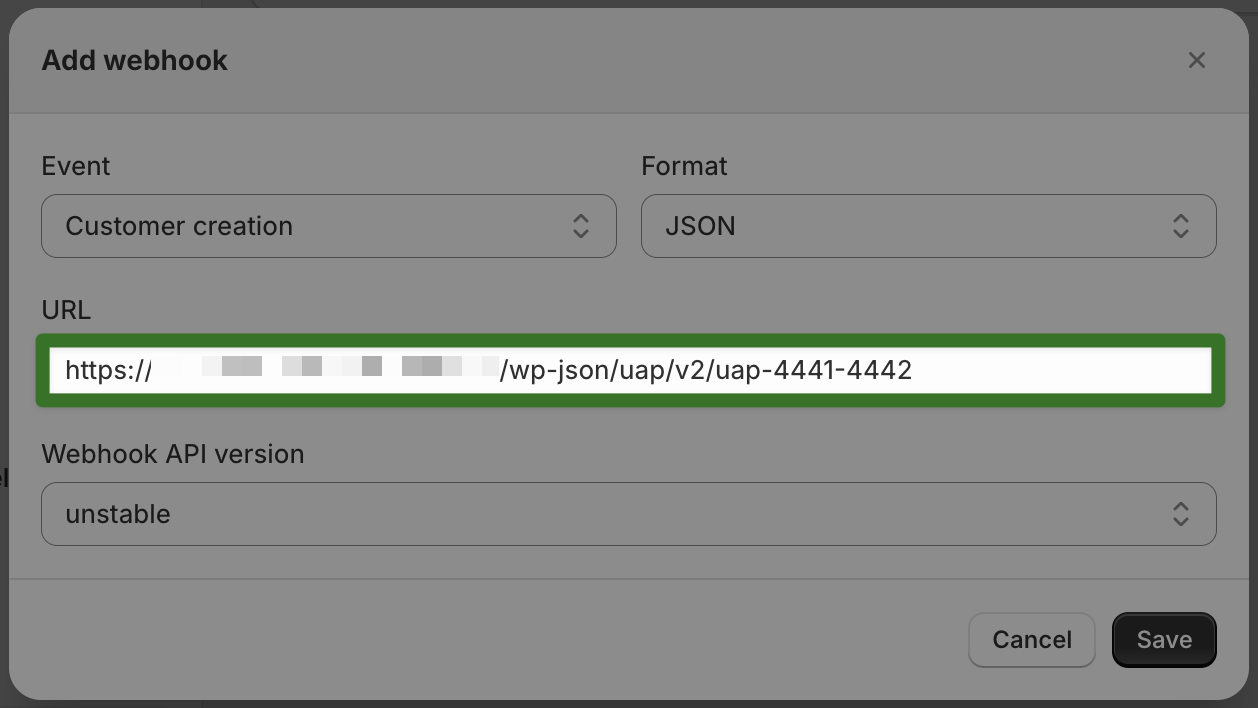
You can leave the Webhook API version unchanged. Once you’re finished, click Save.
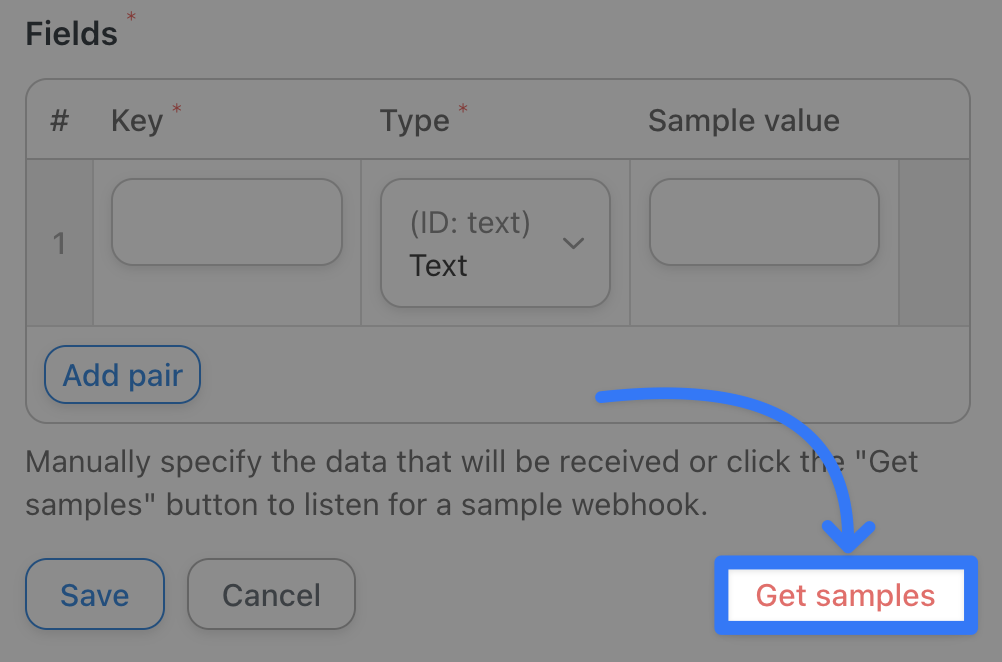
Return to your Automator tab and click Get samples.
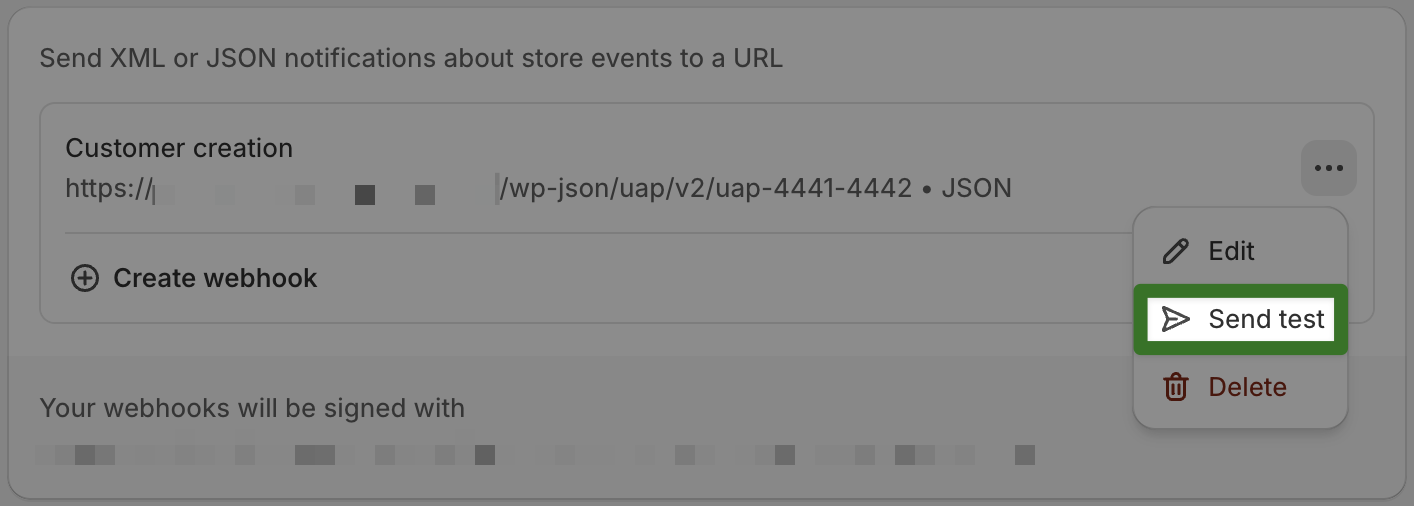
Within sixty (60) seconds, return to your Shopify tab, click the three dots in your new webhook and click Send test.
Return once again to your Automator tab. After a successful test, a modal with the test results will have appeared.
We recommend using the fields from the test results. To do so, simply click Use these fields.
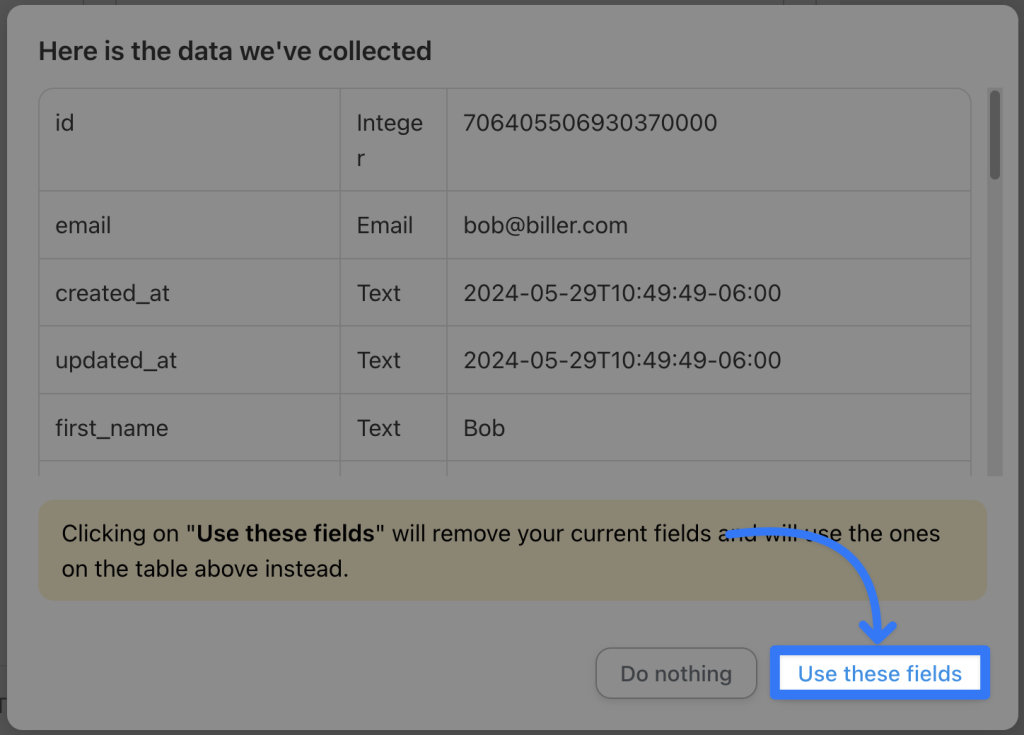
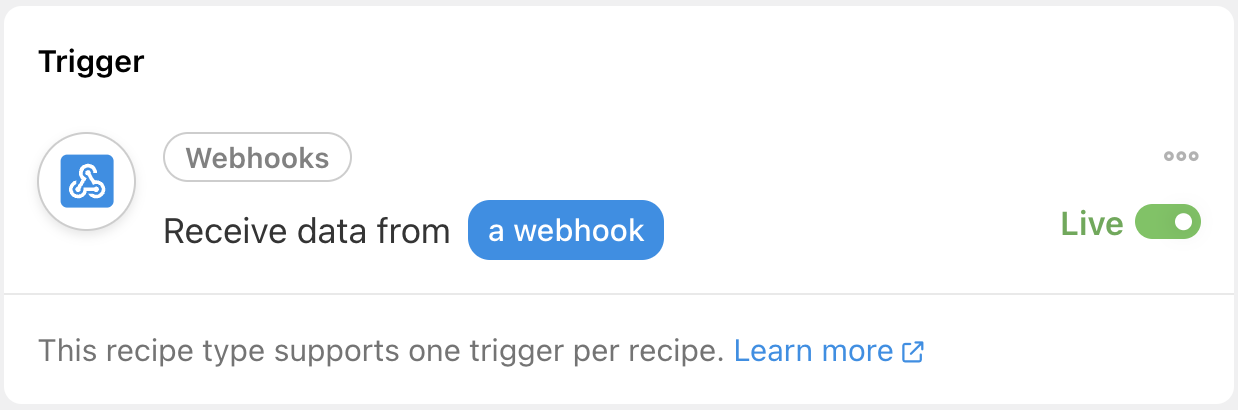
Review the fields from the test. Once you’re satisfied, click Save.
Your completed trigger should look like this:
Step 4: Configure Your Action(s)
In the Actions panel, click Add action. From the menu of available integrations, select Emails.

From the dropdown list that appears, select Send an email.
Automator will present you with a form to draft your email. You can fill out these fields with static data by simply manually entering the information.
However, we want this information to be populated dynamically. To do so, we’ll use tokens (i.e., dynamic data pulled from your WordPress website and from within recipes).
To select a token, click on the Asterisk in any given field and select the corresponding token. For example, we selected the Field #2 email token from our webhook trigger for the To field.
(Note: Some Shopify webhook events such as Order payment will create more than 250 unique tokens. You can use the search function to quickly find the appropriate token.)
You can now fill out the Subject field with a combination of static text and dynamic tokens.In the Body field, we’re going to send a password reset link to our Shopify customer using the User password reset link token.
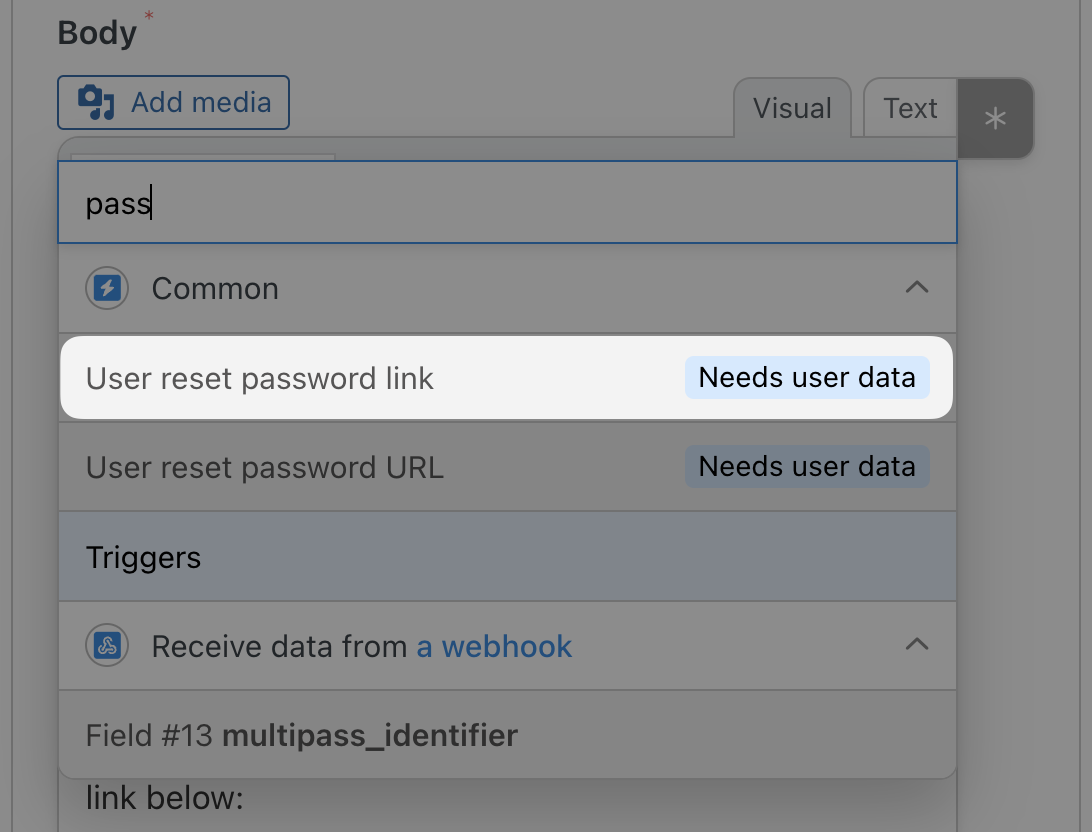
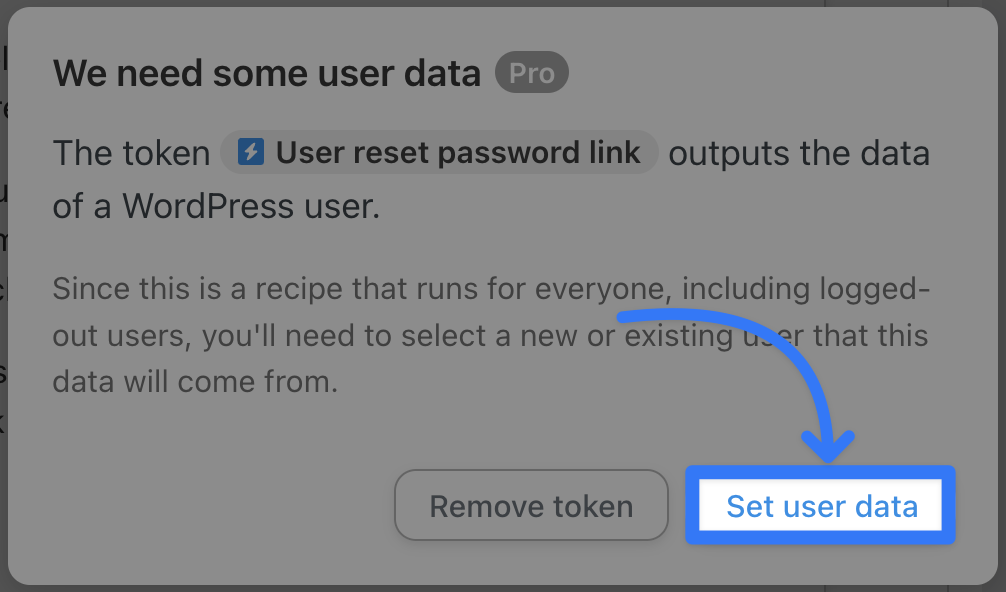
Once you select the token, you will see a modal appear. This is where we get to create our new WordPress user.
Click Set user data.
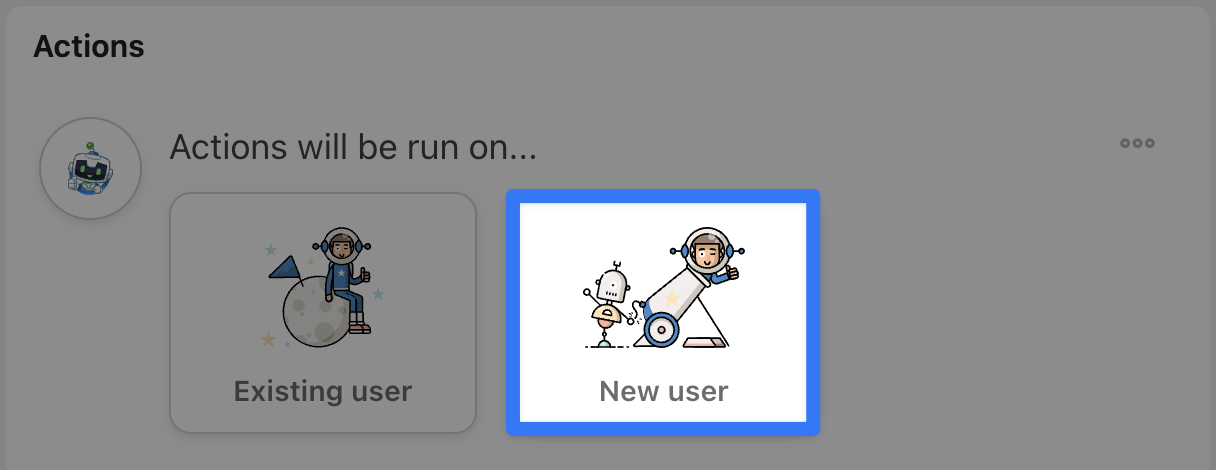
At the top of the Actions panel, you will see two options. Click on New user.
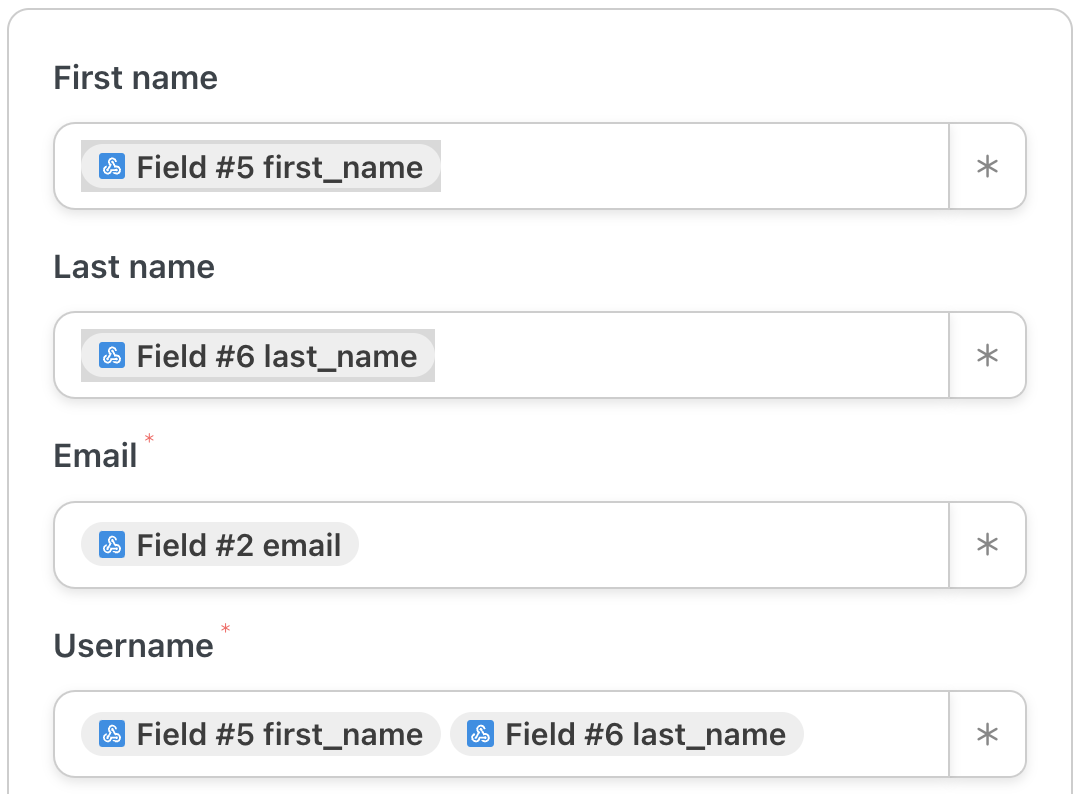
Automator will present you with a form to set the new user’s data. Fill out these fields with tokens from the Shopify webhook.
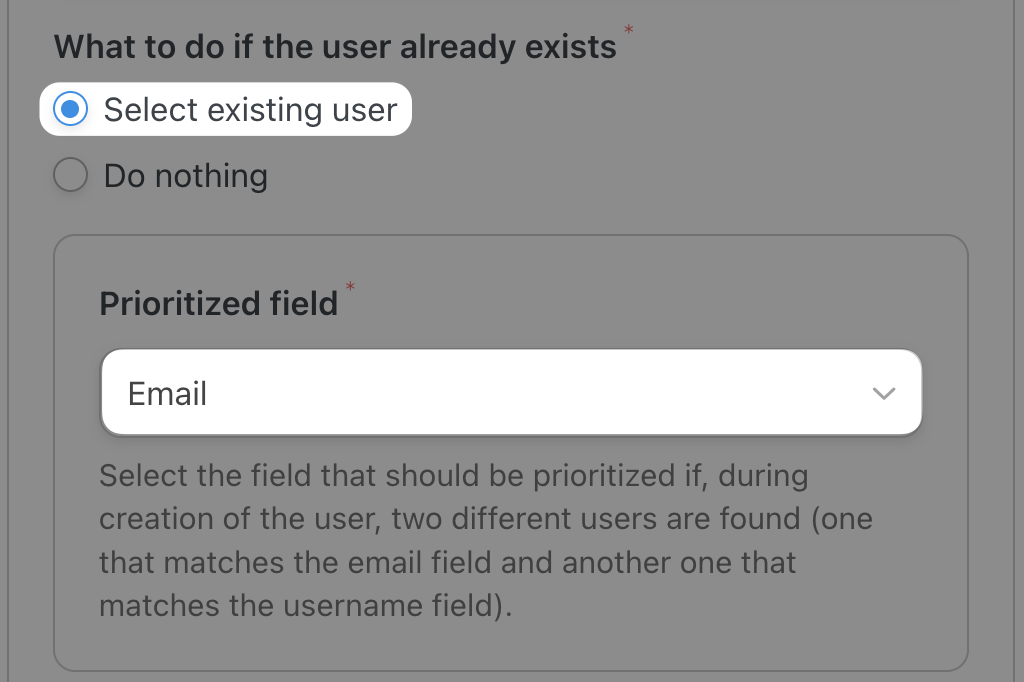
At the bottom of the form, you’ll see a radial with the question “What to do if the user already exists?” Click the radial Select existing user and set the Prioritized field to Email or whichever data point suits your workflows.
Once you’re finished, click Save.
Return to the draft of your email. Once you’re satisfied with it, you can send a test to an email address of your choice. Simply click Send test email.
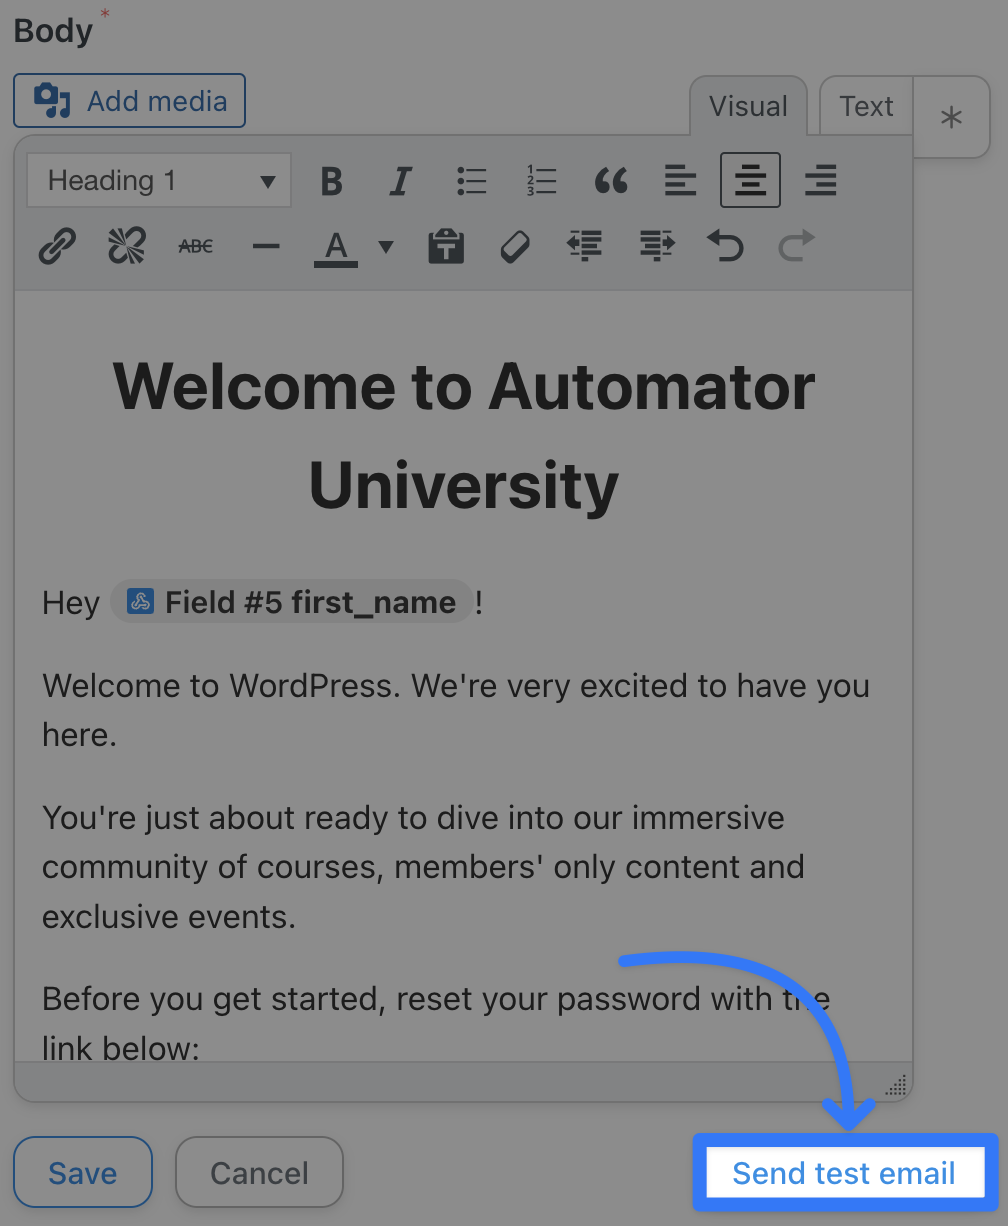
Here’s how our preview looked:
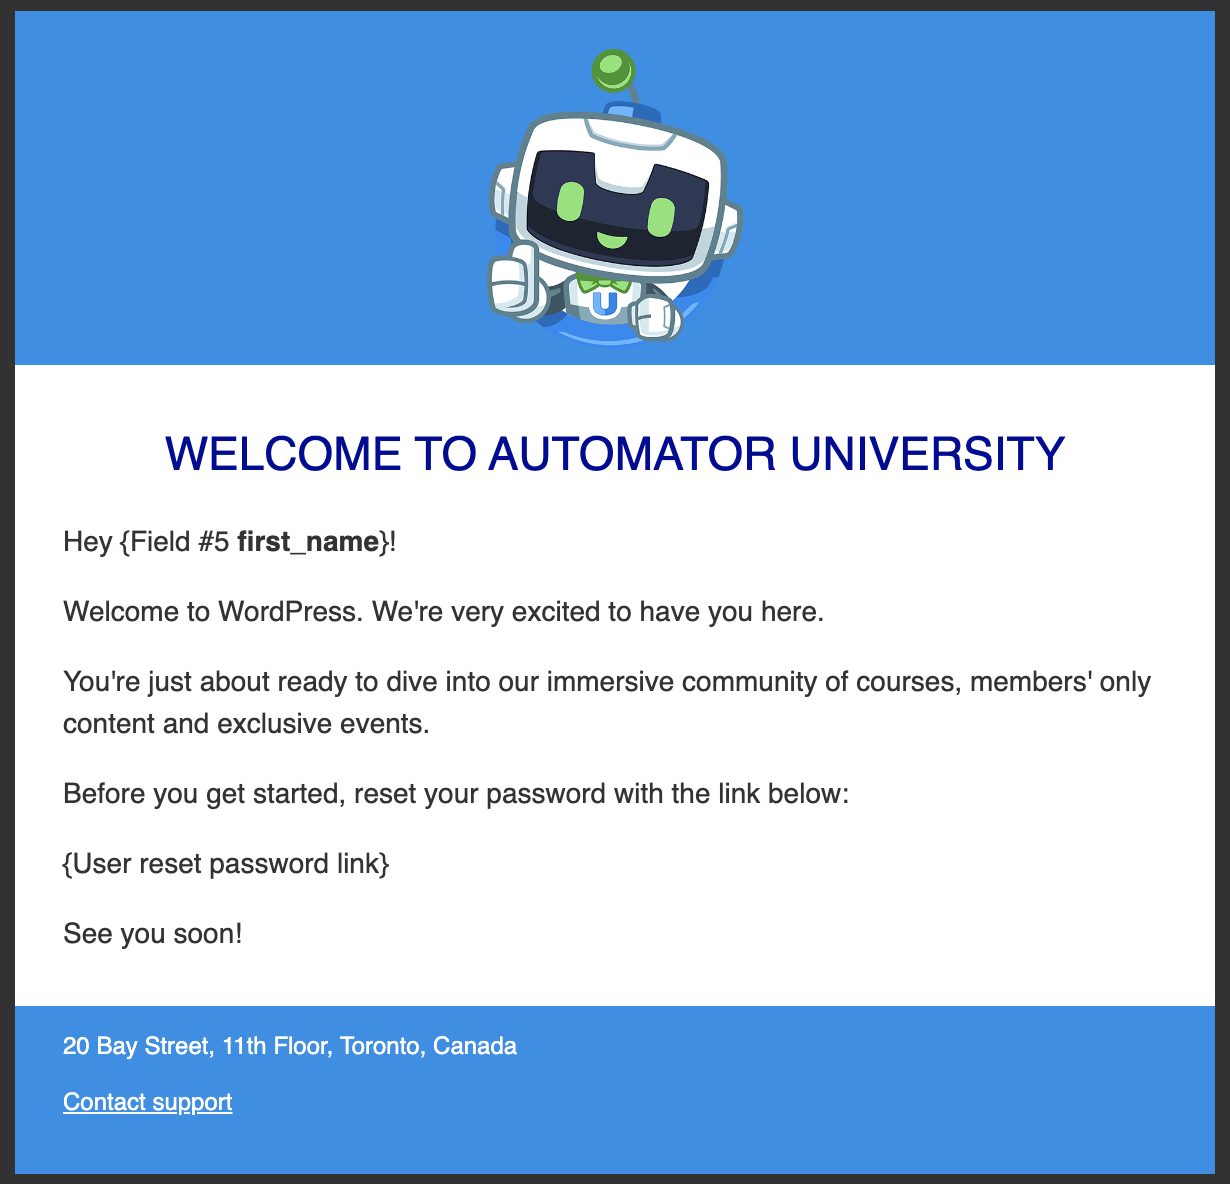
Want to know how we branded our email? Check out this article>>>.
Once you’re satisfied with your password reset email notifying your new WordPress user about their account, click Save.
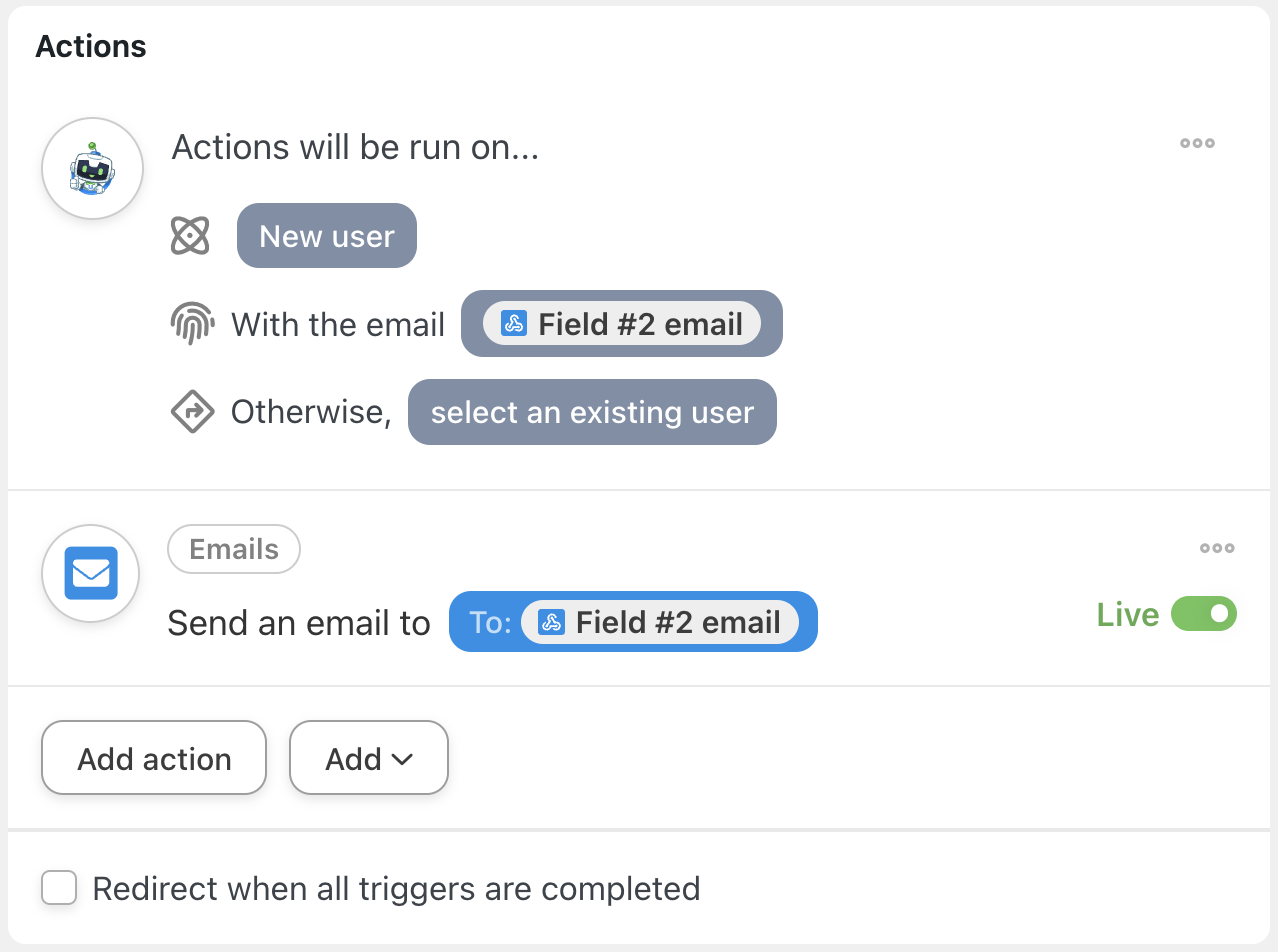
Your completed action, along with the user selector/creator should look like this:
Step 5: Go Live!
You’re just about ready to complete your first Shopify and WordPress integration. All that’s left for you to do is to toggle the recipe from Draft to Live.
That’s it! Go ahead and test out the integration. Create a new customer in Shopify and watch them show up as a user in WordPress with a personalized email to reset their password.
Want to sync your Shopify customer database with your WordPress website? Get Automator now>>>.
Advanced Shopify and WordPress Integrations
Now that you’ve created your first Shopify to WordPress integration, it’s time to kick things up a notch. As we mentioned earlier, Automator has 214 integrations, meaning that you can connect Shopify to the entire WordPress ecosystem!
Here’s just one example of how you can connect Shopify to WordPress—and so much more!
Enroll Shopify Customers in LearnDash Courses
Shopify is a great storefront for selling your online courses. LearnDash, on the other hand, is the leading LMS for WordPress websites. With Automator, you can easily connect the two to deliver the best elearning experience to your customers.
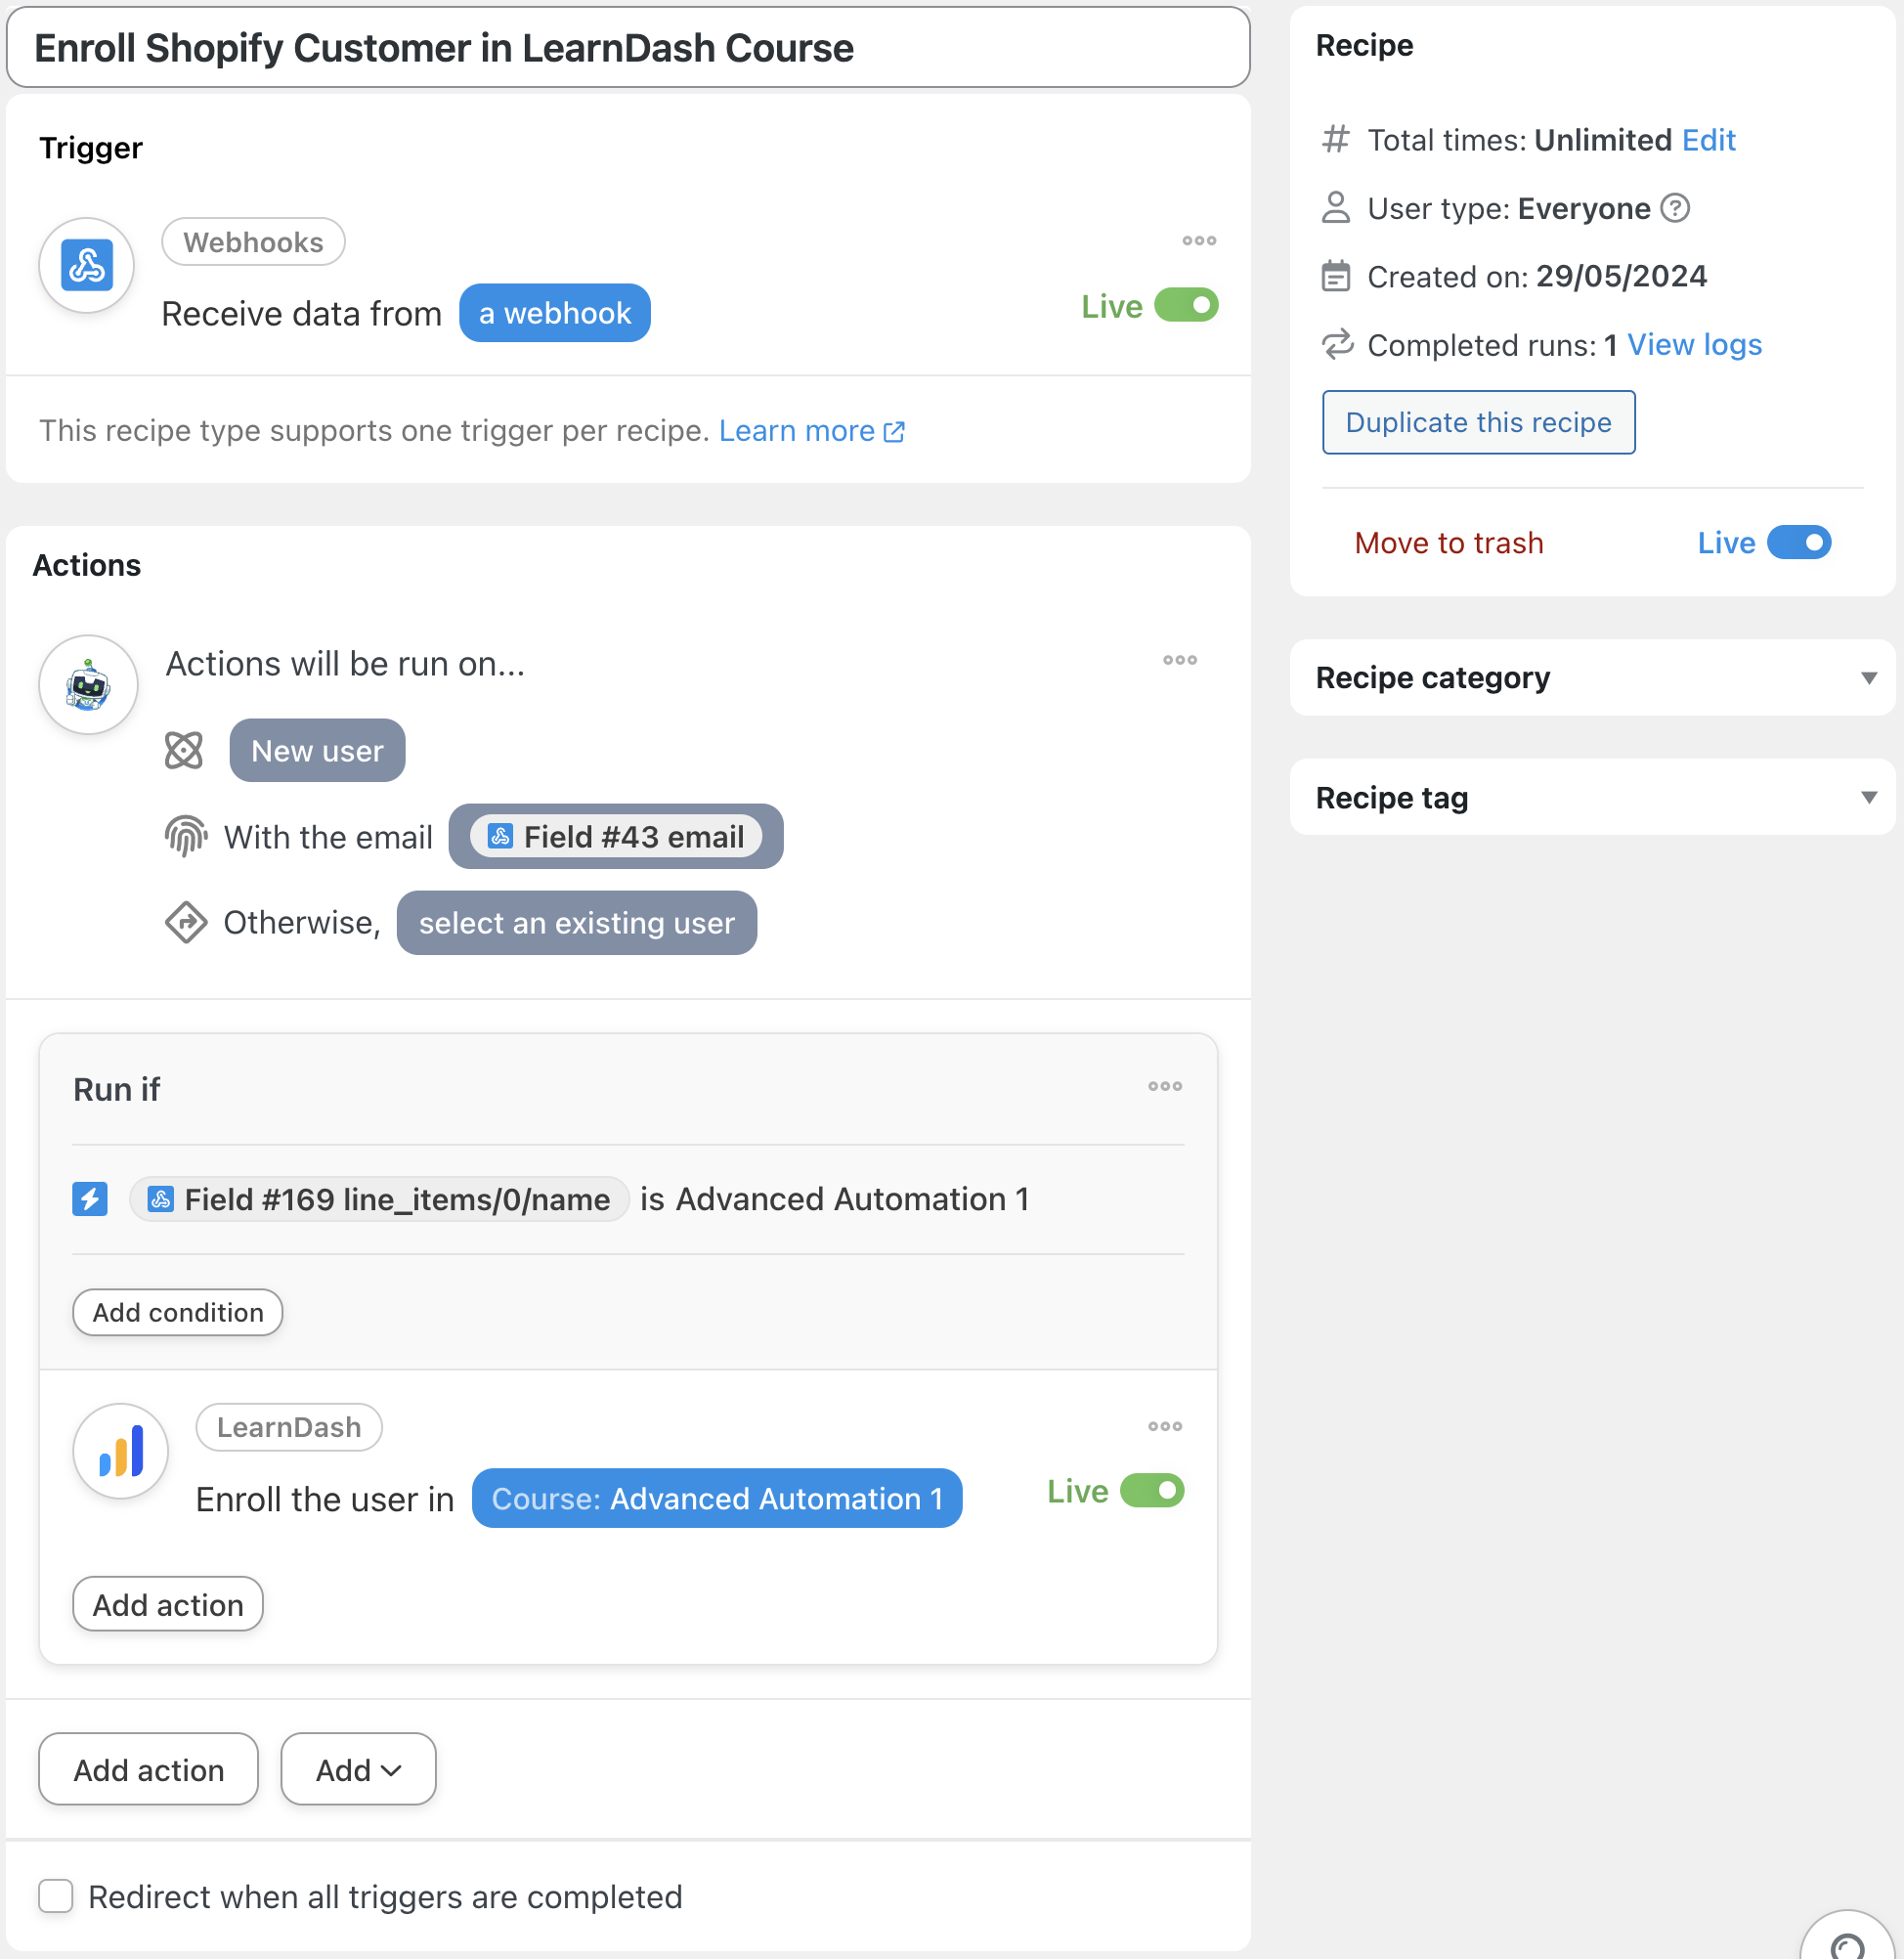
The recipe pictured above takes advantage of some powerful Automator features that will take your integrations to the next level. Don’t worry—they’re user-friendly.
Here’s how we created that recipe.
Step 1: Create and Name a New Recipe
From your WordPress Admin Dashboard, navigate to Automator > Add new recipe. In the pop-up window that appears, select Everyone.
We’ve named this recipe “Enroll Shopify Customer in LearnDash Course”.
Step 2: Configure Your Trigger(s)
Repeat Step 2 from the previous recipe that we created together. (In Shopify, select whichever webhook trigger best suits your workflows. For example, we selected the Order payment event.)
Step 3: Configure Your Action(s)
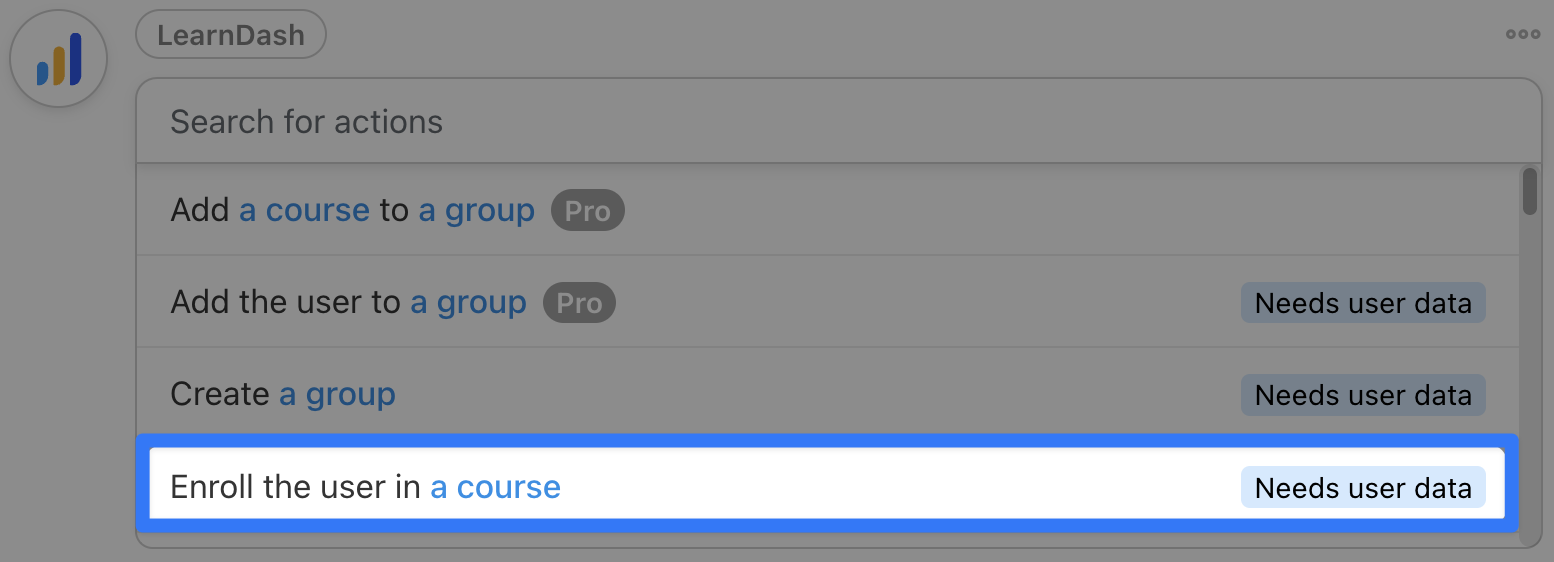
In the Actions panel, click Add action and select LearnDash.

From the dropdown list that appears, select Enroll the user in a course.
Because we have set the recipe type to Everyone, Automator will need some additional information to know which user(s) to run the recipe on.
In the modal that appears, click Set user data.
You can choose to run the recipe on existing WordPress users only or to create a new one. In our example, not all of our Shopify customers are existing WordPress users. As such, we have selected New User.
Automator will present you with a user form. Fill out the fields using tokens from the webhook trigger.
At the bottom of the form, you’ll see a radial with the question “What to do if the user already exists?” Click the radial Select existing user and set the Prioritized field to Email or whichever data point suits your workflows.
(If you choose a field other than Email, we recommend selecting a data point that is least likely to be duplicable and most likely to be required by your Shopify customers.)
When you’re finished, click Save. Your Actions panel should now look something like this:
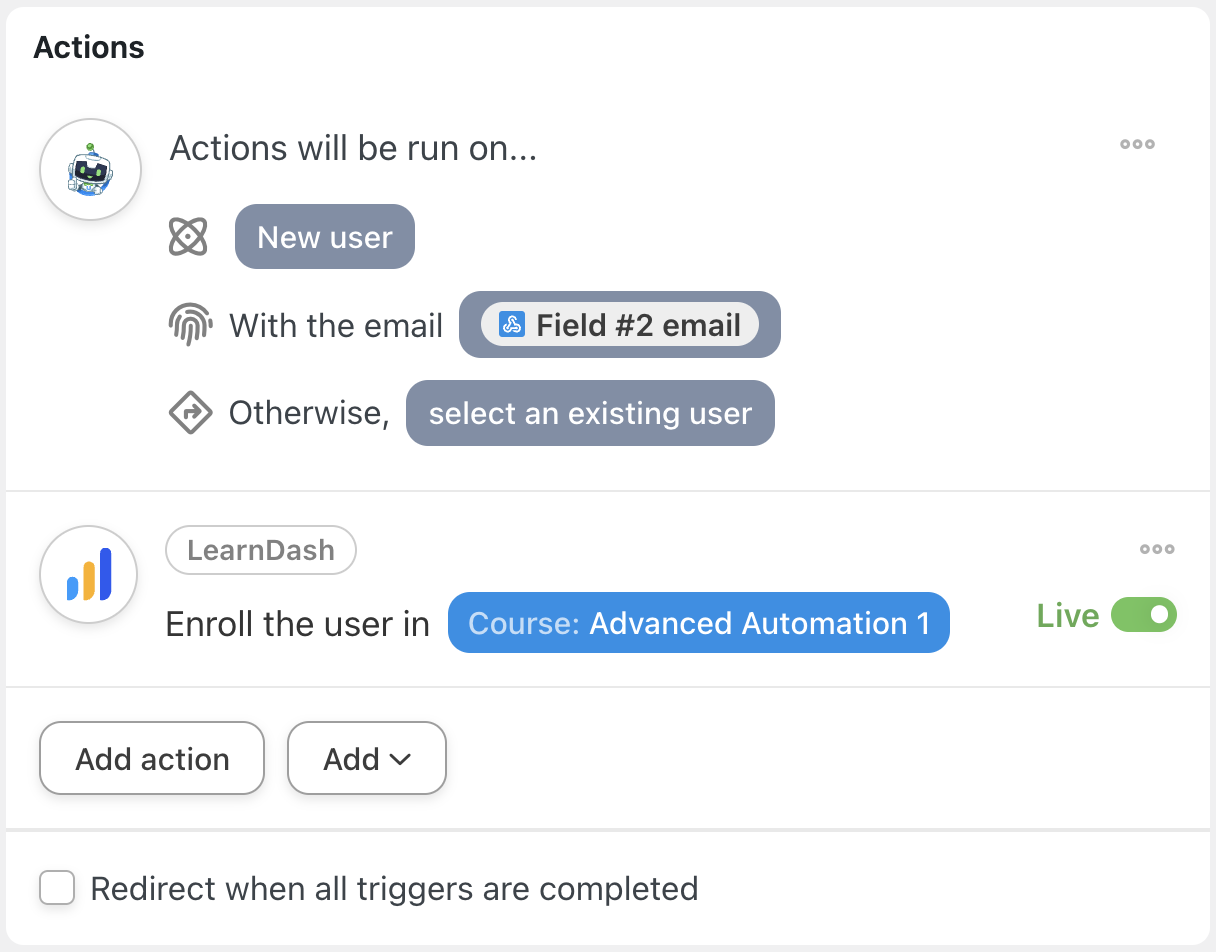
To complete the action, click on the text highlighted in blue. Automator will prompt you to select a course. Select the course you want to enroll your students in.
When you’re finished, click Save. Your completed action should look like this:
Step 4: Add a Filter(s)
Right now, the recipe would enroll every Shopify customer who placed an order in the LearnDash course that you specified in the action. Needless to say, if you have multiple courses and/or products in your Shopify store, this probably isn’t your intention.
Thankfully, we can use Automator’s filters feature to make this recipe run as it should.To add a filter, hover over the action and click Filter. In the modal that appears, select A token meets a condition.

Another modal will appear where you can define the conditions that the token must satisfy for the action to run. Because Shopify produced so many tokens, there are a few ways to define the conditions.
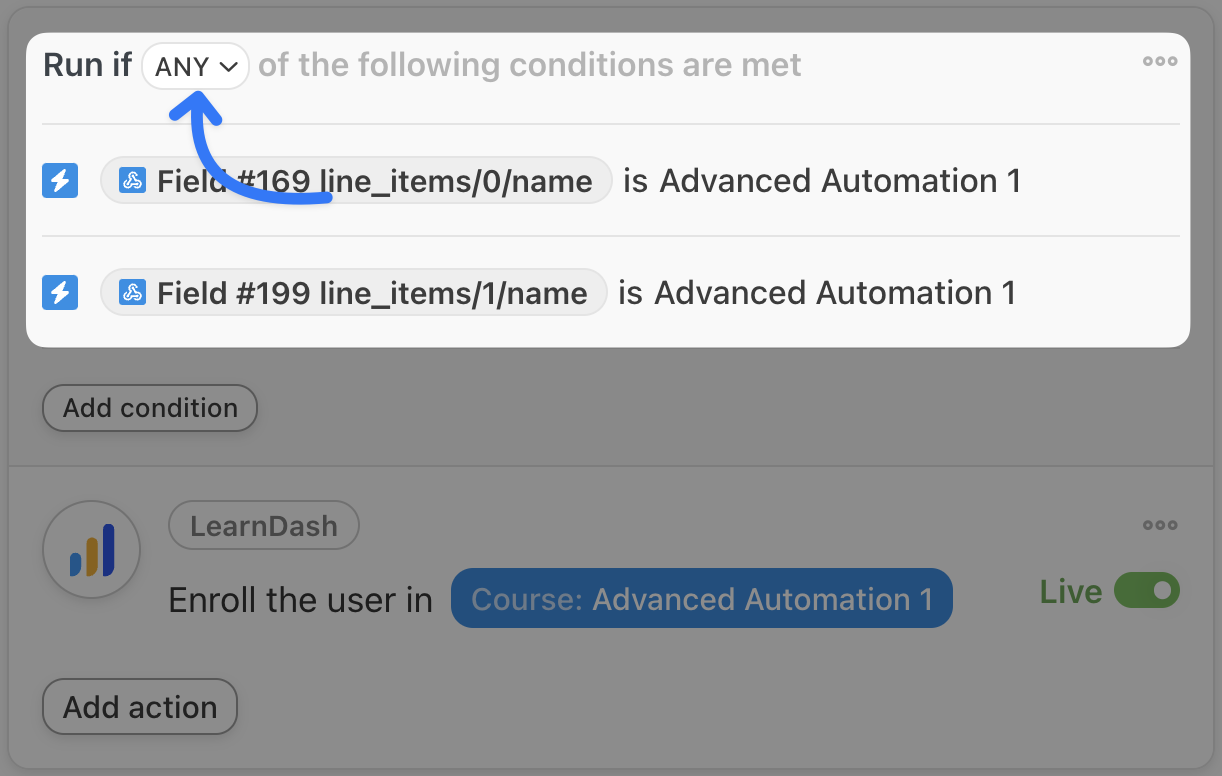
For example, we have selected the {{line_items/0/name}} token (i.e., the name of the first item in our customer’s order). We then specified that this token must be “Advanced Automation 1”, i.e., the name of the Shopify product that corresponds to our LearnDash course.
Once you’ve defined the condition, click Save filter.
Your completed action with a trigger should look something like this:

(Note: To accommodate orders with more than one product, you will need to add additional filters. This way, Automator can “scan” the entire order for the Shopify product(s) that correspond to the LearnDash course you specified in the action. If you have added more than one filter, make sure that you select Any in the Actions panel.)
(Note: If you don’t want to add too many filters, you can limit the number of items in a cart at checkout. To do so, from your Shopify Store Admin, navigate to Settings > Checkout and scroll down to Checkout rules. You may need to install an app.)
Step 5: Go Live!
You’re just about ready to pair Shopify with the most powerful LMS for WordPress. All you have to do is toggle the recipe from Draft to Live.
Are you ready to boost your elearning game with Shopify? Get Automator now>>>.
But why stop there…
Turn Shopify Customers Into WordPress Members
Memberships are a great way to create a community around your ecommerce platform. Whether you’re selling access to exclusive content, restricted areas or special offers, membership plugins like MemberPress make community building and management that much easier.
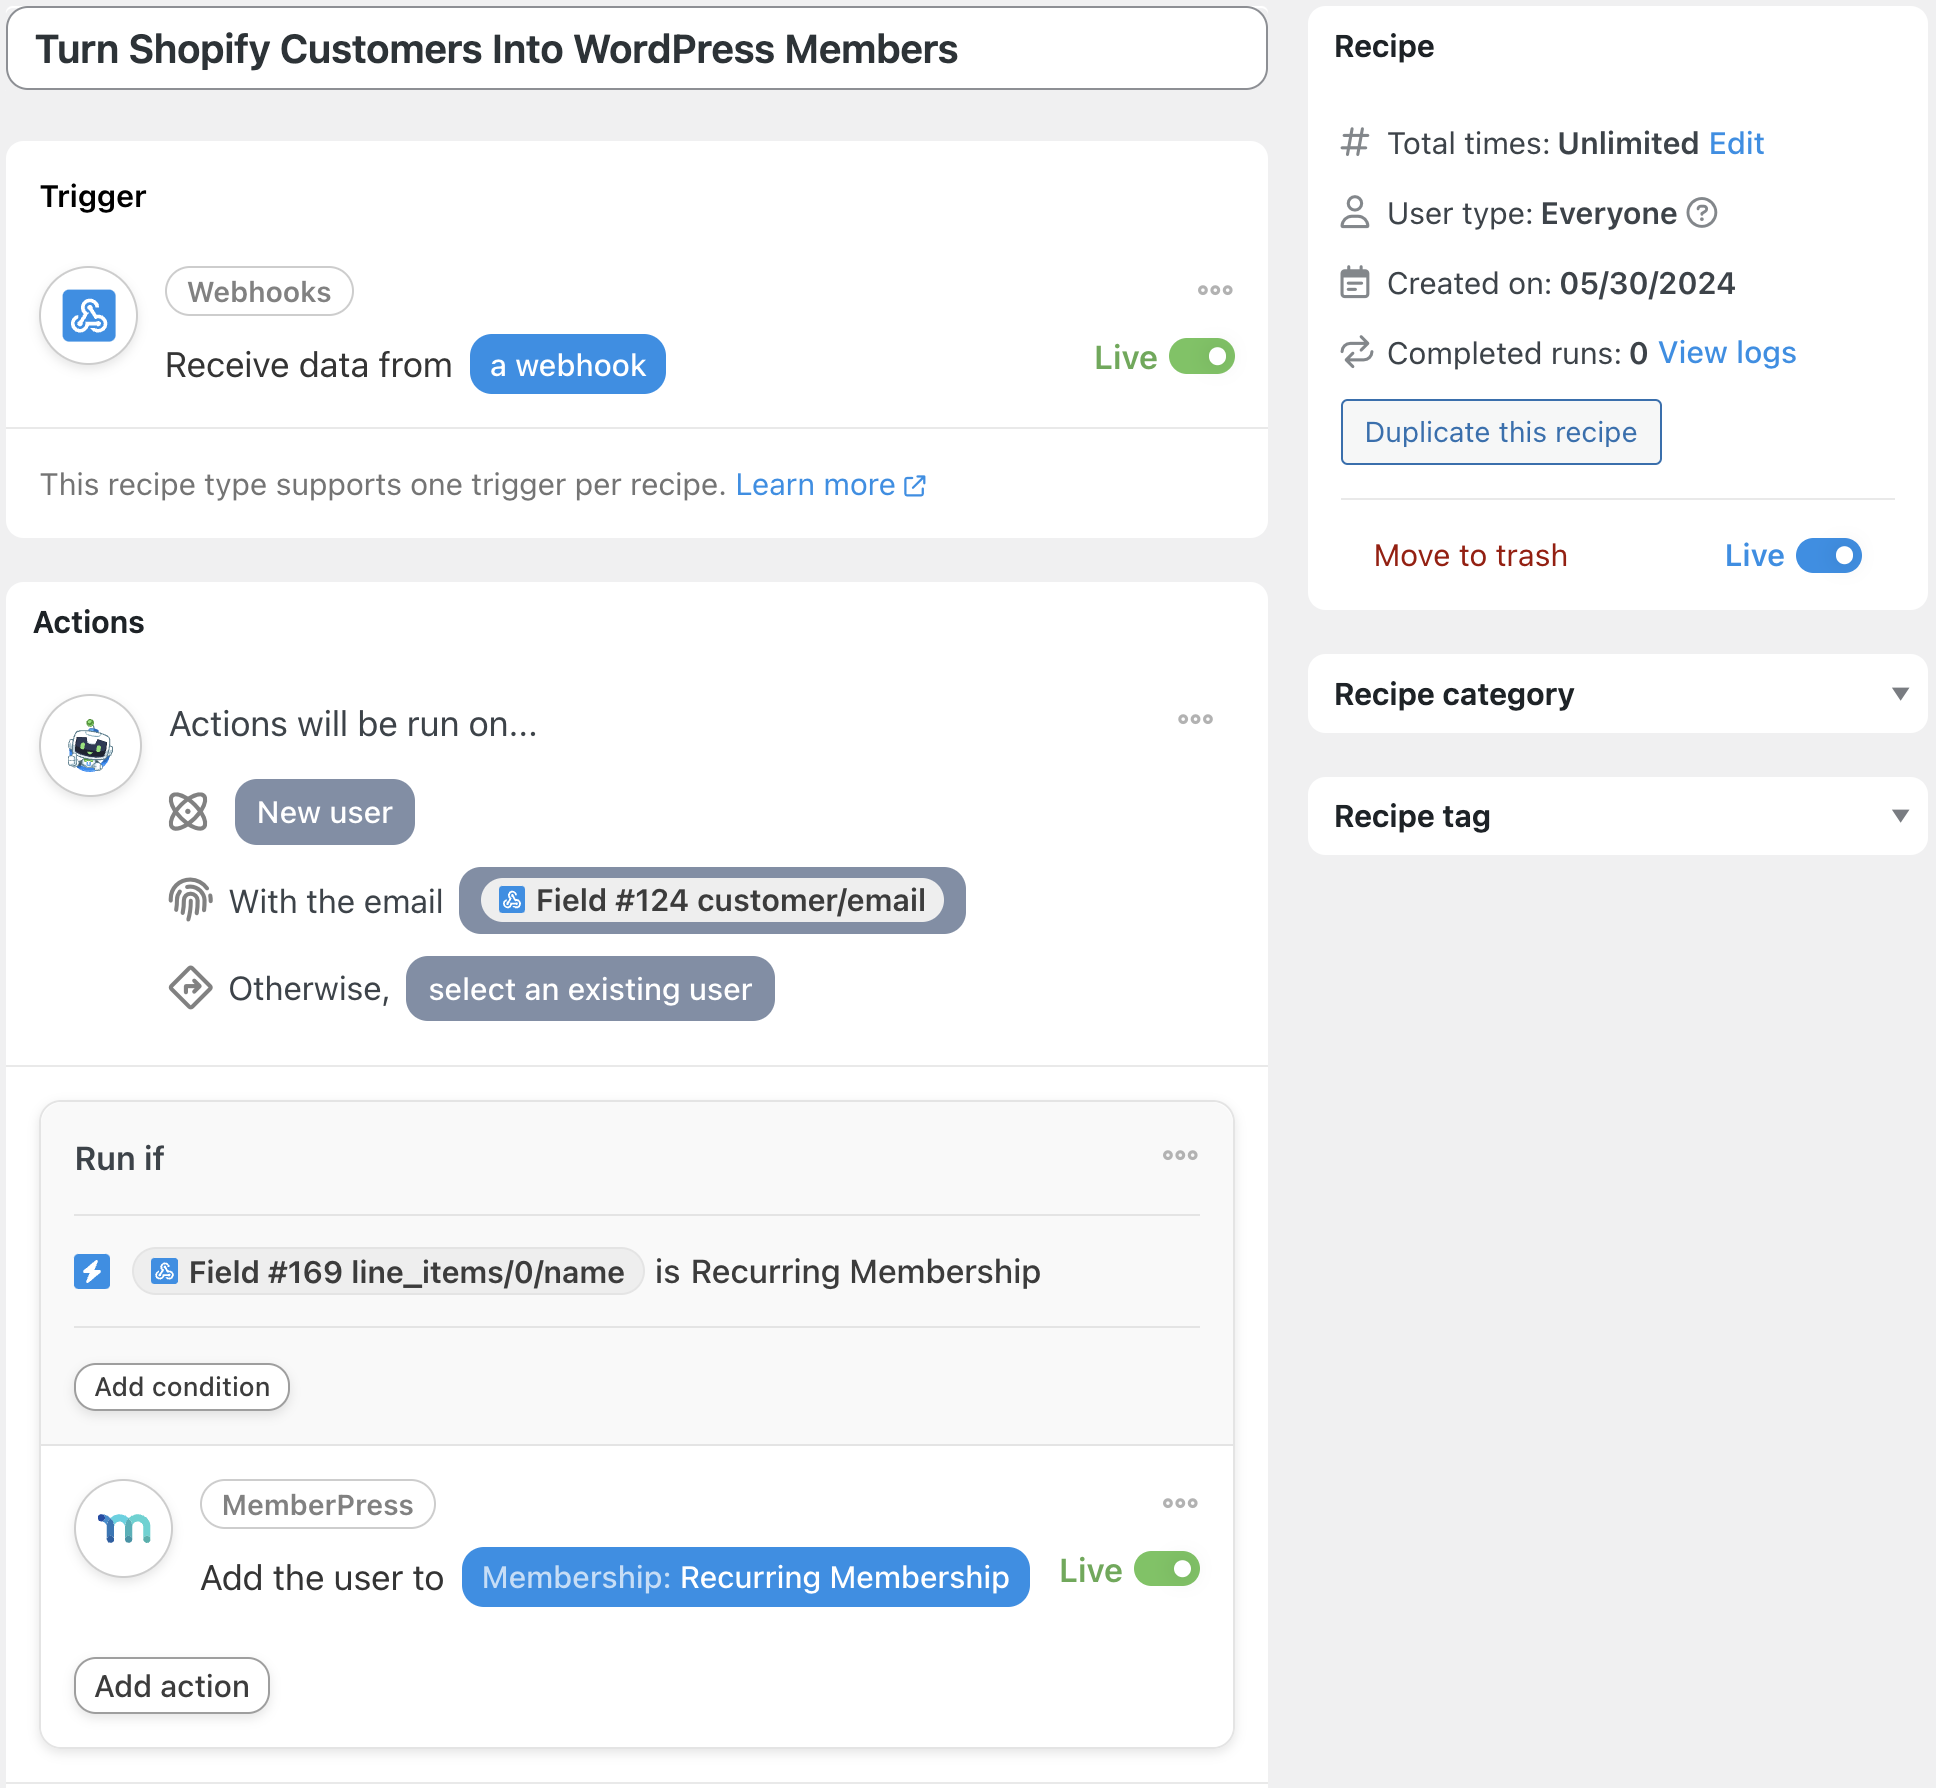
Similar to selling access to your courses, Automator can connect your WordPress-powered membership website to your Shopify store. As in the recipe pictured above, just swap out an LMS integration for a membership one.
Want to turn your Shopify customers into loyal members? Get Automator now>>>.
Register Shopify Customers for WordPress Events
Few ecommerce products or services create a sense of community quite like events. Whether it’s virtual get-togethers or in-person meetups, plugins like The Events Calendar help you bring your customers together.
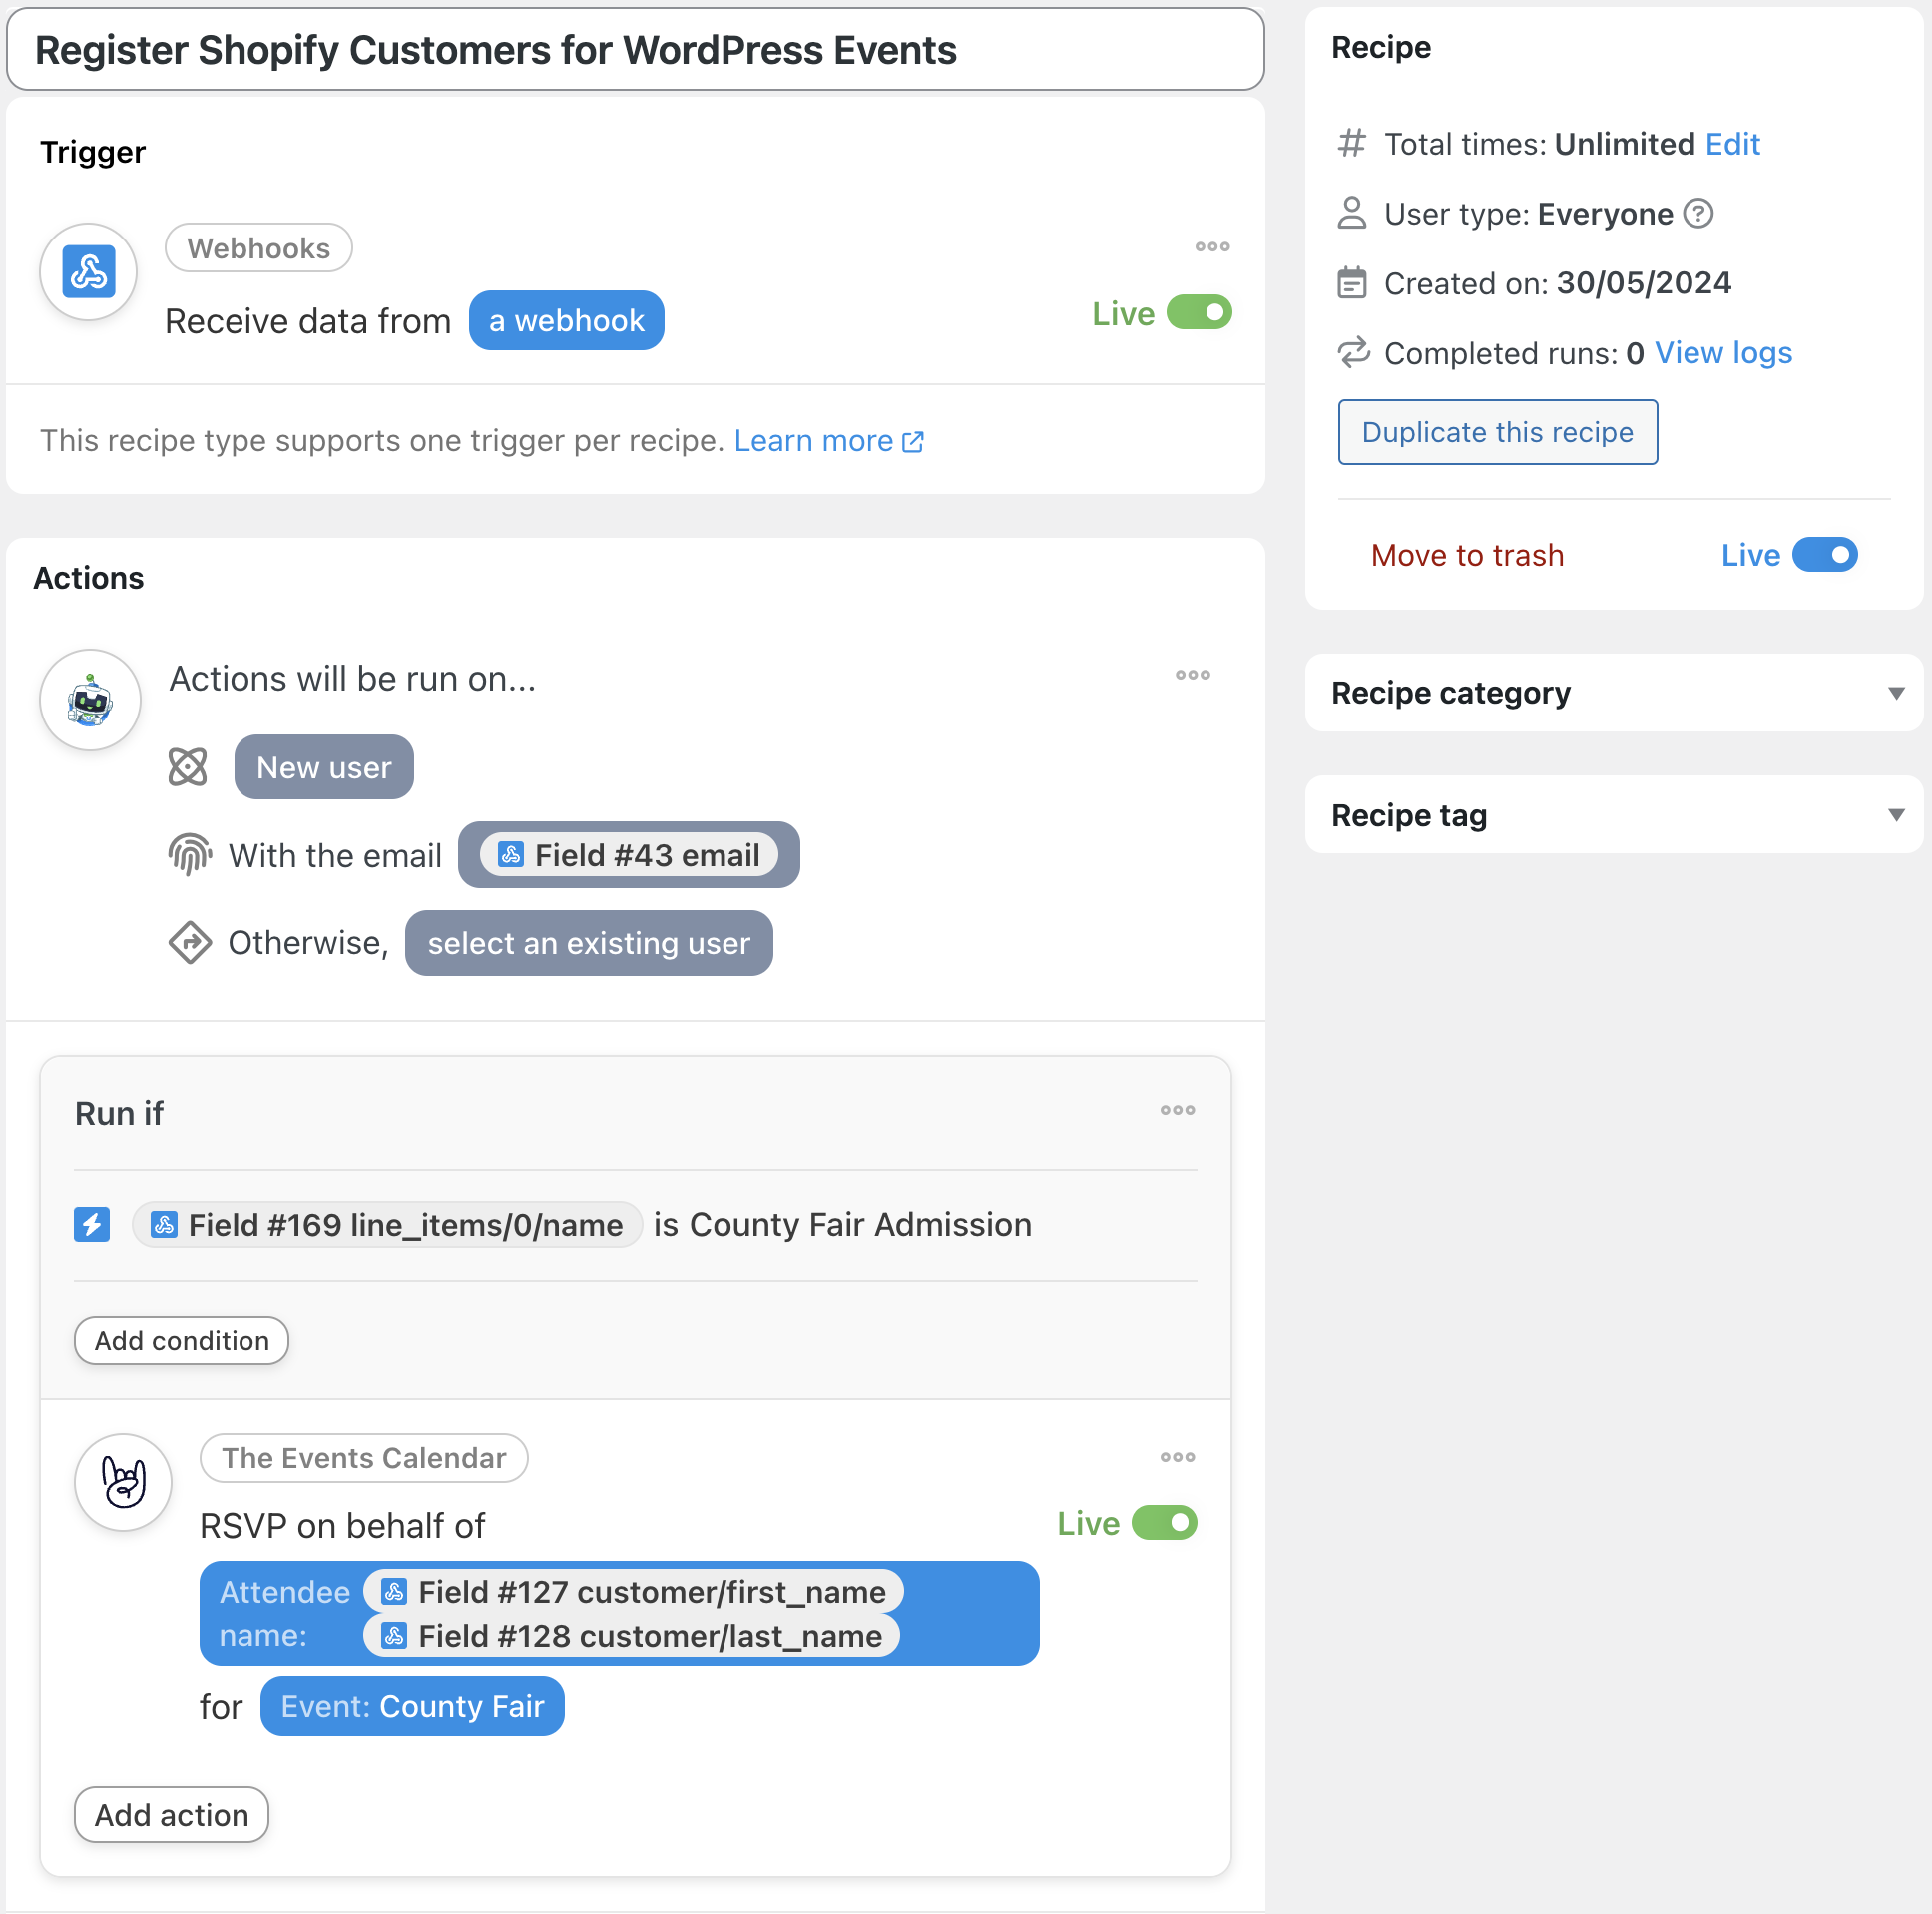
Managing your events is easiest with a CMS like WordPress. And when you pair that community and content management power with the ecommerce simplicity of Shopify, you can sell tickets, memorabilia, paraphernalia and more with ease.
Ready to bring your Shopify customers together? Grab your Automator Pro license>>>.
Frequently Asked Questions
Conclusion
In this article, we explored the seamless process of integration Shopify with WordPress using Uncanny Automator.
By following this step-by-step guide, you have acquired the tools and knowledge you need to harness the power of WordPress for your Shopify store. Whether you’re creating WordPress users from Shopify customers, enrolling them in courses or registering them for events, Automator simplifies the process with its user-friendly, no-code interface.
Ready to enhance your ecommerce capabilities?
Grab your Automator Pro license and upgrade your ecommerce game>>>.
Until next time, happy automating!

Related Posts


This Post Has 0 Comments