Revive old WordPress posts with AI and Uncanny Automator. Learn how to reverse content decay…
Find and Re-Engage Inactive WooCommerce Customers
Want to know how to get your WooCommerce customers back? Launch your re-engagement campaign with Automator and win-back your inactive WooCommerce customers!

Saying goodbye to your WooCommerce customers is never easy. But it’s a whole lot easier when you know that they’ll be back. However, every now and then, after checkout, one of your shoppers will simply disappear—almost like they’ve fallen asleep at their keyboard.
We probably don’t have to tell you about the advantages of returning customers. They boost your KPIs such as lifetime value and loyalty scores. They cost less to convert than new customers and add to your invaluable word-of-mouth marketing efforts.
But, quite apart from the impact on your bottom line, we’re sure that you’d simply love to hear from these catnapping customers once again. So, if you’ve been asking yourself, “How do I get my WooCommerce customers back?” you’ll want to keep reading.
In this step-by-step guide, we’ll show you how Uncanny Automator can sound an alarm clock to bring your inactive WooCommerce customers back from dreamland.
Let’s wake up some shoppers!
Introduction
We’re sure that you’re eager to reach through your computer screen and give your dormant customers a gentle tap on the shoulder. (Or shout through a megaphone.) First, let’s take a look at exactly how Automator is going to help you accomplish this.
By the end of this quick tutorial, Automator will help you to:
- define how long a customer must be “sleeping” before they are considered inactive,
- automatically identify and target inactive WooCommerce customers,
- integrate WooCommerce with your CRM and favorite plugins to launch high-converting re-engagement campaigns, and
- accomplish so much more!
Without further ado, let’s get those customers to rise and shop!
Find Inactive WooCommerce Customers with Uncanny Automator
What if we told you that you could get your inactive WooCommerce customers back with just one plugin? From ecommerce automation to marketing automation and more, Uncanny Automator can help you:
- find and target inactive customers,
- send automated personalized messages,
- and even generate personalized offers that maximize conversion rates.
And you can do it all without ever having to write (or read) a single line of code.

If Automator sounds like the stuff of a WordPress developer’s dreams, that’s because it is. Automator is the #1 automation and integration plugin for WordPress websites. Using simple combinations of triggers and actions, you can connect all of your favorite apps and plugins to create seamless workflows.
When it comes to finding and re-engaging inactive WooCommerce customers, you’ll need metadata-level access and control of your WordPress website. Fortunately, Automator puts the power and flexibility of metadata right at your fingertips with a click-and-play interface. No phpMyAdmin, no SQL necessary.
The FREE forever version of Automator doesn’t have the ability to manage user meta data. As such, throughout this article, we’ll be relying on Automator Pro features. We’ll also be using the Custom User Fields Addon, included (for FREE) with an Automator Plus and/or Elite license.
If you aren’t yet convinced that Automator is the plugin you’ve been daydreaming of, you can still follow this guide risk-free as Automator offers a 14-day money back guarantee.
Get your Automator Plus or Elite license here so you can follow along.>>>
Send Automated Emails to Inactive WooCommerce Customers
Now that you have an Automator license, it’s time to wake up those sleeping customers with an automated alarm they can’t ignore.
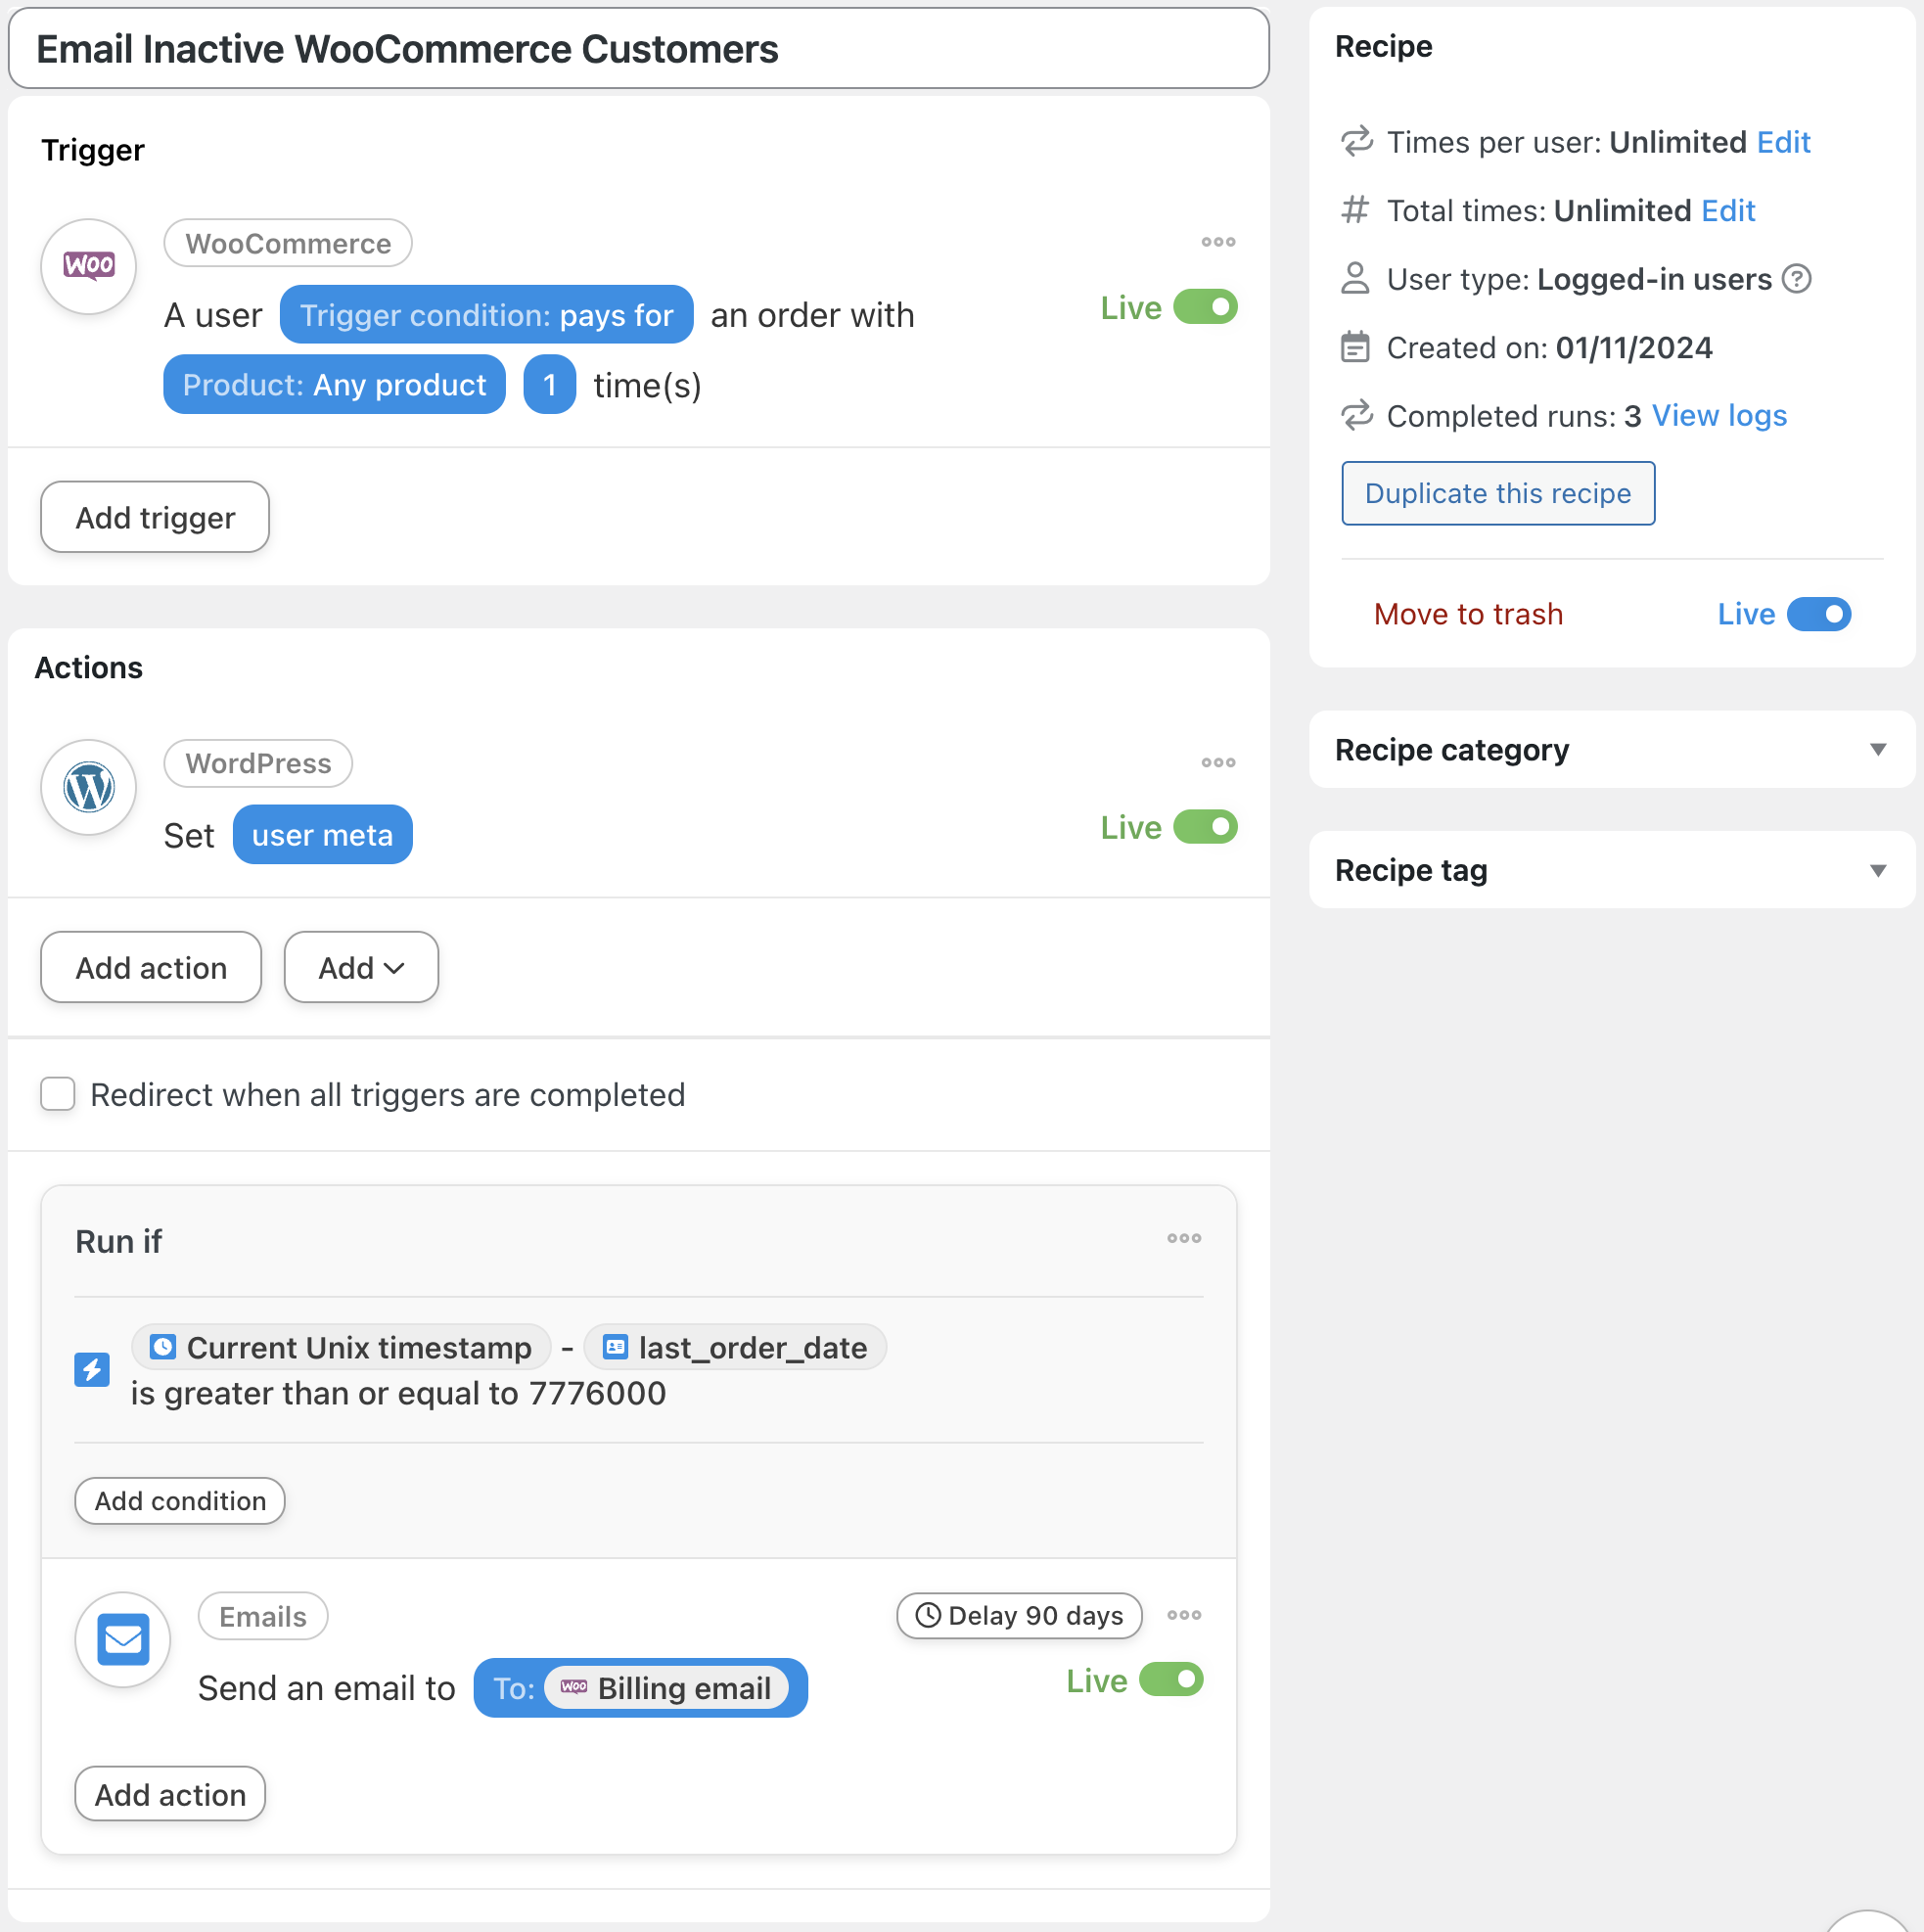
In the recipe pictured above, we’re able to store our customers’ last order data as user meta. Then, using some nifty Automator features, we’re able to send an automated email after 90 days if the user hasn’t placed another order. Here’s how we did it.
Step 1: Create New User Meta
From your WordPress Admin Dashboard, navigate to Automator > Settings and click on Addons. In the tabs on the left-hand side, select Custom User Fields.
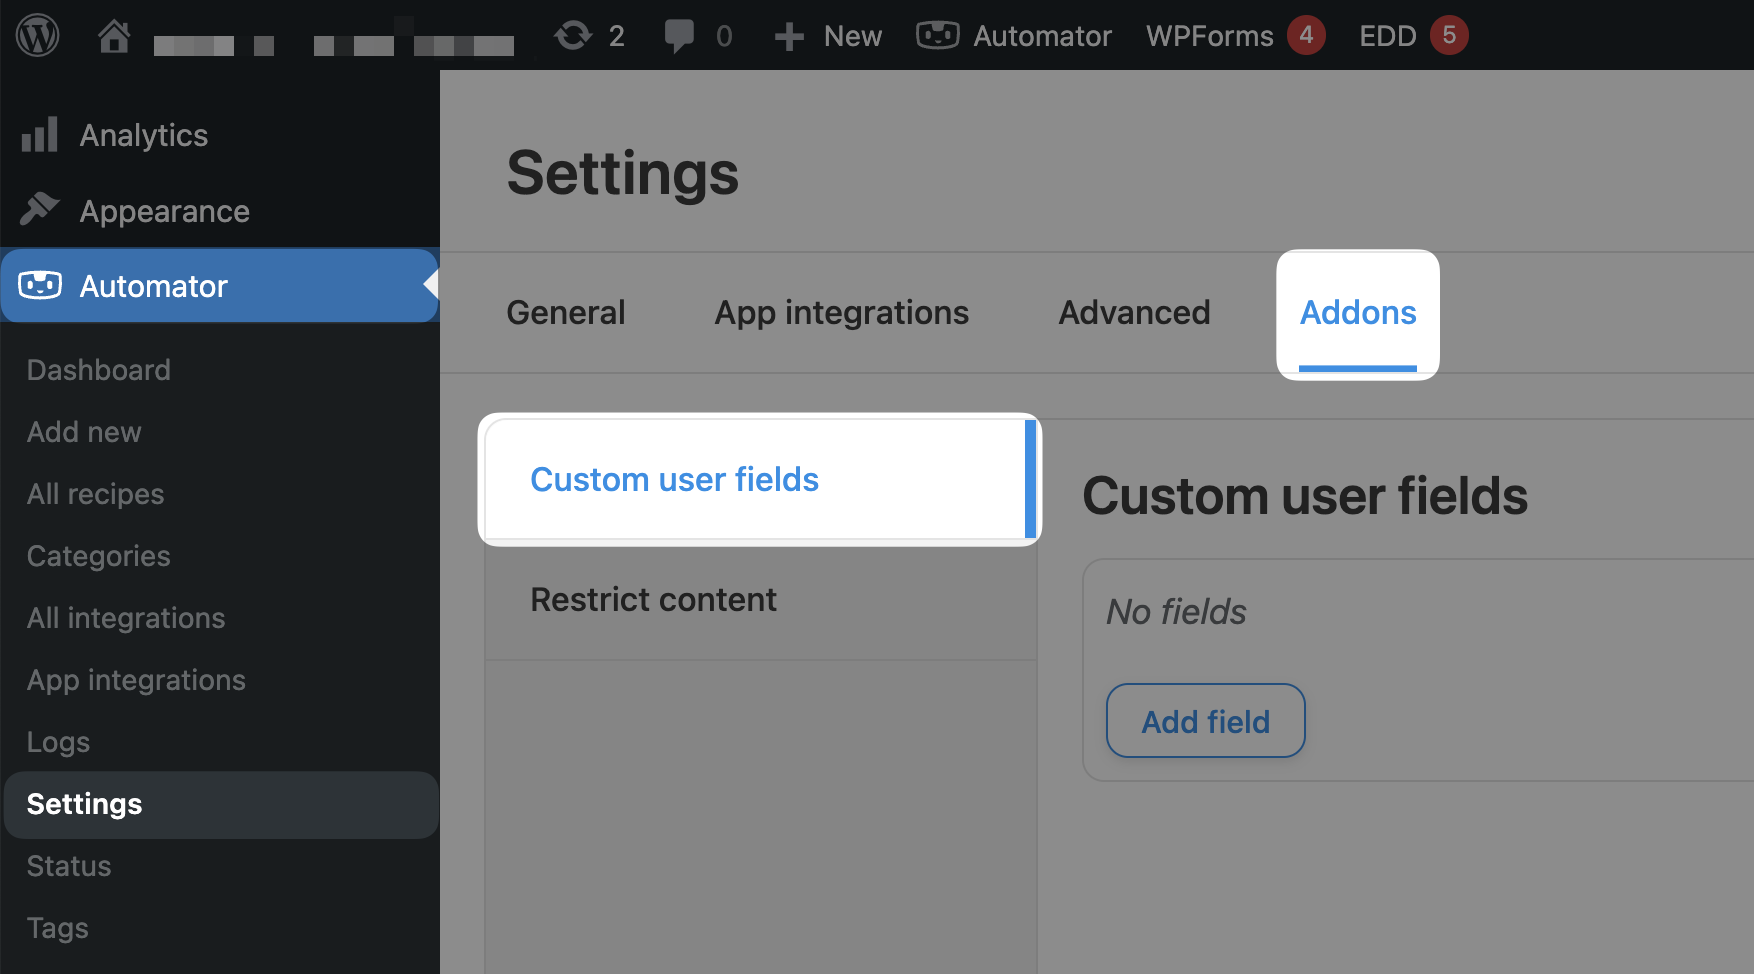
Next, click Add field. In the pop-up window that appears, enter the name you want to give your user meta into the Field name field. For example, we have named this custom user meta “Last Order Date”.

(Note: The Custom User Fields Addon will automatically create the user meta key for you. Unless you choose a custom meta key, it will always begin with “uacuf” and replace spaces in the field name with underscores “_”.)
When you’re finished, click Save.
You can now use this custom user meta easily across your WordPress website, on both the front and back ends.
Step 2: Create and Name a New Recipe
From your WordPress Admin Dashboard, navigate to Automator > Add new recipe. In the pop-up window that appears, select Logged-in users.

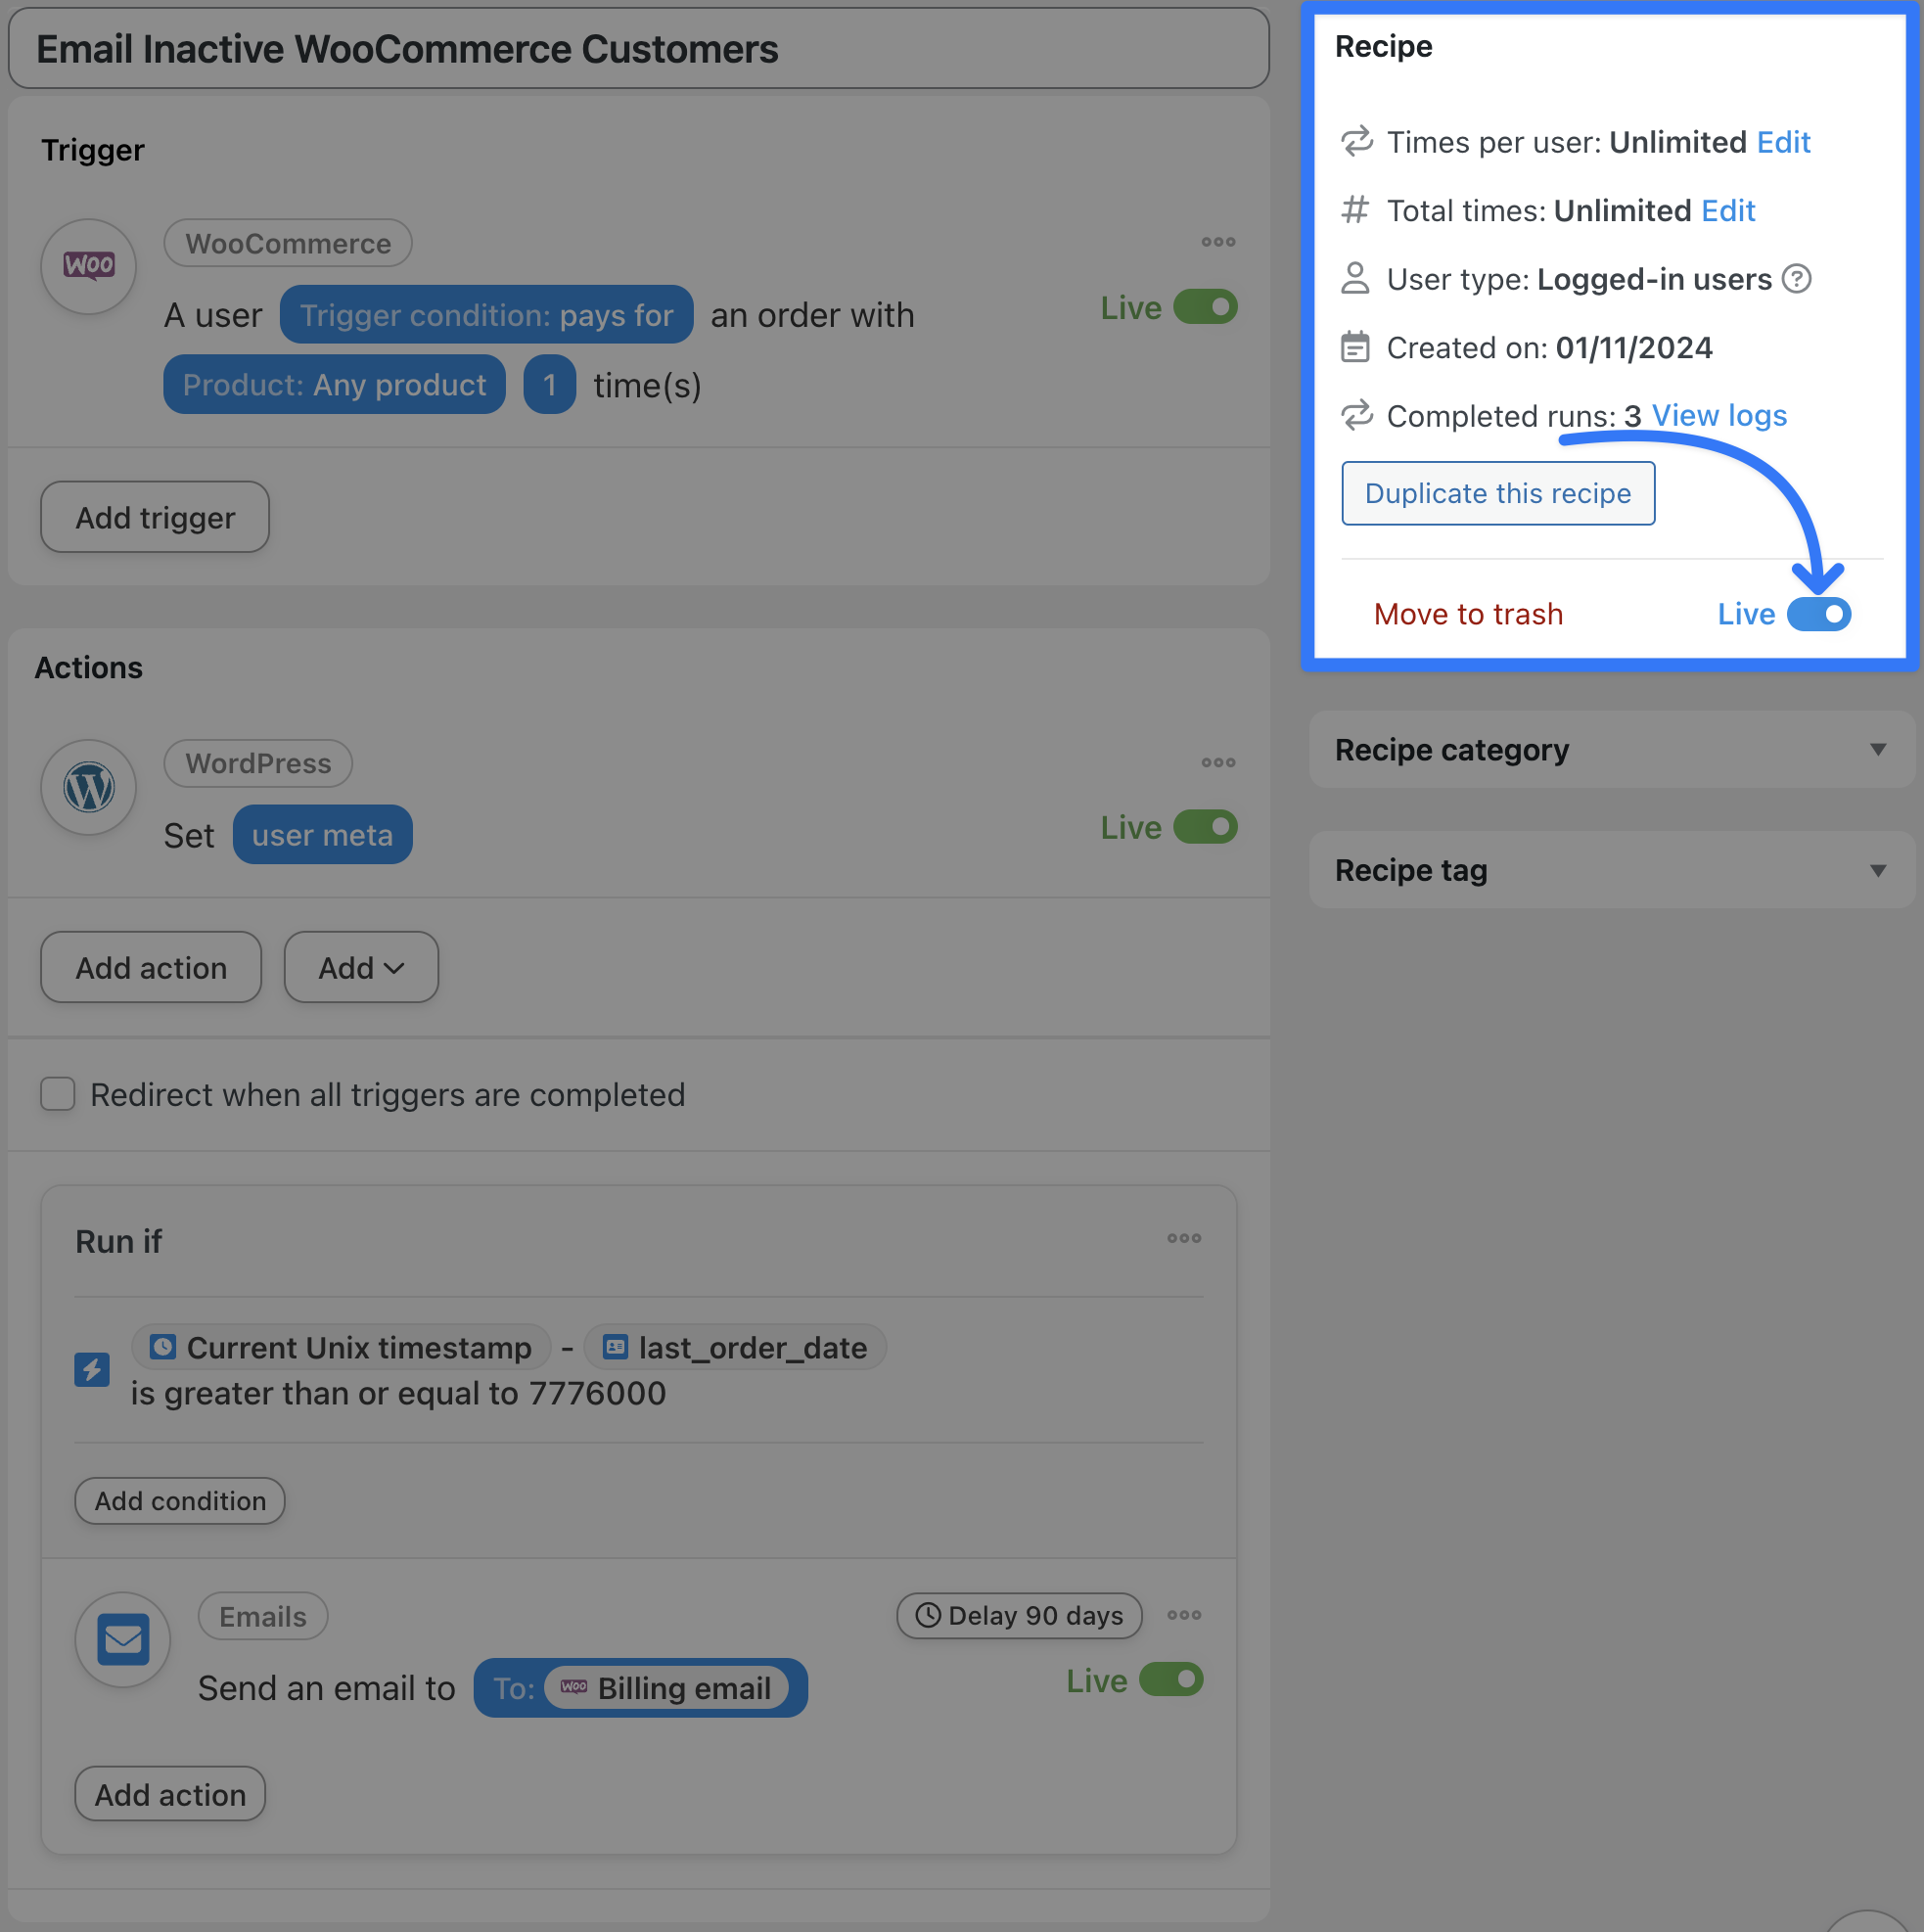
Give your recipe a name that makes it easy to recognize at a glance. For example, we’ve named this recipe “Email Inactive WooCommerce Customers”.
Step 3: Configure Your Trigger(s)
In the Trigger panel, from the menu of available integrations, select WooCommerce.

From the drop-down list that appears, select A user completes, pays for, lands on a thank you page for an order with a product.
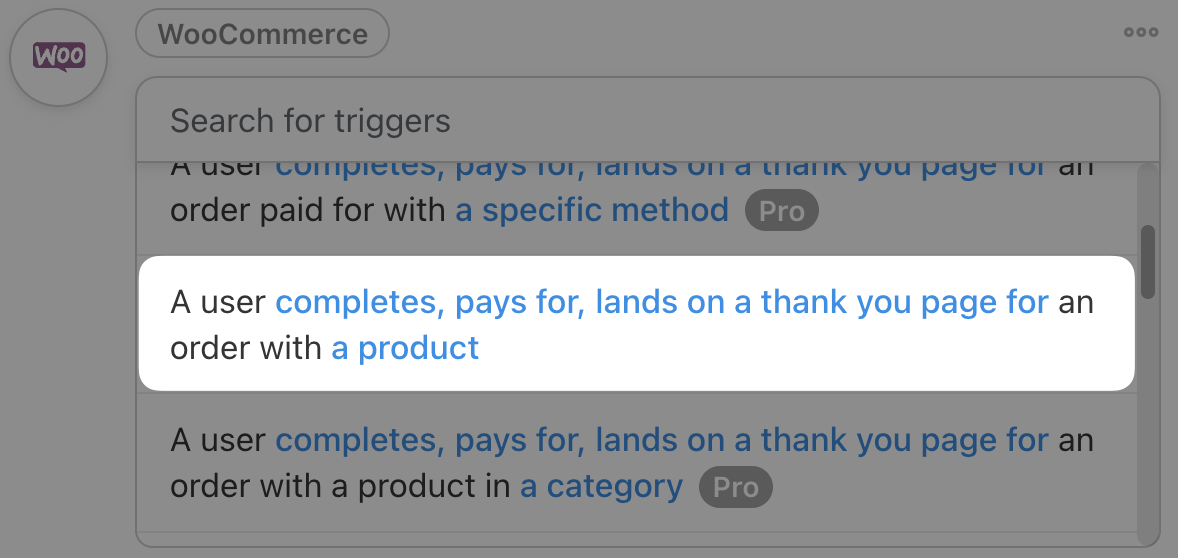
Automator will prompt you to select the Trigger condition and Product. Because we want to keep track of our customers’ activity, not simply their interaction with a specific product, we have selected Any product.
When you’re finished, click Save. Your Trigger panel should look like this:

Step 4: Configure Your Action(s)
In the Actions panel, click Add action and select WordPress from the menu of available integrations.

From the drop-down list that appears, select Set user meta.

We’re going to use tokens (i.e., dynamic data from your WordPress website and from within recipes) to fill out the Key and Value fields. Specifically, we’re going to use the token that represents the custom user field we created in “Step 1” to populate the Key field.
To select a token, click the Asterisk in the Key field. From the drop-down list that appears, select Custom User Fields > Last Order Date – Meta key.
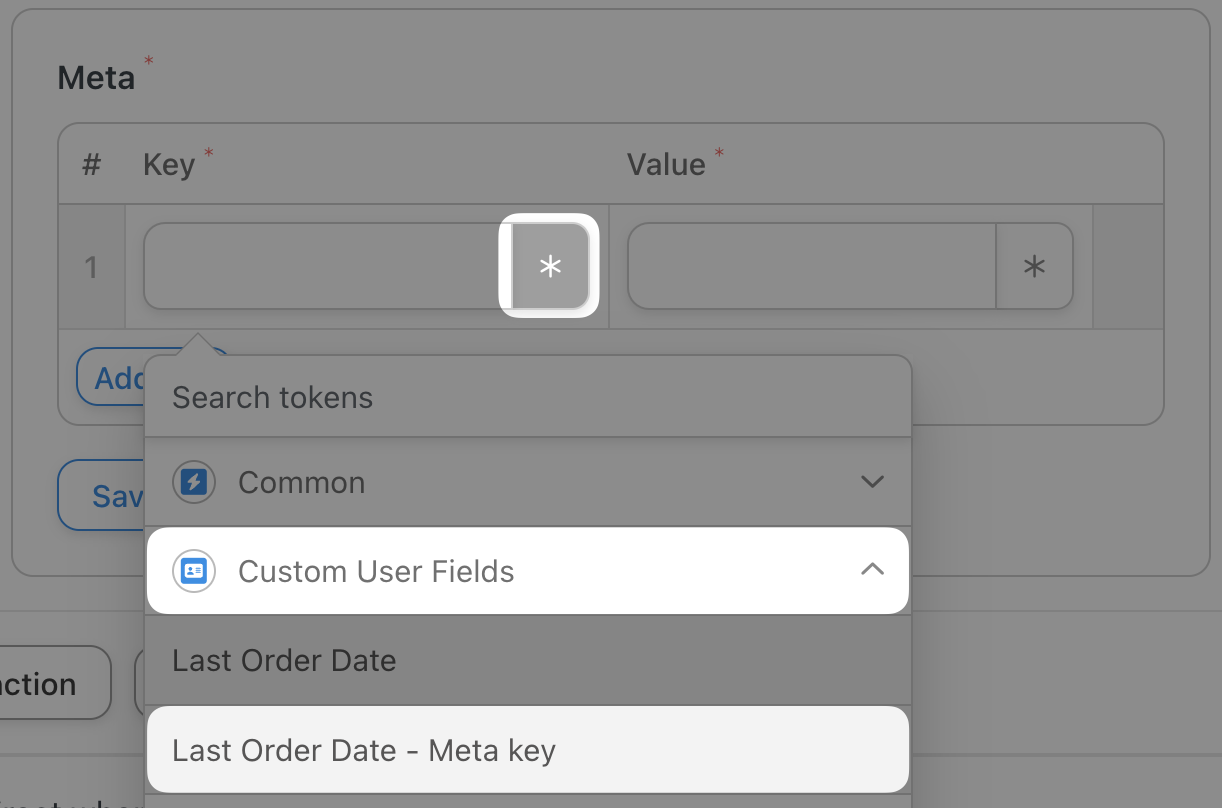
(Note: The name of the token may be different if you chose to give your custom user field in Step 1 a different name.)
Next, in the Values field, select the Current Unix timestamp token.
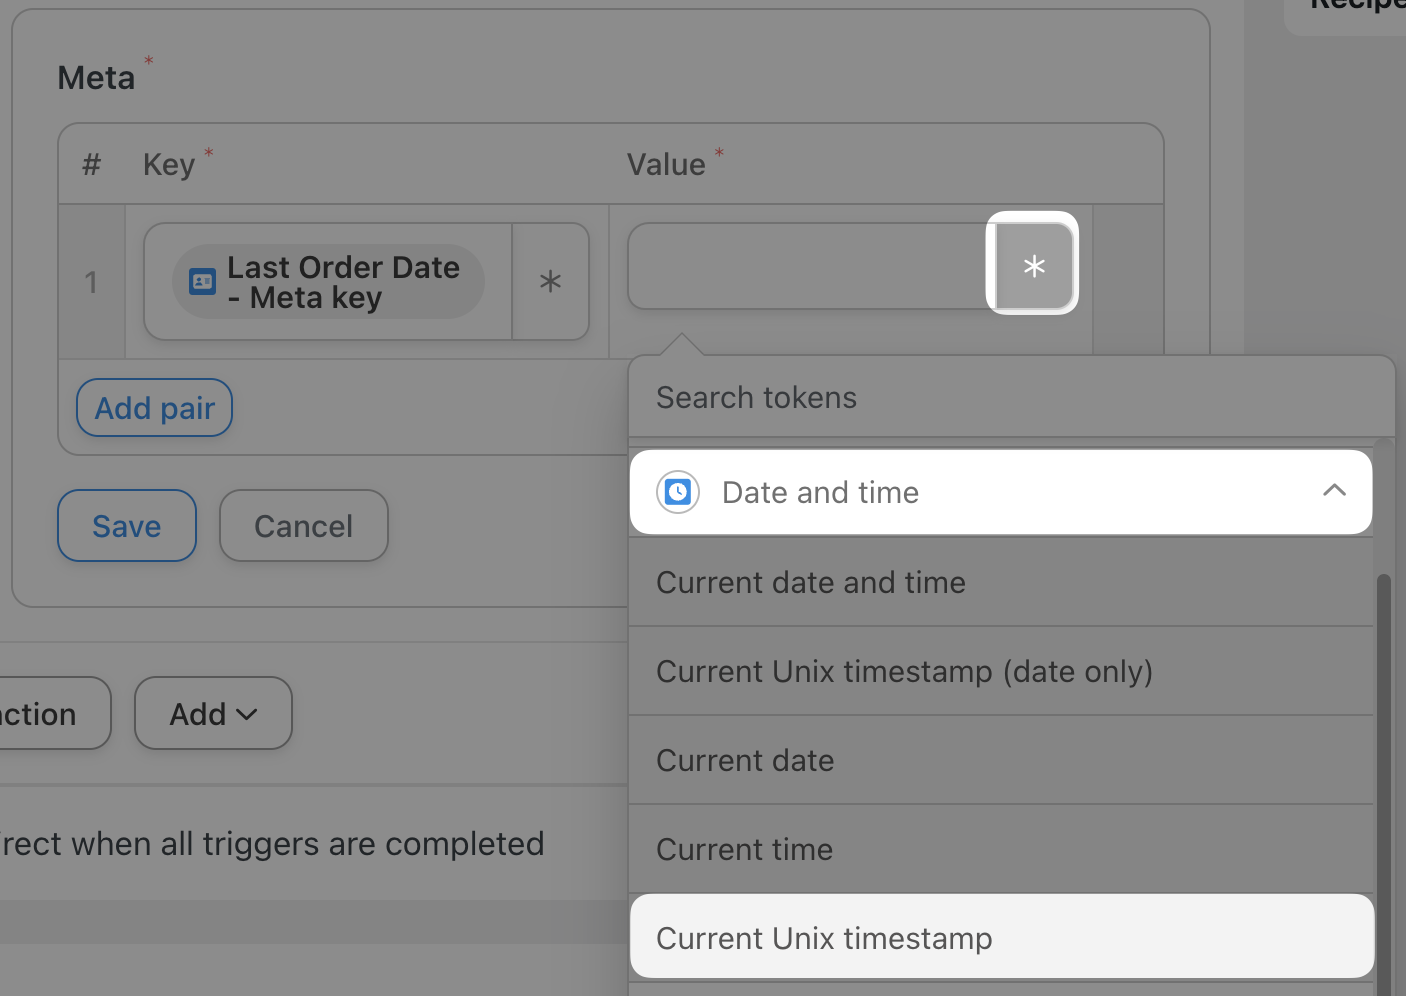
(Note: The WooCommerce action will have its own “Order date” and “Order date and time” tokens. However, these tokens return values in formats that we can’t later work with. If you’re unfamiliar with Unix timestamps, check out our nifty guide here.)
When you’re finished, click Save. Your Actions panel should now look like this:

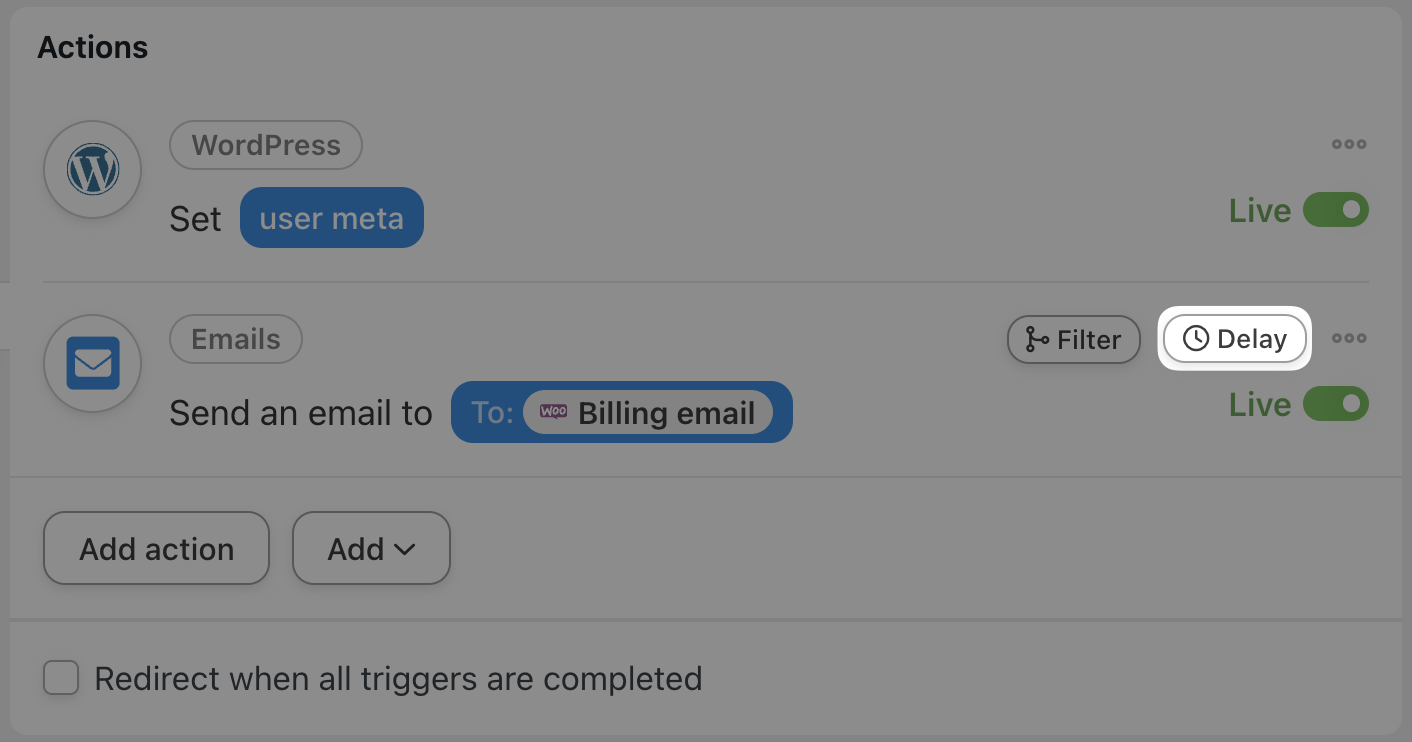
Now that we’ve created the user meta that will act as something of a “clock” that tracks our customers’ activity (or lack thereof) we can add the action(s) that will serve as their alarm.
In the Actions panel, click Add action and select Emails from the menu of available integrations.

From the drop-down list that appears, select Send an email.
Automator will present you with a form to draft your email. Use tokens to populate the required fields such as To and Subject. You can even use tokens within the body of the email to personalize your re-engagement campaign.
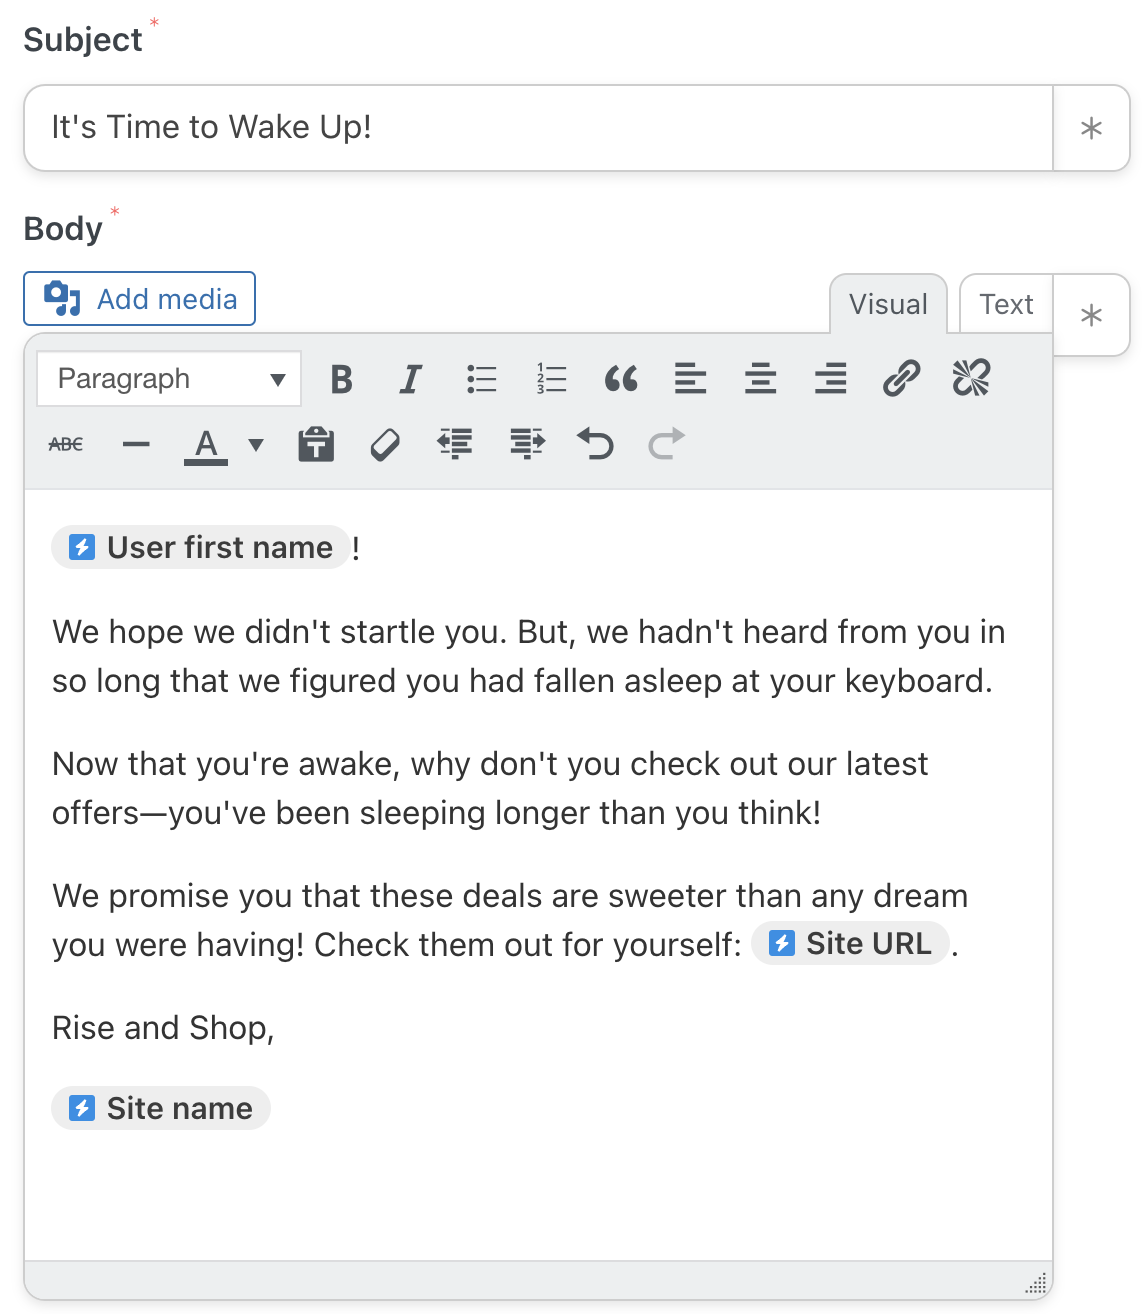
When you’re satisfied, click Save.
Of course, we don’t want our customers to receive this re-engagement email until and unless they have nodded off at their keyboard. This is where the dreamlike magic of Automator really comes in.
Hover over the Emails actions and click Delay.
In the pop-up window that appears, set the period of dormancy that you want to allow your customers before considering them to be inactive. For example, we have set a period of 90 days.
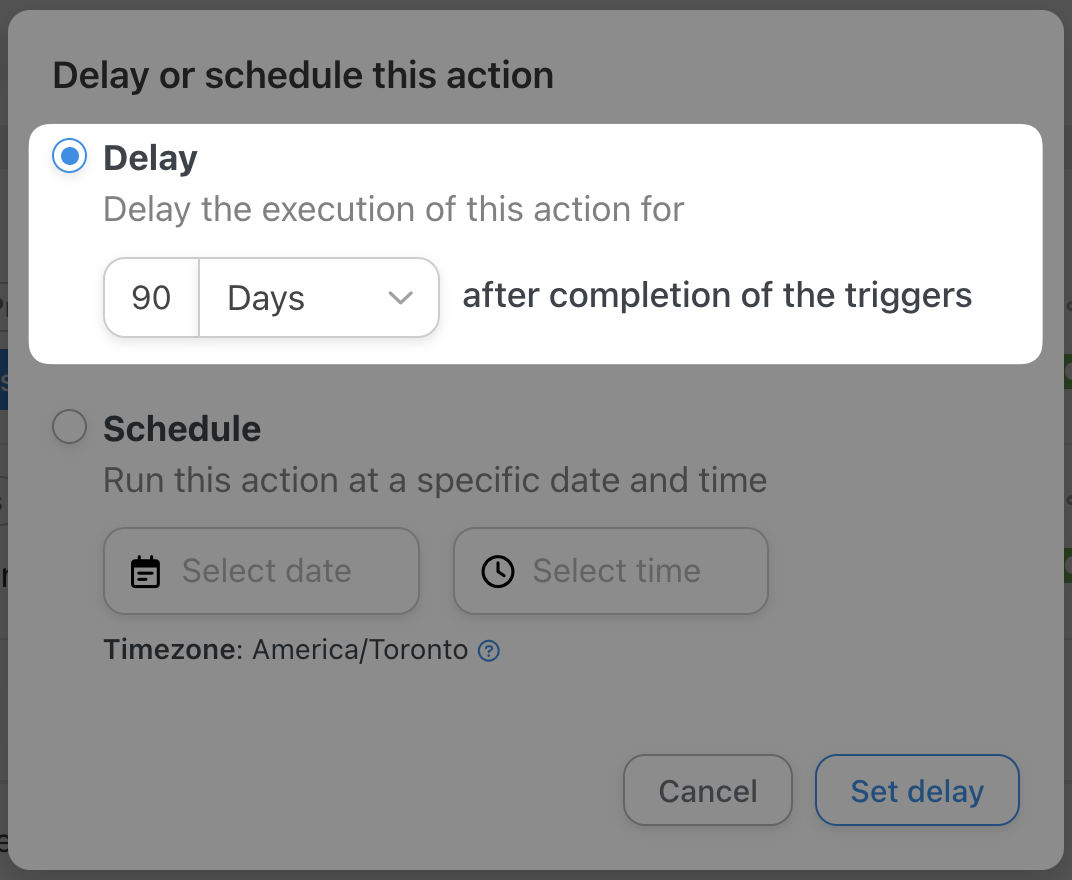
When you’re finished, click Set delay.
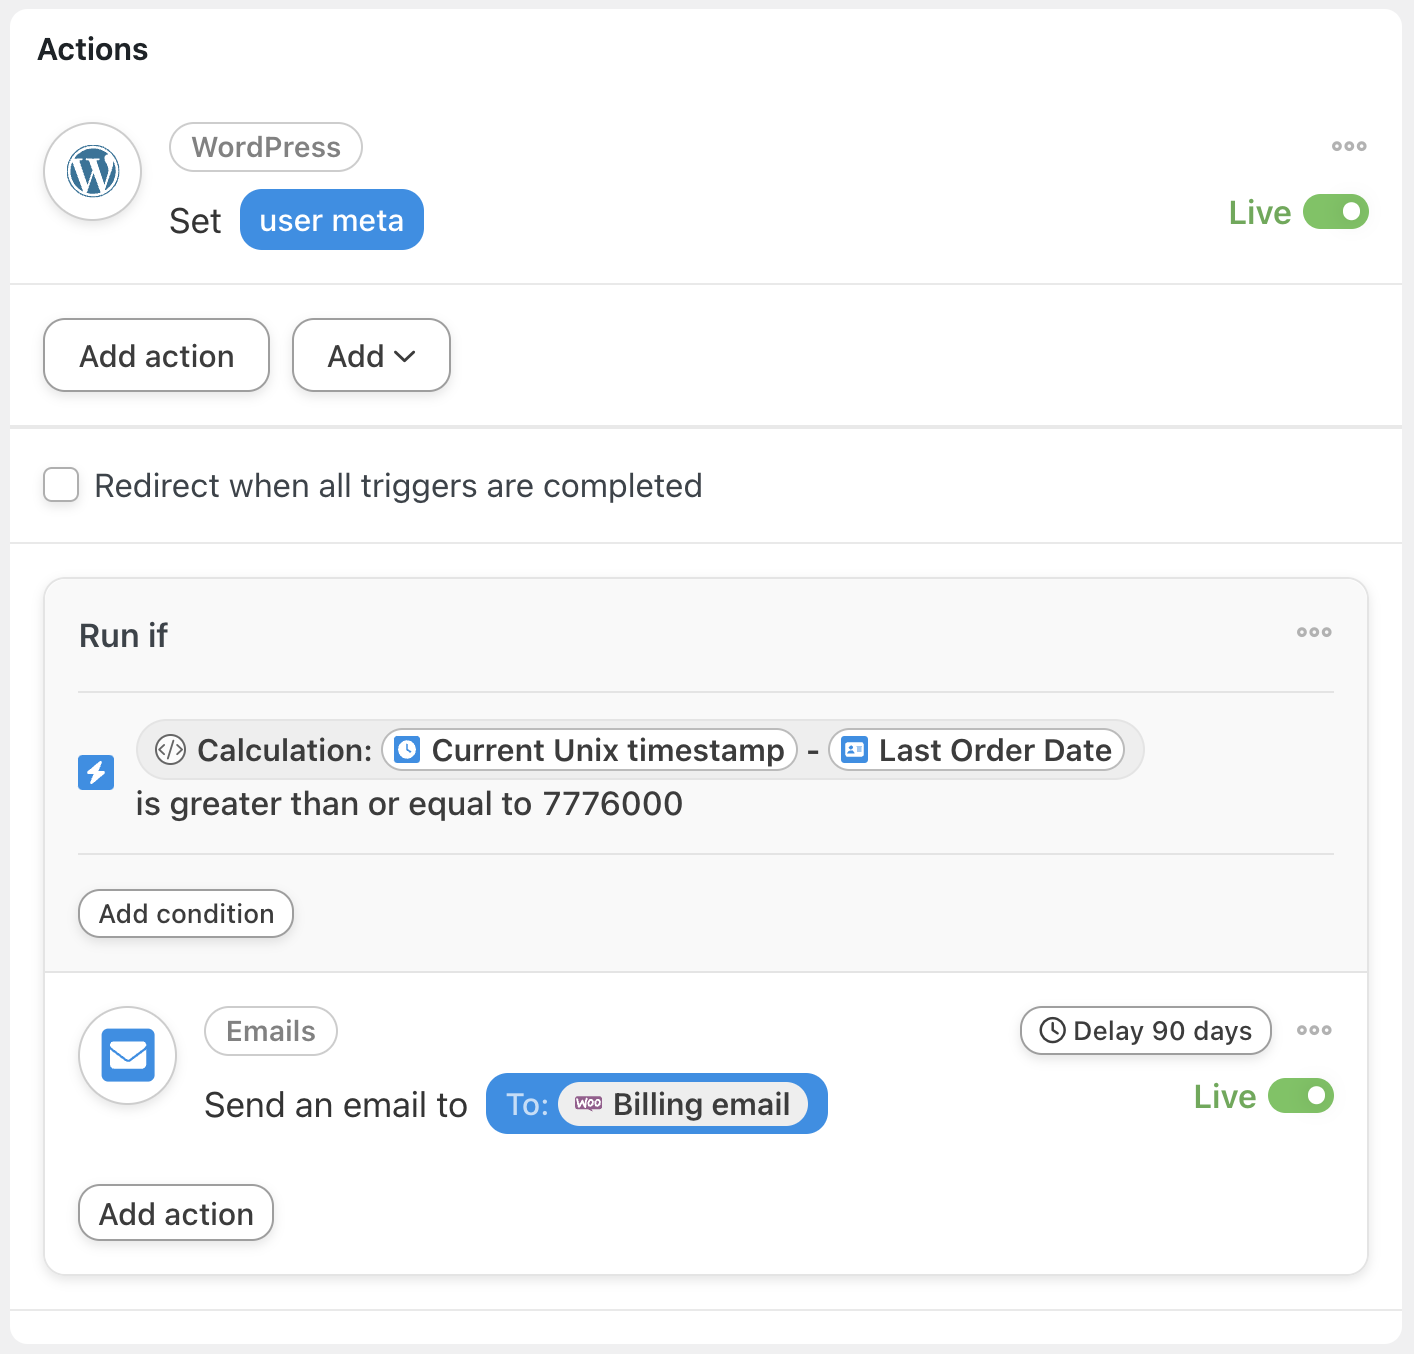
Now, as the recipe stands, our customers will receive the re-engagement email after 90 days regardless of whether or not they make another purchase. Once again, we’ll turn to another powerful Automator feature to finish the recipe.
Hover over the Emails action and click Filter.
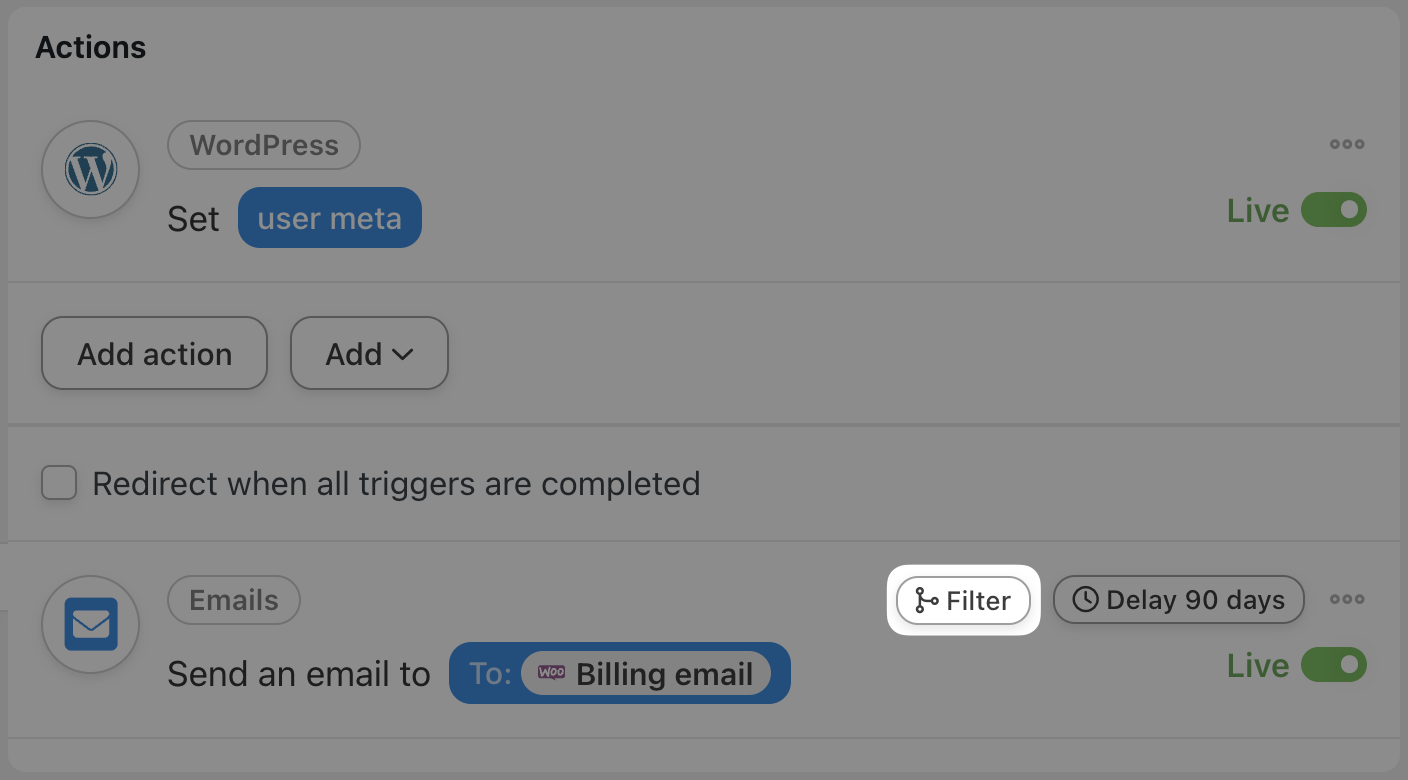
In the pop-up window that appears, select A token meets a condition.

Next, Automator will prompt you to configure the rule that defines the condition(s) that the token must satisfy. In our example, we want to define a condition whereby a user’s “Last Order Date” exceeds 90 days. Note that the token we’ve just described is not the user meta data itself, but rather the difference between the current date and the user meta data value.
To create this new token, click the Asterisk in the Token field and select Modifiers > Calculation.

A Calculation window will appear. To see whether or not the customer’s “Last Order Date” was more than 90 days ago, subtract the “uacuf_last_order_date” token from the “Current Unix timestamp” token.

Once you’re finished click Add token. Automator will return you to the previous window to finish configuring the rule.
If the difference between the “Current Unix timestamp” and the “Last Order Date” is equal to or greater than 7,776,000, then the customer will be considered inactive.
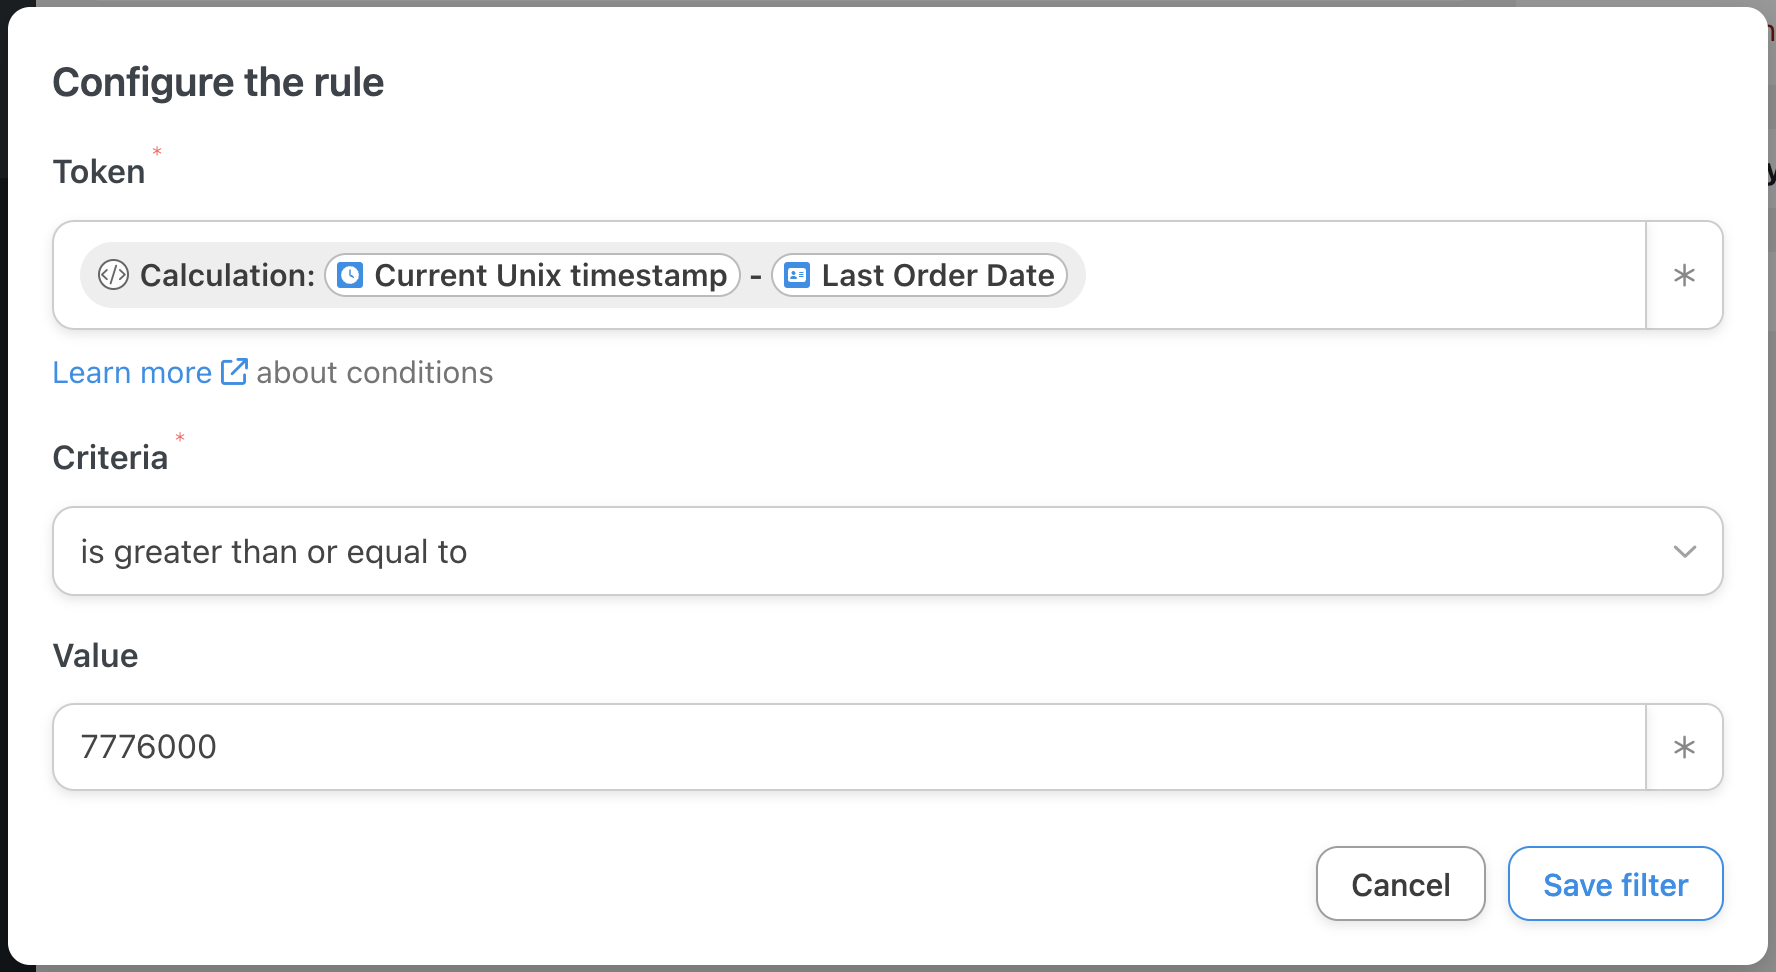
(Note: The value 7,776,000 is 90 days in Unix time. If you specified a different amount of time for customer inactivity, you can calculate that period in Unix time as follows: number of days * 24 * 60 * 60 where “24” represents the number of hours in a day, “60” represents the number of minutes in an hour and the final “60″ represents the number of seconds in a minute.)
Once you’re finished, click Save filter. Your Actions panel should now look something like this:
Step 5: Go Live and Sound the Alarm!
You’re just about ready to give your customers that virtual tap on the shoulder. All that’s left for you to do is to toggle the recipe from Draft to Live.
We’re pretty sure that your customers will be wide awake and ready to check out your latest deals after this recipe. But, what if they hit the snooze button?
Let’s take a quick look at some of Automator’s other triggers and integrations to see how you can get those sleepyheads out of bed and back online.
More Ways to Re-Engage Inactive WooCommerce Customers
If the smell of bacon and waffles is enough to wake anyone out of bed in a literal sense, then the sweet smell of savings should be enough to wake up inactive customers. At least, that’s the reasoning behind this small modification we made to the recipe we just created.
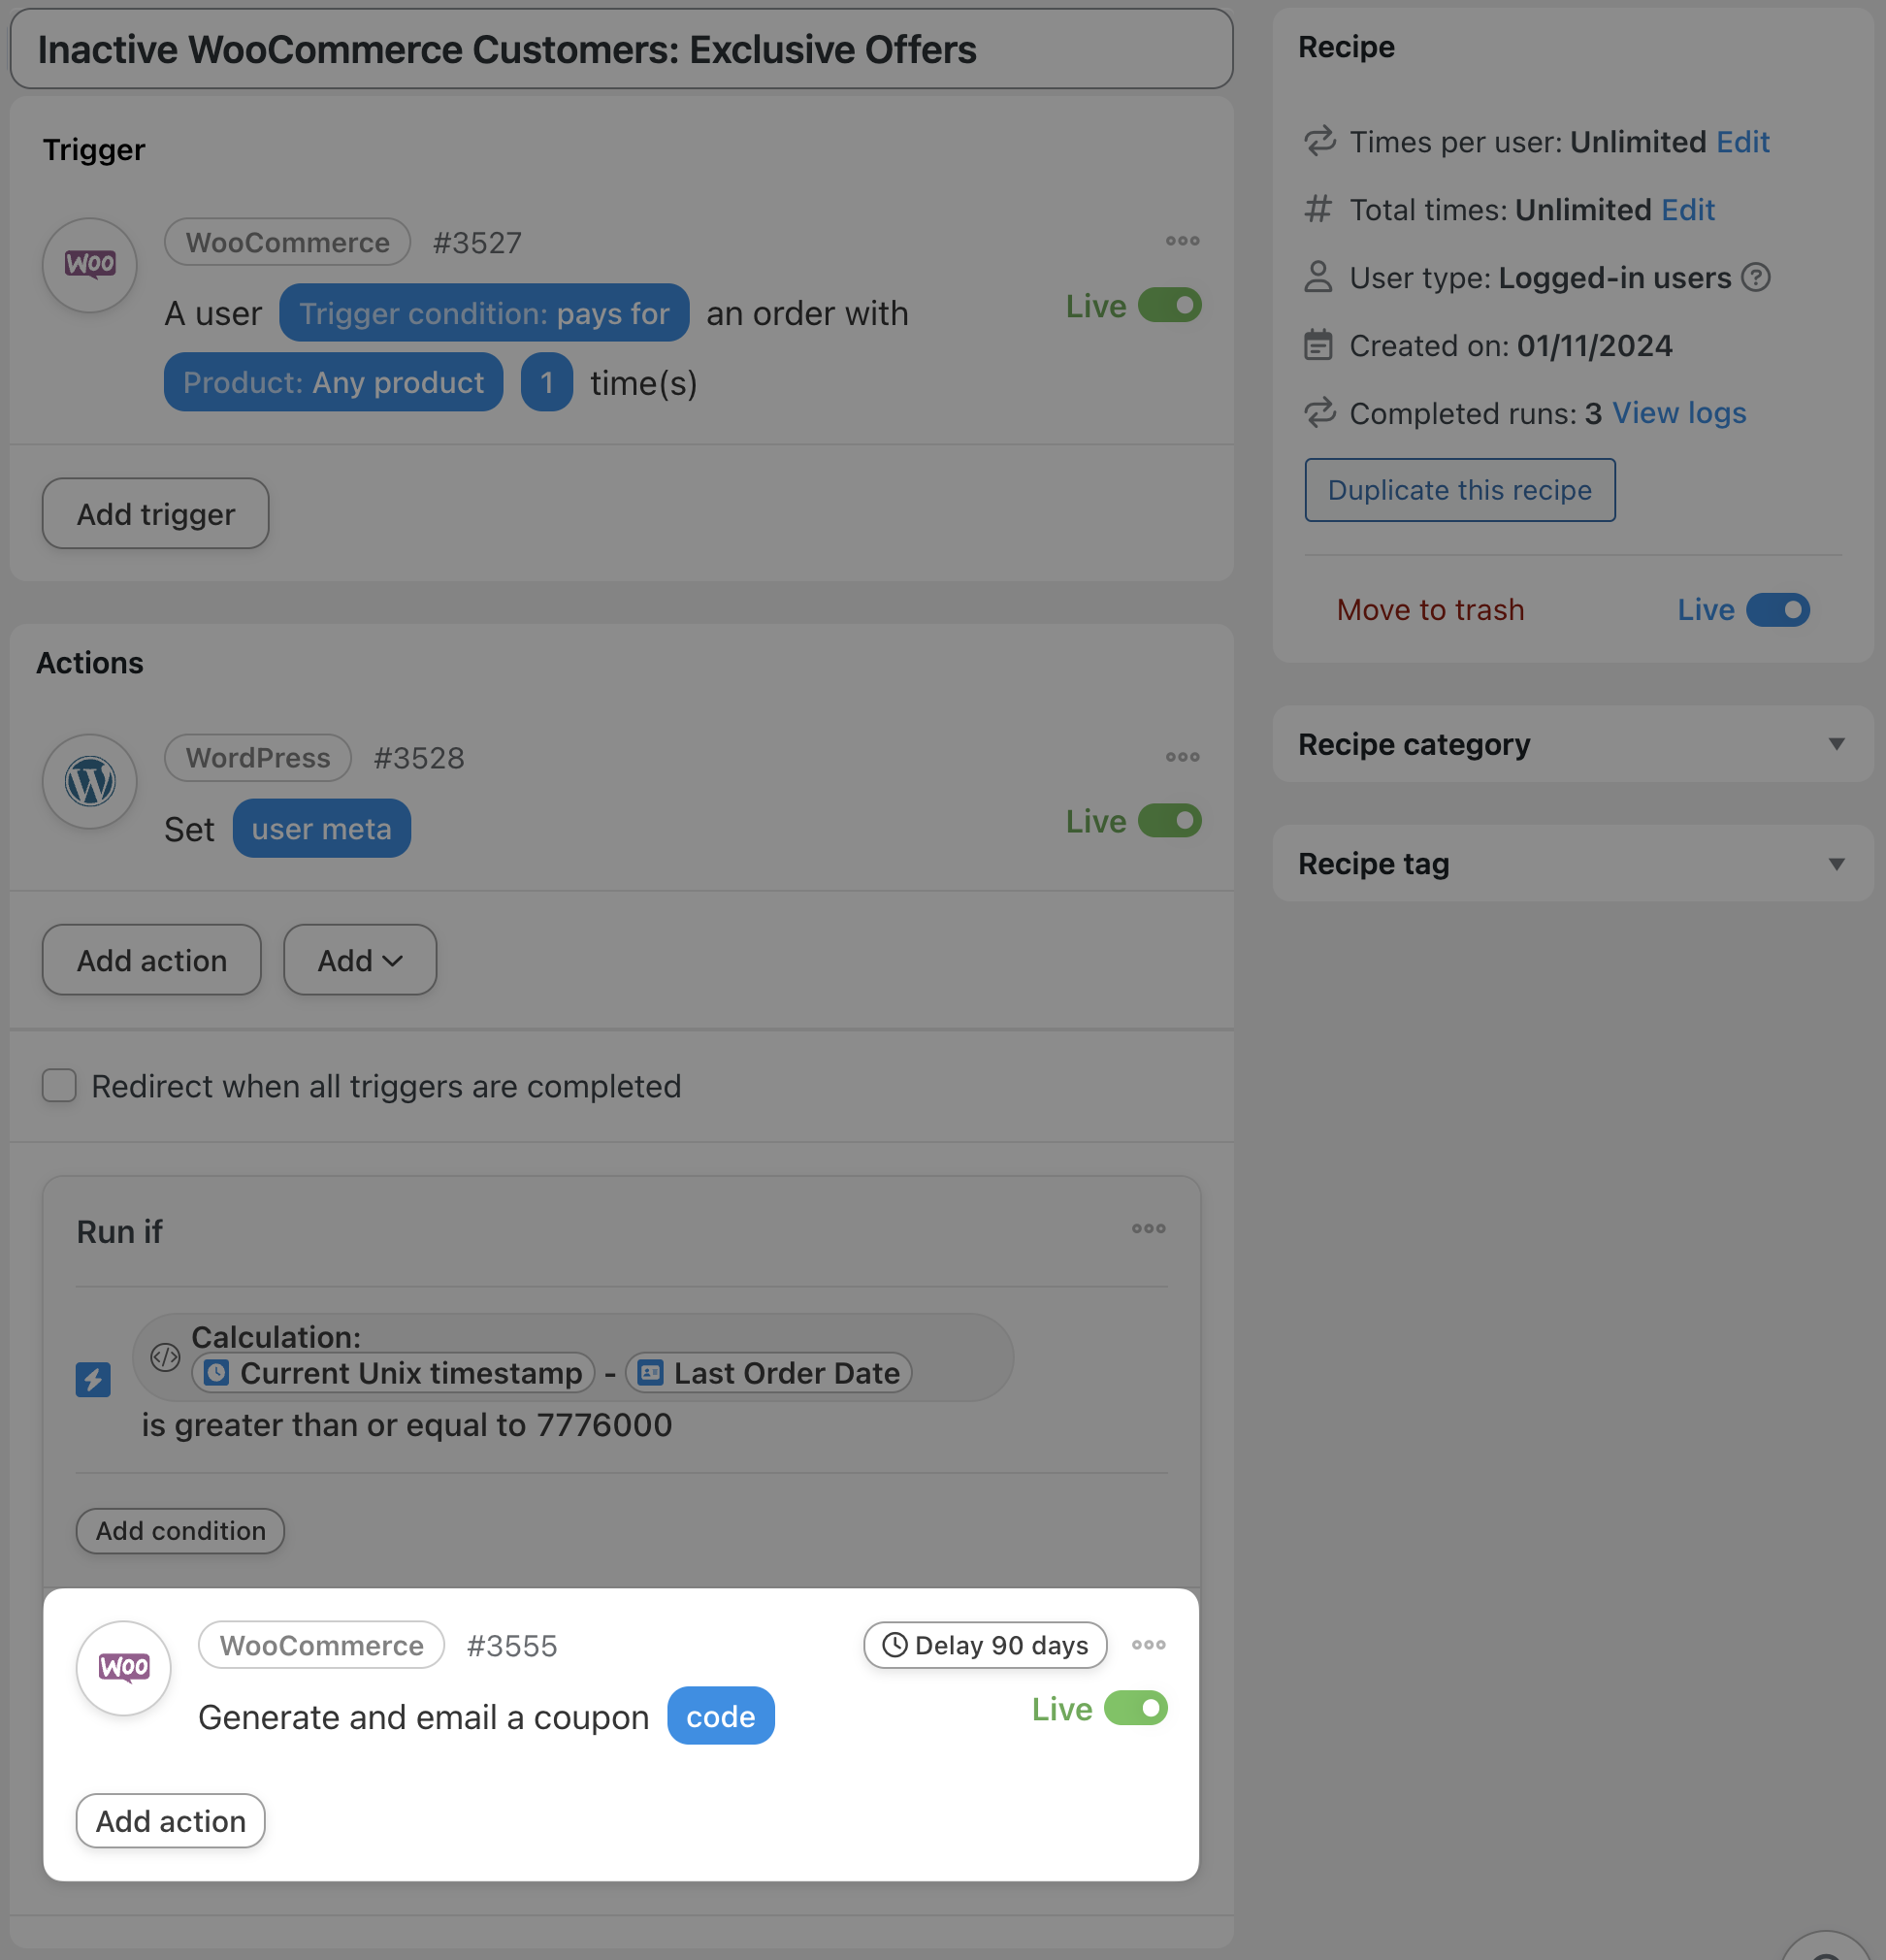
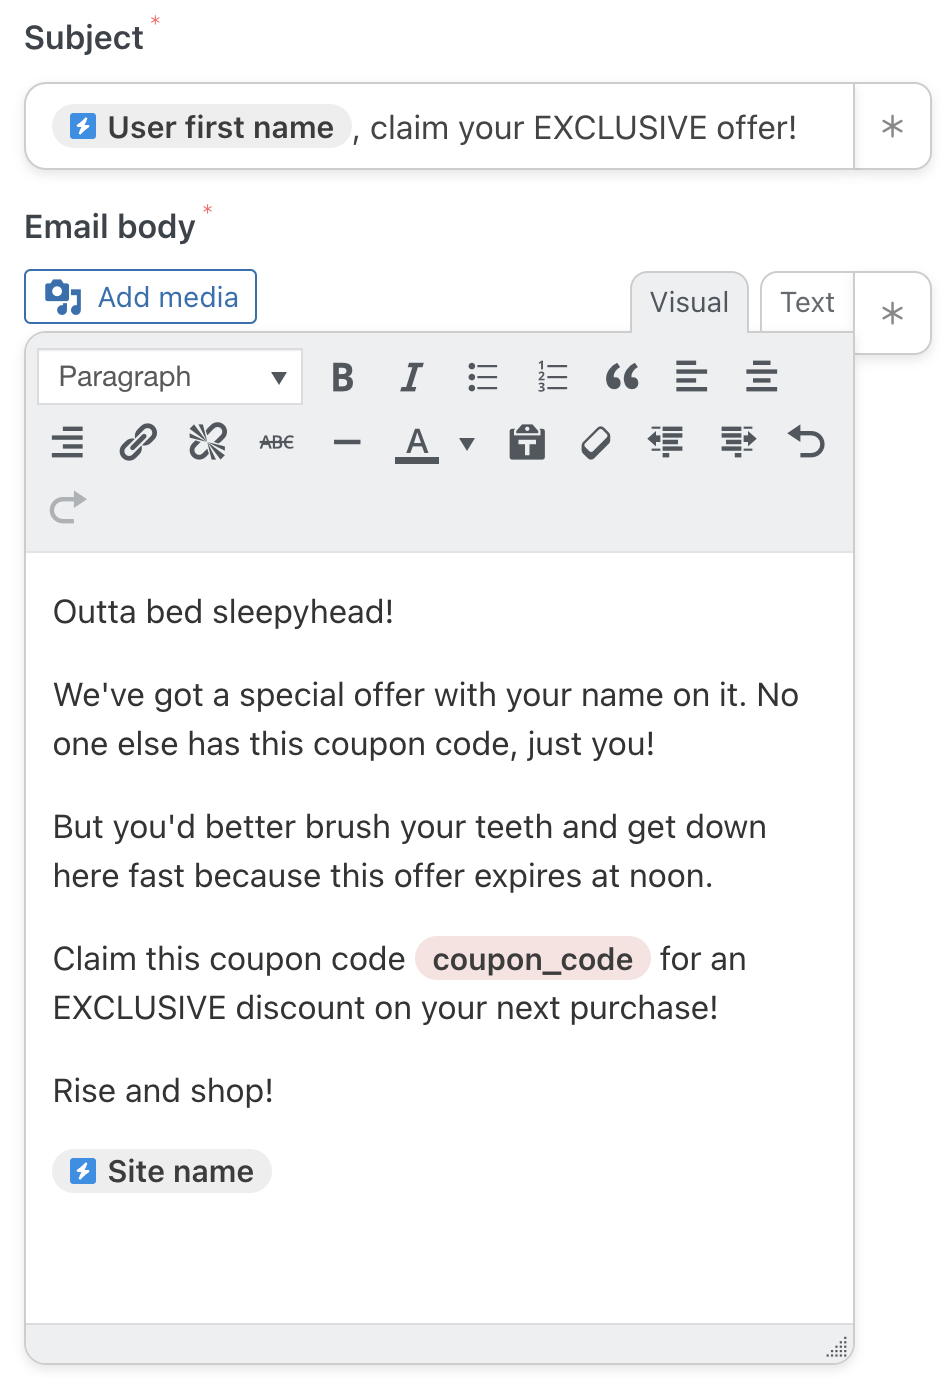
When a simple tap on the shoulder isn’t enough, get your inactive WooCommerce customers back with an exclusive offer, tailored just for them. In the recipe pictured above, all we did was swap out our Emails action with an action to generate and email a brand new coupon code to our snoozing shopper.
Of course, every one of your WooCommerce customers will have their own shopping habits. As such, Automator gives you the ability to create flexible and dynamic recipes that are as personal as a good mattress. Take the recipe pictured below, for example.
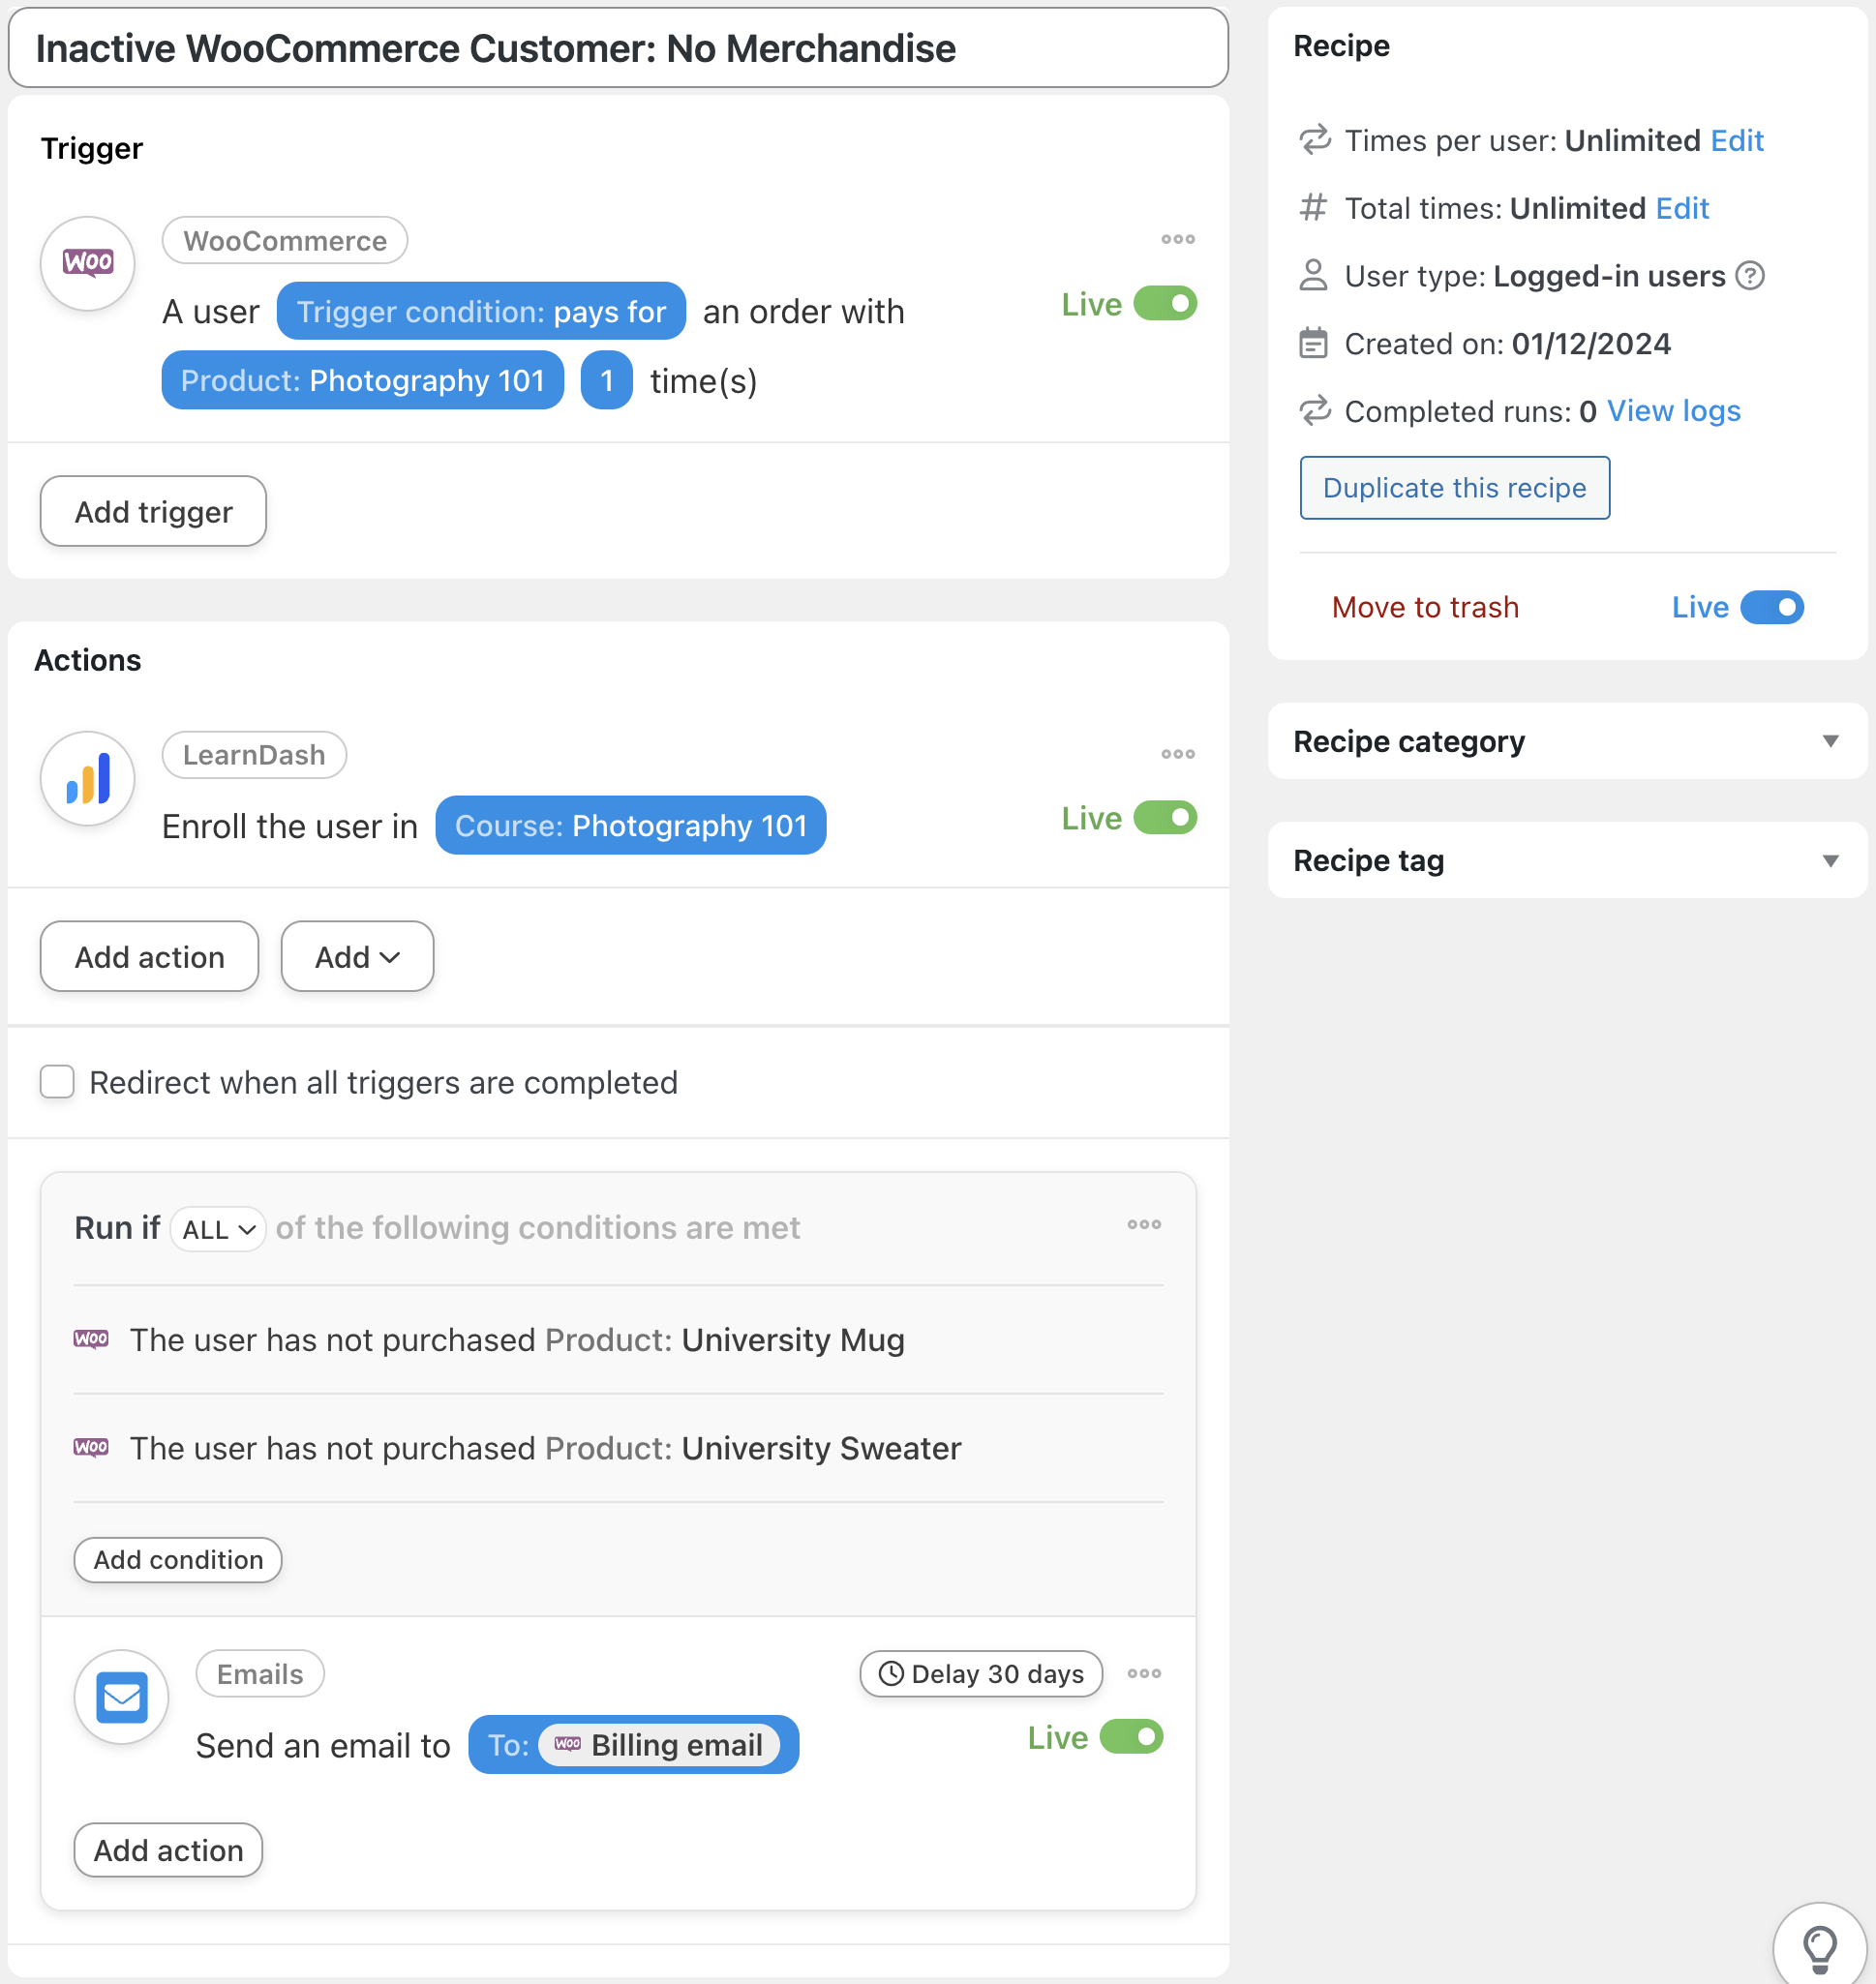
In this recipe, we’re able to enroll our customers in a LearnDash course when they purchase the associated course product in our WooCommerce store. Then, in 30 days we’re able to automatically send them an email if they haven’t purchased any of our online university’s merchandise or course-related materials.
Track Inactive WooCommerce Customers in Your CRM
CRMs such as ActiveCampaign, HubSpot, Drip and MailPoet are great for tracking your contacts who haven’t been reading your emails. However, without Automator, these CRMs have no idea what’s happening in your WooCommerce store. And what good are emails that don’t convert readers into buyers?
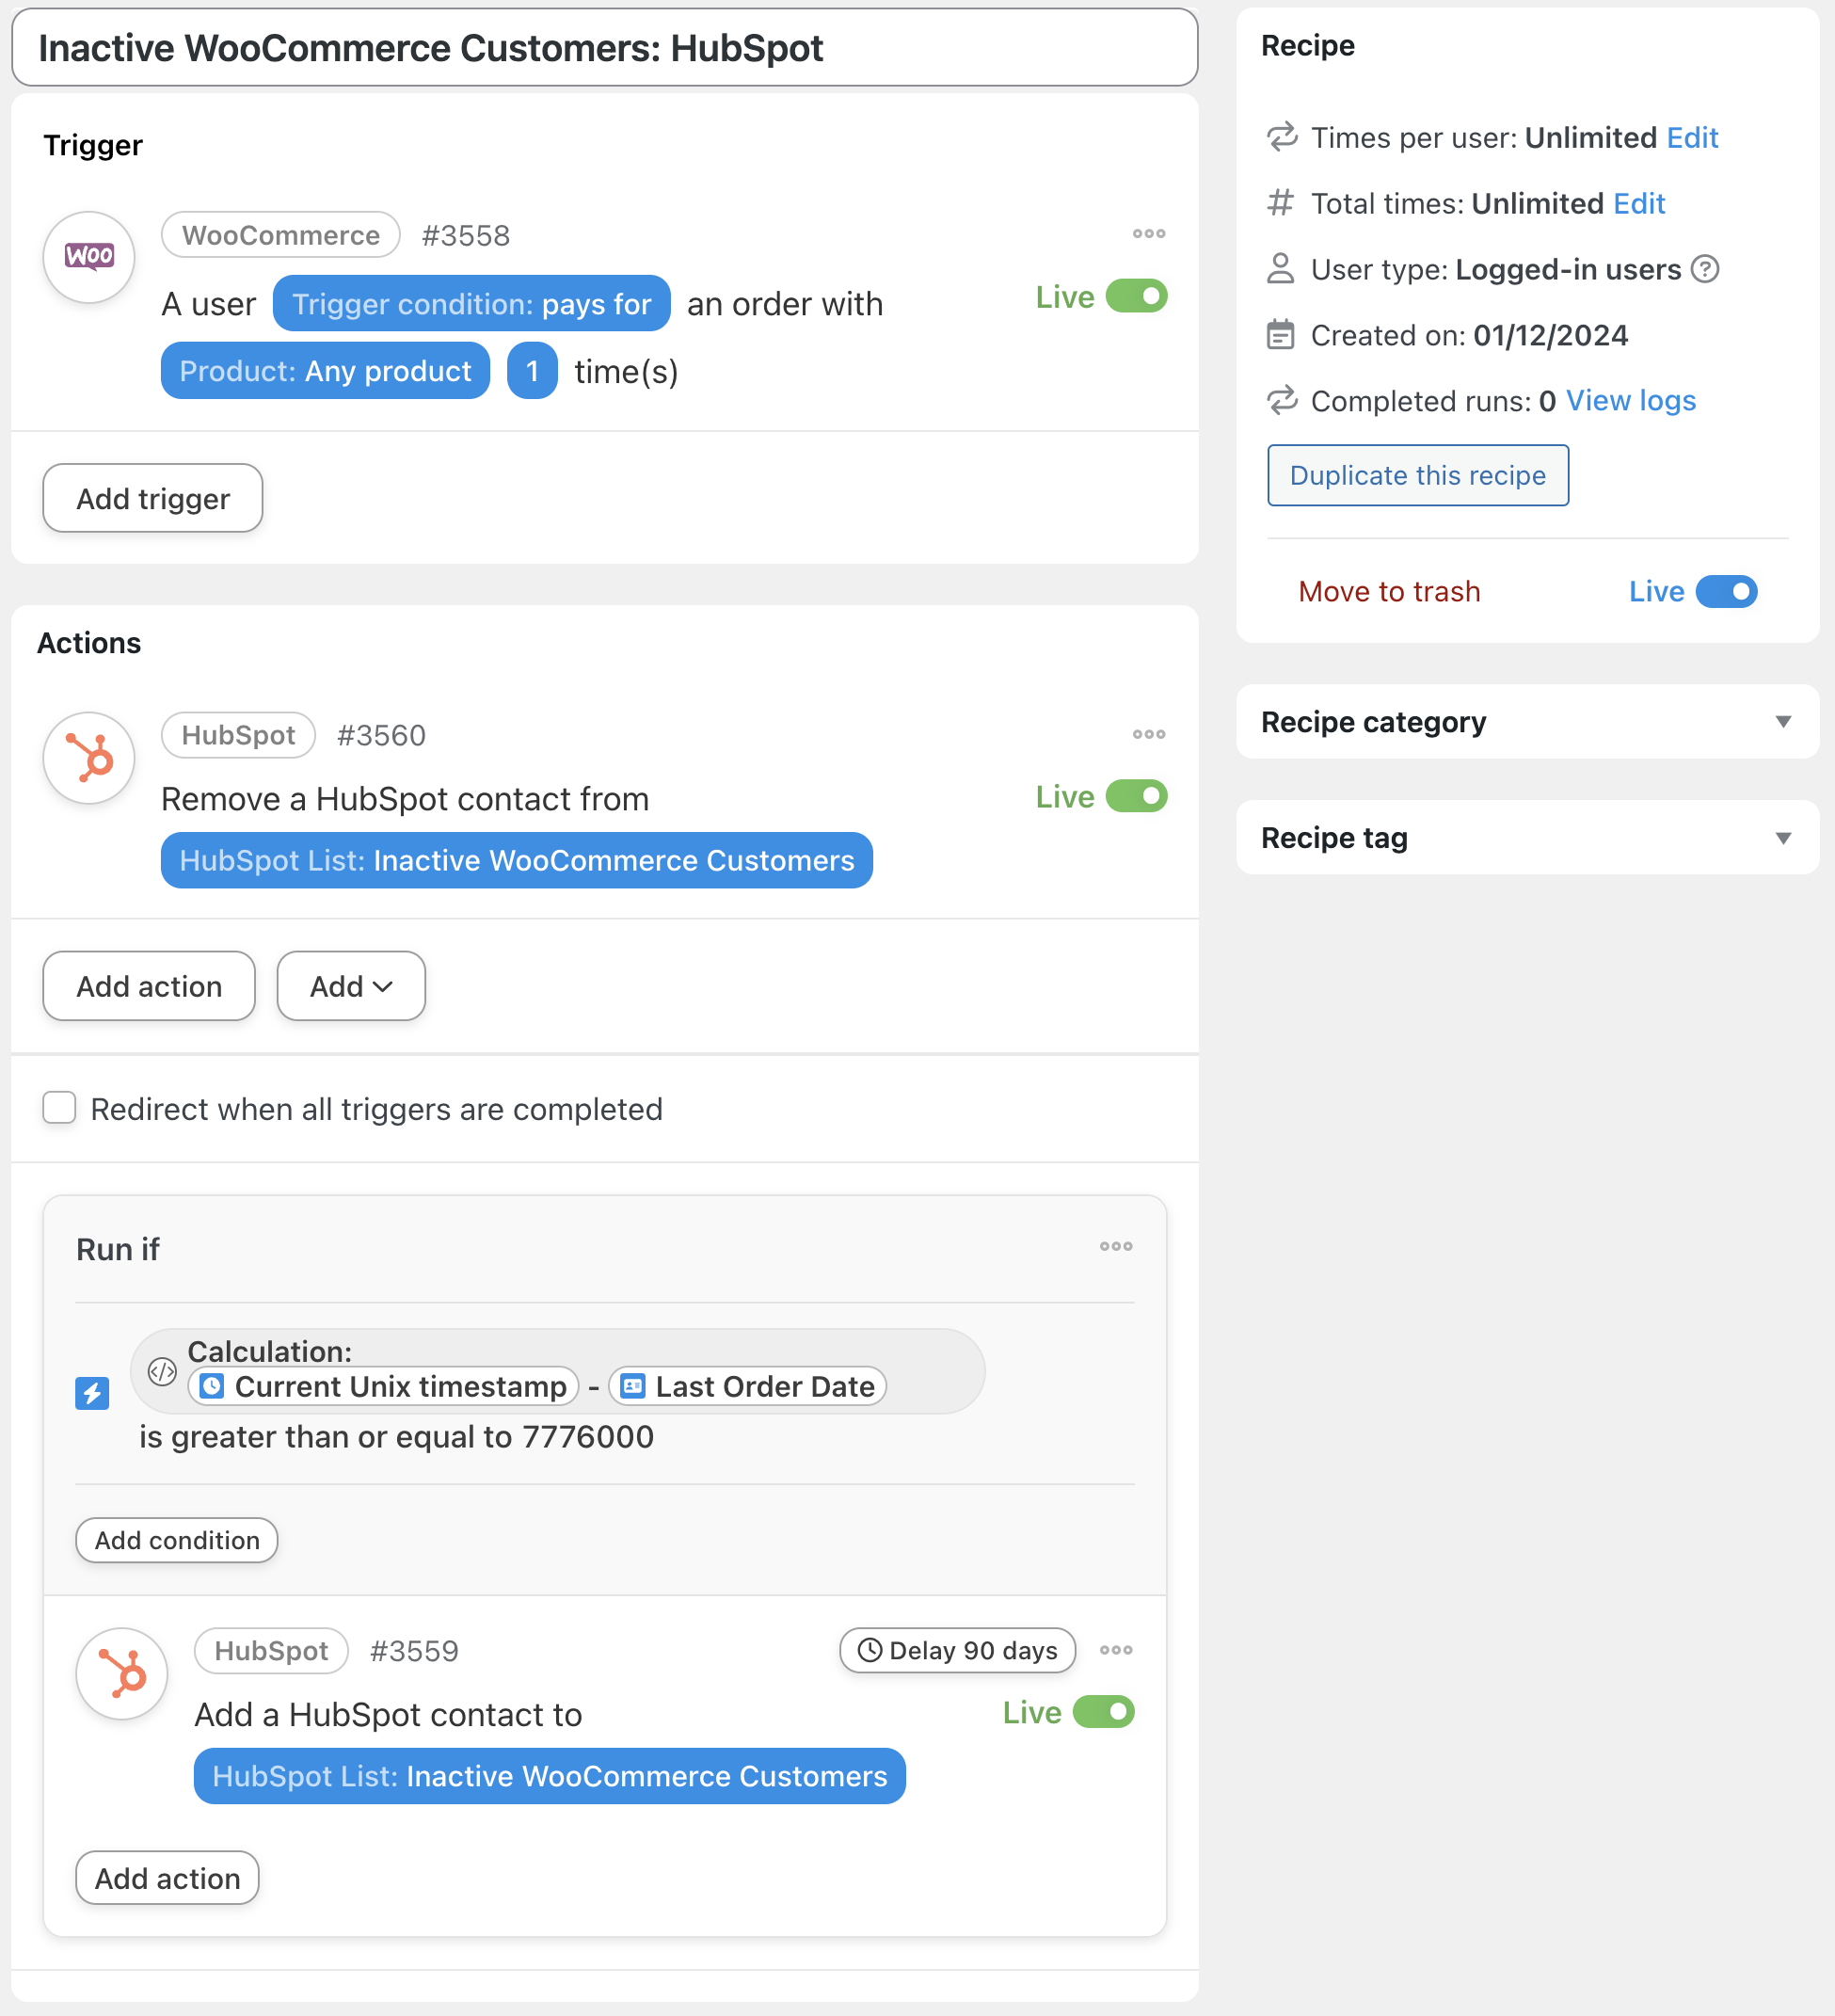
In the recipe pictured above, we’re able to connect our WooCommerce store to a HubSpot list that tracks our inactive WooCommerce customers. If you prefer to manage your emails through your CRM, check out our list of 214 integrations to see if Automator connects with your CRM. If you don’t see it right now, check back soon—we’re always adding more integrations!
Conclusion
Well, if that didn’t wake your inactive WooCommerce customers from their slumber, they might not be sleeping…
As promised, in this article, we showed you how to define, identify and target inactive customers. Then we showed you a few different ways to integrate your WooCommerce store with your other apps and plugins to create personalized and high-converting re-engagement campaigns.
If you’re still not sure how Automator can help you shake your customers out of their hibernation, drop us a line in the comments section below. We promise, U-Bot is never sleeping!

Related Posts


This Post Has 0 Comments