Revive old WordPress posts with AI and Uncanny Automator. Learn how to reverse content decay…
How to Automate Spaced Repetition Learning in WordPress
Everyone could use a refresher! In this blog post we’ll show you how to create a fully automated spaced repetition learning schedule for your WordPress users.

If practice makes perfect, then repetition makes retention!
Spaced repetition learning is a proven method for increasing learners’ retention and boosting student engagement. It’s also an opportunity for educators to test the effectiveness of their lessons and teaching techniques. But it isn’t always easy to manage.
If you’re working with a WordPress LMS like LearnDash, you likely have hundreds (or maybe even thousands) of lessons. Not to mention, more than enough students to fill a campus quad. Fortunately, there are tools you can use to harness the power of spaced repetition learning in WordPress without carrying out endless repetitions yourself.
In this blog post, we’ll show you how to automate your spaced repetition learning schedule with Uncanny Automator and OpenAI. We’ll even recommend some simple ways to enhance your spaced repetition learning to ensure your students are getting what they need.
Let’s master spaced repetition learning with the power of automation and innovation. Your personalized learning adventure starts here.
Introduction
Incorporating spaced repetition learning into your WordPress LMS might not seem like an easy task. But, we promise, if you follow the steps in this how-to guide, you’ll be able to create a WordPress-based spaced repetition learning platform like no other.
This article will cover:
- What is Spaced Repetition Learning?
- What You Need to Automate Space Repetition
- A Step-by-Step Guide to Automated Spaced Repetition Learning
- Tips, Tricks and Best Practices
But let’s not repeat ourselves. Let’s get right into it!
What is Spaced Repetition Learning?
Alert your students: cramming doesn’t work!
While there is a certain excitement to pulling an all-nighter before a big exam, cramming simply isn’t the best strategy for learning and assimilating new information. But there’s plenty of research to suggest that spaced repetition is.
In the simplest terms, spaced repetition is a learning methodology designed to optimize memory retention. The foundation of the approach lies in the psychological spacing effect, which suggests that learners can better retain information when they revisit it at increasing intervals over time.
If you’ve ever used language learning apps such as Duolingo or taken music lessons, then you’ve already used this learning methodology yourself.
As ubiquitous as spaced repetition modules are, creating your own might seem like a daunting task. After all, more repetition means more content. However, if you have the right tools, then you can fully automate spaced repetition learning in WordPress.
What You Need to Automate Spaced Repetition in WordPress
In this section, we’ll walk you through the plugins and apps that will take the repetition out of your content creation process.
Uncanny Automator
If you’re unfamiliar with Uncanny Automator, then allow us to introduce you to your new favorite teacher’s assistant!
Automator is the #1 automation and integration tool for WordPress users. With simple combinations of triggers and actions, you can create seamless workflows across your apps and plugins.

In this blog post, we’ll show you how to integrate your lesson creation process with OpenAI so that you can auto-generate summaries and questions to help your students retain information. Then, we’ll show you how Automator can send scheduled emails or other communications to your learners at increasing intervals of your choice.
Throughout this post, we’ll be using Automator Pro features. Get your license now so you can continue to follow along.>>>
Open AI and GPT
OpenAI are the geniuses behind the language model, Chat GPT, and the image generation tool DALL•E. While it’s good fun to prompt GPT to write witty poems in the style of your favorite bard, you can use it for so much more.

In this post, we’ll show you how to integrate OpenAI with your WordPress website using Uncanny Automator. Once you’ve harnessed the power of AI on your WordPress website, you can drastically improve your LMS capabilities to implement repetitive learning—and much more!
If you don’t already have an OpenAI account, you’ll need to create one to help generate the spaced repetition learning content for your students>>>.
Throughout this article, we’ll be using GPT-3.5, the free version of GPT. However, if you want a more powerful model, you can upgrade to GPT-4.0 for just $20/month.
LearnDash
At the core of any good spaced repetition learning module is an LMS with the capabilities and versatility to personalize the learning experience. That’s where LearnDash comes in.

LearnDash is a powerful plugin all on its own. However, we’ll show you how to truly unlock the potential of this LMS to add a fully automated spaced repetition learning feature.
Get started with LearnDash now.>>>
Step-by-Step Guide to Automated Spaced Repetition Learning
What if you could automatically create a summary when you published a new lesson? What about some key takeaways and a handful of questions? Then, what if you had the power to send this content to your learners in spaced intervals whenever they completed the lesson?
Well, then you would have created your very own fully automated spaced repetition learning module, wouldn’t you have? Now that you have Automator, OpenAI and LearnDash, you can do precisely that.
All of the magic will happen inside Uncanny Automator. In this section, we’ll walk you through creating your first spaced repetition learning recipes (i.e., combinations of triggers and actions).
After that, you’ll be able to repeat, repeat, repeat!
Step 1: Create and Name a New Recipe
From your WordPress Admin Dashboard, navigate to Automator > Add New. In the pop-up window that appears, select Logged-in users.

Give your recipe a name that will make it easy to recognize at a glance. For example, we’ve named this recipe “Lessons: Spaced Repetition Learning”.
Step 2: Configure Your Trigger(s)
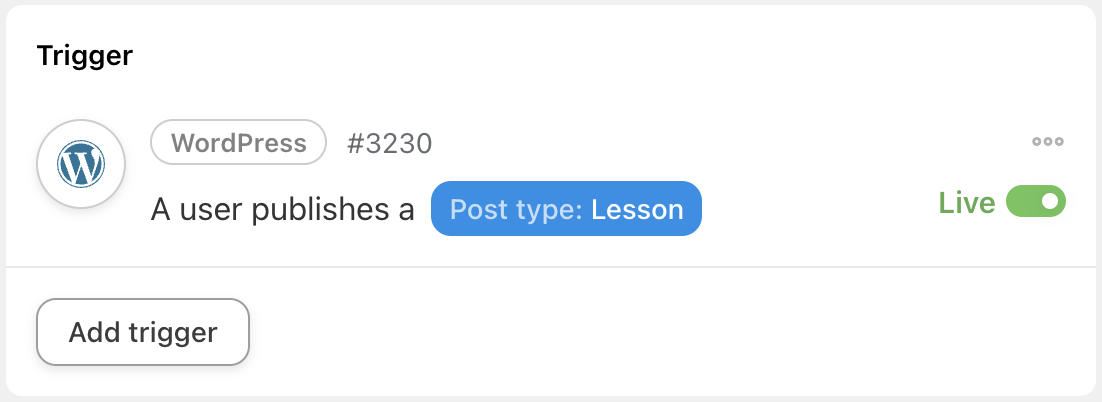
In the Triggers panel, from the menu of available integrations, click on WordPress.

From the drop-down list that appears, select A user publishes a post.

Automator will prompt you to select the post type. From the drop-down list, select Lesson and click Save. Your trigger should look like this:
Step 3: Create OpenAI Lesson Summary
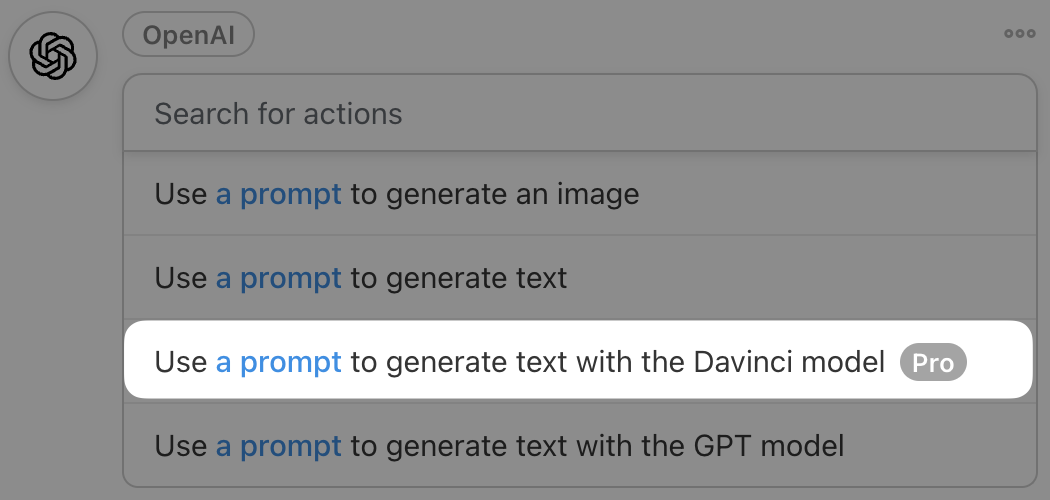
In the Actions panel, click on Add action. From the menu of available integrations, click on OpenAI.

If you haven’t already connected your OpenAI account, simply click Connect account in the pop-up window and follow the prompts. You’ll need to generate a Secret key. To do so, navigate to https://platform.openai.com/ and click on API keys in the sidebar.
After you’ve connected your OpenAI account, from the drop-down list that appears, select Use a prompt to generate text with the Davinci model.
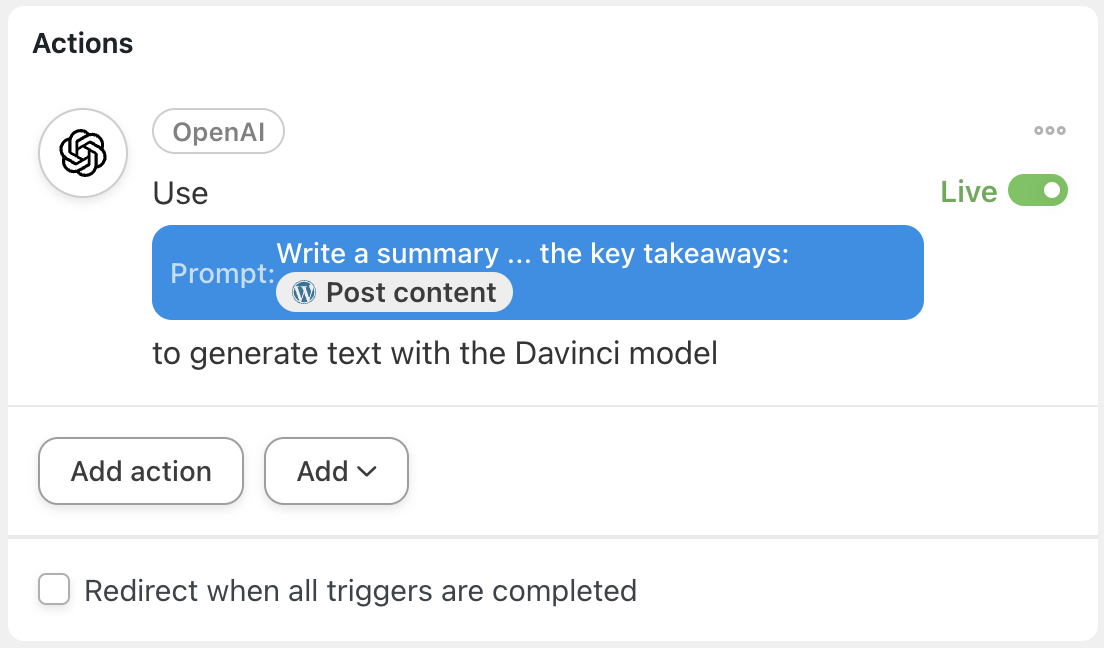
Automator will give you the option to configure the settings of your OpenAI prompt. In the Prompt field, write the prompt that will generate a summary in the style and format that suits your workflows.
Of course, to get OpenAI to create a summary of your new lesson, it will have to read it. You can accomplish this using tokens (i.e., dynamic data pulled from your WordPress website and even from within recipes).
In the Prompt field, click on the Asterisk and select Post content.

When you’re satisfied with your prompt, click Save. Your completed action should look something like this:
Step 4: Set Post Meta
OpenAI will generate your lesson summary. Now, you just need to connect the lesson summary to your lesson. You can do this using post meta.
In the Actions panel, click on Add action and select WordPress from the menu of available integrations. From the drop-down list that appears, select Set post meta.
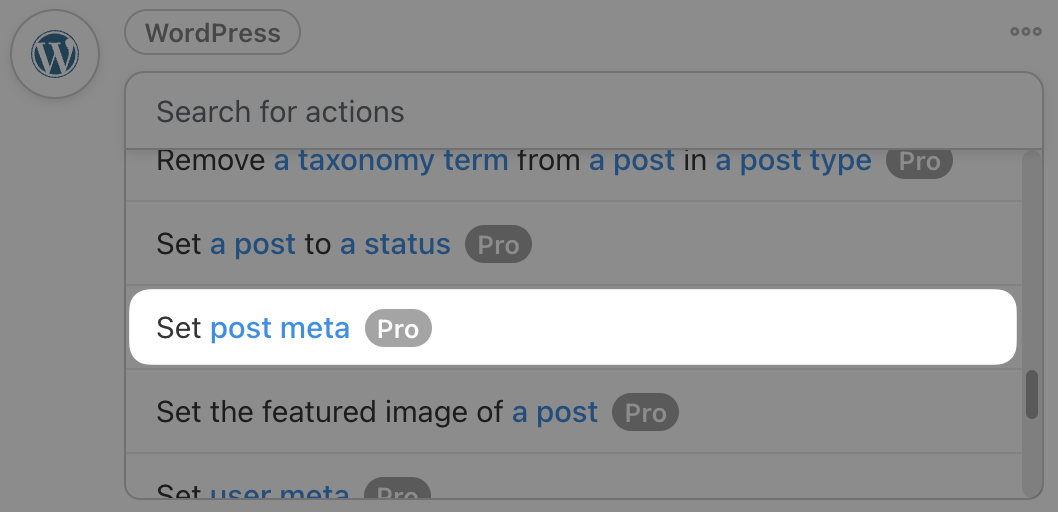
In the Post type field, select Lesson.
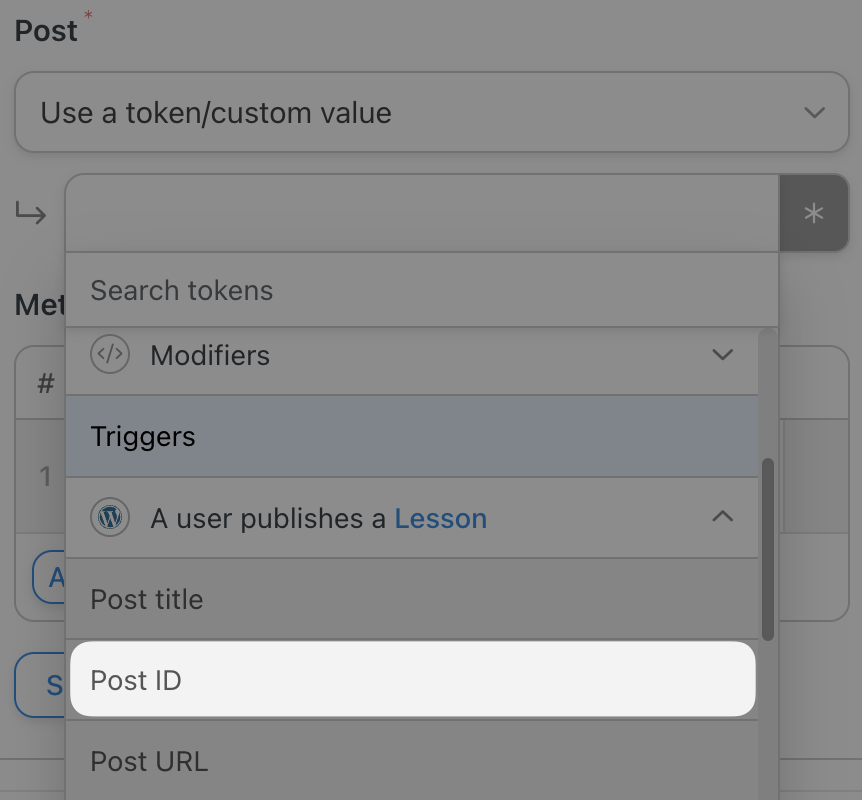
In the Token field, select Use a token/custom value and select the Post ID token under A user publishes a Lesson trigger.
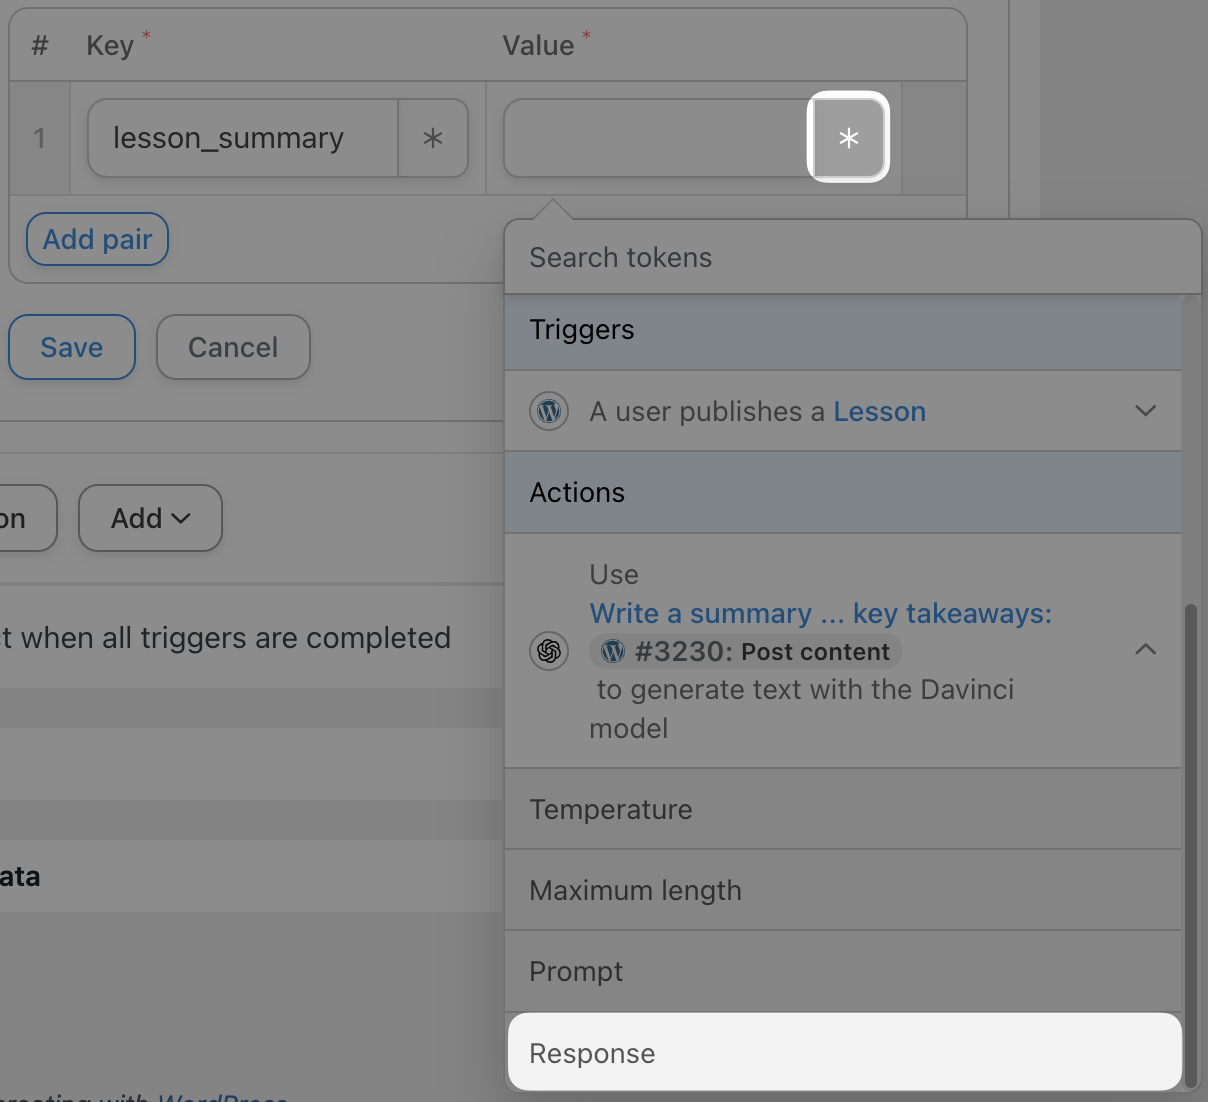
Under Meta, give your new post meta a name in the Key field. For example, we’ve named this new meta “lesson_summary”. To set the value of the new meta, select the Response token in the Value field.
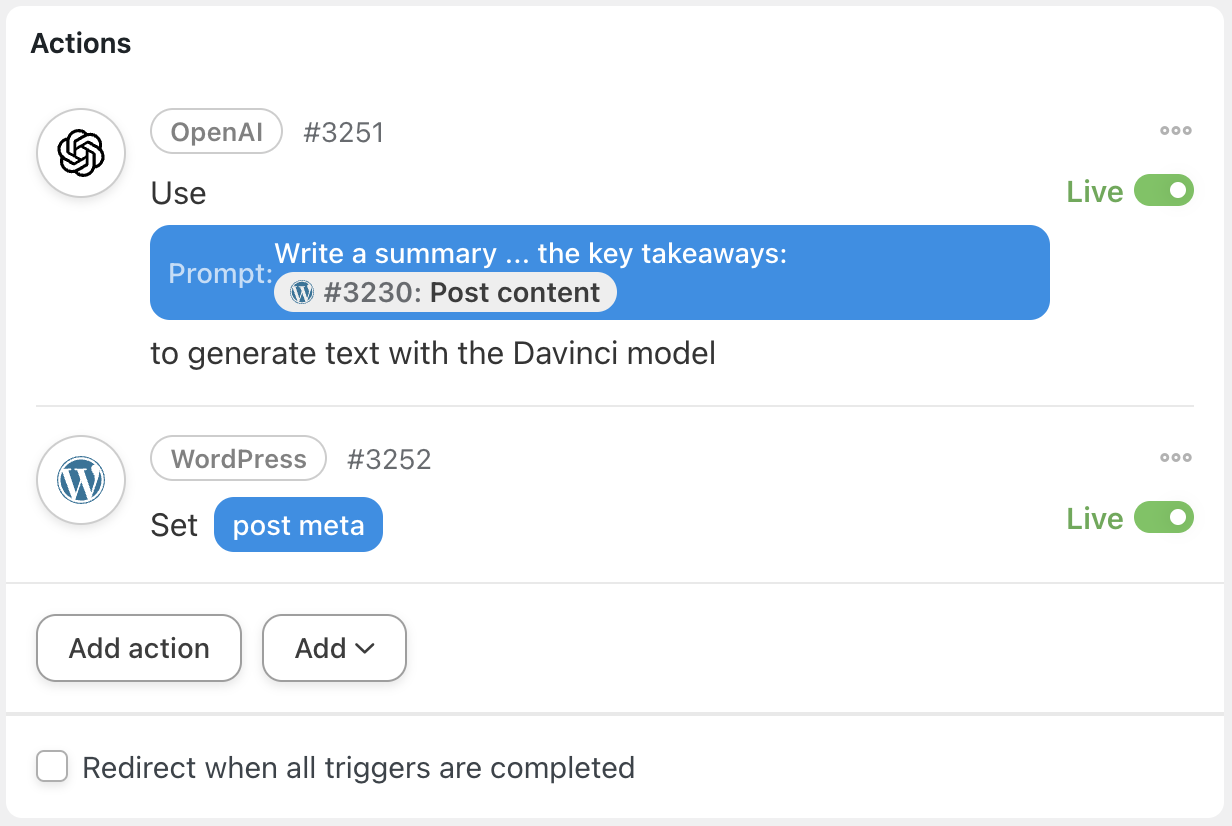
When you’re finished, click Save. Your Actions panel should now look something like this:
Step 5: Create More Repetitive Learning Content
Spaced repetition learning requires more content than one simple summary. You can repeat Steps 3 and 4 as many times as you would like to generate different kinds of content to send to your learners at various intervals.
For example, we’ve created two more OpenAI actions in addition to our first one to generate different types of summaries and questions based on our lesson. We then added more key/value pairs to our post meta action to store the new content.
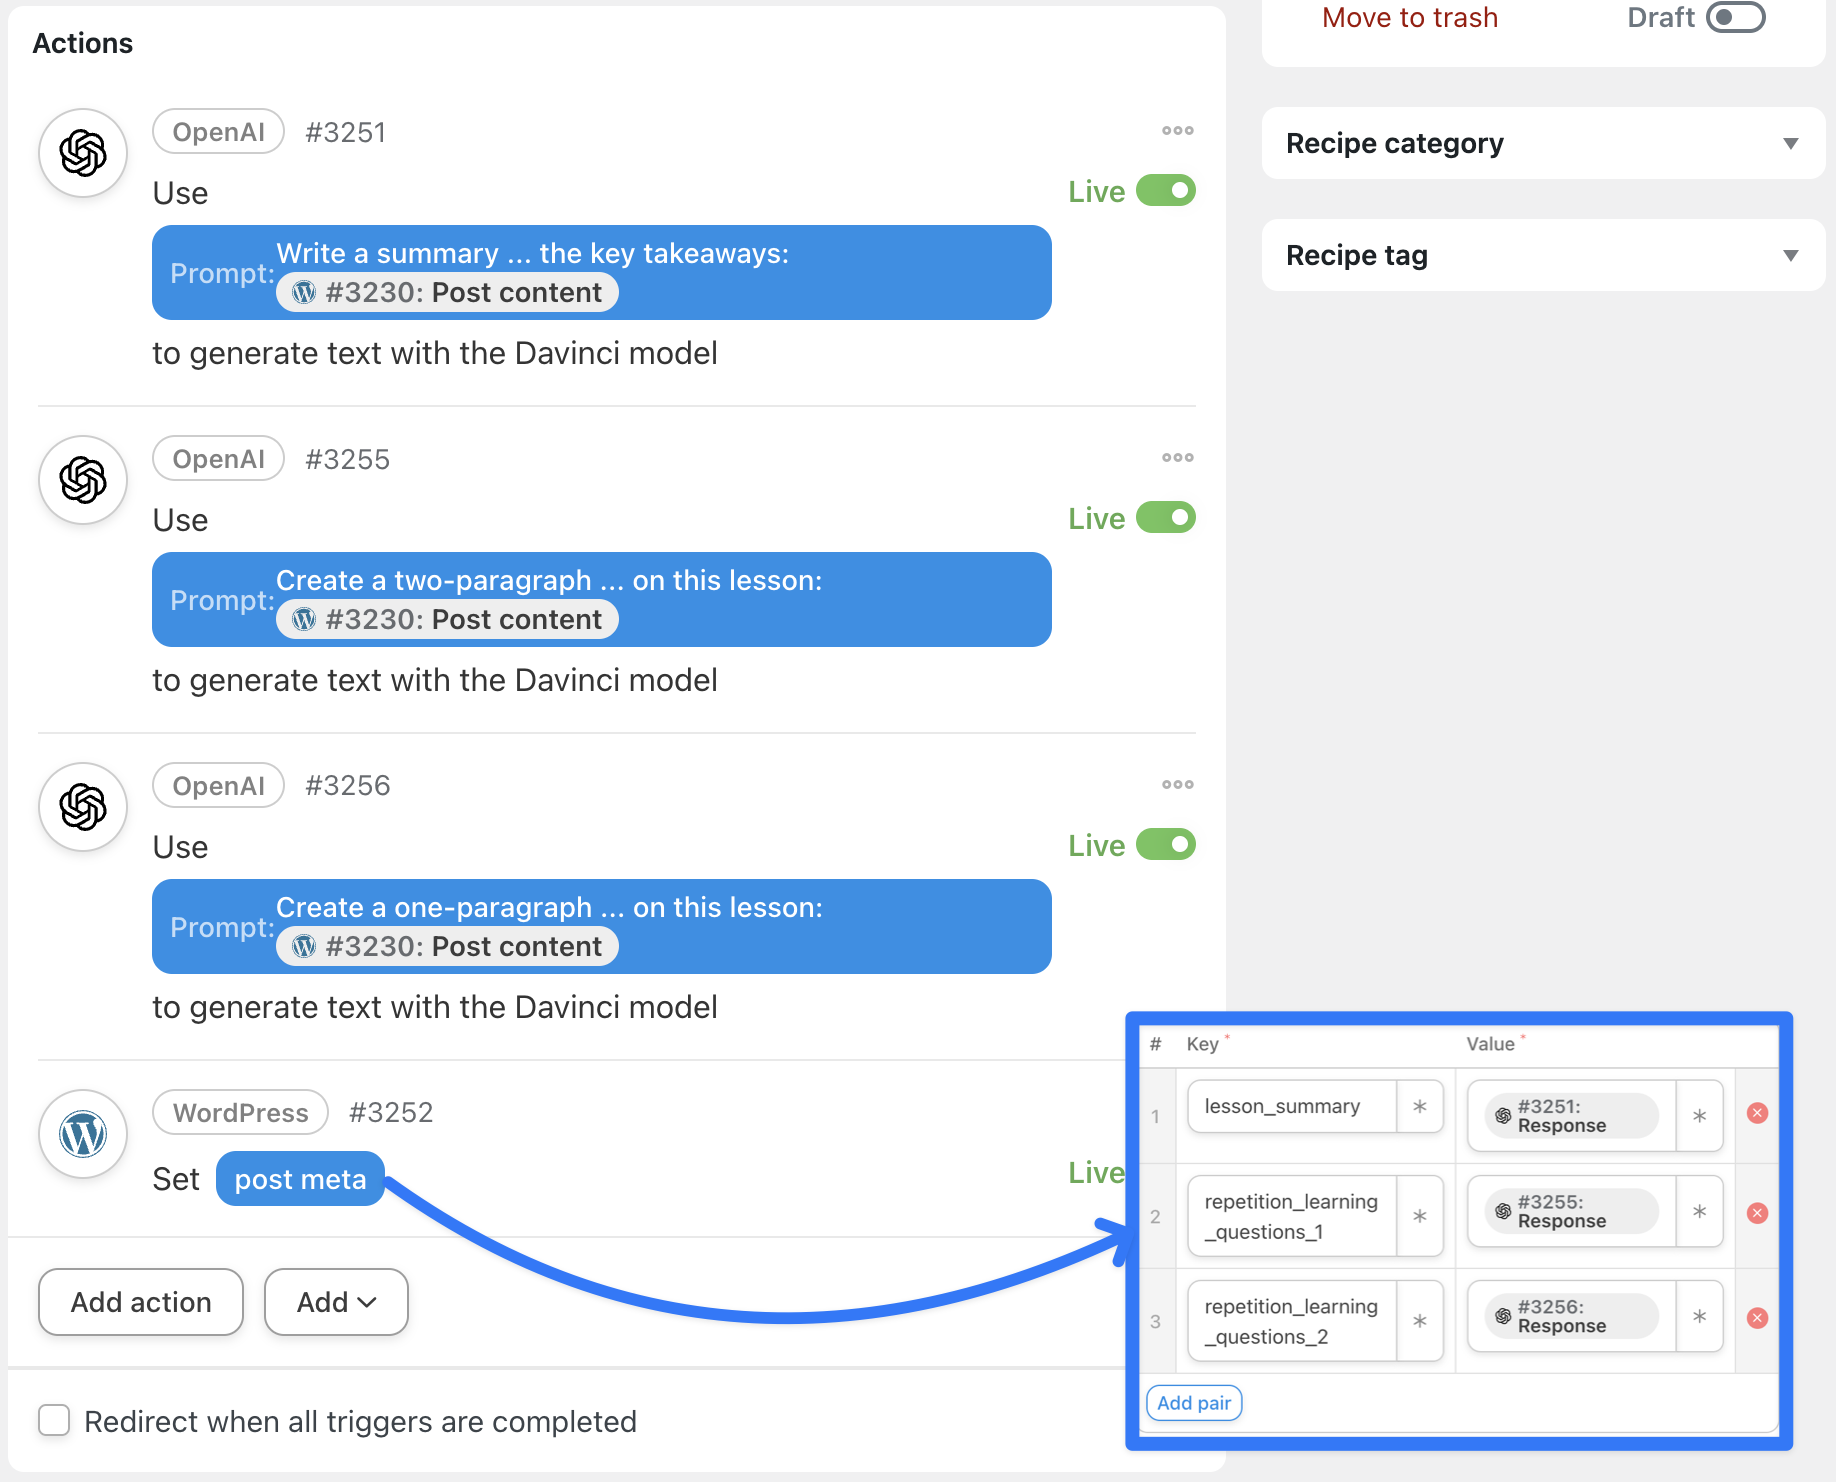
Automator allows you to create as many key/value pairs as you’d like from a single action. And you know what that means, don’t you? Endless repetition!
Step 6: Go Live!
Toggle the recipe from Draft to Live.

Now, every time that you publish a new lesson, you’ll have all of the spaced repetition content ready to go and waiting for your learners.
But how do you get all of this great refresher content to your learners? Automator can handle that too.
Step 7: Create and Name a New Recipe
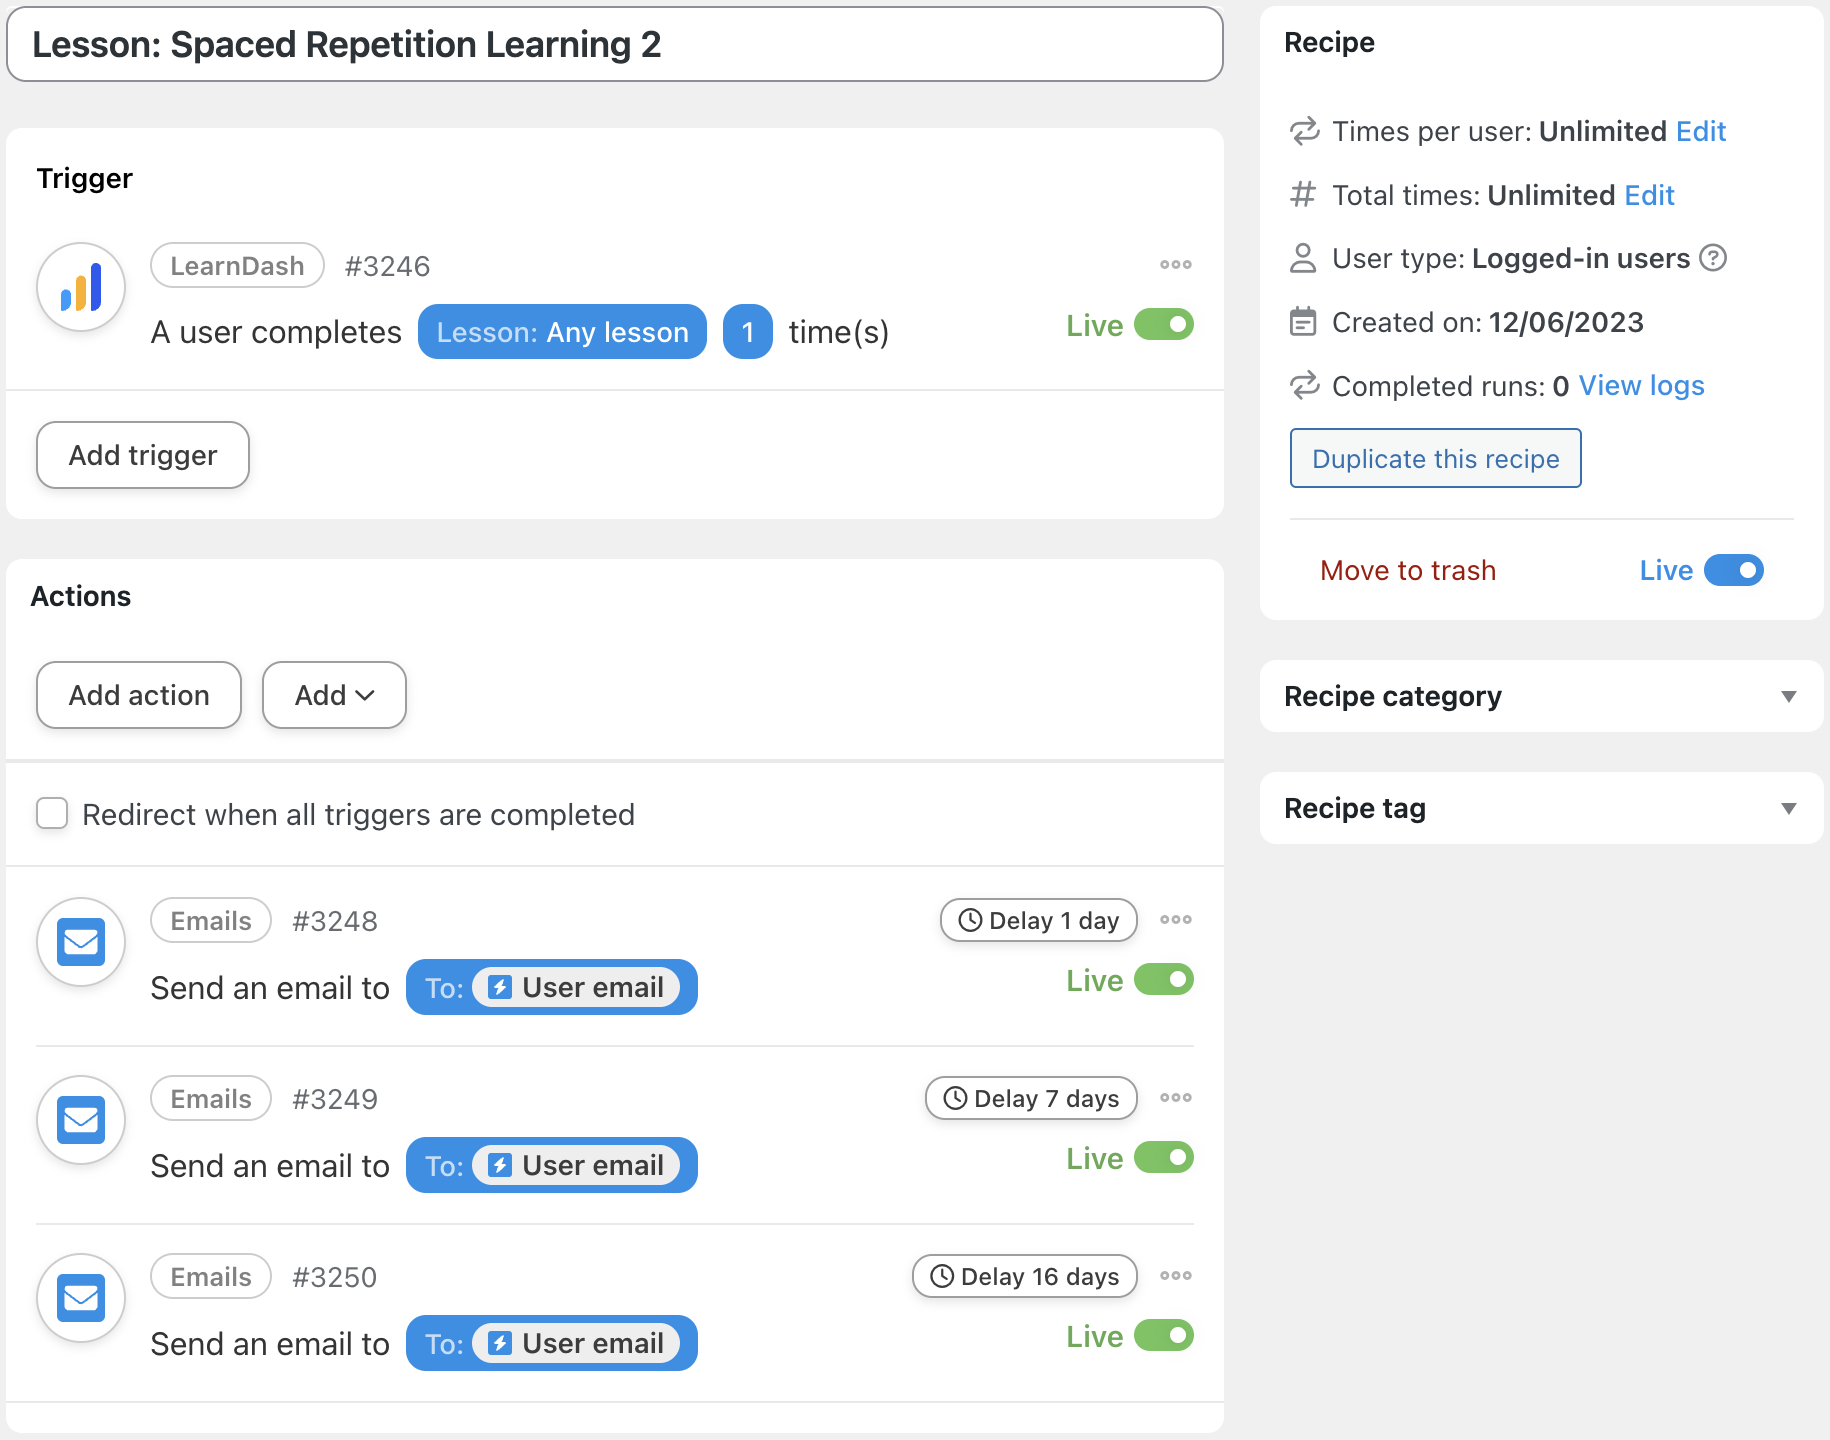
From your WordPress Admin Dashboard, navigate to Automator > Add New. In the pop-up window that appears, select Logged-in users. We’ve named this recipe “Lesson: Spaced Repetition Learning 2”.
Step 8: Configure Your Trigger(s)
In the Triggers panel, from the menu of available integrations, select LearnDash. From the drop-down list that appears, select A user completes a lesson.
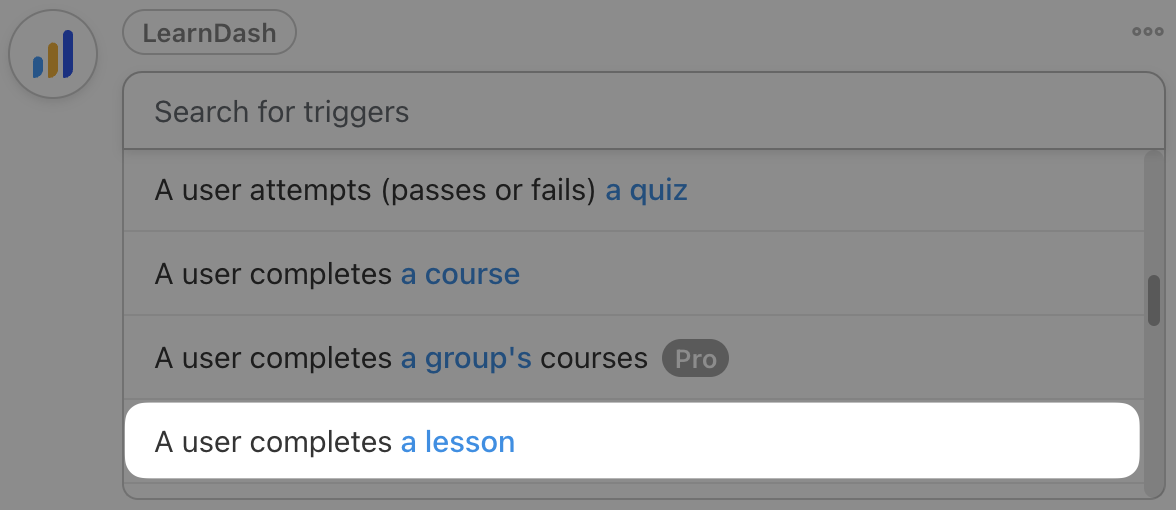
Automator will prompt you to select a course and a lesson. Because we are creating spaced repetition learning content for all of our lessons, we have simply left the default selections, Any course and Any lesson.
After you’re finished, click Save.
Step 9: Send an Email—or Two, or Three
In the Actions panel, from the menu of available integrations, select Email. From the drop-down list that appears, select Send an email.
In the To field, select the User email token (this token represents the email address of the user who has completed the trigger).

Fill out the Subject field however you’d like.
Now comes the fun part. This is where you get to send the content that we created with OpenAI to your learners. As this is the first email in our spaced repetition learning schedule, we’re going to send our learners the lesson summary that we stored under the key “lesson_summary”.
In the Body field, draft your email as you normally would. To retrieve the spaced repetition content, we’re going to use tokens once again.
To retrieve the spaced repetition learning content associated with the lesson, click the Asterisk in the Body field and select Advanced > Post meta.
Automator will open a Token data window. In the Post ID field, select the Lesson ID token from the trigger. In the Meta key field, enter the key that corresponds to the post meta that you want to retrieve. Recall that we used the key “lesson_summary”.

When you’re finished click Add token. Finish drafting your email and when you’re satisfied, click Save.
Hover over your completed action and click Delay—this is where we’ll add the “spaced” in spaced repetition.
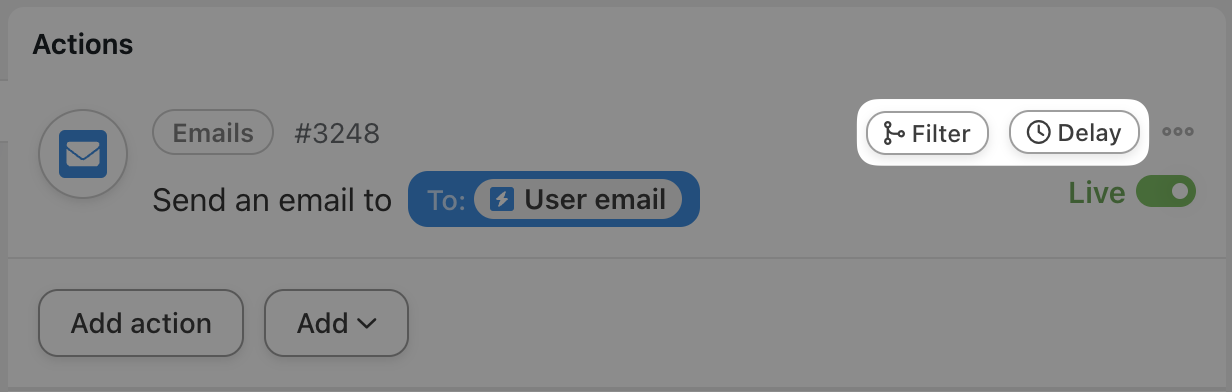
Automator will present you with a Delay or schedule this action window. You probably already have an optimized spaced repetition schedule, so all you have to do is set the delay accordingly. For example, we have chosen “1 day”.

Once you’re finished, click Set delay.
Repeat this action as many times as you want to create your spaced repetition learning schedule. For example, we’ve added two more Send an email actions with their own delays:

Step 10: Go Live!
We promised that Uncanny Automator would be your new favorite teacher’s assistant. As soon as you toggle this recipe from Draft to Live, we’re certain that you’ll agree!
Now that you’ve set up your first spaced repetition learning module with Automator recipes, it’s time to perfect the process. After all, practice does make perfect!
Tips, Tricks and Best Practices
The best part about using Automator to build your spaced repetition learning platform is the flexibility it offers you. With these tips, tricks and best practices, you can customize your students’ learning experience and create workflows that better suit your needs.
Can I create spaced repetition learning content for lessons that I have already published?
Absolutely you can! Automator has a few incredibly powerful features packed away in its elegant user interface. One of those features is Loops. With Loops, you can perform actions on WordPress users and posts in bulk. This means that you can retroactively create the post meta for your spaced repetition learning modules.
I don’t like the response from OpenAI. Can I edit the post meta after creating it?
Absolutely! Whether you want to change one word, one line or the entire response, you can edit post meta with Automator. Just use the Run now integration for your trigger and the Set post meta action in the WordPress Core integration.
As good as AI tools have gotten in the recent past, they aren’t perfect. We do recommend reviewing any and all AI-generated content before integrating it into your educational materials. Automator integrates seamlessly with planning and communication tools such as ClickUp and Slack, so administrators can easily communicate with educators that there’s content awaiting their review.
I don’t want to send my learners too many emails. Are there any alternatives?
Too much of a good thing is, well, not a good thing. If you’re concerned about sending too many emails, you can take advantage of Automator’s 214 integrations.
Post your spaced repetition content to a BuddyBoss group and allow your learners to review content together. Create Zoom or Google Calendar events so that your educators can review lesson material with learners virtually. Send daily key takeaways and tidbits directly to your learners via SMS with Twilio or WhatsApp.
Just because learning should be repetitive, doesn’t mean that you have to be as well!
Not all of my learners want to use spaced repetition learning. Can they opt-out?
Remember when we said that Automator has tons of powerful features packed into its elegant user interface? Well, another one of those features is filters. Using filters, you can choose to run actions only on users who meet certain criteria such as, for example, a user meta value.
Managing those meta values is easiest with the Custom User Fields Addon, included—for FREE—with Automator Plus and Elite.
Conclusion
Hopefully, now, you’re feeling much more confident in creating your own spaced repetition learning platform in WordPress. Of course, the best way to get better at creating Automator recipes is to repeat, repeat, repeat!
Want to know more about how Automator can help you with your spaced repetition learning? Maybe you want to incorporate this new content into your data and analytics? Let us know in the comments section below.
We promise not to repeat ourselves… too much.

Related Posts


This Post Has 0 Comments