Revive old WordPress posts with AI and Uncanny Automator. Learn how to reverse content decay…
How to Connect Easy Digital Downloads to Mailchimp
Learn how to connect Easy Digital Downloads to Mailchimp with Uncanny Automator. Automate your audiences segmentation, and personalized emails effortlessly.
Are you looking to supercharge your email marketing efforts by integrating Easy Digital Downloads (EDD) with Mailchimp?
Whether you want to automate your marketing campaigns, streamline subscriber management, or enhance customer engagement, connecting these two powerful tools can transform the way you manage your digital store.
And, with Uncanny Automator, the process is easier than ever!
Imagine being able to automatically add EDD customers to your Mailchimp lists right after they make a purchase. Or, how about tagging customers who use a discount code at checkout? Maybe you’d like to unsubscribe a contact from an audience after their software license has expired.
With the seamless integration capabilities of Uncanny Automator, you can create sophisticated automated workflows like those that save you time and boost your marketing effectiveness.
In this step-by-step guide, we’ll show you exactly how to connect Easy Digital Downloads to Mailchimp using Uncanny Automator. By the end of this tutorial, we’ll have created time and cost saving recipes that can help you improve your email marketing.
Without further ado, let’s dive in.
Why Connect Easy Digital Downloads to Mailchimp with Automator
For WordPress businesses seeking to license software, sell subscriptions or bring their digital goods to market, there are few plugins that offer as much versatility as Easy Digital Downloads. And none that offer as much value.
Similarly, Mailchimp is one of the leading email marketing platforms. Quite apart from making it a joy to engage with your audience through beautifully designed campaigns, Mailchimp allows for powerful segmentation to drive conversions.
By connecting EDD to Mailchimp, you can upgrade your email marketing strategy to generate more leads, improve conversions and communicate more effectively with your customers. Most importantly, with Uncanny Automator, you can put the whole thing on autopilot.

There are plenty of factors that make Automator the #1 integration and automation tool for WordPress websites. But it all boils down to this:
- Ease-of-Use: Using simple combinations of triggers and actions called recipes, Automator connects all of your favorite apps and plugins. A user-friendly click-and-play interface means that you can automate your workflows in just minutes—or even seconds.
- Versatility: With features such as filters and delays, Automator gives you the flexibility to connect your favorite apps and plugins however you choose. Features like these give you the ability to extend Mailchimp’s segmentation tools to your EDD and vice versa.
- Affordability: Unlike other automation and integration solutions, Automator won’t charge you each time you run an automation. In other words, the more you automate and integrate, the more you save!
- Integrations: Automator has 214 integrations with more on the way all of the time. This means that you can connect EDD to Mailchimp and a whole lot more. Not to mention, Automator connects to EDD Recurring Payments and EDD Software Licensing as well.
- Support: Unparalleled support has made Automator one of the highest-rated plugins in the WordPress ecosystem. Whether you need help setting up a time-saving recipe or want to see some new integrations or features, the Automator support team is always at the ready.
Grab your Automator Pro license to unlock and optimize brand new email marketing strategies>>>.
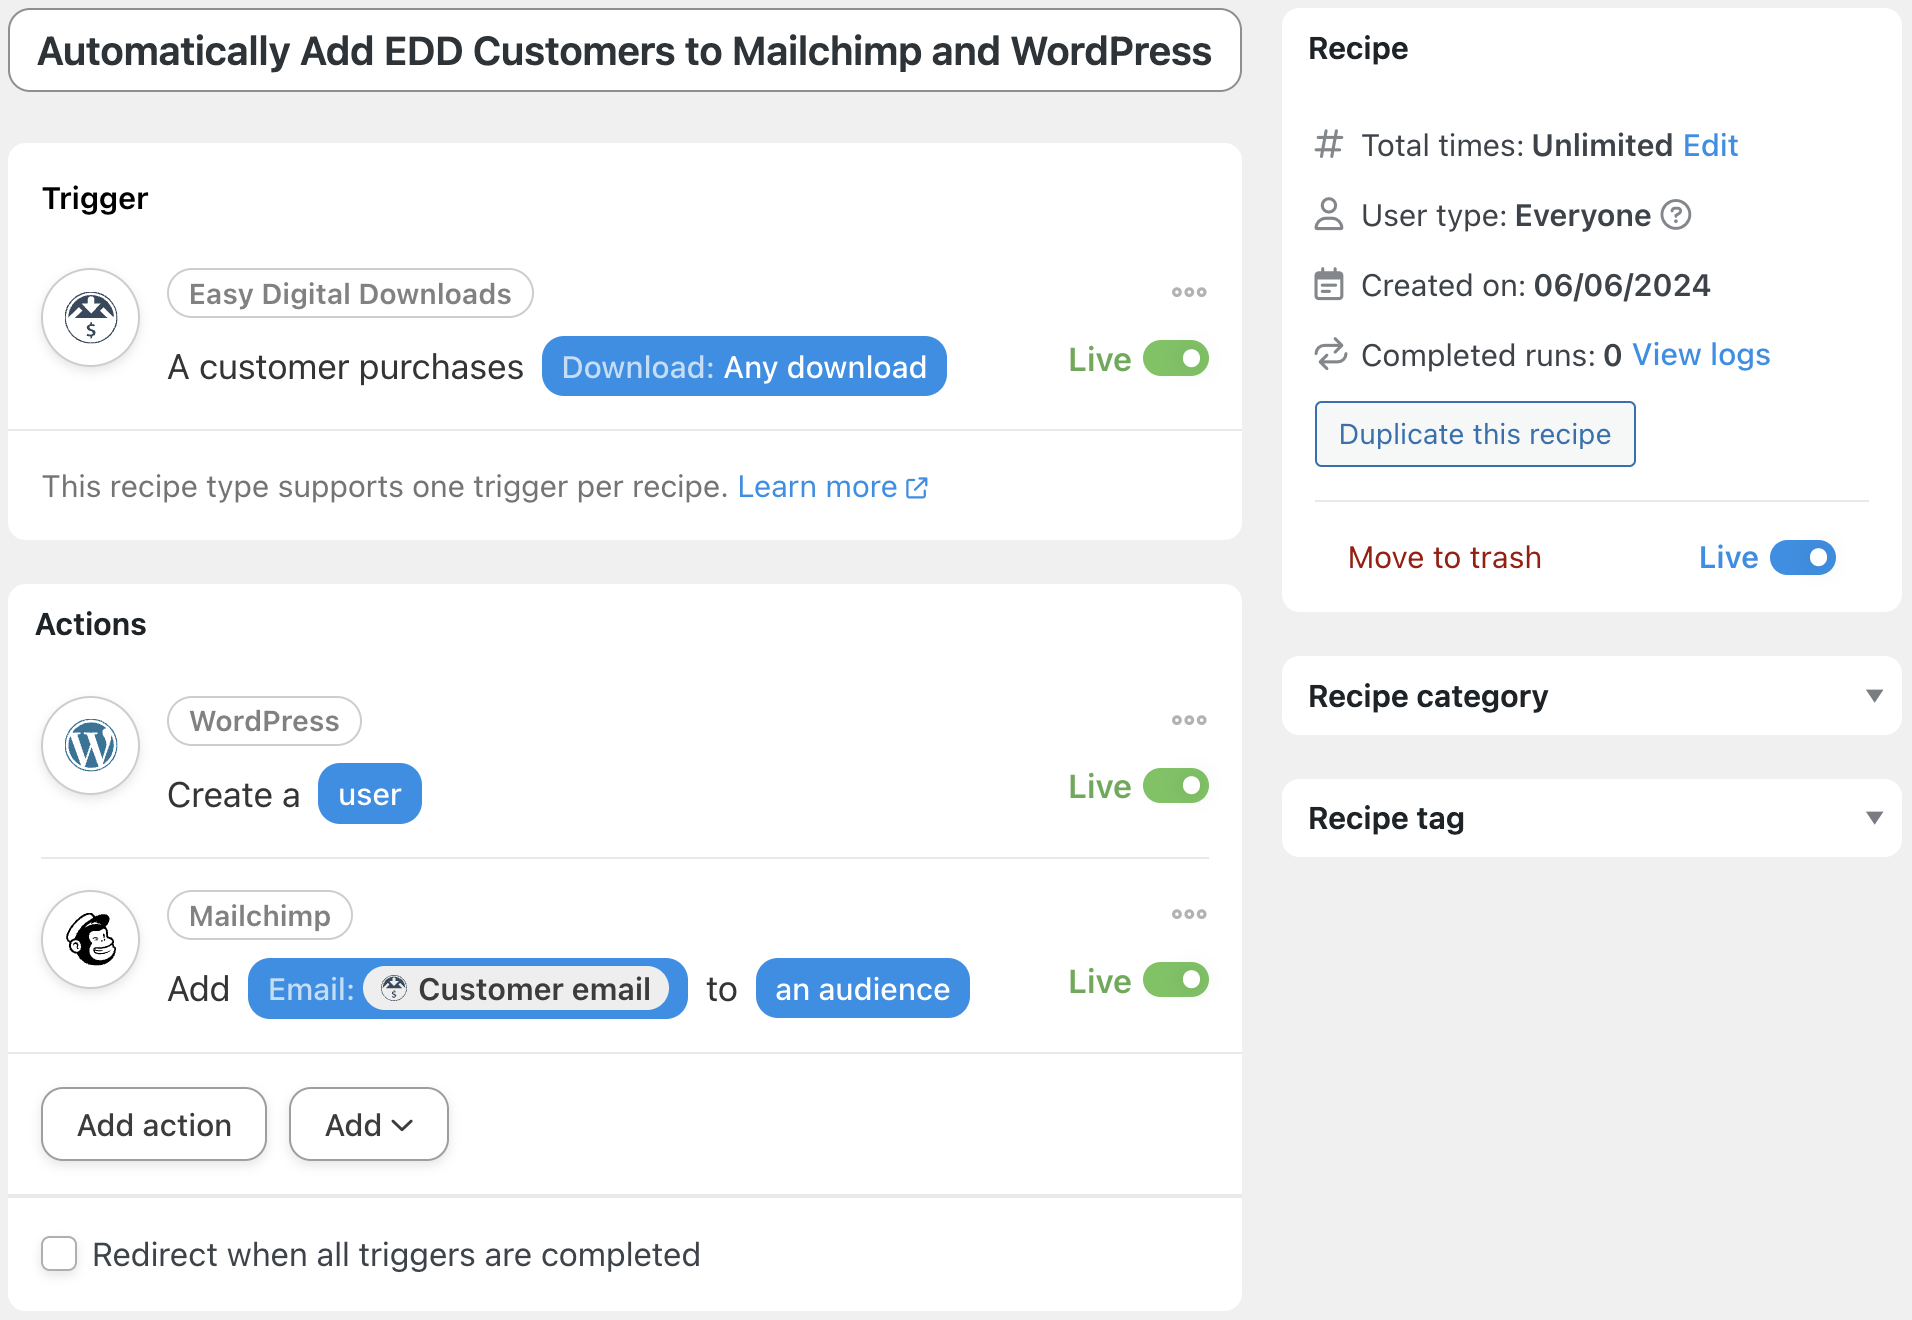
Automatically Add EDD Customers to Mailchimp
Now that you have your Automator Pro license, it’s time to create your first EDD and Mailchimp integration.
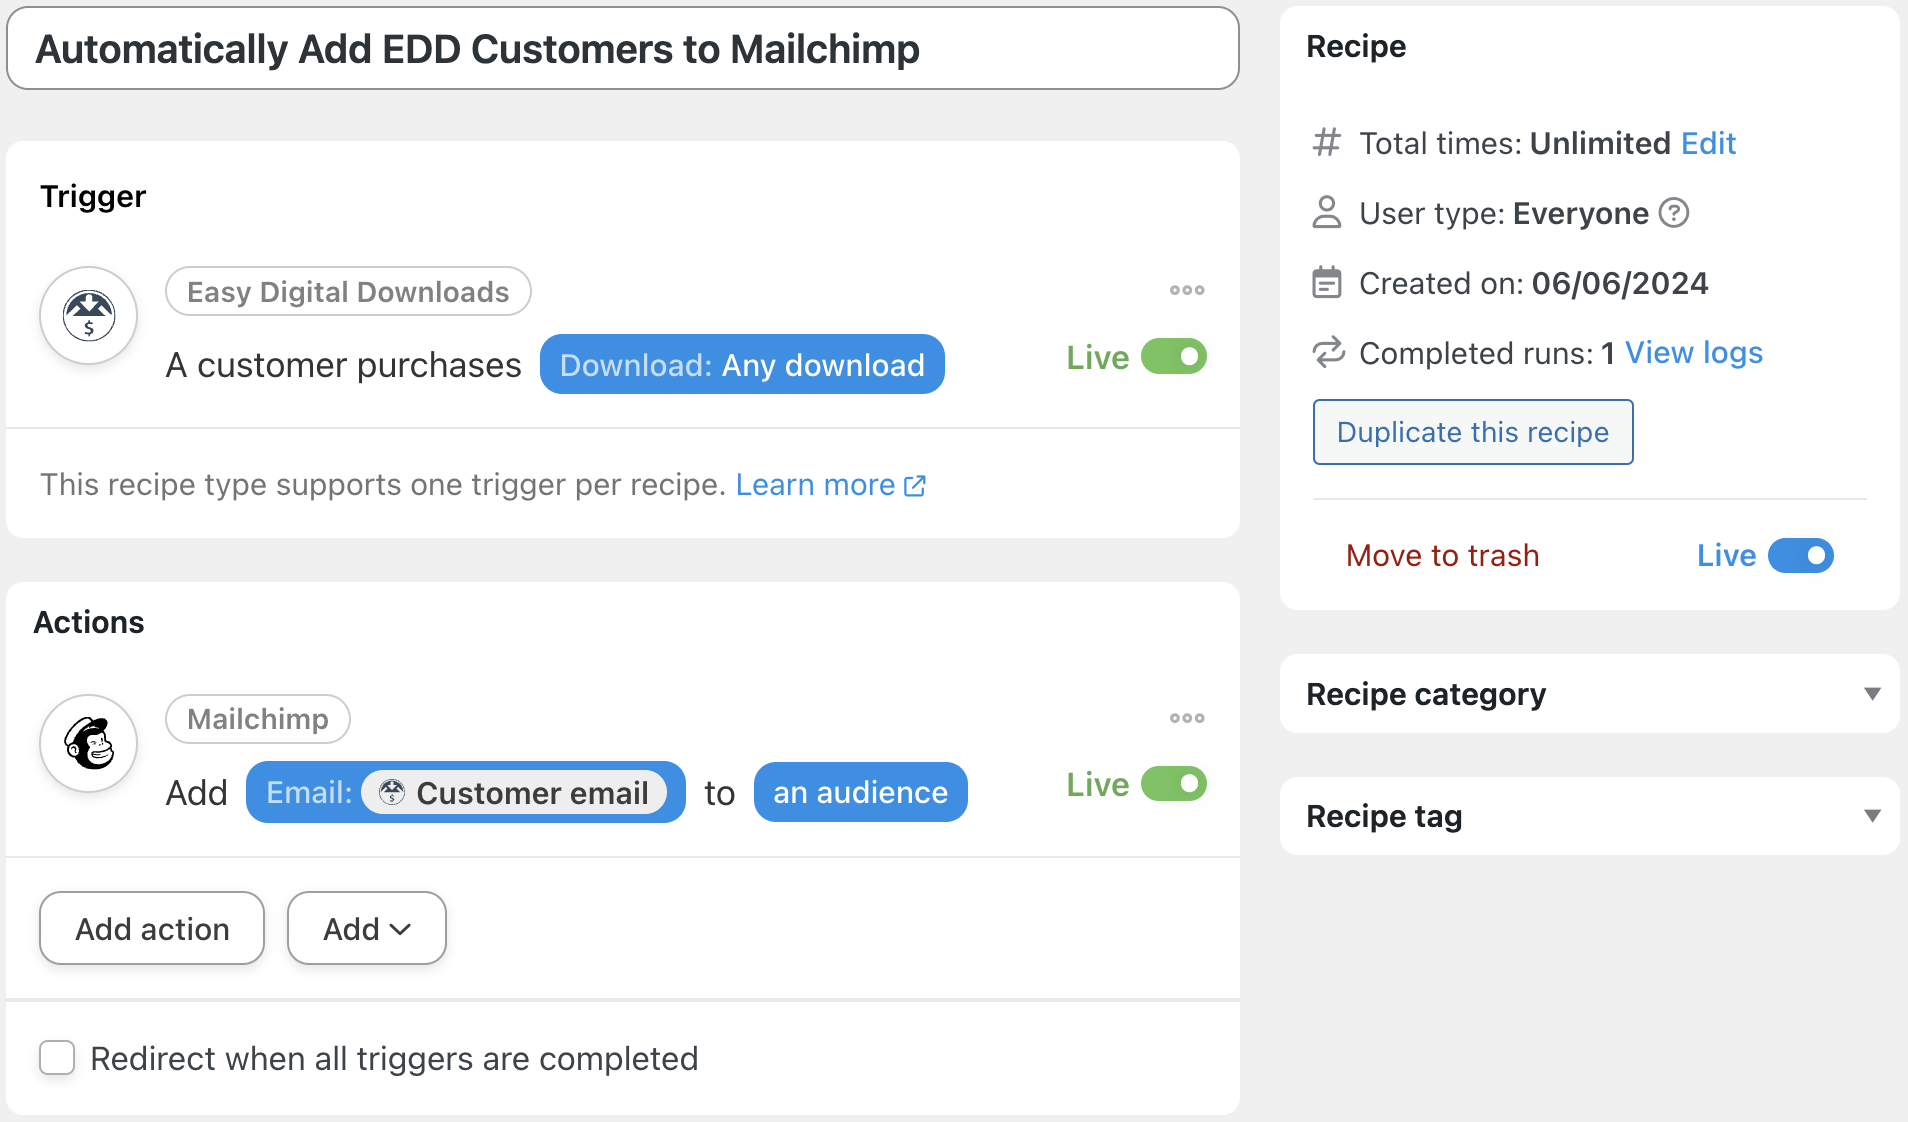
In the next five steps, we’ll show you exactly how to recreate the recipe pictured above. Let’s get to it.
Step 1: Create a New Recipe
From your WordPress Admin Dashboard, navigate to Automator > Add new recipe. In the pop-up window that appears, select Everyone.

(Note: We selected the recipe type Everyone so that we can capture as many leads as possible, whether they are existing users on our WordPress website or not.)
Step 2: Name Your Recipe
Give your recipe a name that makes it easy to recognize at a glance. For example, we have named this recipe “Automatically Add EDD Customers to Mailchimp”.
Step 3: Configure Your Trigger(s)
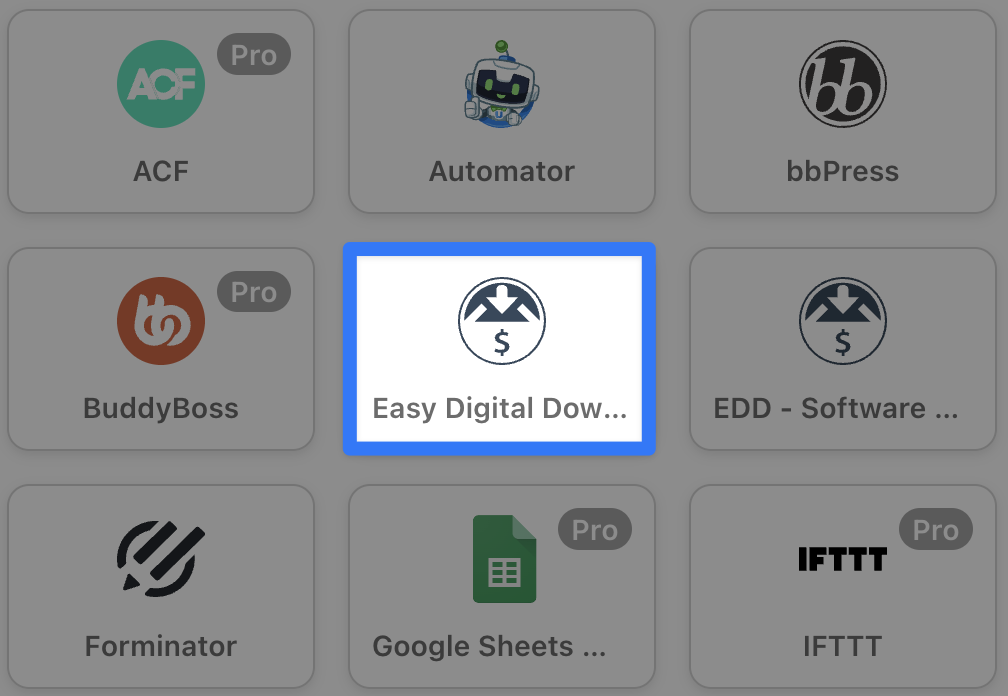
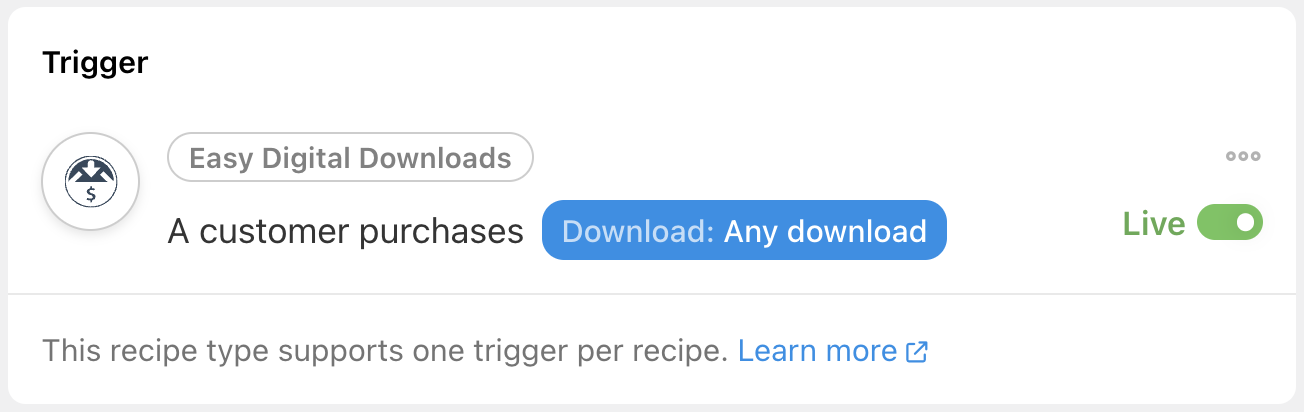
In the Trigger panel, from the menu of available integrations, select Easy Digital Downloads.
From the dropdown list that appears, select A customer purchases a download.
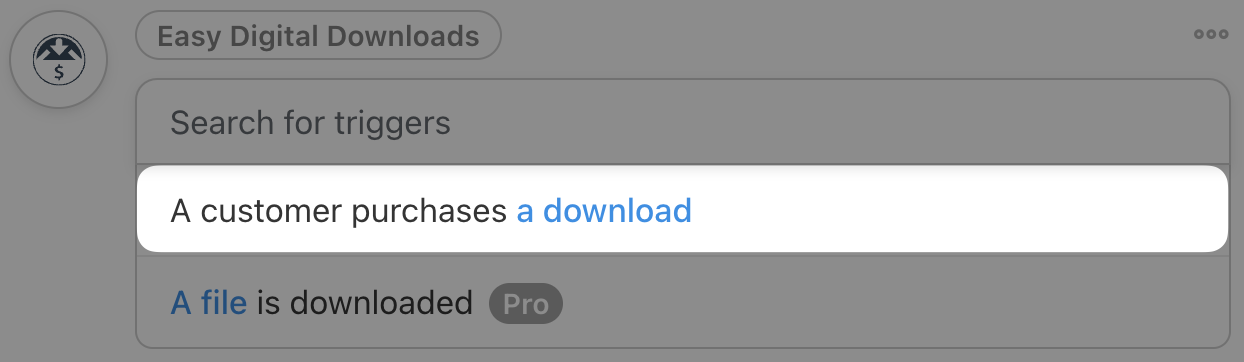
Automator will prompt you to select a specific downloadable product. Because we want to capture as many leads as possible, we have selected Any download.
Once you’re finished, click Save. Your completed trigger should look like this:
Step 4: Configure Your Action(s)
In the Actions panel, click Add action and select Mailchimp from the menu of available integrations.
If you haven’t already connected your Mailchimp account, you can do so now. Simply click Connect account in the modal that appears and follow the prompts.
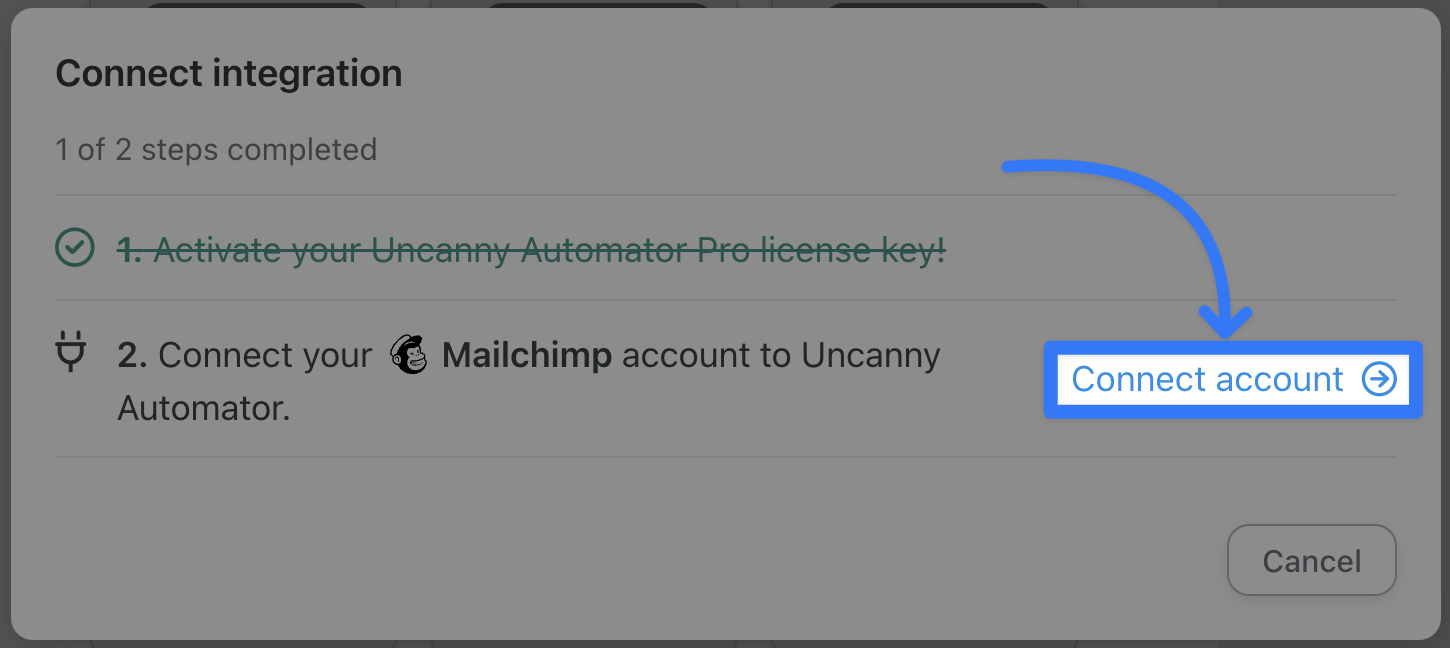
(Note: Automator will guide you through connecting your Mailchimp account to WordPress and it shouldn’t take more than 30 seconds. However, if you would like a detailed guide, click here.)
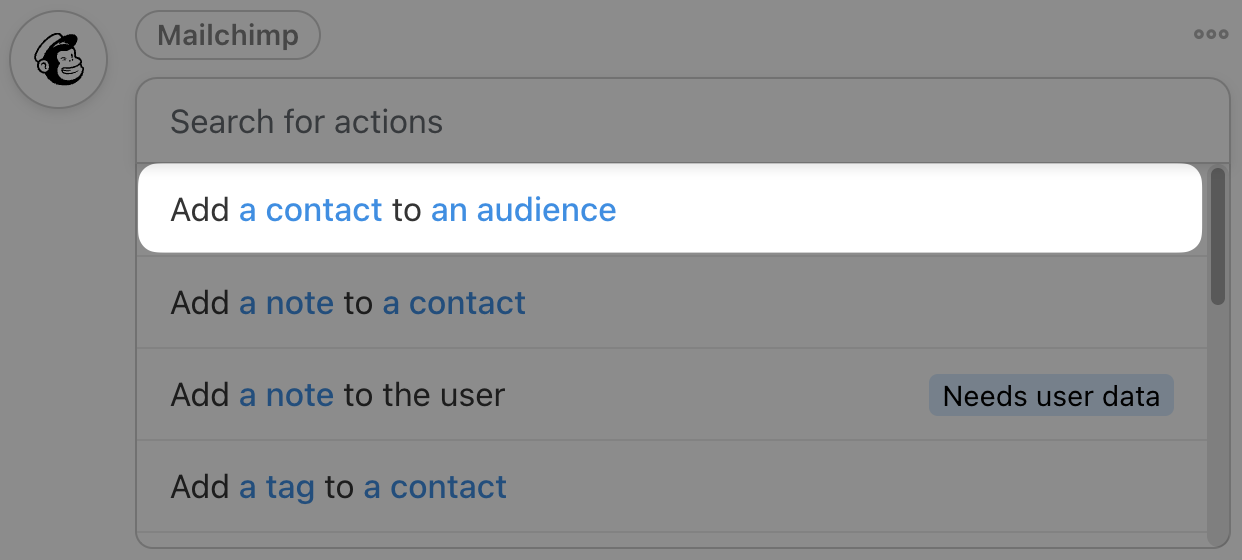
Once you’ve connected your Mailchimp account, return to the recipe editor and select Add a contact to an audience from the dropdown list.
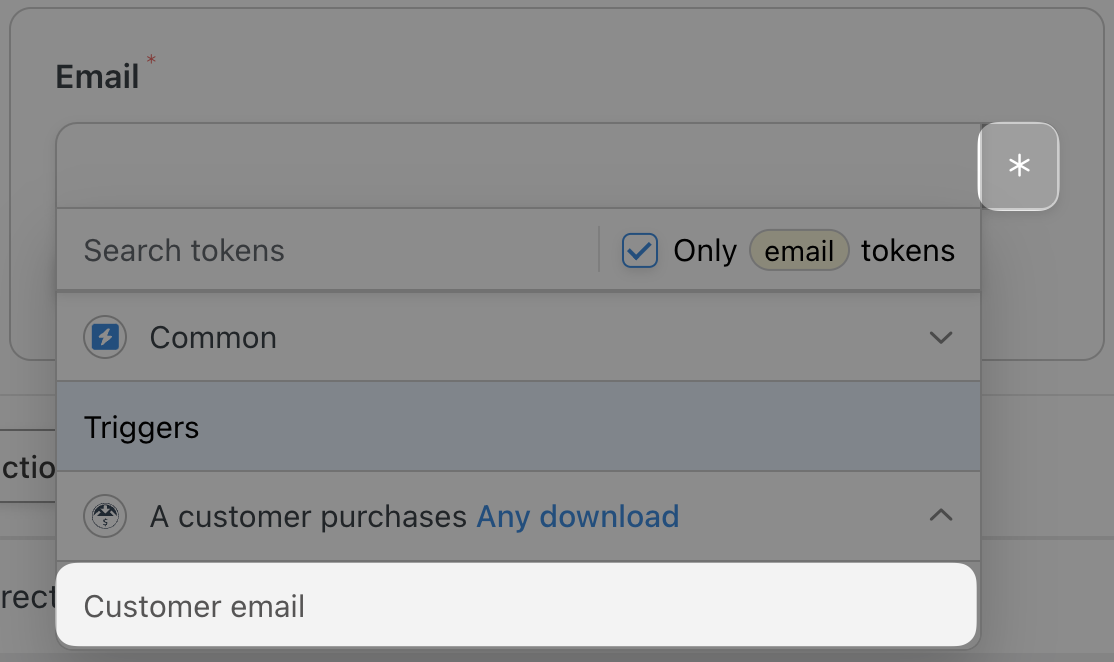
Automator will prompt you to select an email address. We are going to use a token (i.e., dynamic data pulled from your WordPress website and from within recipes).
To select a token, click the Asterisk.
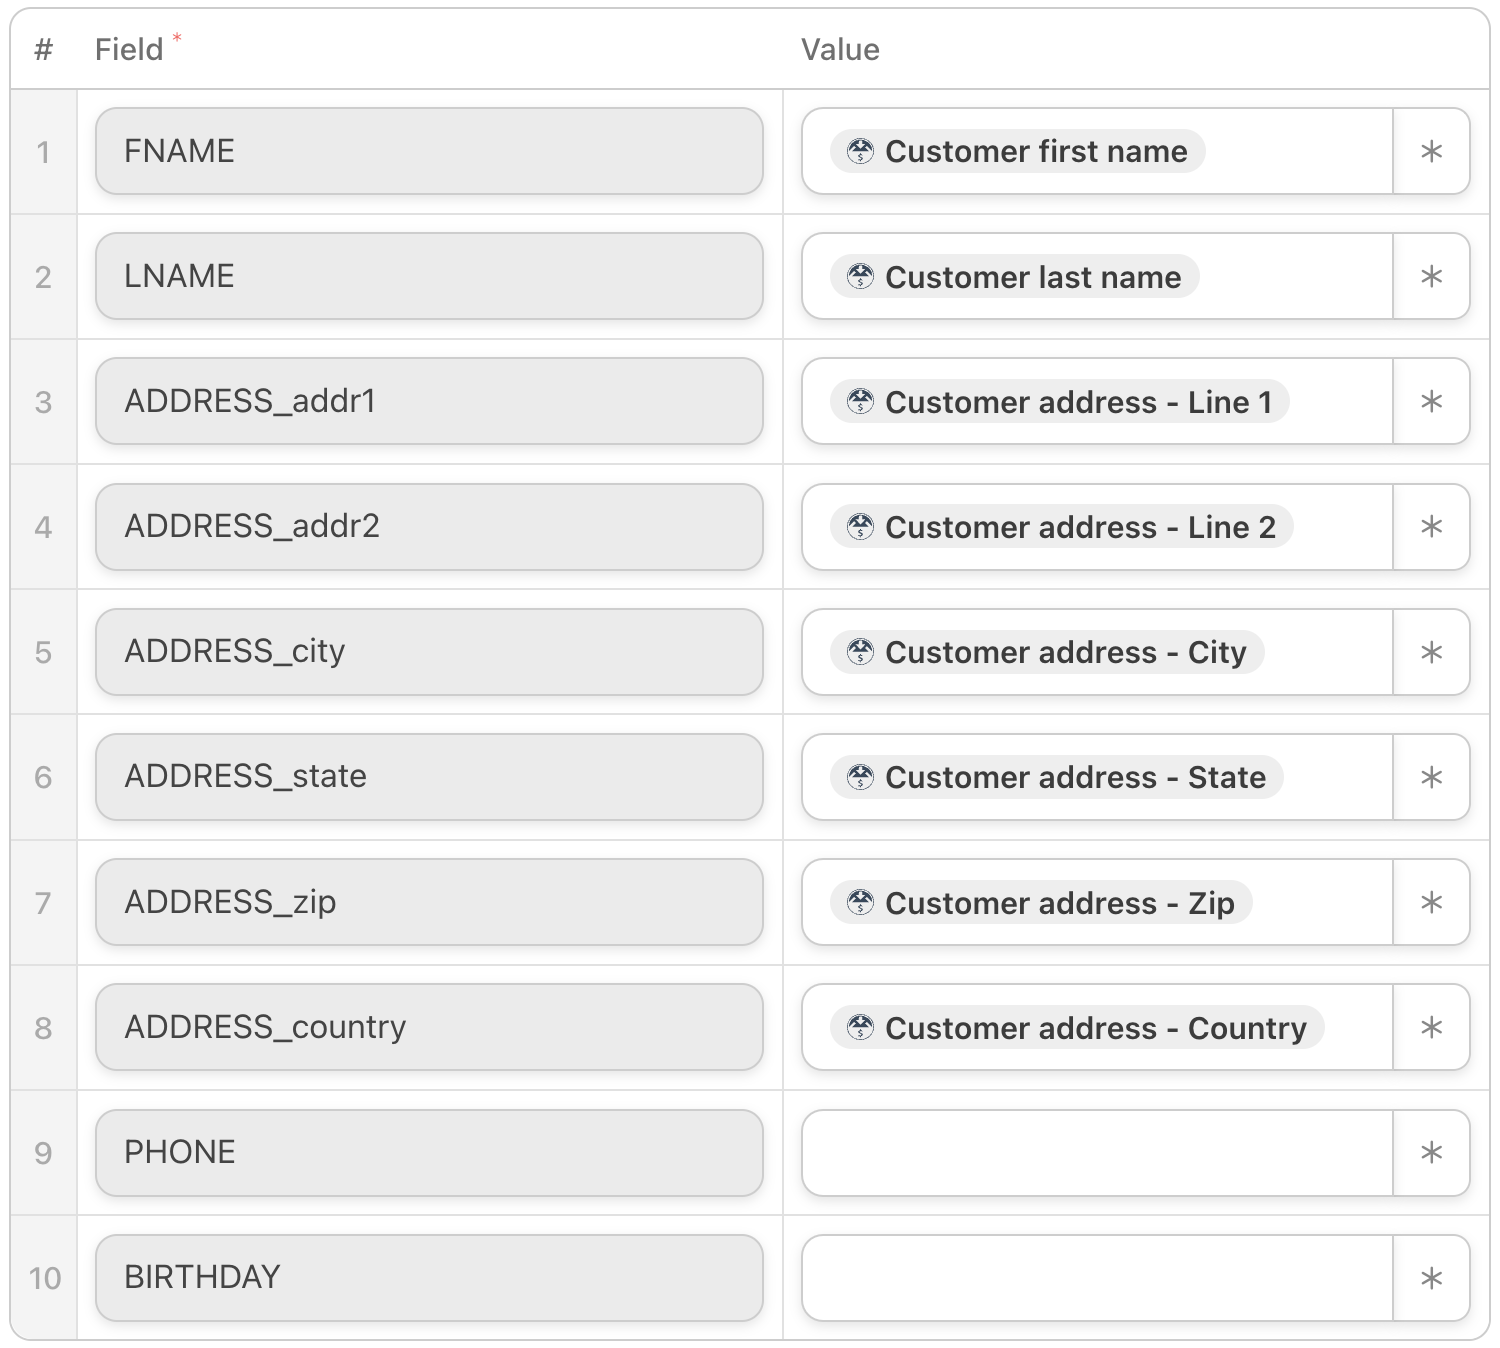
Automator will then present you with a form where you can enter the details for this new Mailchimp contact.
To add additional information about this new contact, click Load fields and populate the values using tokens.
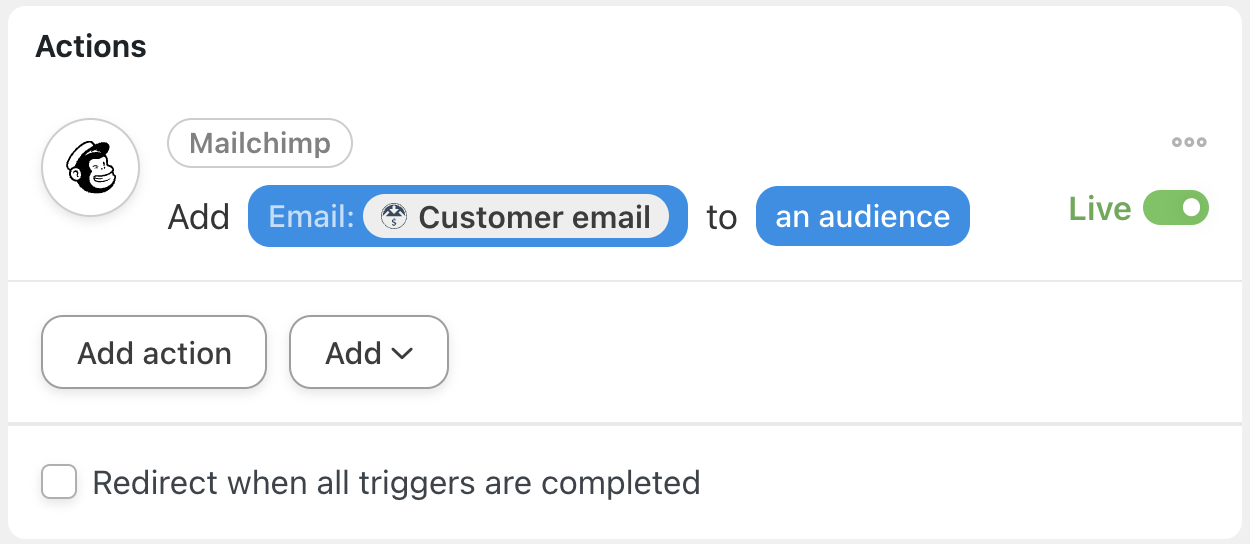
Once you’re satisfied, click Save. Your completed action should look something like this:
Step 5: Go Live!
You’re just about ready to complete your first EDD and Mailchimp integration. All that’s left for you to do now is toggle the recipe from Draft to Live.
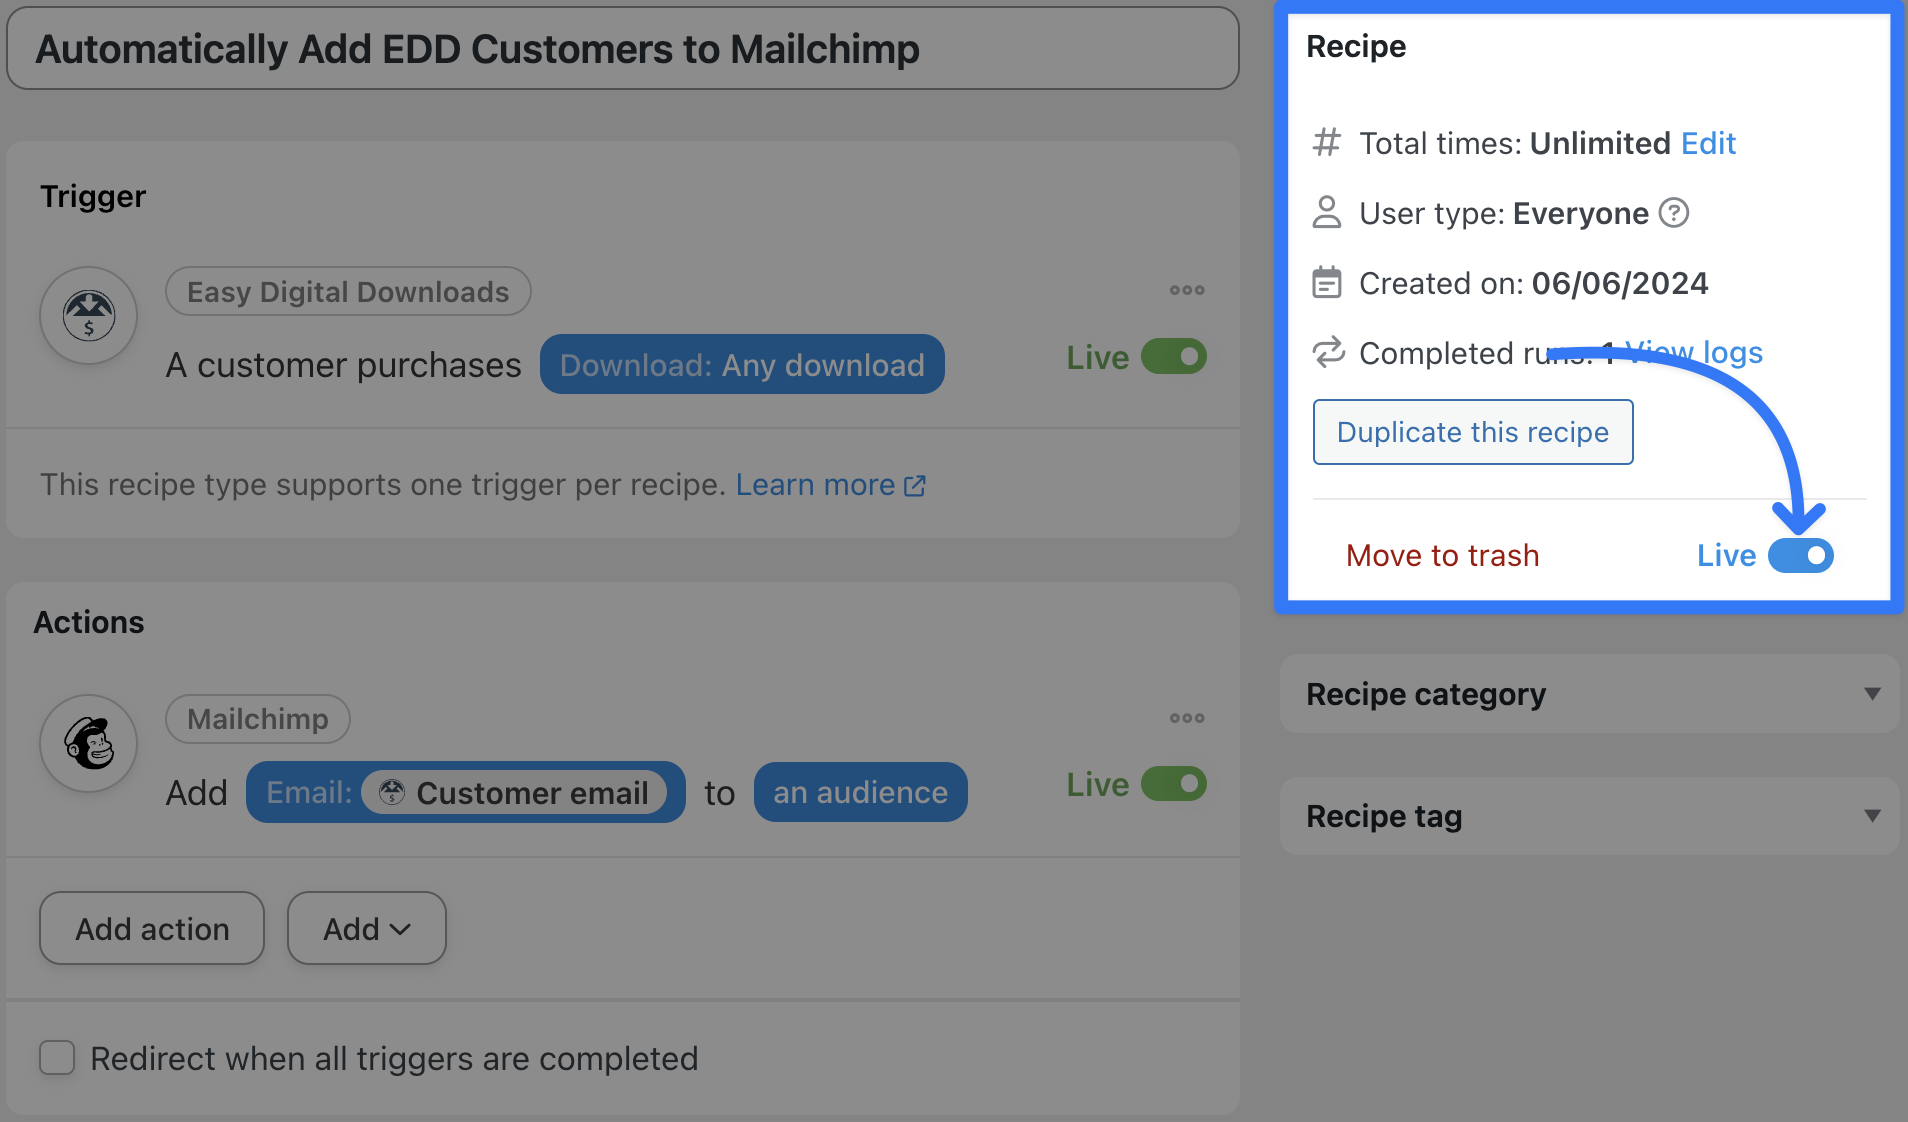
Now, all of our EDD customers will automatically be added to our Mailchimp audience.
See how easy it is to connect EDD to Mailchimp with Automator? Get your Pro license now>>>.
With an Automator Pro license, you can even take this recipe a step further by creating a WordPress user from an EDD purchase.
Automatically Add Notes and Tags to Mailchimp Contacts
Now that you’re adding your EDD customers to your Mailchimp audiences, you can take the integration a step further to automate and improve your segmentation.
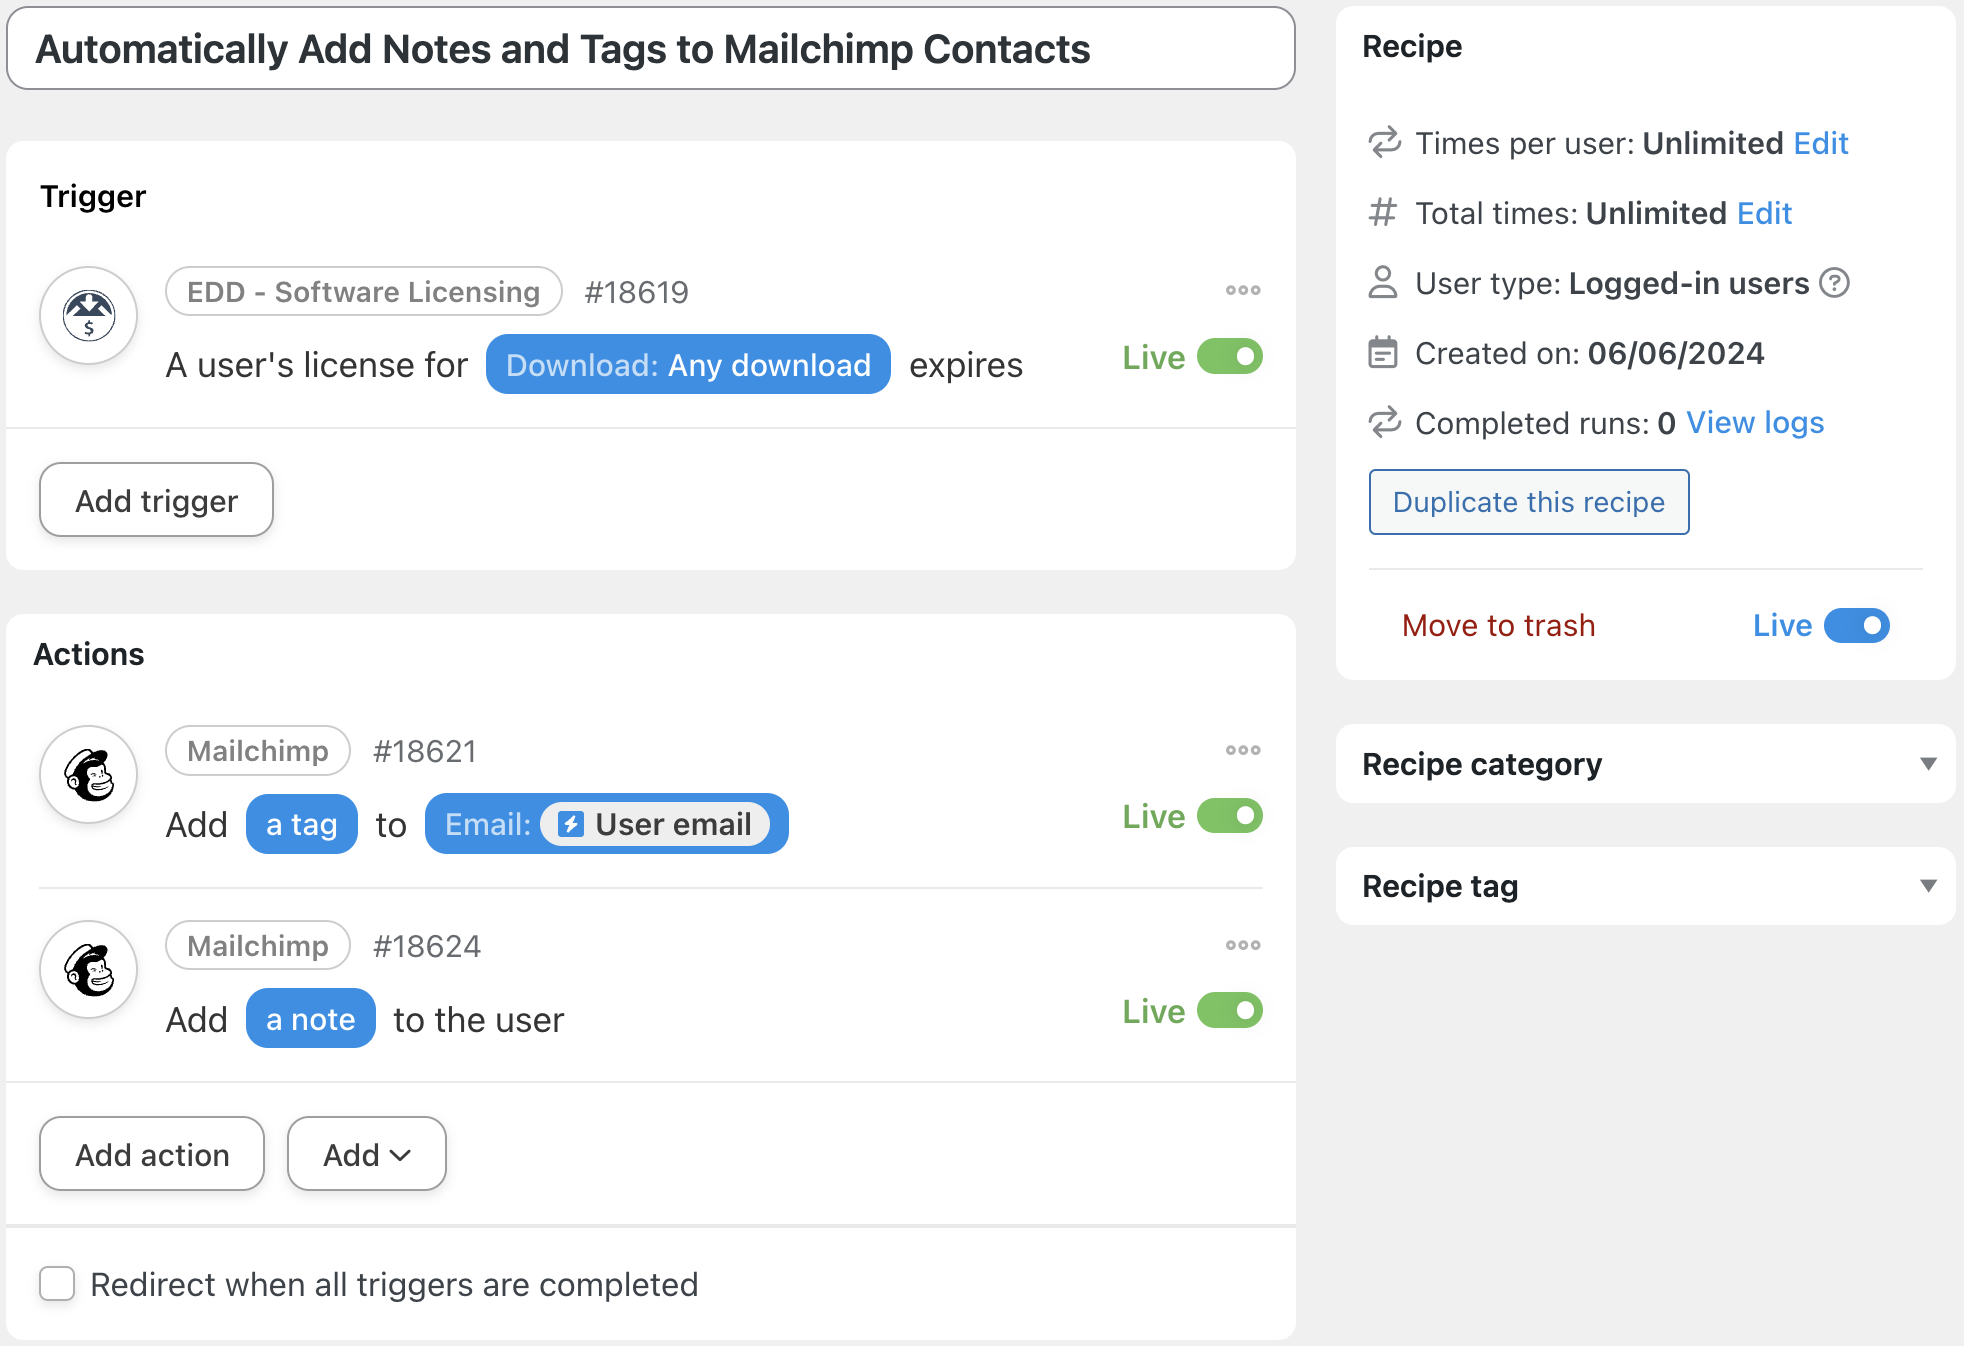
Let’s recreate the recipe pictured above together. Then we’ll show you some powerful features for creating more dynamic and personalized workflows.
Step 1: Create a New Recipe
From your WordPress Admin Dashboard, navigate to Automator > Add new recipe. In the pop-up window that appears, select Logged-in users.
(Note: We’re able to select Logged-in users because we added an action to our previous recipe to create a WordPress user from an EDD purchase.)
Step 2: Name Your Recipe
We’ve named this recipe “Automatically Add Notes and Tags to Mailchimp Contacts”.
Step 3: Configure Your Trigger(s)
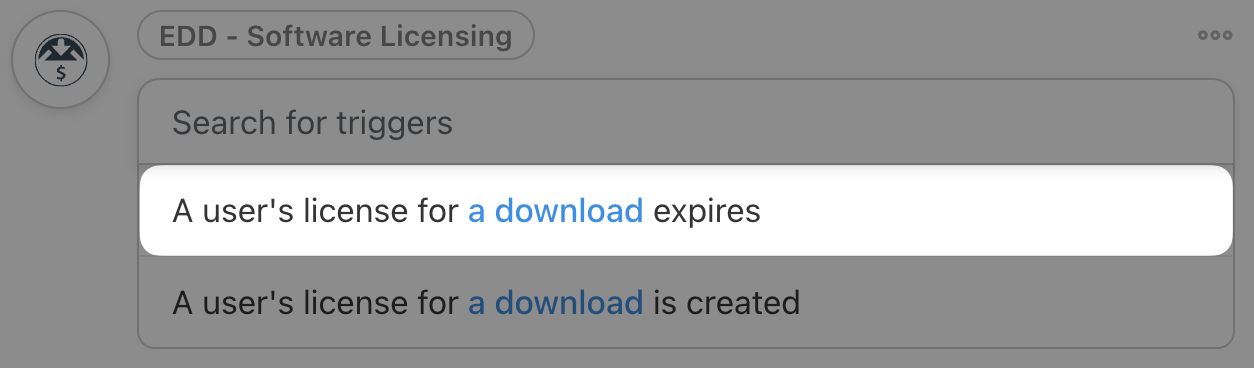
In the Trigger panel, from the menu of available integrations, select Easy Digital Downloads – Software Licensing. From the dropdown list that appears, select the trigger for which you would like to segment your Mailchimp audience.
For example, if we’re setting up a winback campaign, we might select the trigger A user’s license for a download expires.
Once you’ve configured your trigger, click Save.
Step 4: Configure Your Action(s)
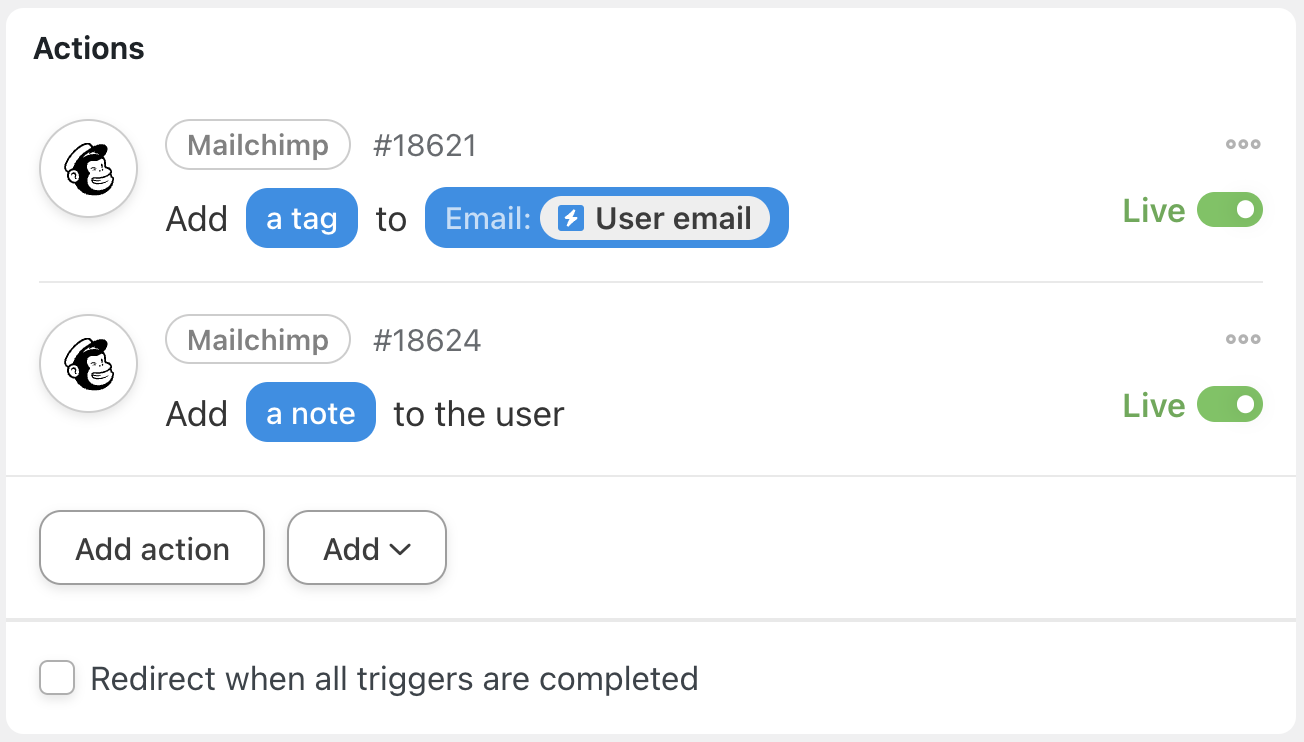
In the Actions panel, click Add action and select Mailchimp. From the dropdown list appears, select Add a tag to the user or Add a tag to a contact if you did not create a WordPress user in the previous recipe.

Automator will prompt you to select the tag. Once you’re finished click Save.
You can also add a note to the user/contact to help build your customers’ profiles and further improve segmentation.
If you add a note, Automator will present you with a form where you can draft the note you wish to add to the contact in Mailchimp. You can draft this message with a combination of static text and tokens.
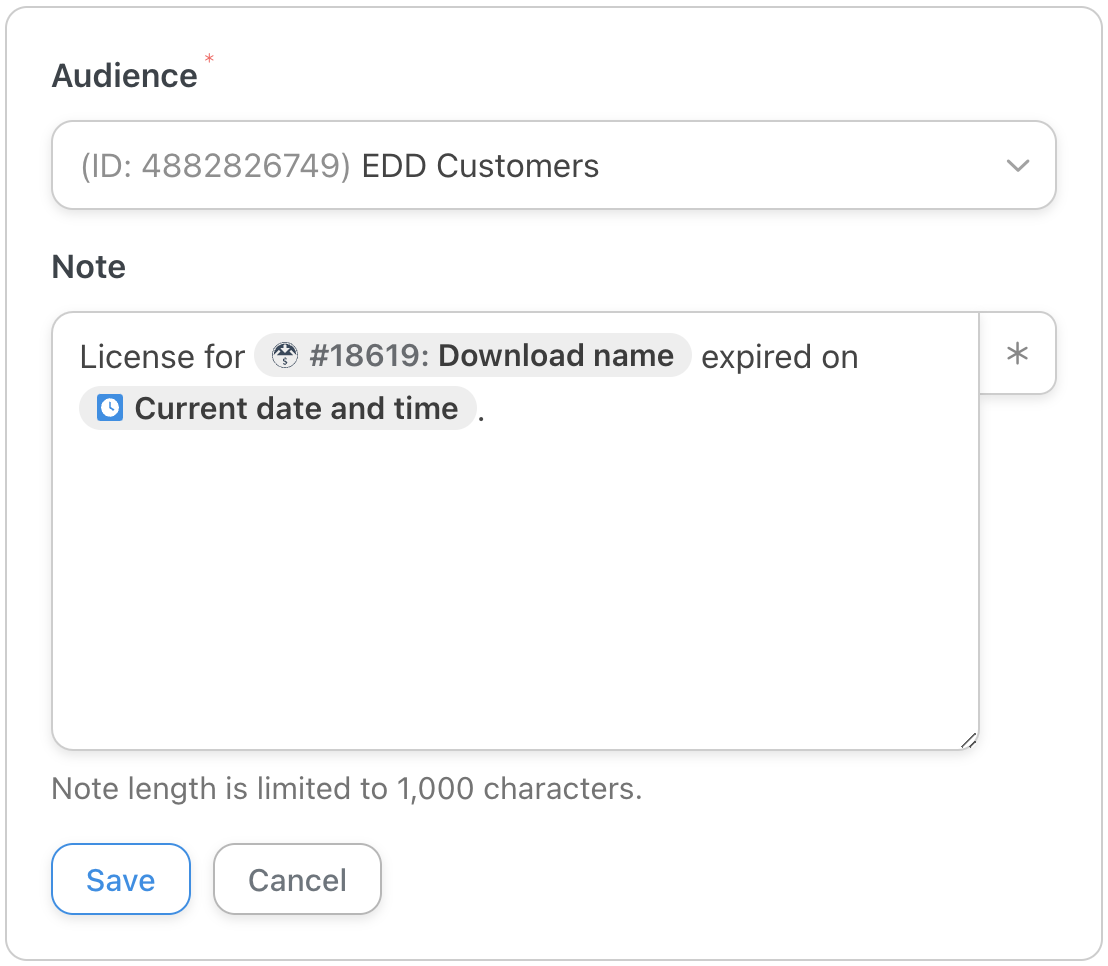
Once you’re satisfied with the note, click Save.
With both of these actions, your Actions panel should look something like this:
Step 5: Go Live
To automate your Mailchimp segmentation, all you need to do is toggle your recipe from Draft to Live.
Ready to improve your Mailchimp segmentation with Automator? Grab your Pro license today>>>.
Now that you’ve gotten the basics down, let’s take a look at some more advanced Automator features to further improve your marketing automation.
Don’t worry; advanced doesn’t mean difficult.
Advanced EDD and Mailchimp Integrations with Automator
Mailchimp already has some powerful marketing automation tools of its own. For example, we’ve created this winback campaign for our EDD – Software Licensing products.
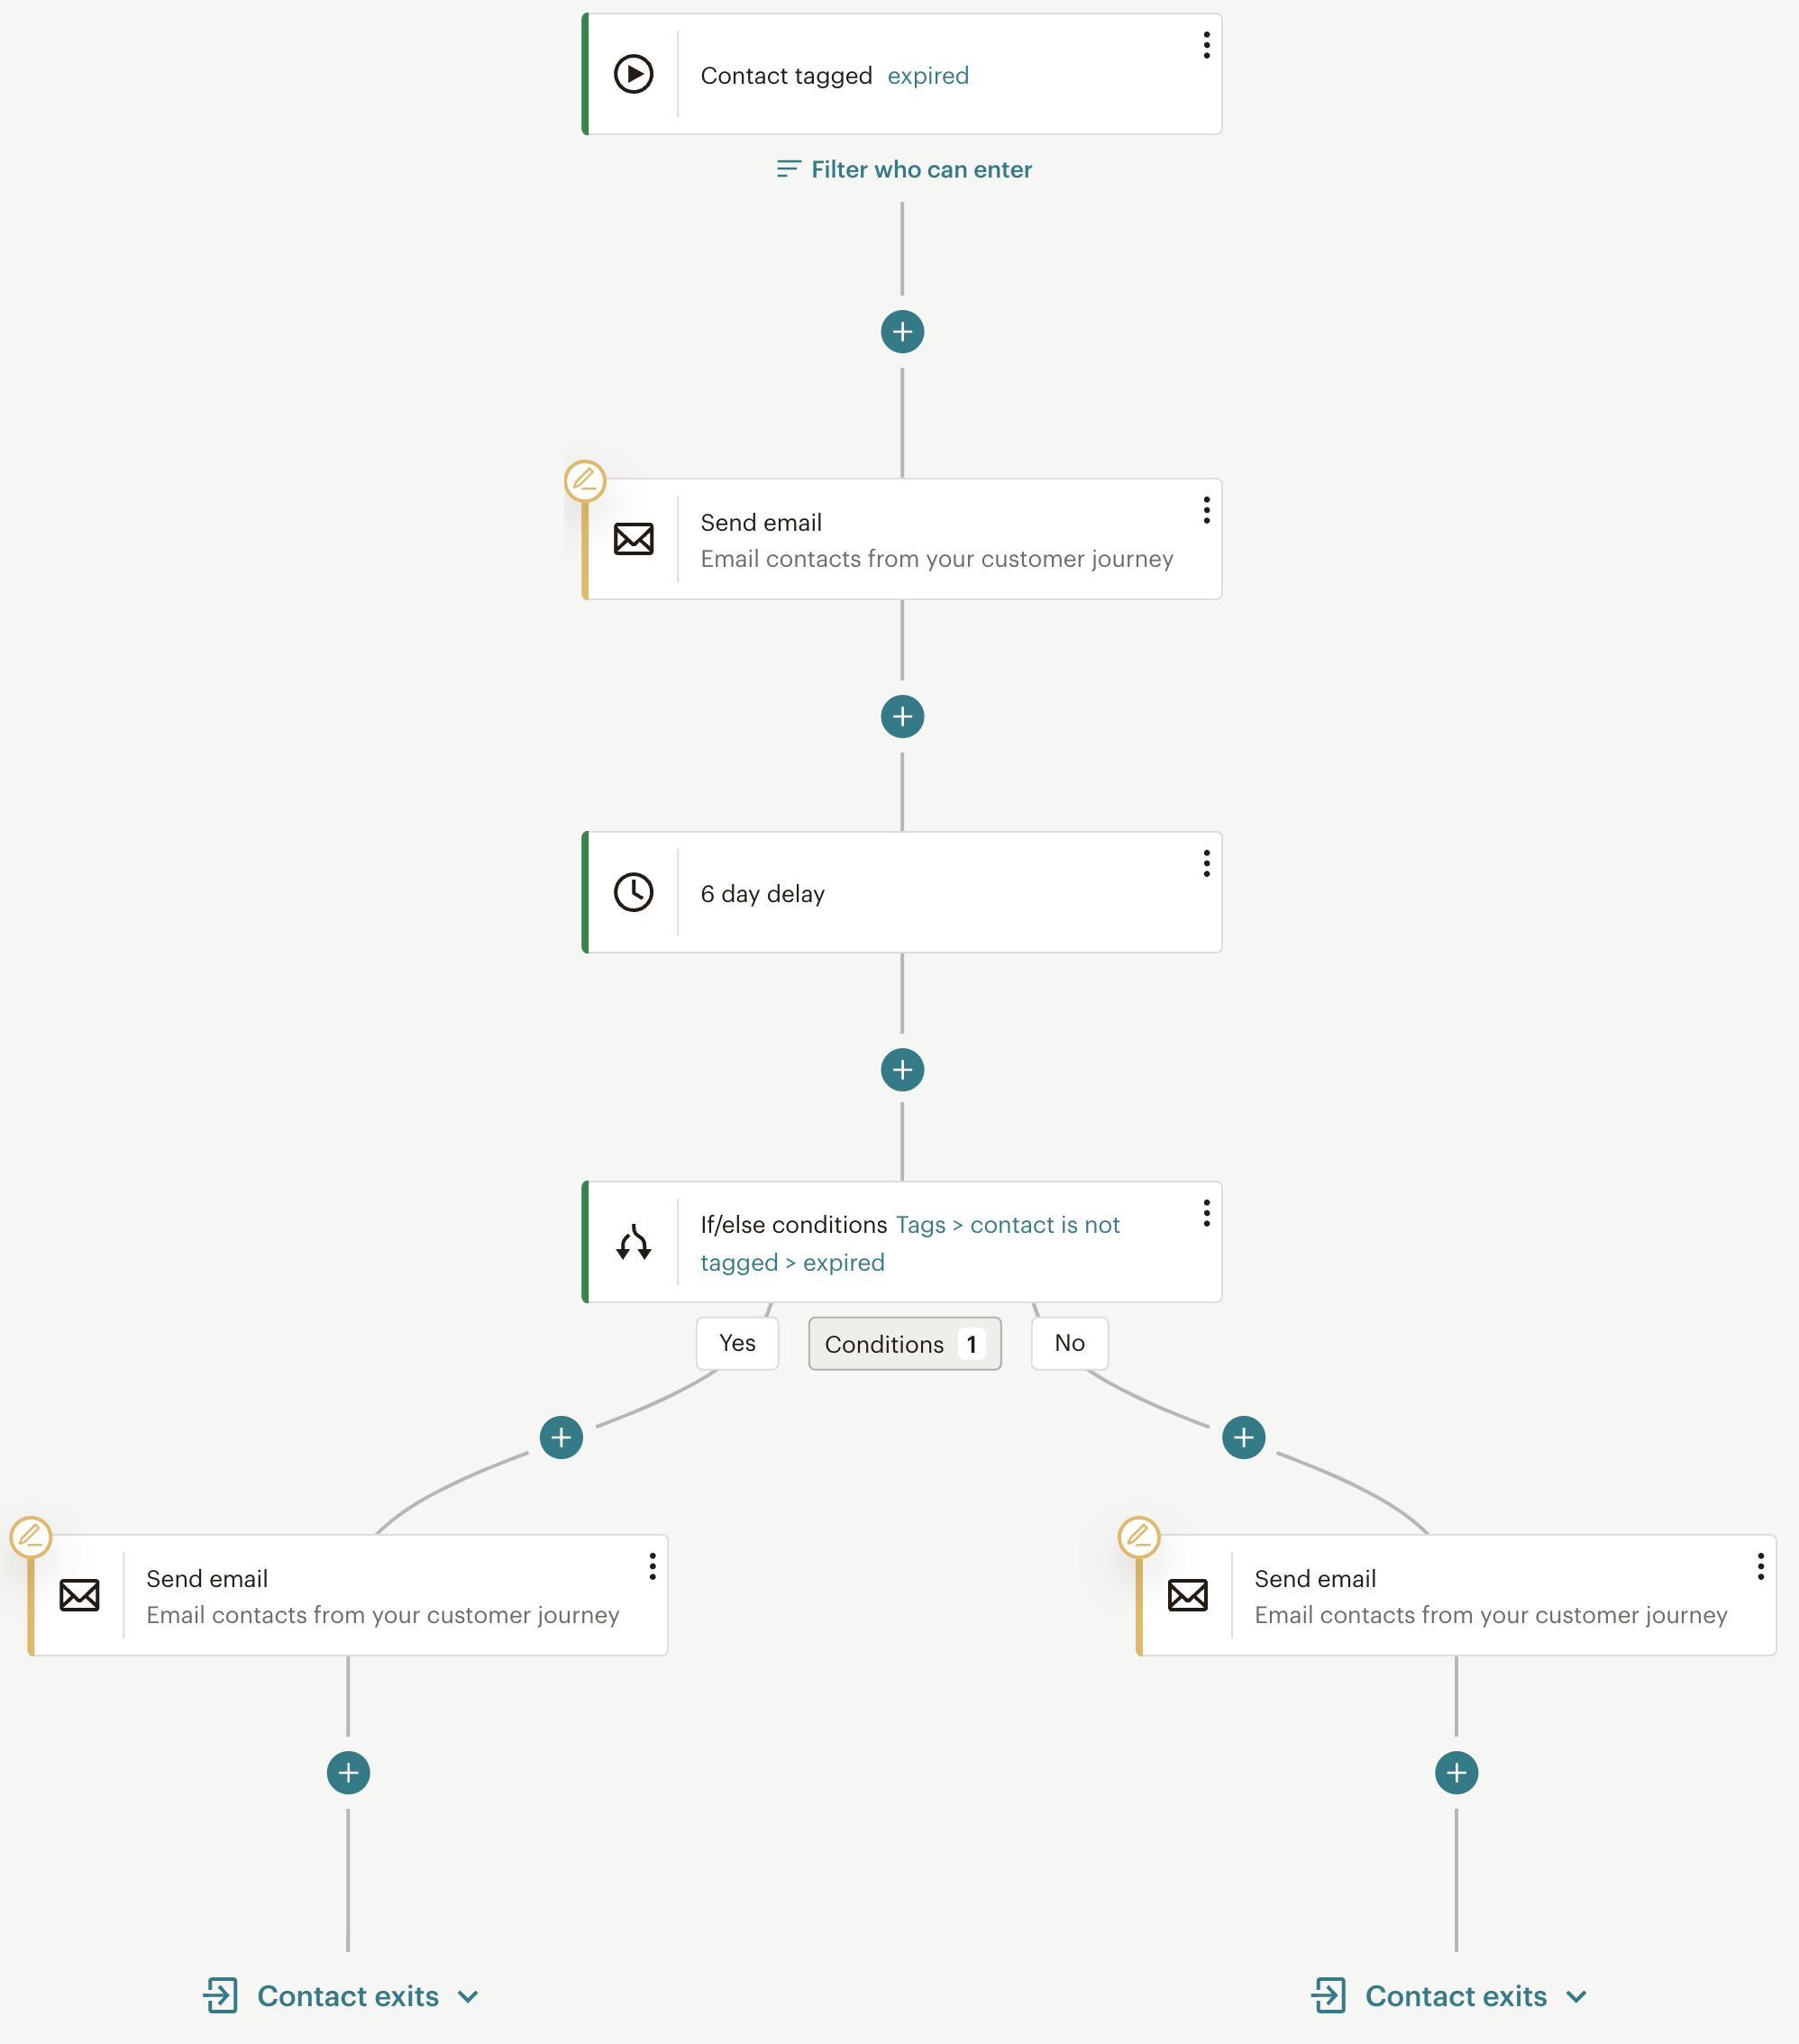
However, without Automator to integrate EDD and Mailchimp, we wouldn’t be able to create such a dynamic journey for our customers.
Here’s how we did it.
Step 6: Add a Third Action + Filter
As our recipe stands, our Mailchimp contact will have an “expired” tag on their profile in perpetuity. But, we’re running a winback campaign and we’re pretty sure that it will be successful.
As such, we’ve added the action Remove a tag from the user. Now, we just need a way for Automator to know which user(s) to remove the tag from.
That’s where filters come in.
After configuring the action, hover it and click Filter.

A Condition modal will appear. Select EDD – Software Licensing > The user has/does not have an active license for a download.
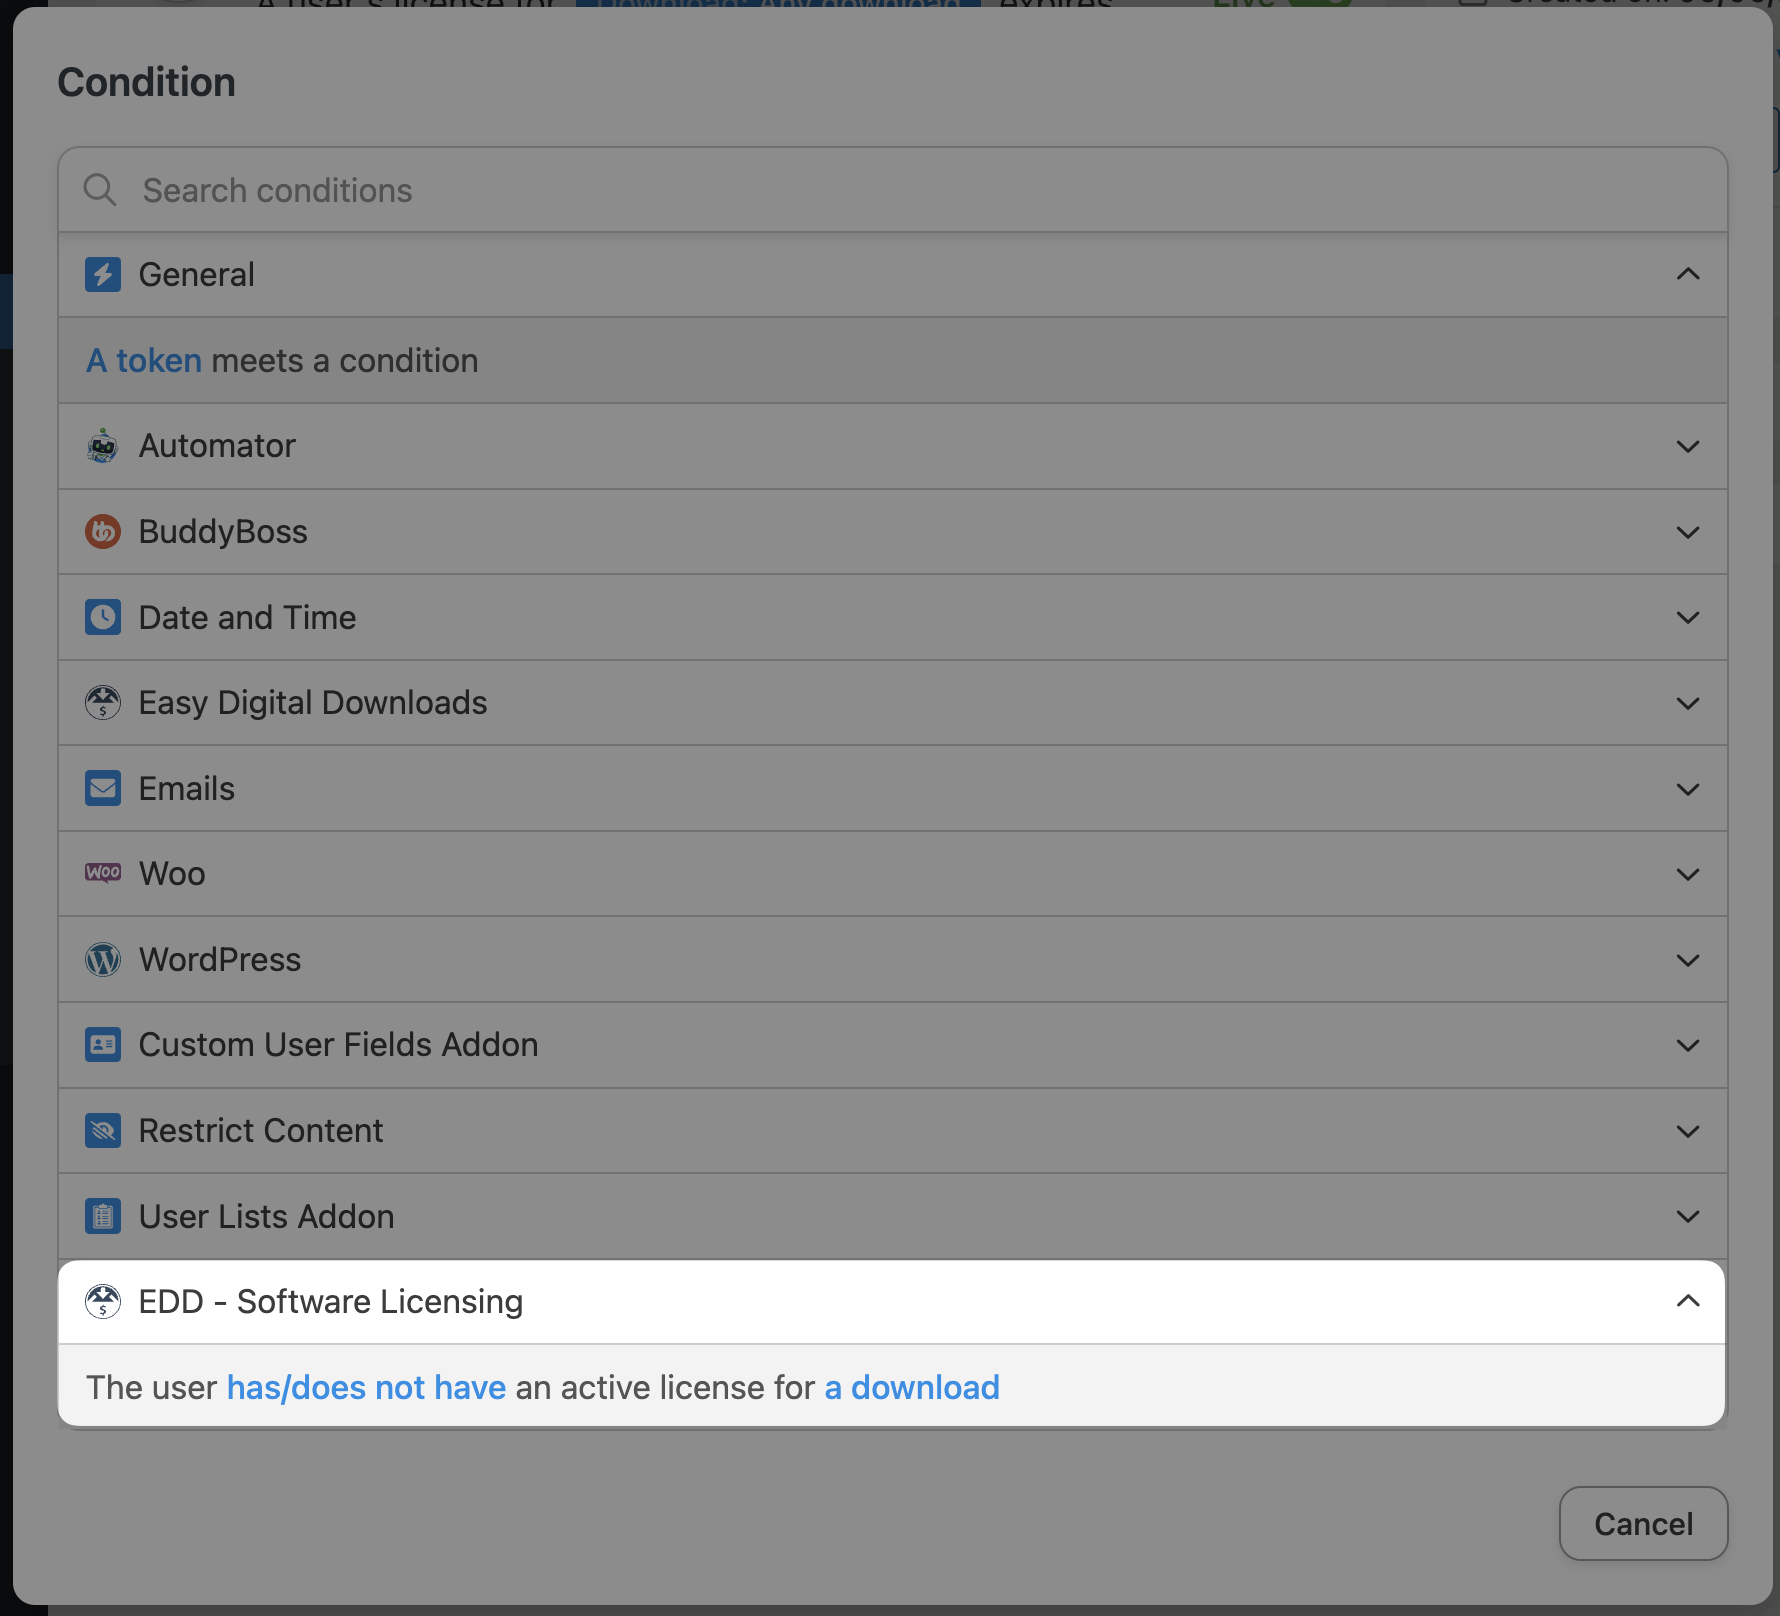
A second modal will appear where you can configure the condition. Once you’re done, click Save filter. Your action should now look something like this:

Step 7: Add a Delay
We need time to let our Mailchimp winback automation work its magic on our customers. In order to get our Mailchimp automation and our Automator recipe working in sync, we can add a delay to our action.
To add a delay, simply hover over the action and click Delay. In the modal that appears, set a delay that aligns with your Mailchimp automation.
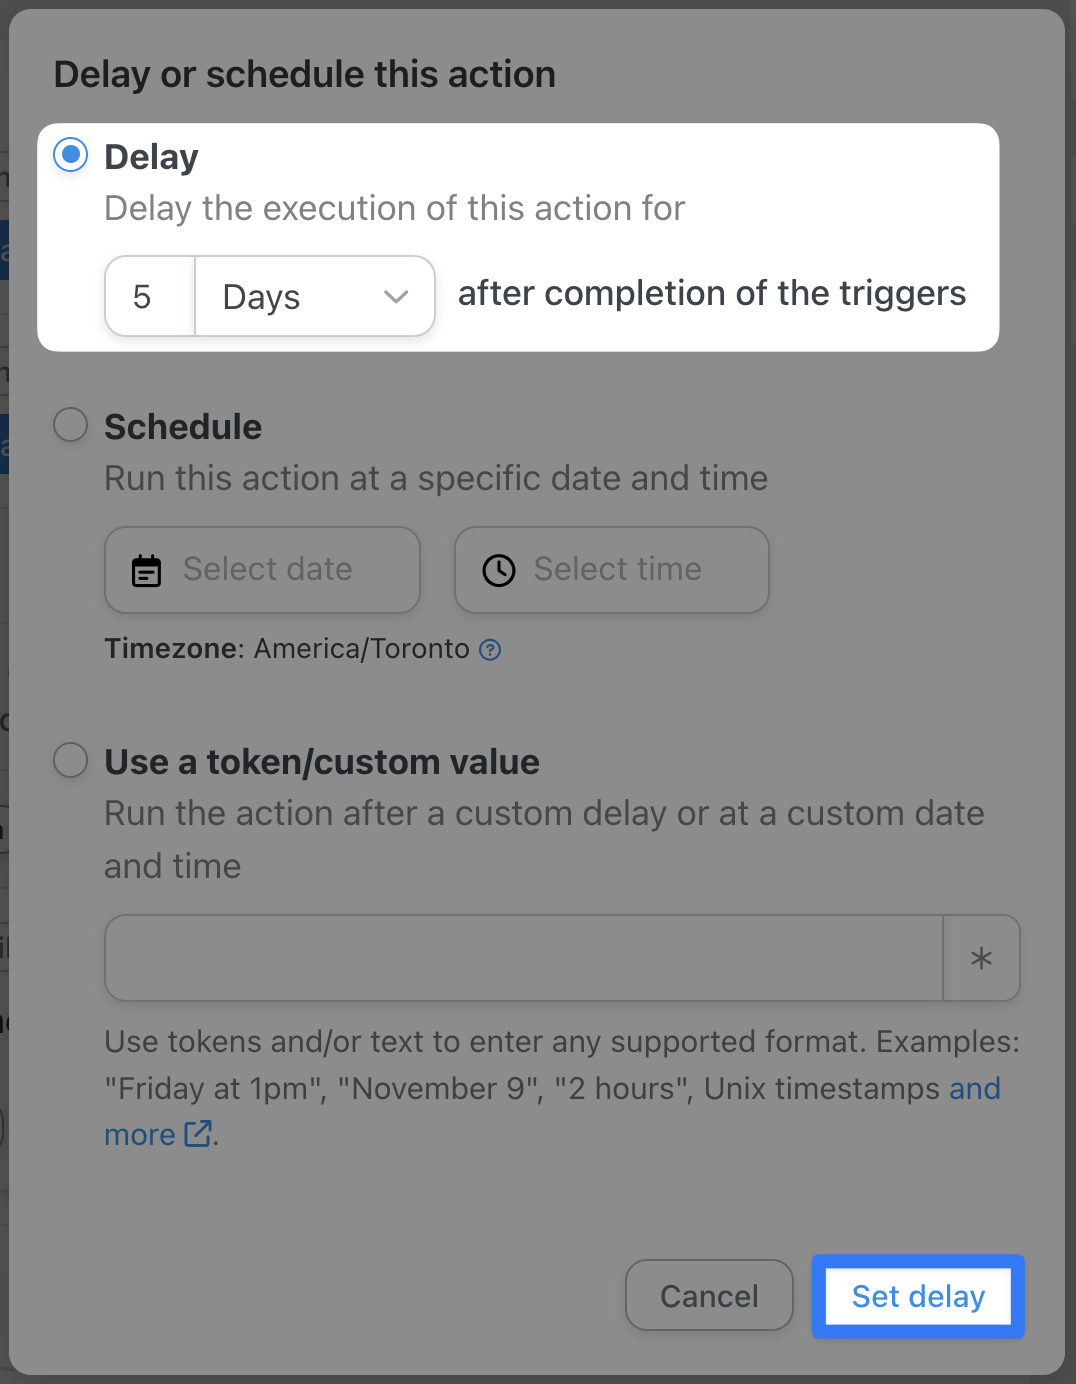
Once you’re finished, click Set delay. Altogether, your Actions panel should look like this:
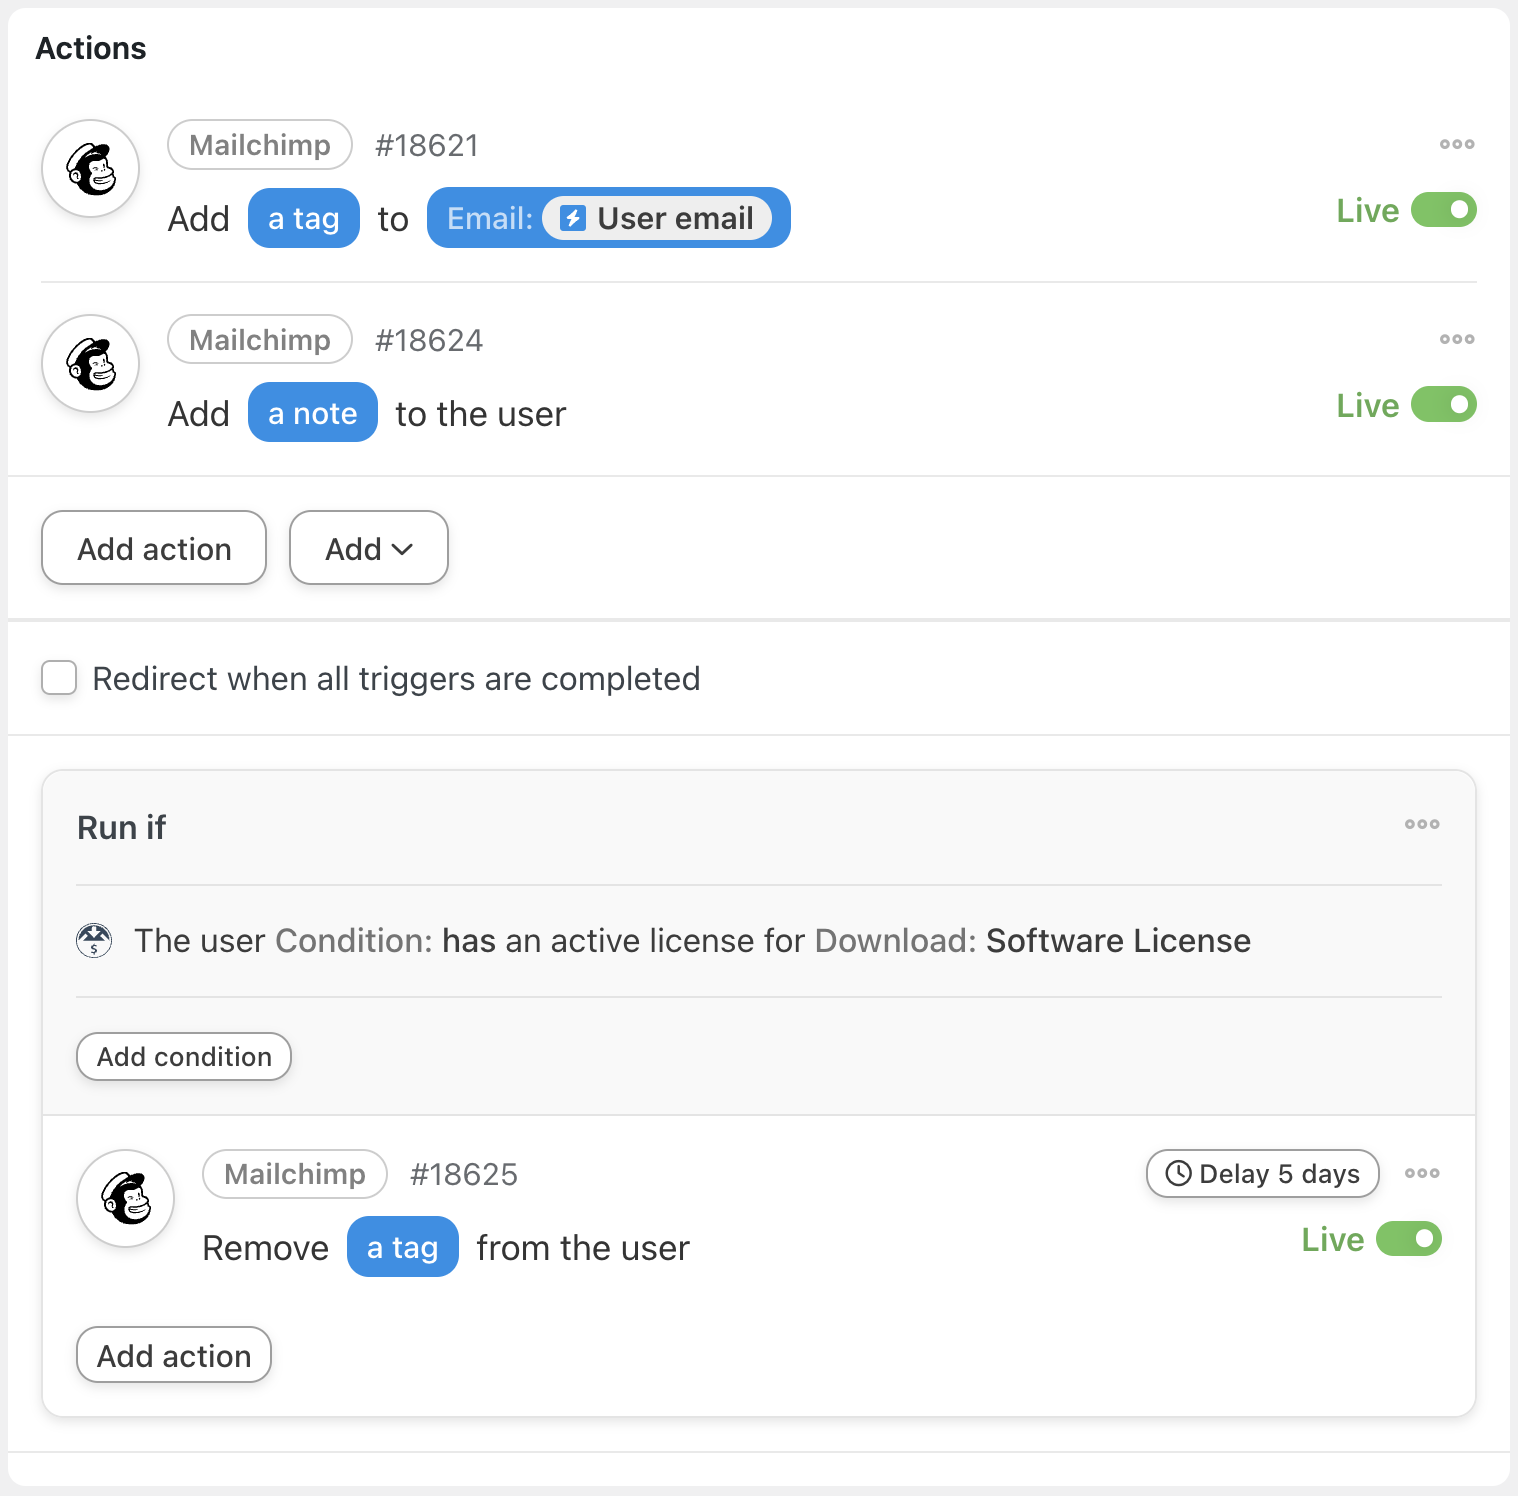
Now, whenever an EDD customer’s license expires, Automator will add a tag to their Mailchimp contact, initiating a winback automation. After five (5) days, our customers will remain in the winback automation unless they have a new and active EDD software license, triggering Automator to remove the tag.
Want to create fully-integrated marketing automations like this one? Grab your Automator Pro license today>>>.
Frequently Asked Questions
Conclusion
Integrating Easy Digital Downloads with Mailchimp using Uncanny Automator opens up a world of possibilities for automating your email marketing efforts.
By seamlessly connecting these two powerful platforms, you can ensure timely and relevant communication with your customers, improve engagement, and boost conversions. Whether you want to add customers to Mailchimp lists, tag them based on their purchases, or manage subscriptions, Uncanny Automator makes it all possible with just a few clicks.
We’ve walked you through the steps to set up basic and advanced recipes, demonstrating how easy it is to automate your workflows. With features like filters and delays, you can customize your integrations to suit your specific needs, ensuring your marketing strategies are always on point.
Ready to take your email marketing to the next level? Grab your Automator Pro license today and start creating powerful automations that save you time and drive results>>>.
Until next time, happy automating!

Related Posts


This Post Has 0 Comments