Revive old WordPress posts with AI and Uncanny Automator. Learn how to reverse content decay…
How to Connect LearnDash to WooCommerce Memberships
Join the integration and automation club! Sell, remove and customize LearnDash course and group access with this seamless LearnDash and WooCommerce Memberships integration.

Have you been looking for a way to connect LearnDash and WooCommerce Memberships? Well, look no further!
In this blog post, we’ll show you how to create a seamless LearnDash and WooCommerce Memberships integration using Uncanny Automator. By the end of this brief tutorial, you’ll be able to sell and remove LearnDash groups and course access through WooCommerce Memberships.
More importantly, you’ll be able to customize the integration to suit your needs and connect it to your CRM.
It will only take a few minutes—and even fewer clicks. So, without further ado, scroll down to join the Time-Saving Integrations Club!
Introduction
Connecting LearnDash to WooCommerce Memberships can open up new pathways for your learners, help you build a learning community and boost your revenue streams. However, attaining a seamless integration between these two awesome plugins can be a challenge.
Unless you have Uncanny Automator.
In this tutorial, we’ll show you some of the unique ways to connect LearnDash to WooCommerce Memberships and so much more!
First, let’s take a look at the plugins that we’ll be using.
Introduction to Uncanny Automator
Uncanny Automator is the #1 automation and integration tool for WordPress websites. As such, it’s a no-brainer for connecting LearnDash to WooCommerce Memberships.

What Automator offers above the native LearnDash and WooCommerce integration is flexibility, customizability and scalability.
Using Automator features such as filters and tokens, you can create dynamic integrations that respond to users’ activity and suit their unique learning pathways. Plus, with 214 integrations (and more always on the way), you can easily scale up your LearnDash and WooCommerce Memberships integration.
Get your Automator Pro license with a 14-day money back guarantee so you can follow along.>>>
Introduction to LearnDash
Turning your WordPress website into an e-learning platform is easiest with LearnDash. In addition to the standard LMS features, such as quiz, lesson and course builders, LearnDash unlocks a bevy of possibilities with greater administrative control.

Most importantly, however, LearnDash integrates with dozens of other plugins (such as WooCommerce) to help you create a more comprehensive learning experience. Of course, when you LearnDash with Uncanny Automator, you gain access to countless more integrations to help your learners, educators and administrators.
If you haven’t already, get LearnDash now and turn your WordPress website into the digital campus you’ve always dreamed of.>>>
Introduction to WooCommerce Memberships
If you’re looking for a way to create an exclusive members’ only section of your WordPress website, WooCommerce Memberships can help you roll out the red carpet and set up the velvet ropes.
WooCommerce Memberships gives you the ability to restrict access to content, create unique membership perks and lay the foundation for an online community.
To get the most out of WooCommerce Memberships, pair it with the core ecommerce plugin and the Subscriptions addon.
Grab the Memberships addon so you can follow along in the next section.>>>
Connect LearnDash to WooCommerce Memberships: Add Users
To connect LearnDash to WooCommerce Memberships, we’re going to create an Automator recipe (i.e., a combination of triggers and actions).
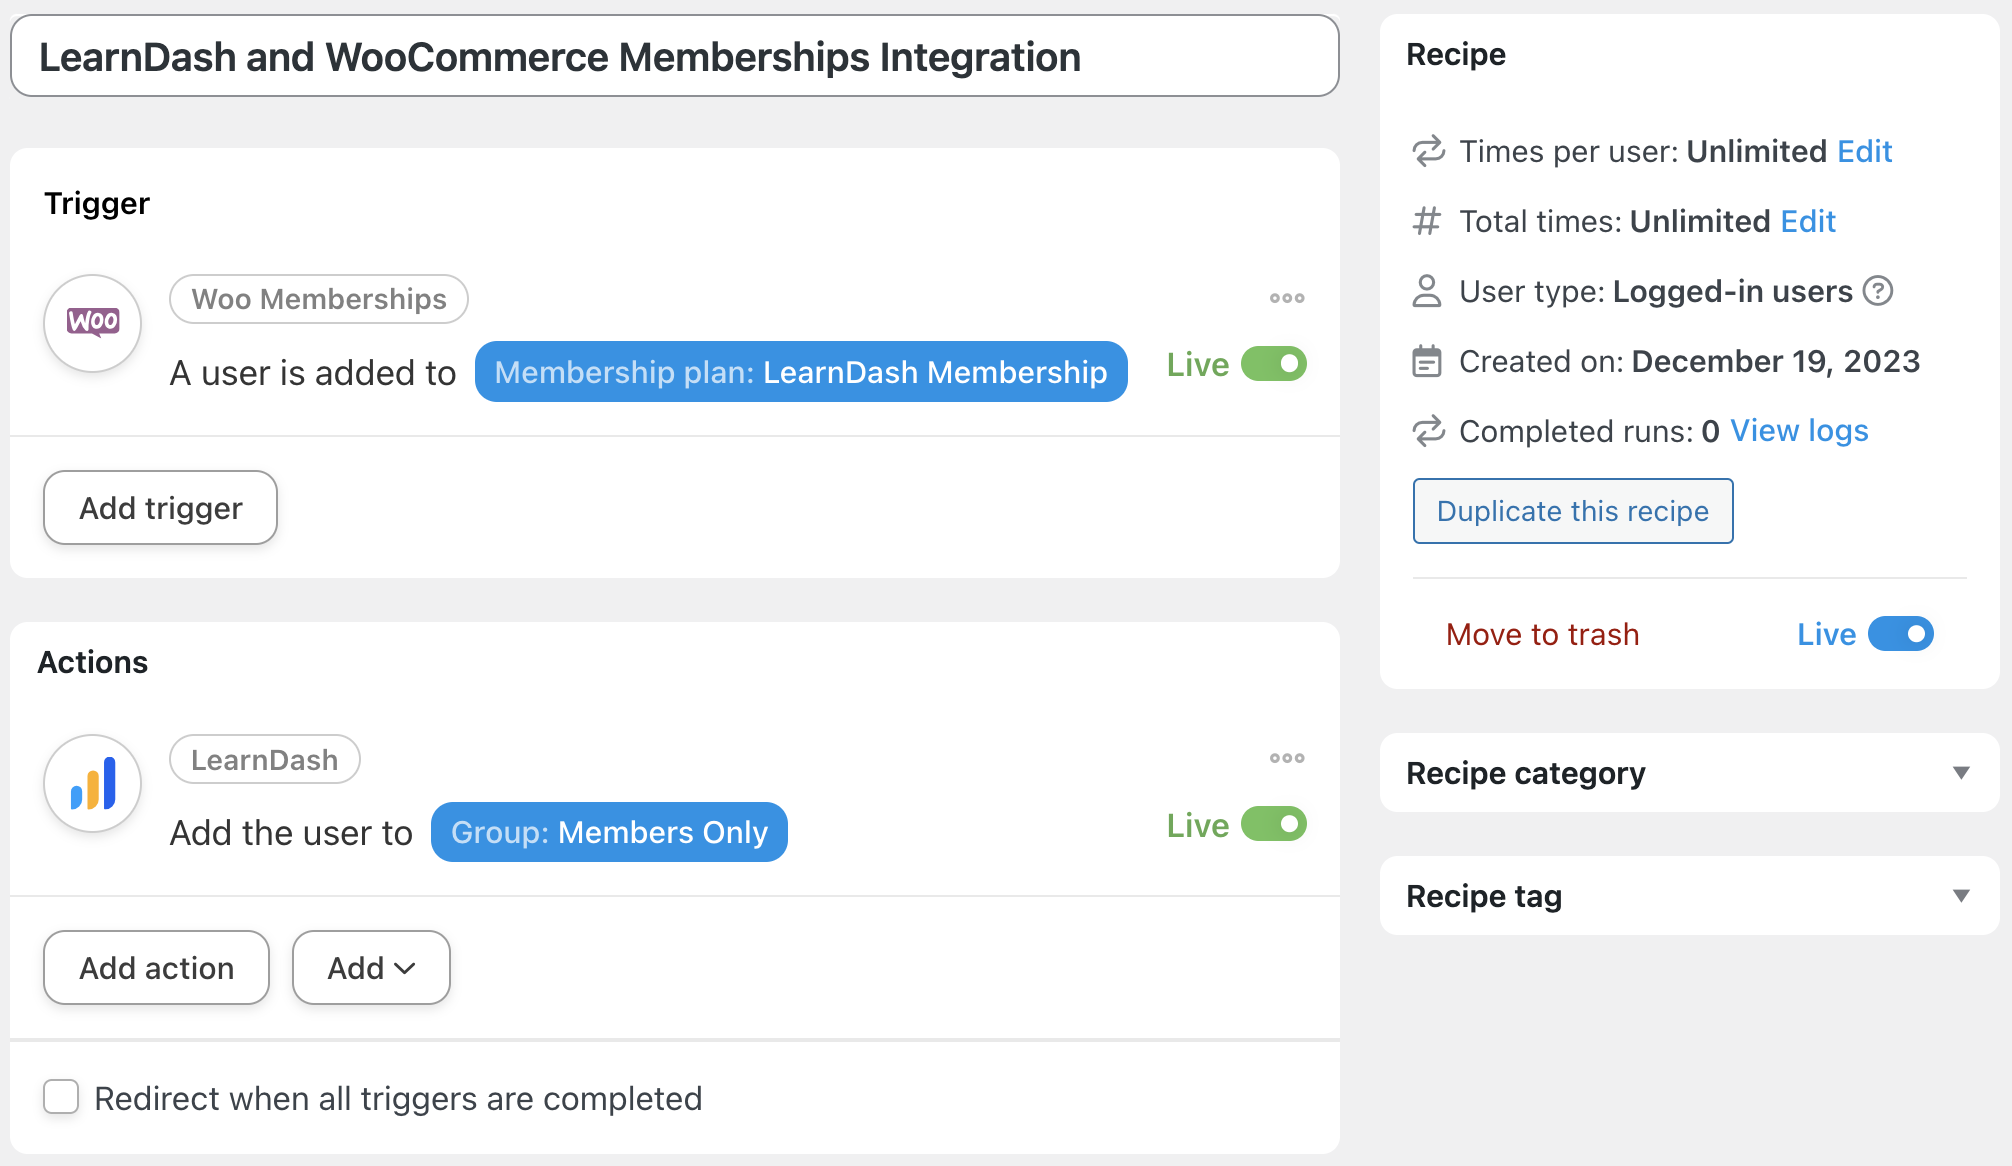
In the next five steps, we’ll recreate the recipe pictured above to add our WooCommerce members to an exclusive members only LearnDash group. Let’s get to it!
Step 1: Create a New Recipe
From your WordPress Admin Dashboard, navigate to Automator > Add New. In the pop-up window that appears select Logged-in users.

(Note: Even though we have selected Logged-in users, this recipe will work on any of our site visitors, even unregistered guests. This is because of our WooCommerce Accounts & Privacy settings that requires all of our customers to create an account or sign in to their existing account at checkout.)
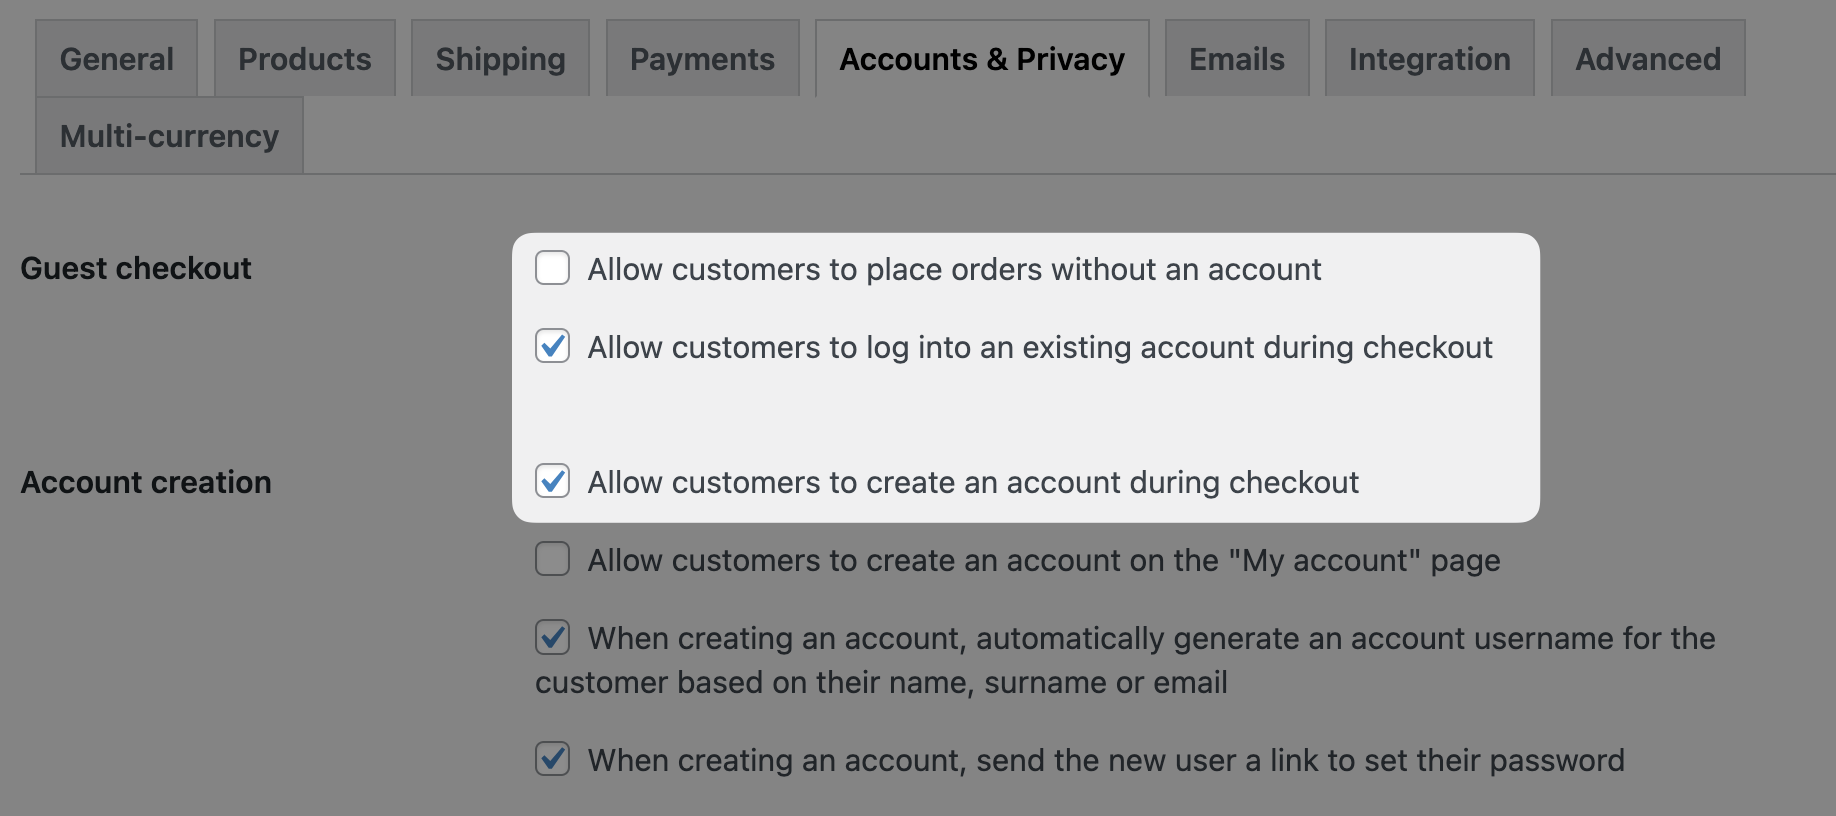
If you haven’t already, you can configure these settings by navigating to WooCommerce > Settings > Accounts & Privacy and selecting the options as pictured above.
Step 2: Name Your Recipe
Give your recipe a name that makes it easy to recognize at a glance. For example, we’ve named this recipe LearnDash and WooCommerce Memberships Integration.
Step 3: Configure Your Trigger(s)
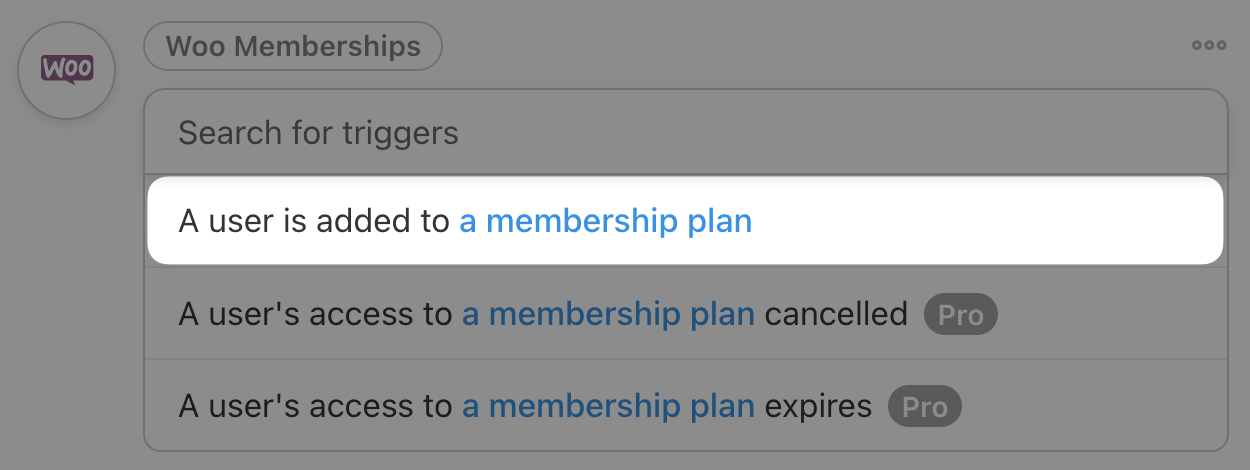
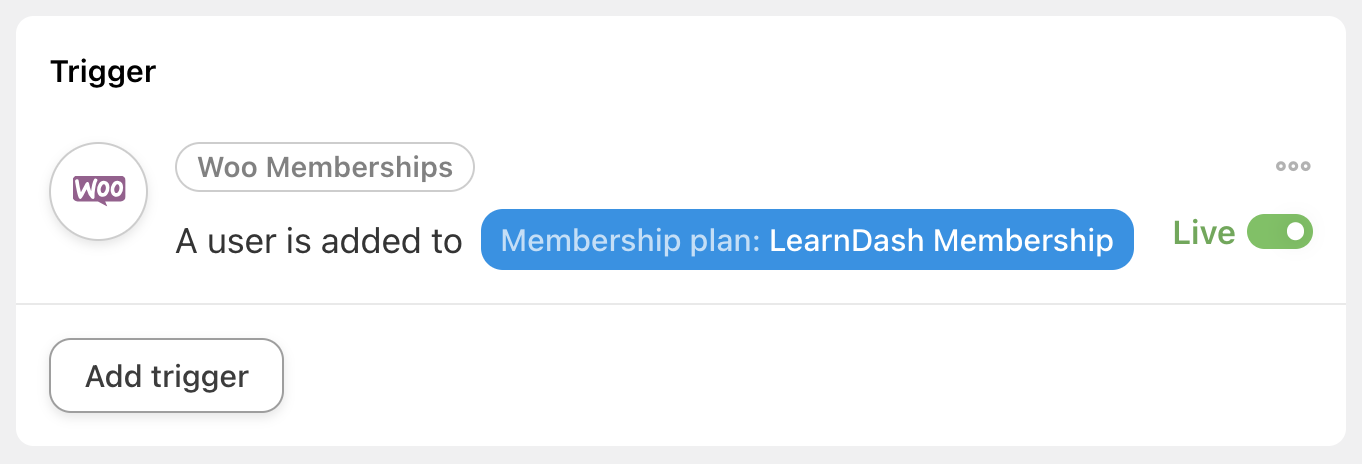
In the Triggers panel, from the menu of available integrations, select Woo Memberships.

From the drop-down list that appears, select A user is added to a membership plan.
Automator will prompt you to select a membership plan. We have selected the membership plan associated with our LearnDash group.
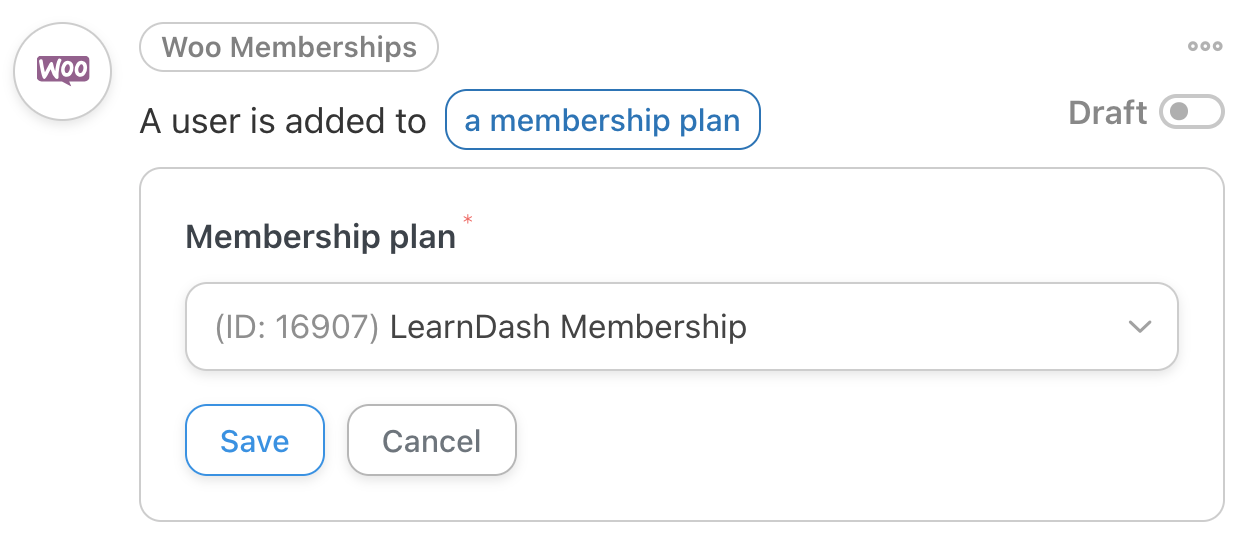
Once you’re finished, click Save. Your trigger should look something like this:
Step 4: Configure Your Action(s)
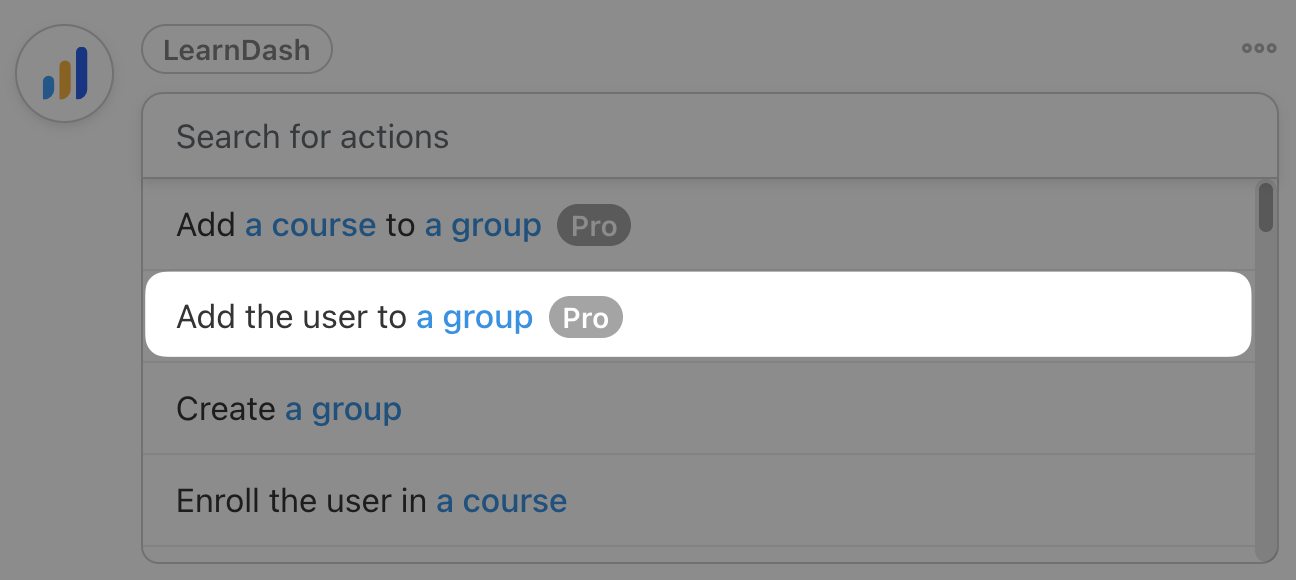
In the Actions panel, click Add action and select LearnDash from the menu of available integrations.

From the drop-down list that appears, select Add user to a group.
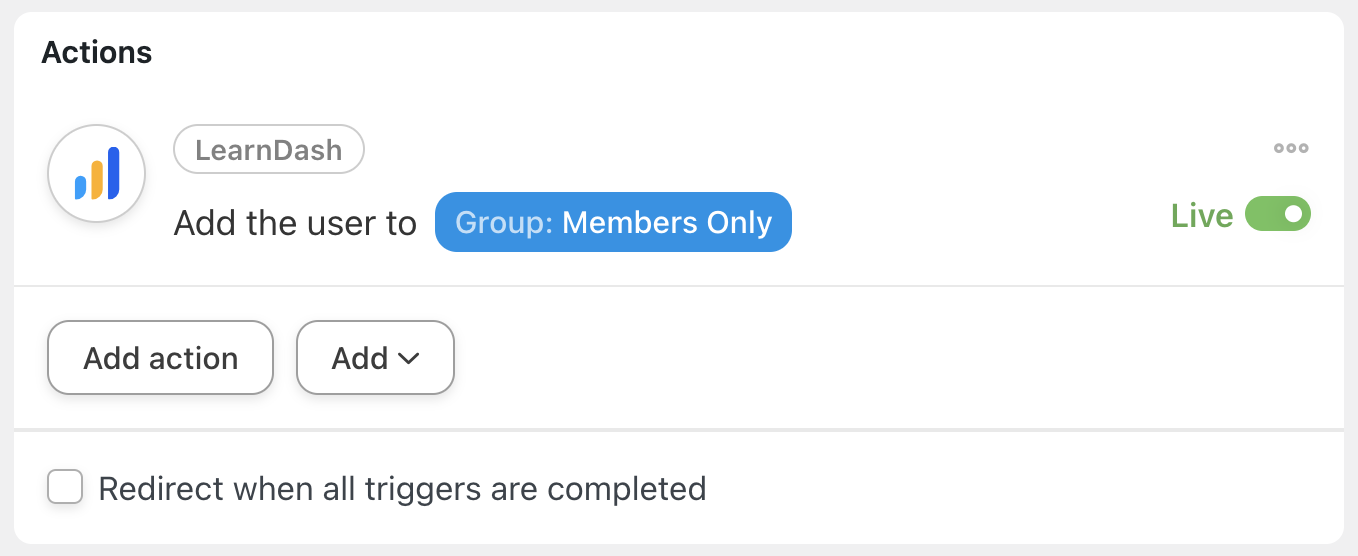
Automator will prompt you to select the group to which you would like to add your new members. For example, we have selected our “Members Only” group.

Once you’re finished, click Save. Your Actions panel should now look something like this:
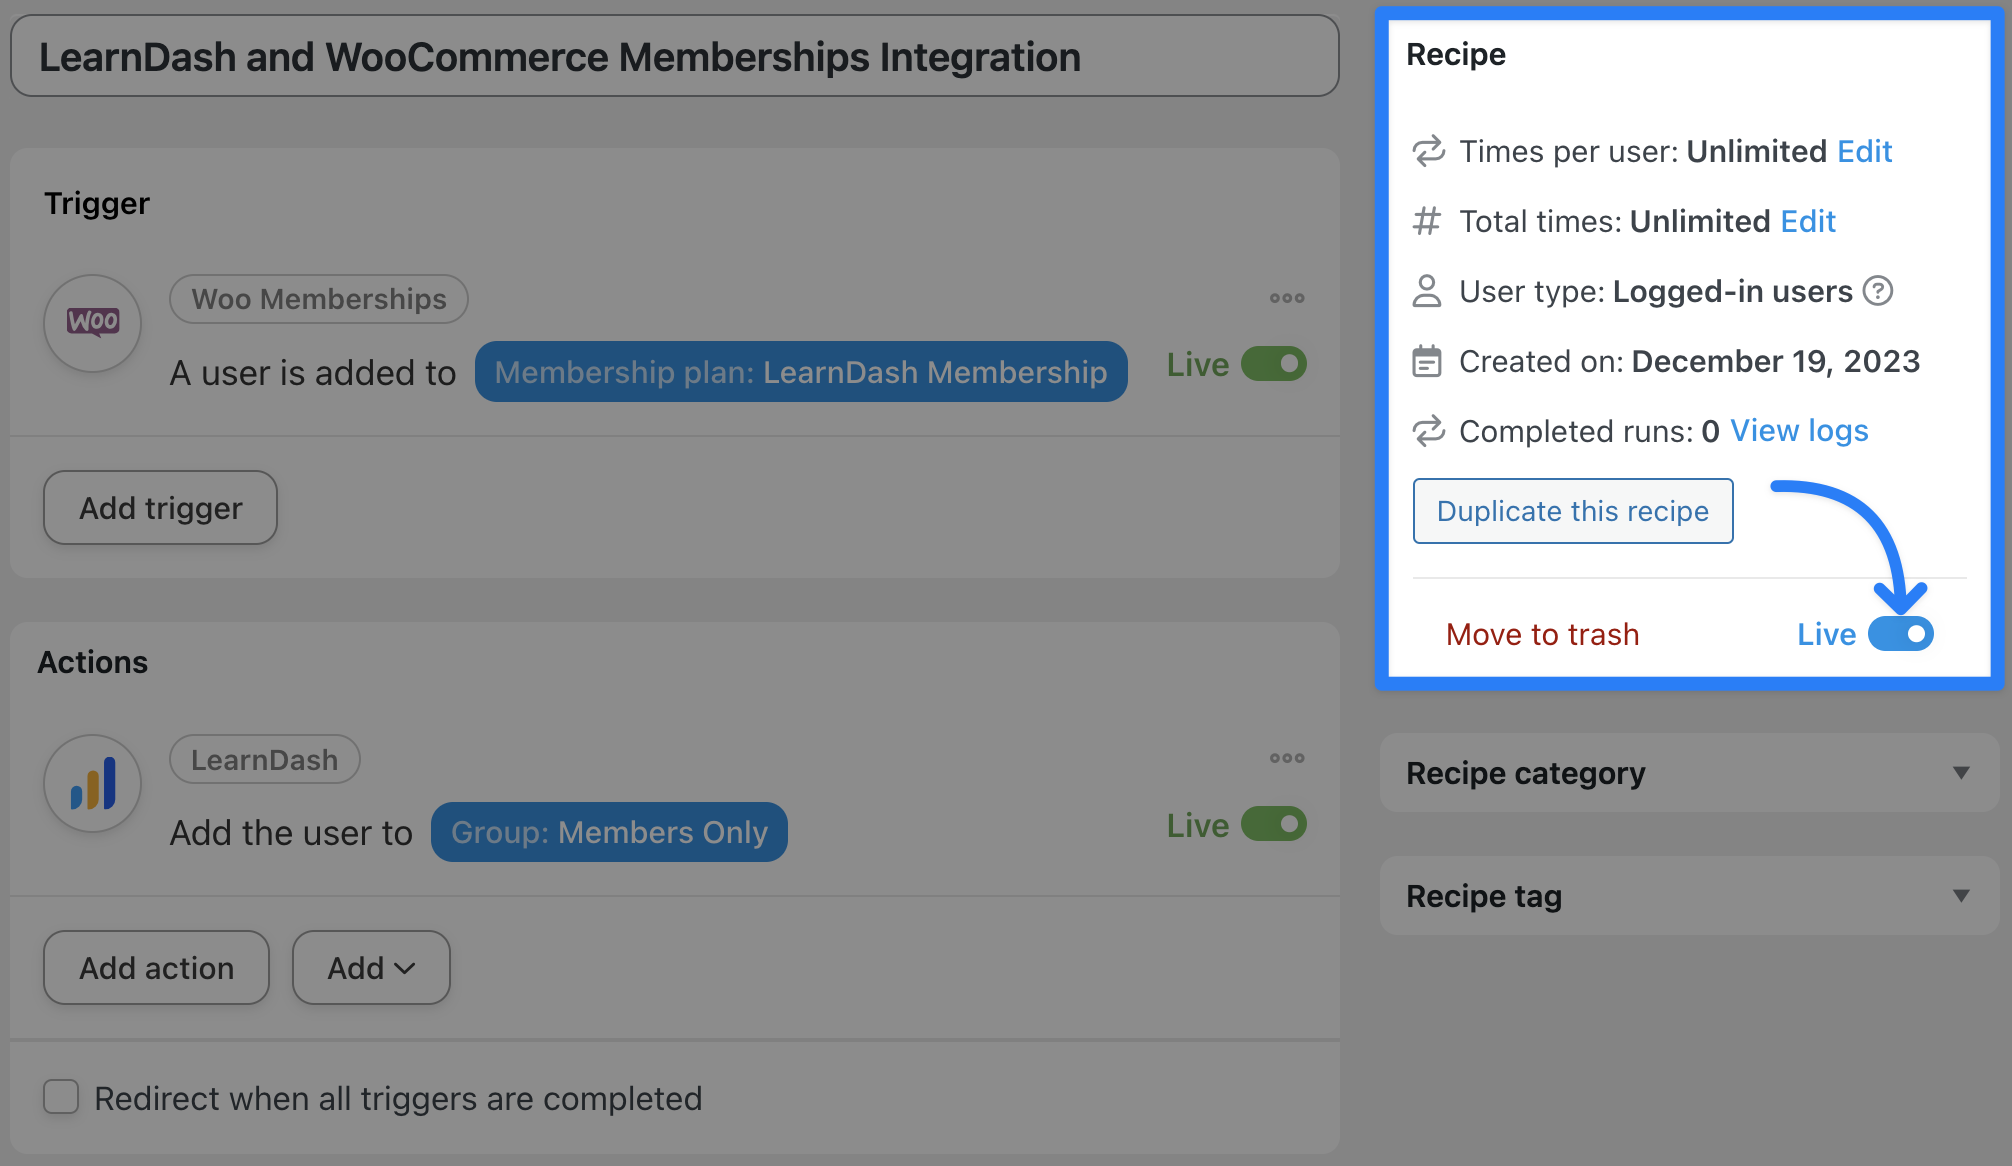
Step 5: Go Live!
You’re just about ready to roll out the LearnDash carpet for your WooCommerce members. All you have to do now is toggle your recipe from Draft to Live.
This simple integration takes care of adding members to our LearnDash group. But what about removing them if/when their membership expires?
Connect LearnDash to WooCommerce Memberships: Remove Users
It’s never easy to say goodbye to your members, but sometimes they do leave. The right automation, however, can make parting ways a much smoother experience for you and your users.
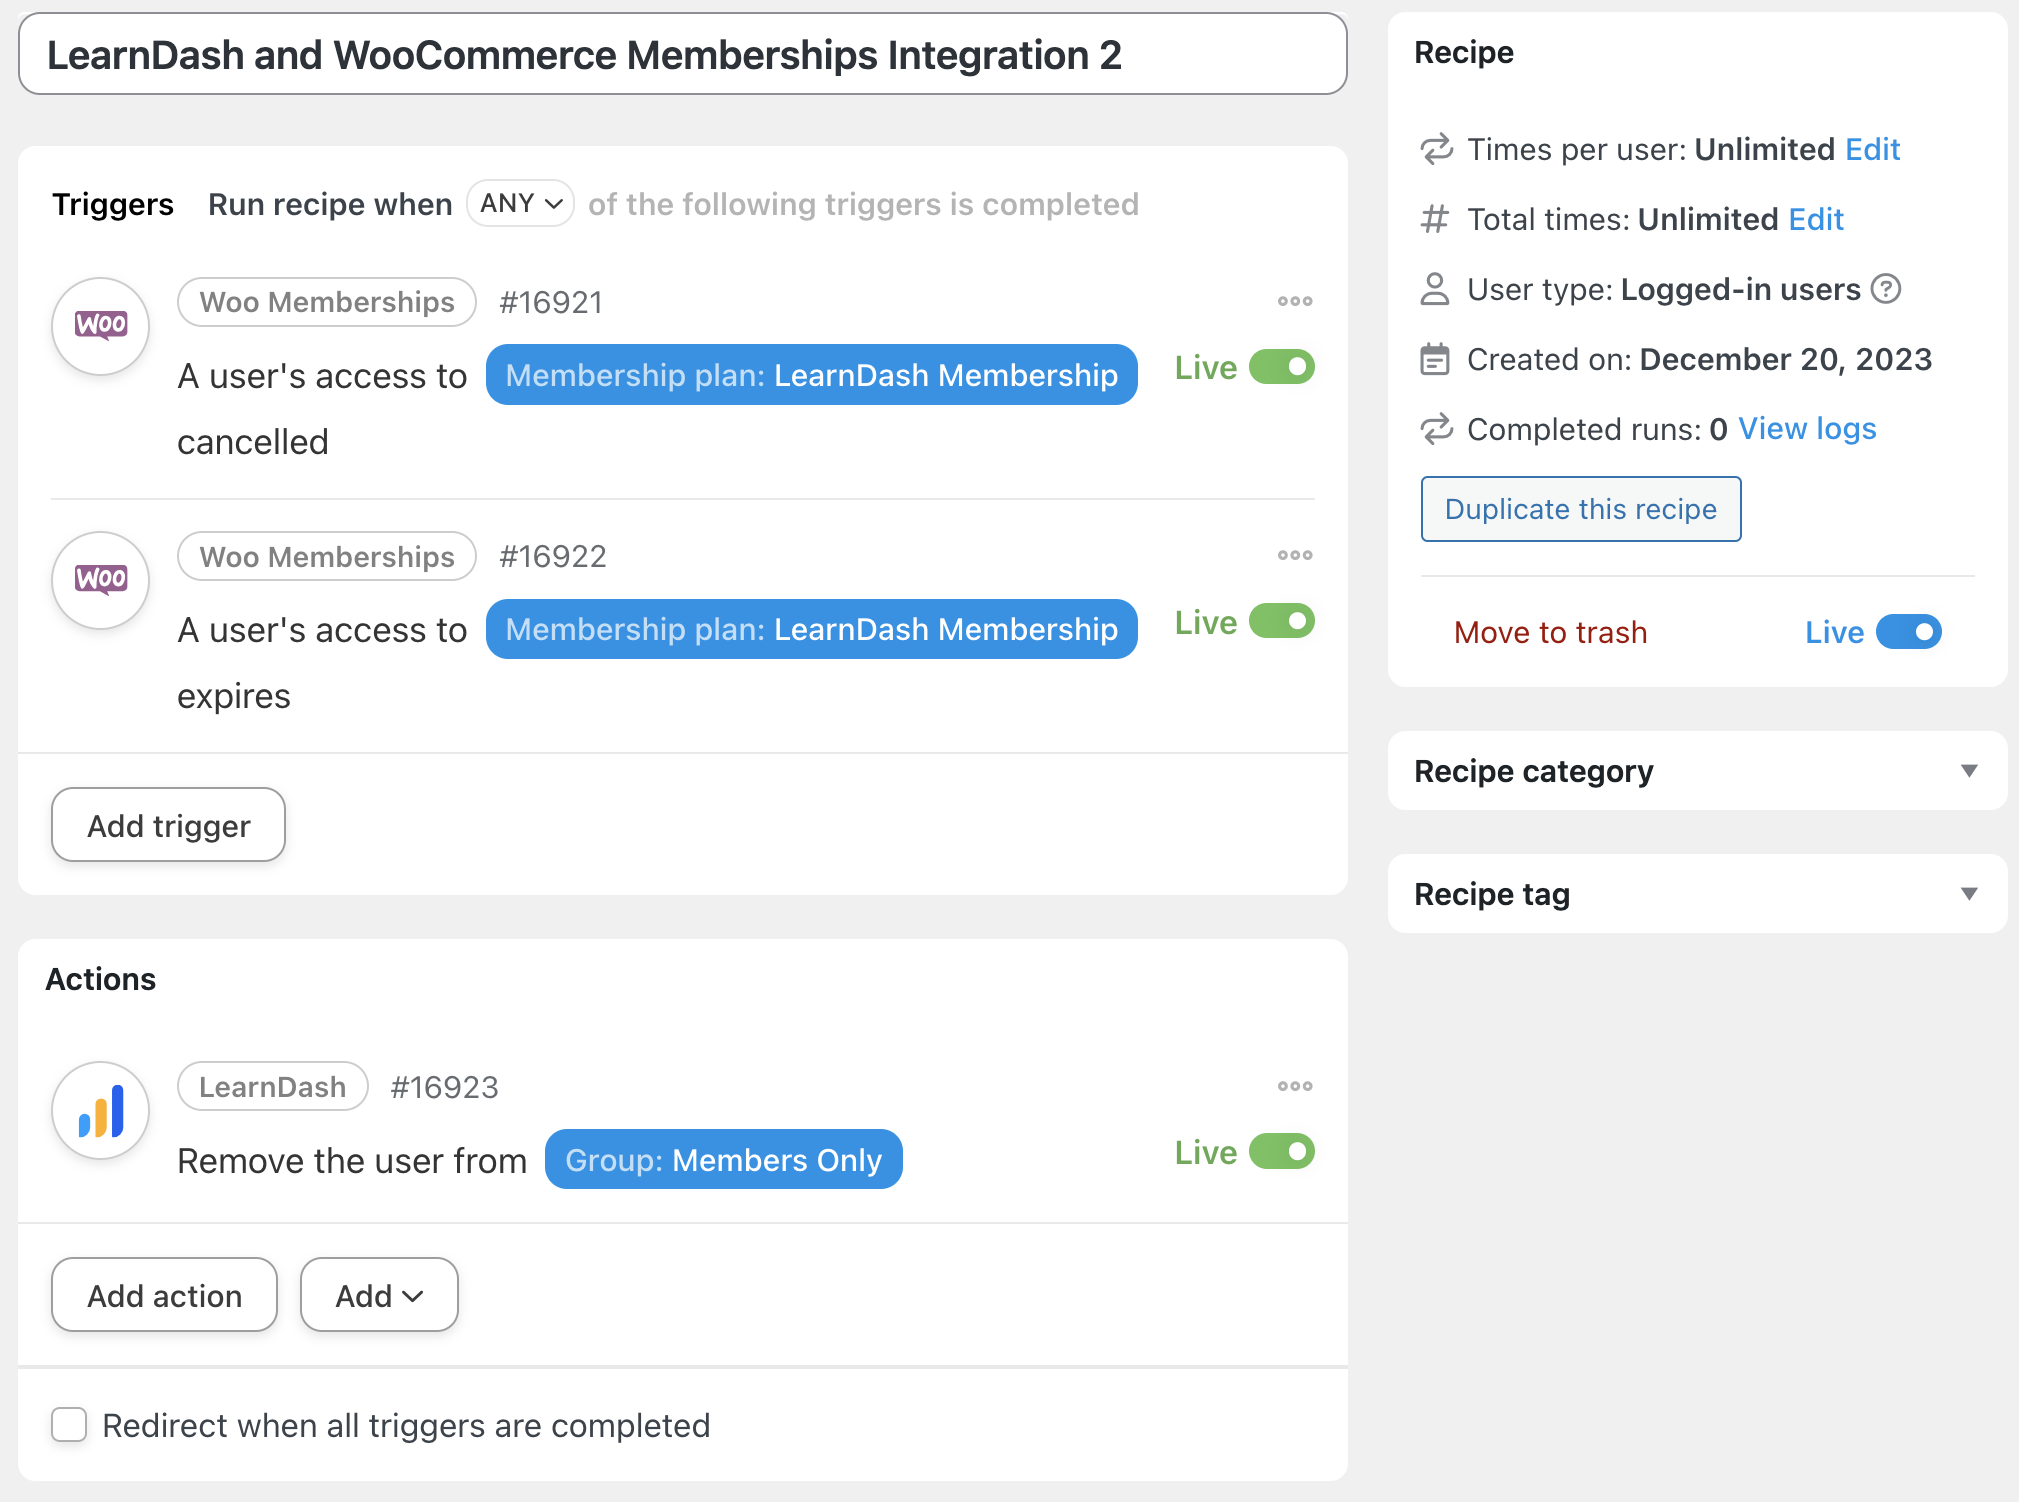
In the recipe pictured above, we’re able to remove users from our LearnDash group if their membership is canceled or expires. Follow the steps below to recreate this recipe. And try out the advanced features shown in the optional step to automate your winback strategy.
Because no one likes saying goodbye!
Step 1: Create a New Recipe
From your WordPress Admin Dashboard, navigate to Automator > Add New. In the pop-up window that appears, select Logged-in users.
Step 2: Name Your Recipe
We’ve simply named this recipe LearnDash and WooCommerce Memberships Integration 2.
Step 3: Configure Your Trigger(s)
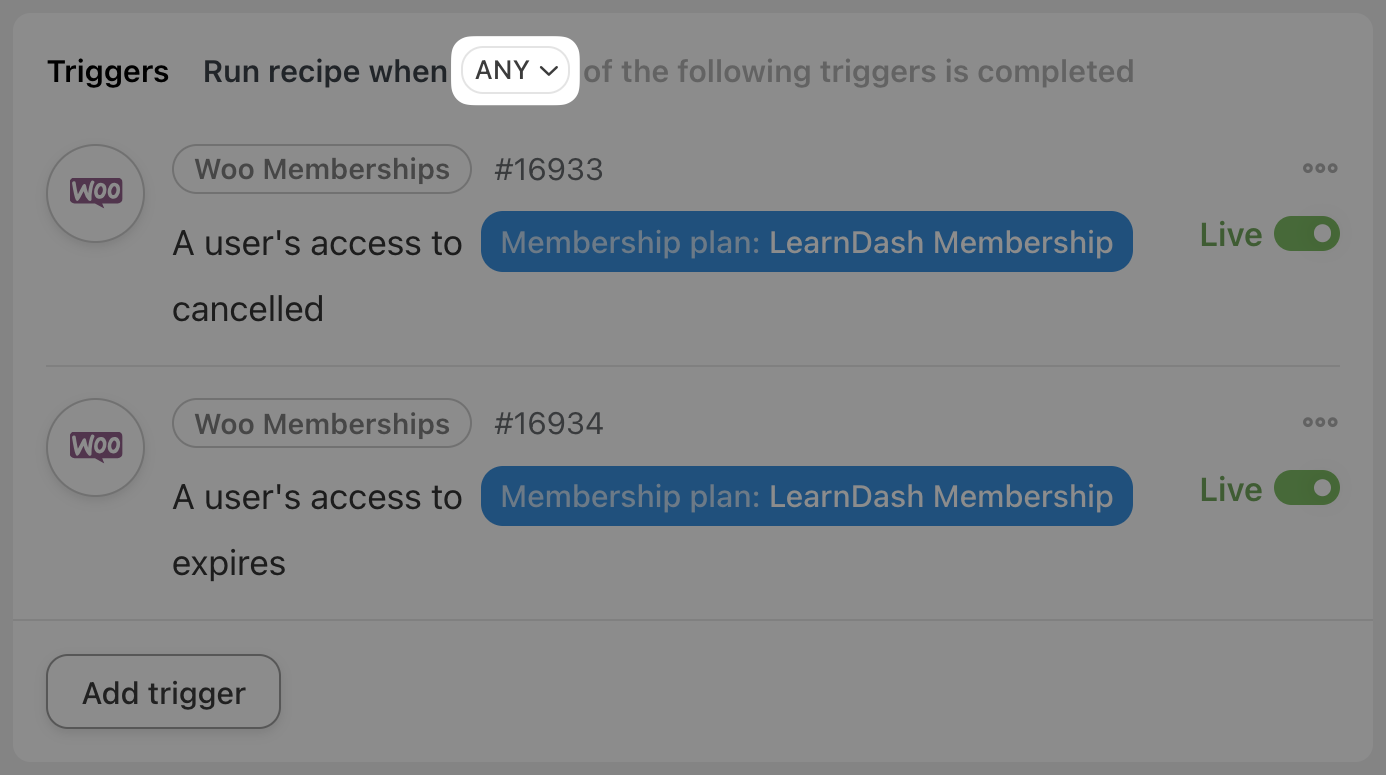
In the Triggers panel, from the menu of available integrations, select Woo Memberships. From the drop-down list that appears, select either A user’s access to a membership plan cancelled or A user’s access to a membership plan expires.

Automator will prompt you to select the membership plan in question. As before, we have selected our “LearnDash Membership” plan.
Once you’re finished click Save.
In the Triggers panel, click Add trigger. Once again, select Woo Memberships from the available integrations. From the drop-down list, select the action you had not selected in the first trigger, select the membership plan and click Save.
At the top of the Triggers panel, set the option to trigger the recipe to Any.
Step 4: Configure Your Action(s)
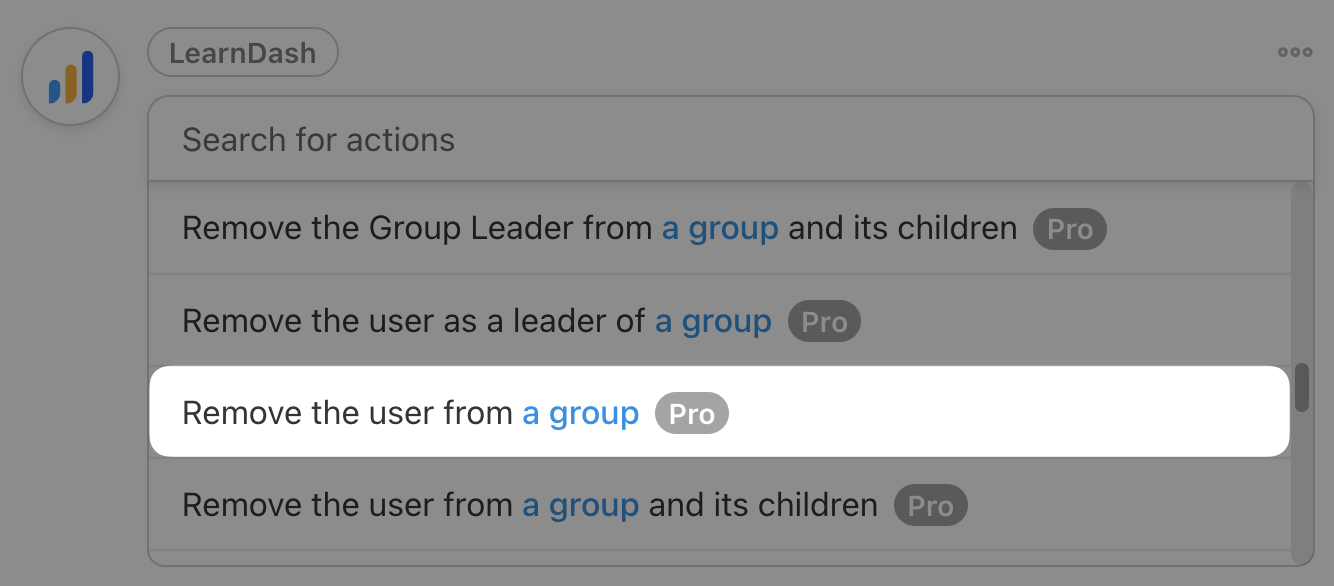
In the Actions panel, click Add action and select LearnDash from the menu of available integrations. From the drop-down list that appears, select Remove the user from a group.
Automator will prompt you to select the group from which you would like to remove the user. Once you’re finished, click Save.
Step 5: Go Live!
All you have to do to help ease the process of saying goodbye to your members, is toggle the recipe from Draft to Live.
But why let your members go without making one last attempt to make them stay?
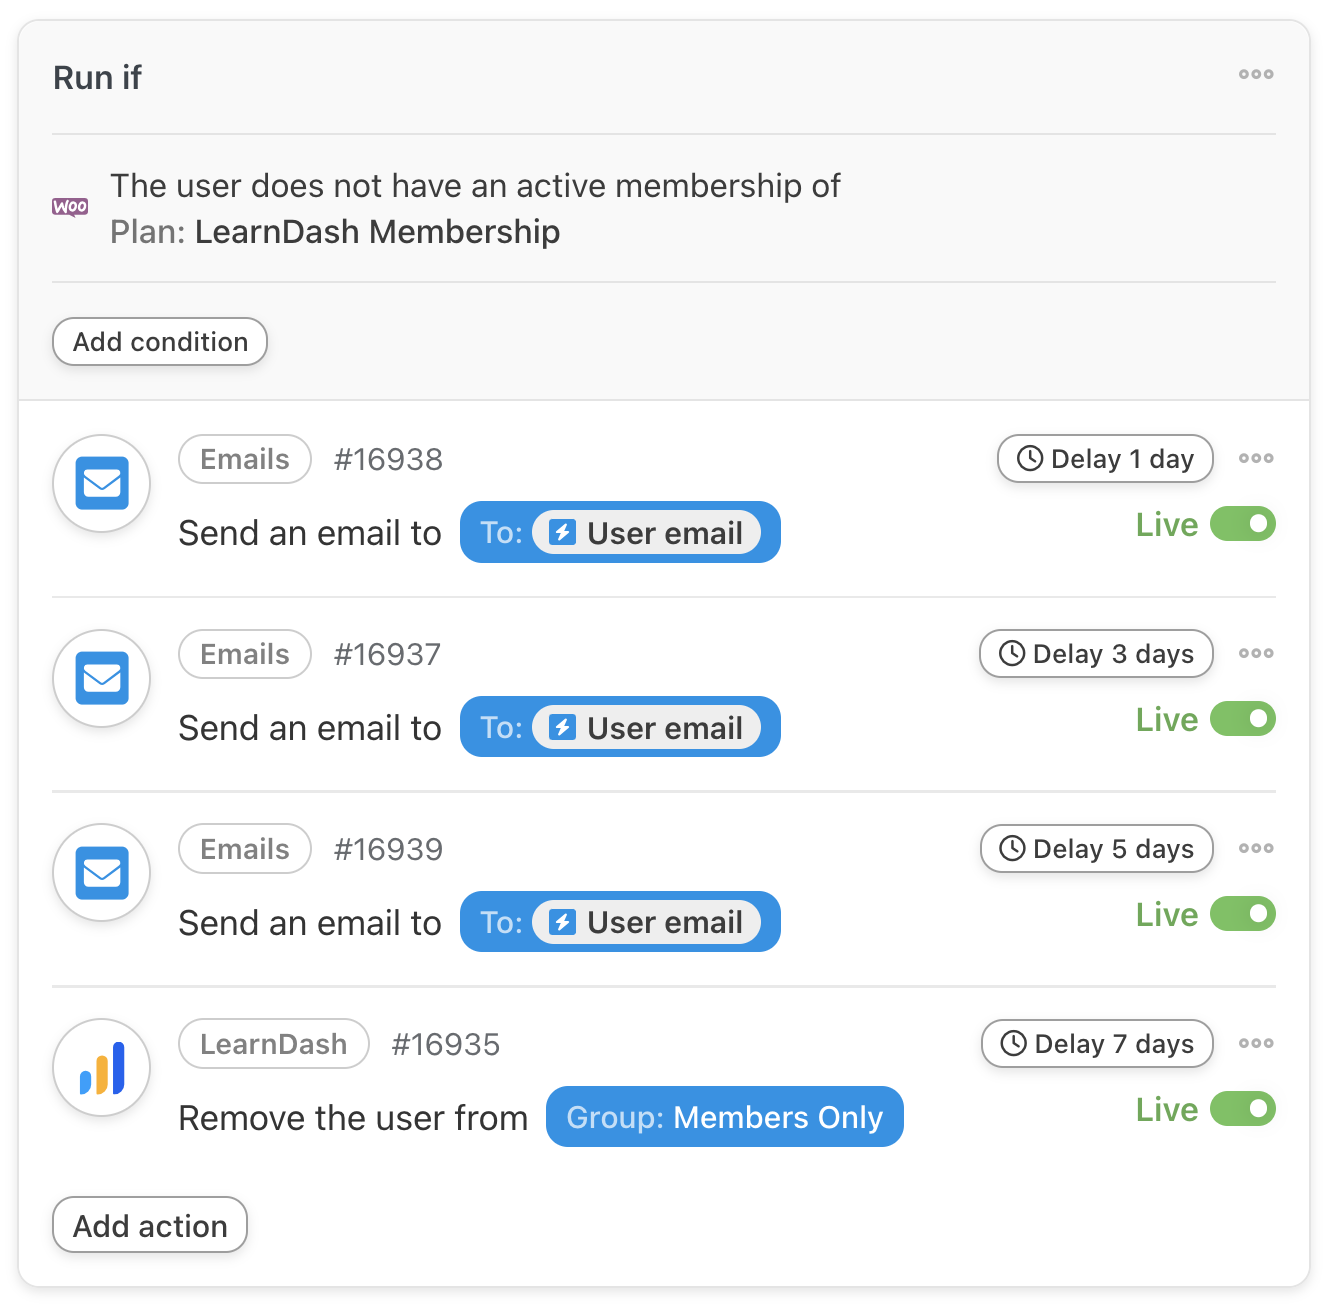
Step 6 (Optional): Add Filter and Delay
Sometimes, your members have every intention of staying. Life simply gets in the way and they may forget to renew their membership. With a filter and delay, you can give your members the friendly reminder they need instead of the boot they didn’t expect.
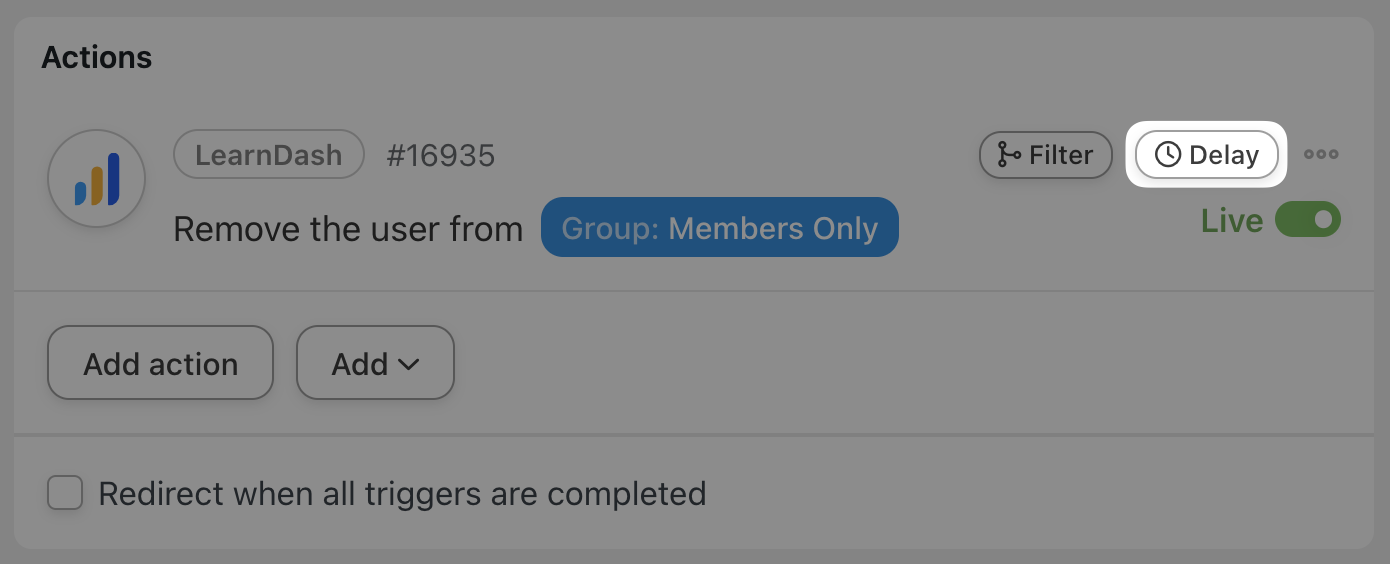
To add a delay, hover over the LearnDash action and click Delay.
In the pop-up window that appears, set a delay that you believe gives your members enough time to renew their membership. For example, we’ve set a delay of seven (7) days.
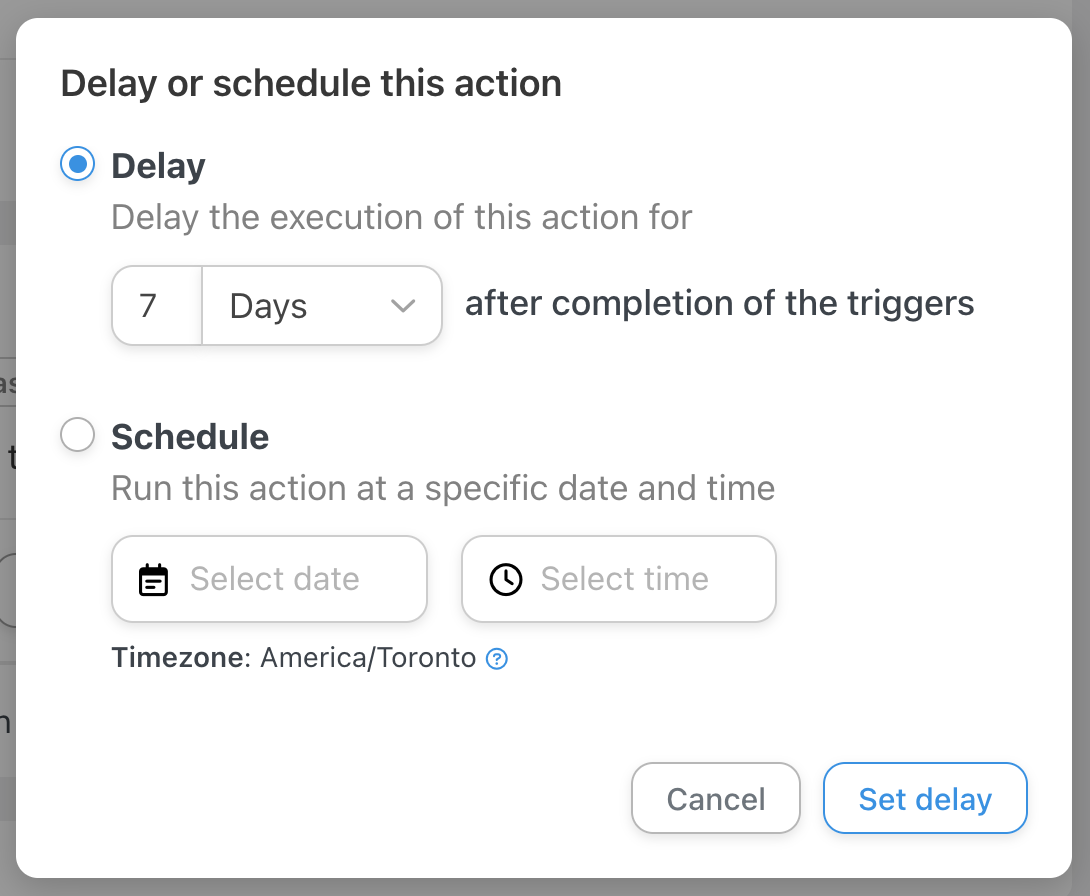
Once you’re done, click Set delay.
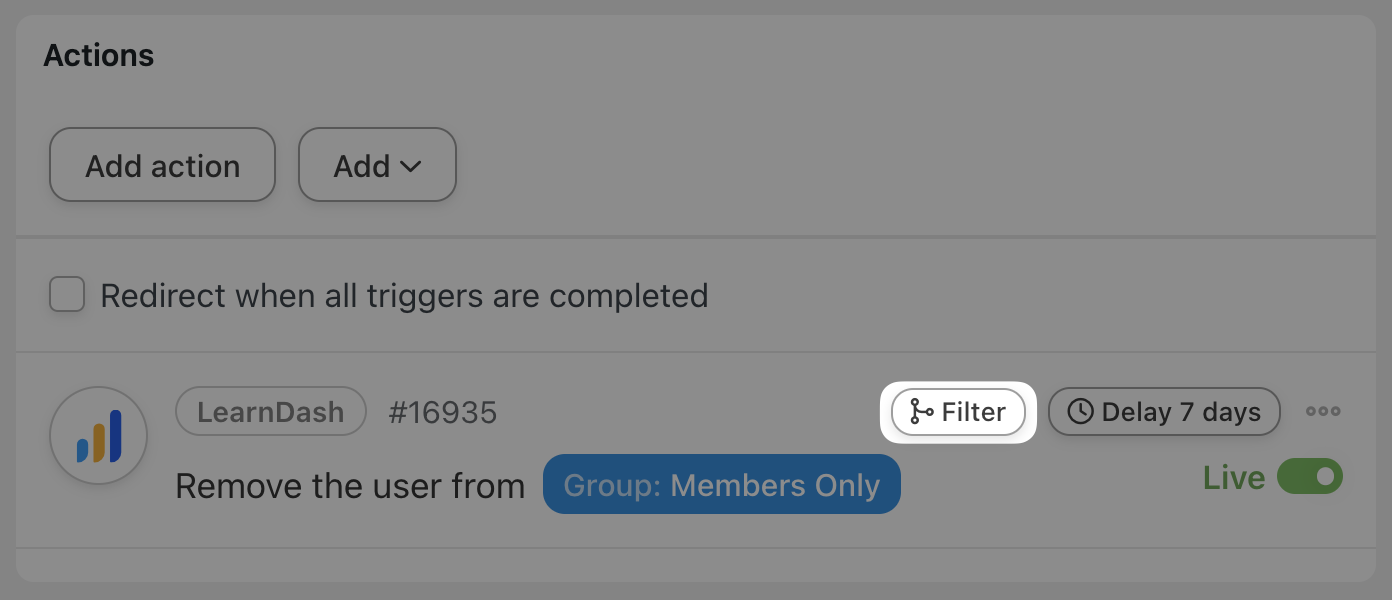
Next, hover over the LearnDash action once again and click Filter.
In the Condition window that appears, select Woo Memberships > The user does not have an active membership of a specific plan.
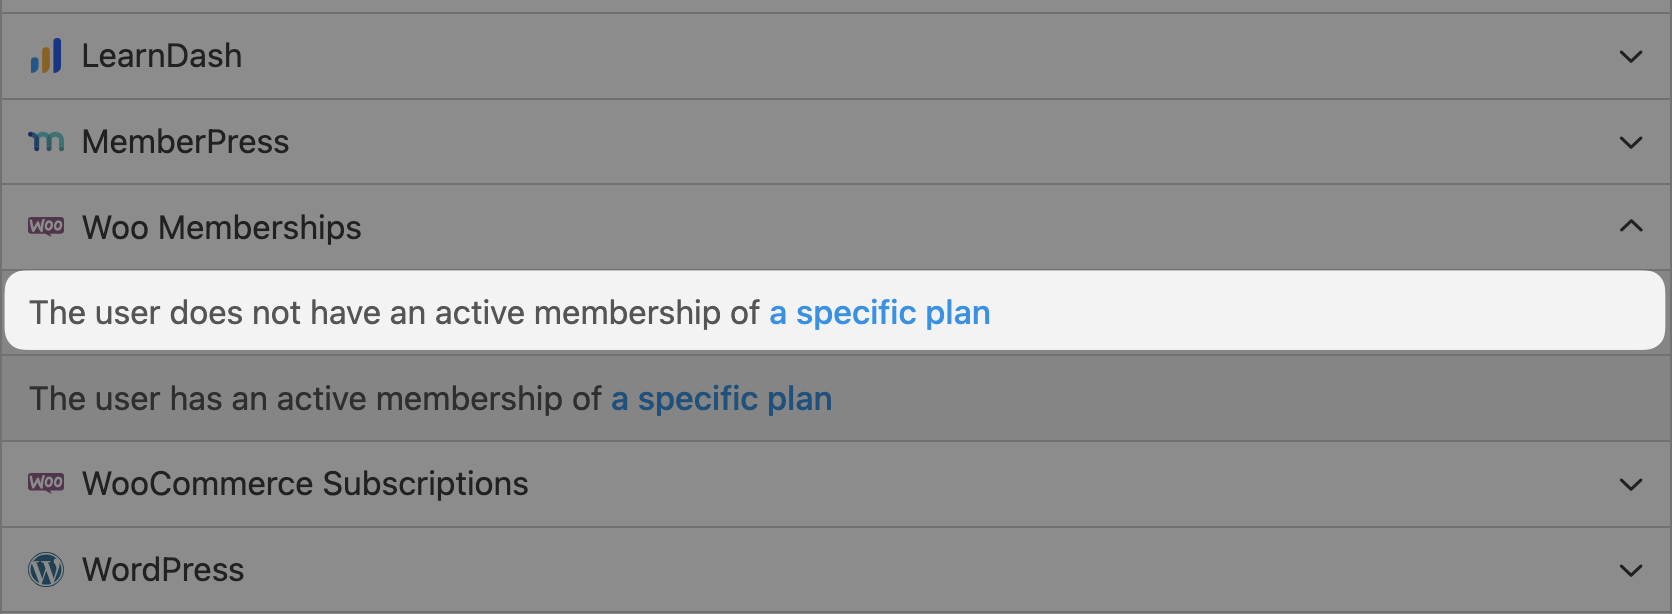
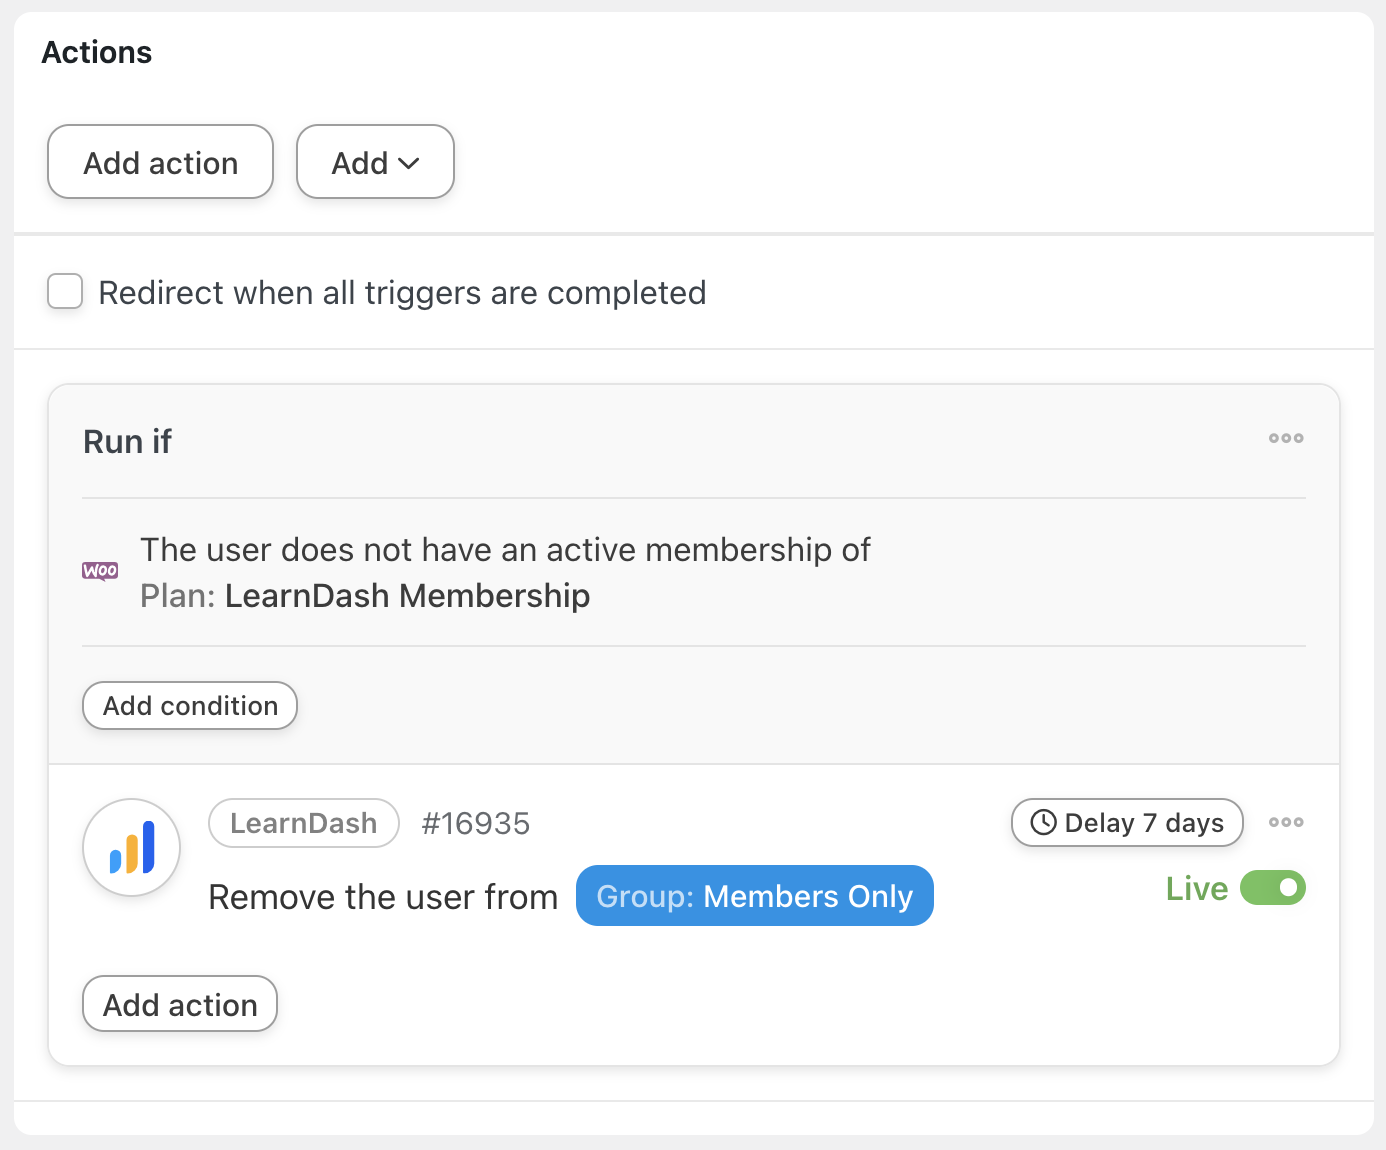
Automator will prompt you to select the membership plan. Once you’re finished, click Save filter. Your Actions panel should now look something like this:
Step 7 (Optional): Add Marketing Automation Action(s)
If your users have forgotten to renew their membership, they’ll likely need a gentle reminder—or two, or three.
Add a few Email actions within the window of time that you’ve given your users to renew their membership to give them the gentle nudge they need.
Alternatively, connect to your favorite CRM, such as ActiveCampaign, MailPoet, Groundhogg, Drip, and many, many more.
More Ways to Connect LearnDash to WooCommerce Memberships
These basic LearnDash and WooCommerce Memberships integrations only took us a few clicks to set up and even fewer minutes. However, you can do a whole lot more by taking advantage of Automator’s other features and integrations.
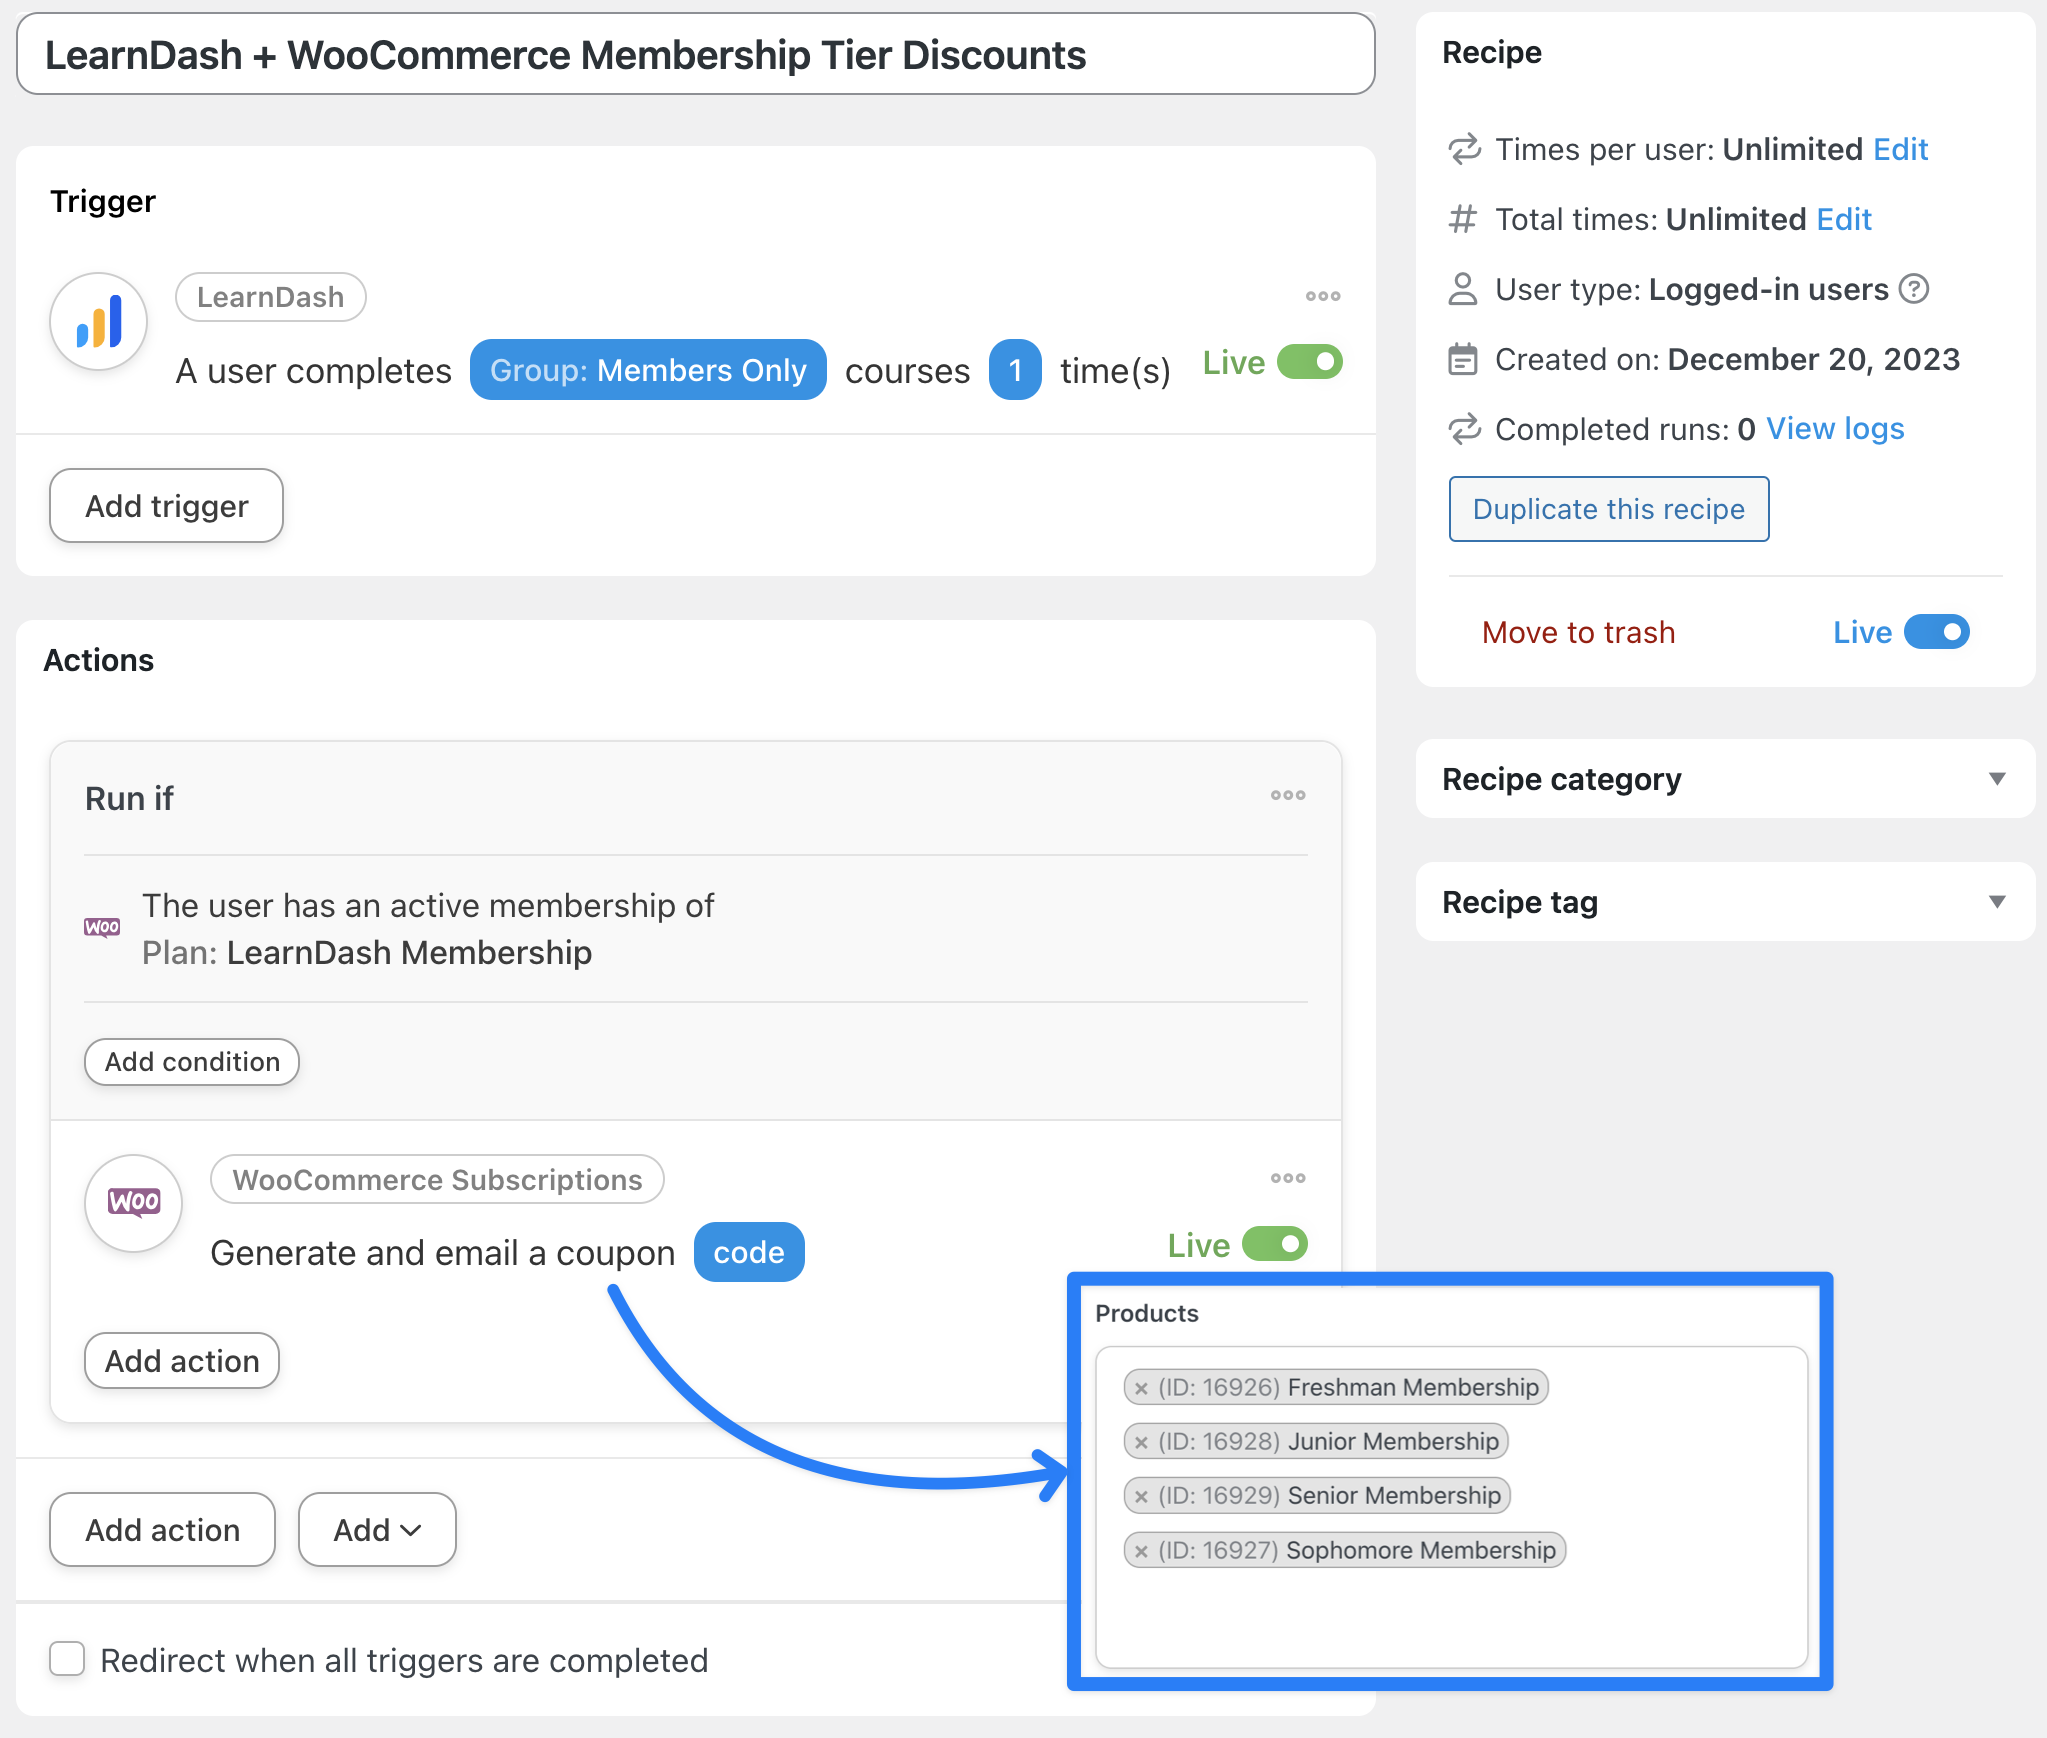
In the recipe pictured above, for example, we’re able to generate and email unique coupon codes to our members who have completed the courses associated with our LearnDash group. They can then use those coupon codes to get a discount on higher tier membership levels.
Conclusion
In this how-to guide, we hope you agree that we’ve shown the easiest way to connect LearnDash and WooCommerce Memberships is with Uncanny Automator. In fact, Automator has as many combinations of triggers and actions for these plugins as the LSATs have questions!
We can’t wait to see what amazing integrations you come up with on your own. But, if you have any questions or would like some help in setting up a unique integration, drop us a line in the comments section below.
Until then, happy automating!

Related Posts


This Post Has 0 Comments