Revive old WordPress posts with AI and Uncanny Automator. Learn how to reverse content decay…
How to Connect WooCommerce to Google Sheets in 5 Easy Steps
Uncanny Automator is the easiest and most cost-effective way to connect WooCommerce to Google Sheets. Jump in, and we’ll show you how it’s done!

Are you looking for a way to connect WooCommerce to Google Sheets? Of course you are! That’s how you’ve landed on this page. And lucky you did.
In this step-by-step guide, we’ll show you how to create your very own WooCommerce and Google Sheets integration using Uncanny Automator. It’s the simplest and most cost-effective way to connect WooCommerce to other WordPress plugins and external web apps.
But that’s enough talking. Let’s get right into it!
Introduction
In this detailed walkthrough, we’ll take you through the steps of integrating WooCommerce and Google Sheets. We’ll show you the basics of using Uncanny Automator to connect your favorite apps and plugins and give you some tips for creating advanced recipes.
By the end of this guide, you’ll be able to:
- send WooCommerce order and product details to Google Sheets,
- send WooCommerce customer data to Google Sheets,
- retroactively send WooCommerce data to Google Sheets, and
- have tons of fun in the process!
First, let’s take a look at some of the advantages of connecting WooCommerce to Google Sheets.
Why Connect WooCommerce to Google Sheets
Connecting your WooCommerce store to Google Sheets offers several advantages. Here are just five reasons why this is one integration that you should make part of your regular operations.
1. Real-Time Updates
Integrating WooCommerce with Google Sheets allows you to get updates about your ecommerce business in real-time. Whether you want to keep track of inventory, closely monitor special sales or simply stay on top of the day’s business, this integration can keep you in the loop.
2. Order Tracking and Fulfillment
Connecting WooCommerce to Google Sheets enables you to track and manage your orders more efficiently. Information about new orders, order status, and customer details can be automatically updated in a Google Sheets worksheet, streamlining your fulfillment process and providing a centralized view of order data.
3. Data Analysis and Reporting
Google Sheets is a robust tool for data analysis and reporting. By linking WooCommerce to Google Sheets, you can export sales data, customer information, and other relevant metrics. This integration allows for the creation of customized reports, charts, and graphs, facilitating better insights into sales performance, customer behavior, and other key business metrics.
4. Automating and Streamlining Operations
Integration between WooCommerce and Google Sheets (especially with Uncanny Automator) reduces the risk for error with automation. For instance, you can automatically update product information, prices, and customer details in the Google Sheets, reducing manual data entry and minimizing the risk of errors. This streamlining of processes can save time and resources for your business.
5. Security and Protection
With a WooCommerce and Google Sheets integration, you can create backups of your ecommerce data in the event that your website experiences any unexpected outages. Furthermore, you can reduce the number of people with administrative access to your WordPress website while simultaneously providing them with the information they need to be effective in their roles.
We’re pretty sure that you’re sold on the idea of creating a connection between WooCommerce and Google Sheets. Now, you just need to know how. Enter: Uncanny Automator.
Introduction to Uncanny Automator
Uncanny Automator is the #1 automation and integration tool for WordPress websites. Using simple, click-and-play combinations of triggers and actions called recipes, you can connect all of your favorite apps and plugins. Such as WooCommerce and Google Sheets!

Most importantly, unlike other integration tools out there, Automator does not charge per automation! That means that you can track as many WooCommerce orders in Google Sheets as you want without incurring any additional costs.
Go ahead and grab your Automator Pro license so you can follow along.>>>
Alternatively, you can download the free version of Automator and register your account to receive a limited number of app credits.
(Note: Google Sheets and other external apps such as LinkedIn, ClickUp, OpenAI and Slack require app credits unless you have an Automator Pro – Basic or higher license.)
Connect WooCommerce to Google Sheets in 5 Steps
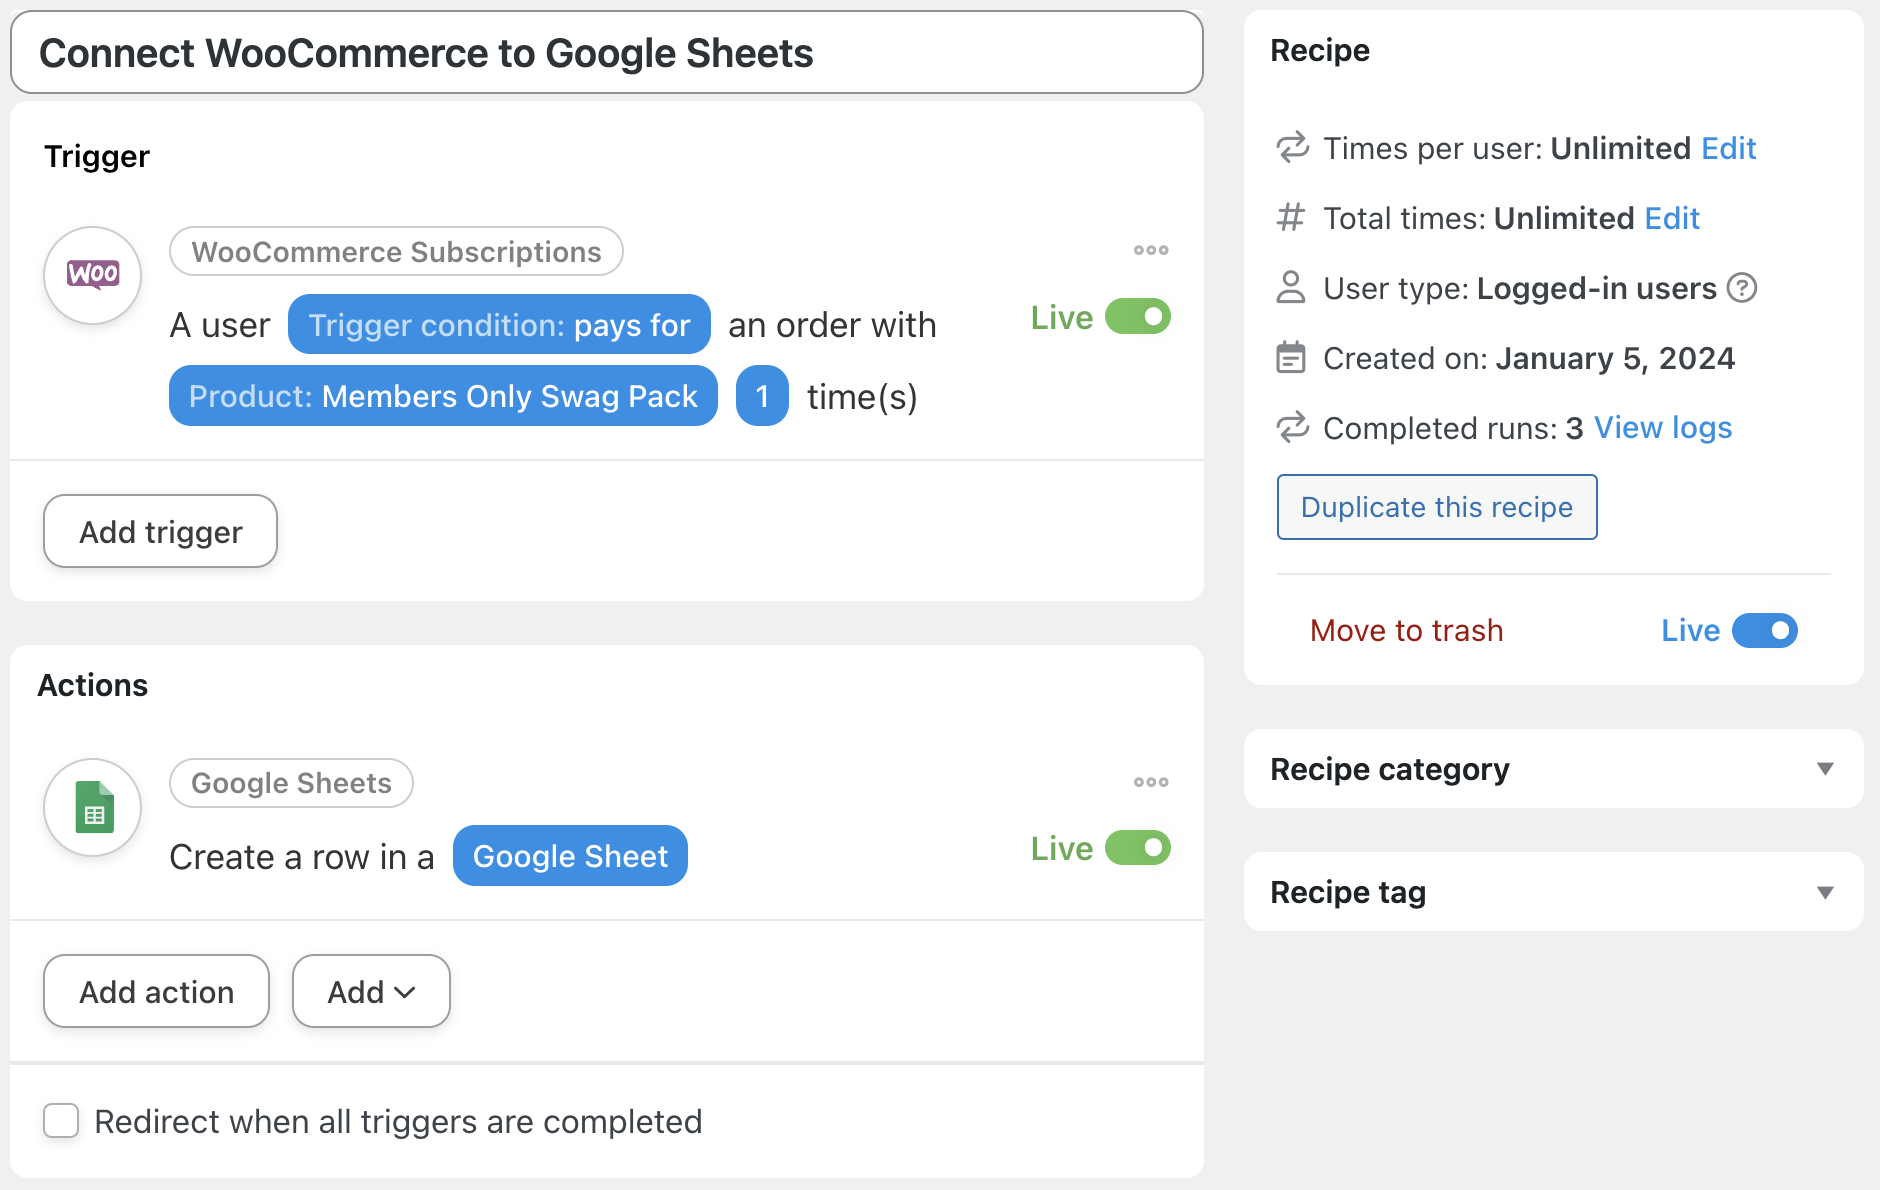
Now that you have Uncanny Automator, we can complete our WooCommerce and Google Sheets integration. Over the next five steps, we’ll walk you through a simple example of sending WooCommerce order data to Google Sheets in an order with a single product as pictured in the recipe below.
After that, we’ll show you how easy it is to handle more complex orders and integrations with the Automator tools that you’re about to learn how to use.
Step 1: Create a New Recipe
From your WordPress Admin Dashboard, navigate to Automator > Add new recipe. In the pop-up window that appears, select Logged-in users.

(Note: we’ve chosen to run this recipe on Logged-in users only because we have configured our WooCommerce settings to require login at checkout. If you have configured your WooCommerce settings differently, simply select Everyone; it will not make a difference in creating this recipe.)
Step 2: Name Your Recipe
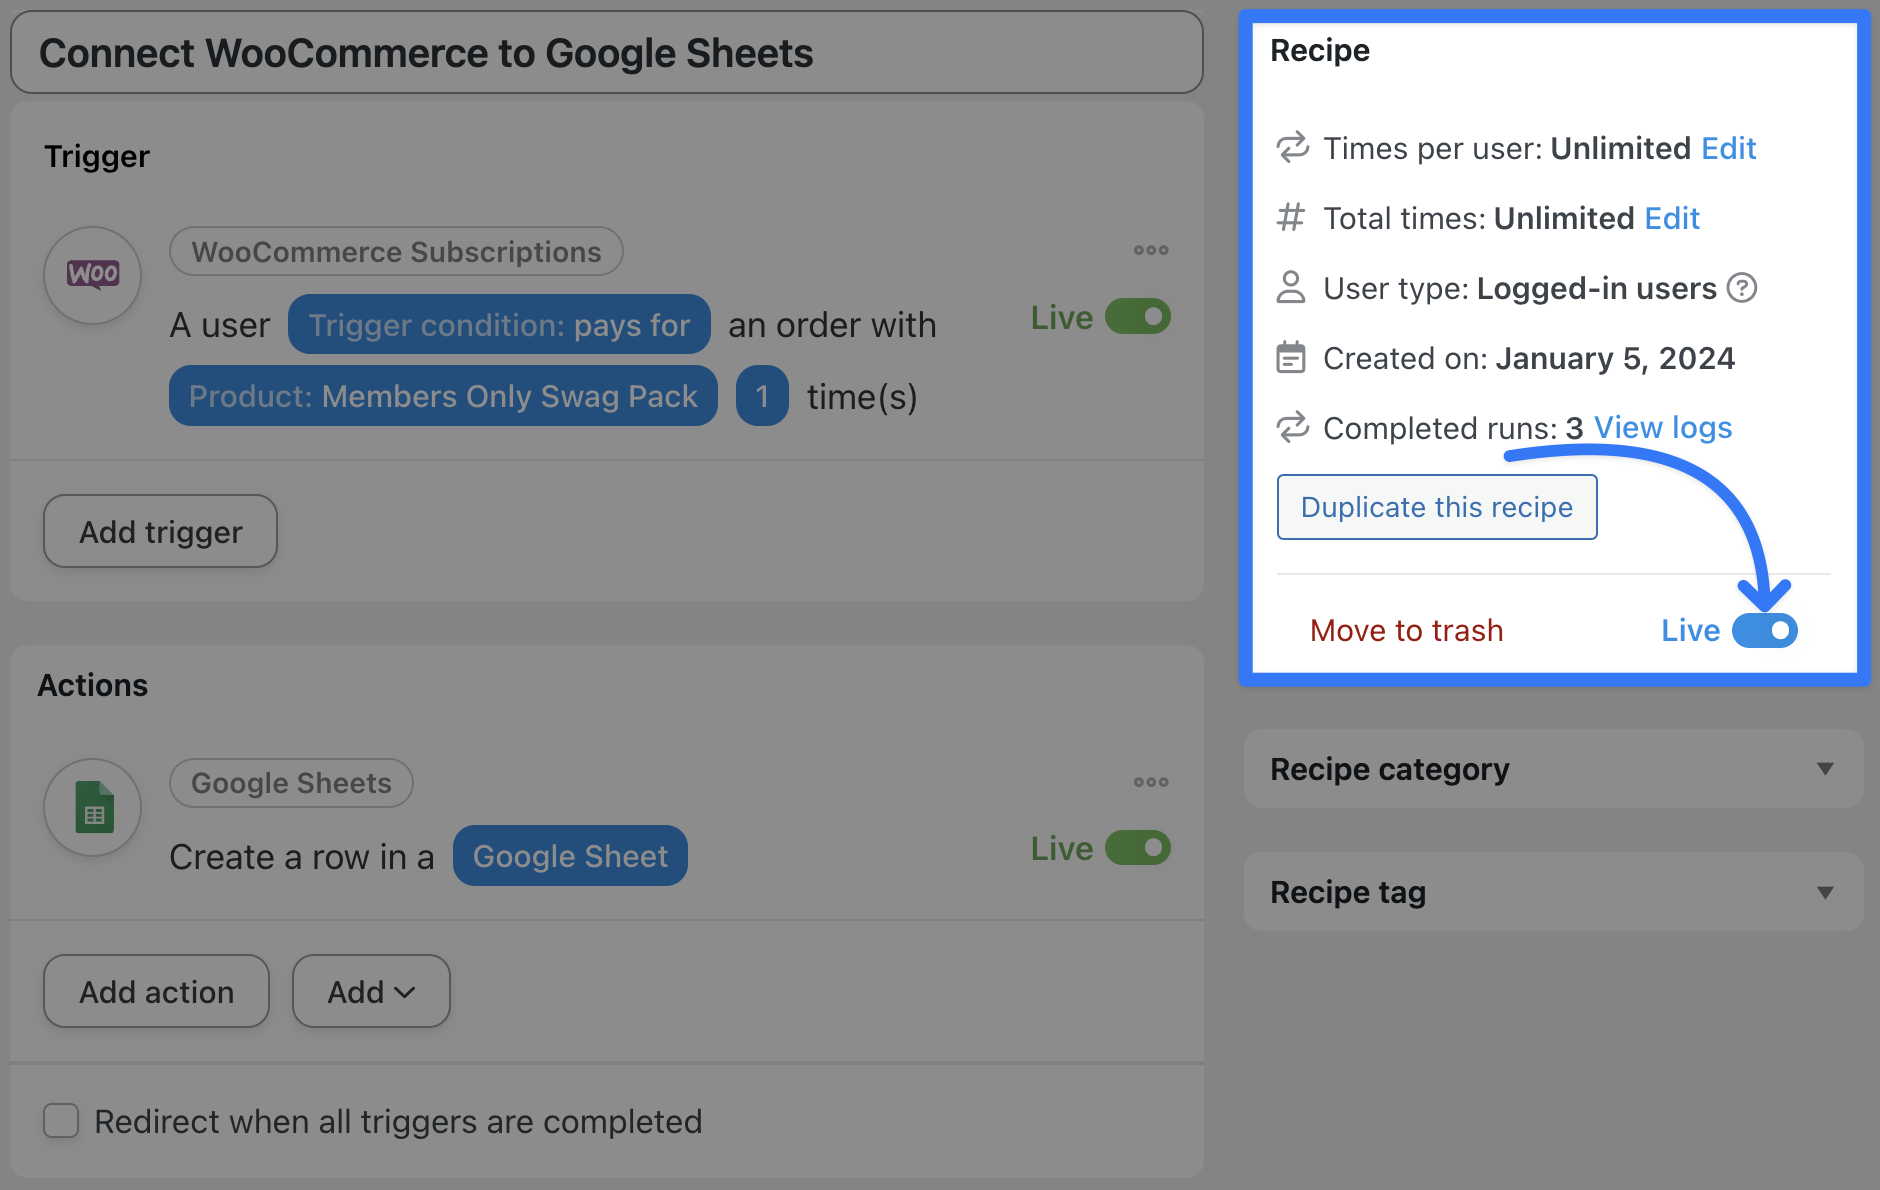
Give your recipe a name that makes it easy to recognize at a glance. For example, we’ve named this recipe “Connect WooCommerce to Google Sheets”. (It’s not very catchy but it gets to the point.)
Step 3: Configure Your Trigger(s)
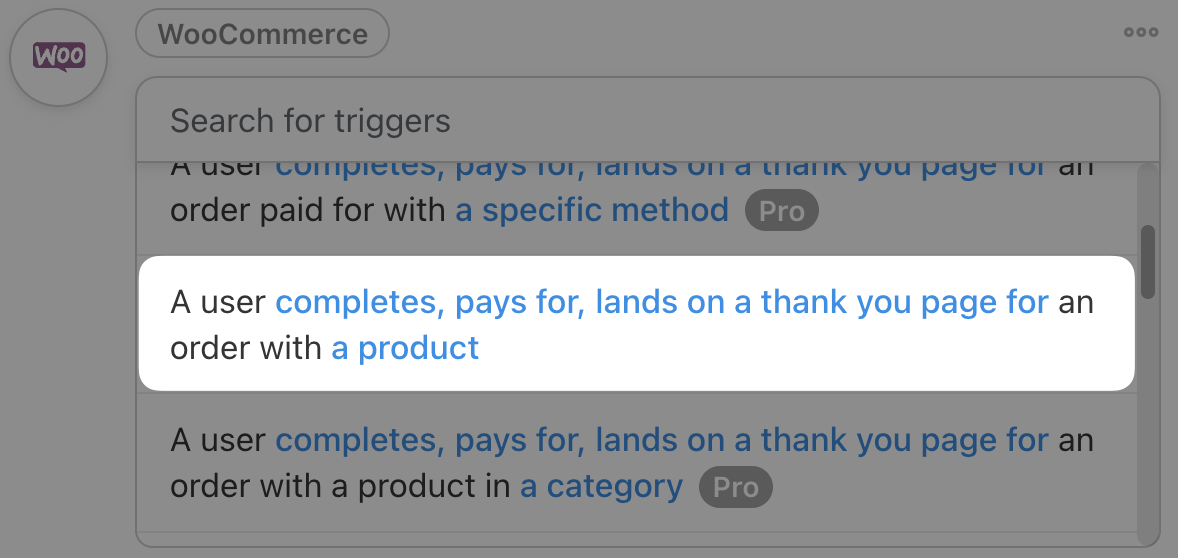
In the Trigger panel, from the menu of available integrations, select WooCommerce.

From the drop-down list that appears, select A user completes, pays for, lands on a thank you page for an order with a product.
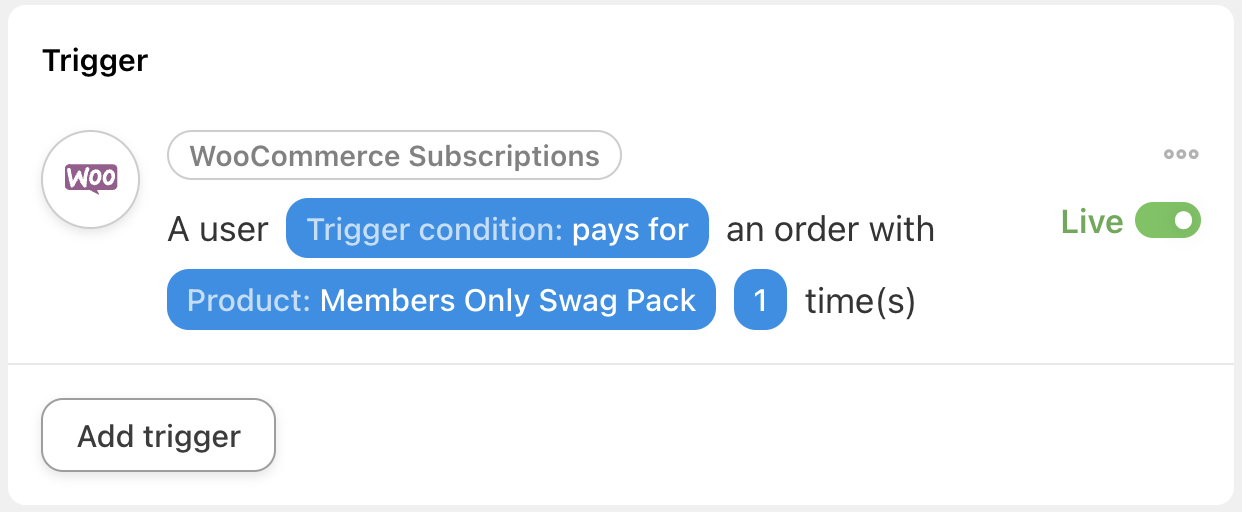
Automator will prompt you to select the Trigger condition and Product. For example, we have selected “pays for” and the product that we want to have tracked in Google Sheets, our “Members Only Swag Pack”.
Once you’re finished, click Save. Your Trigger panel should look something like this:
Step 4: Configure Your Action(s)
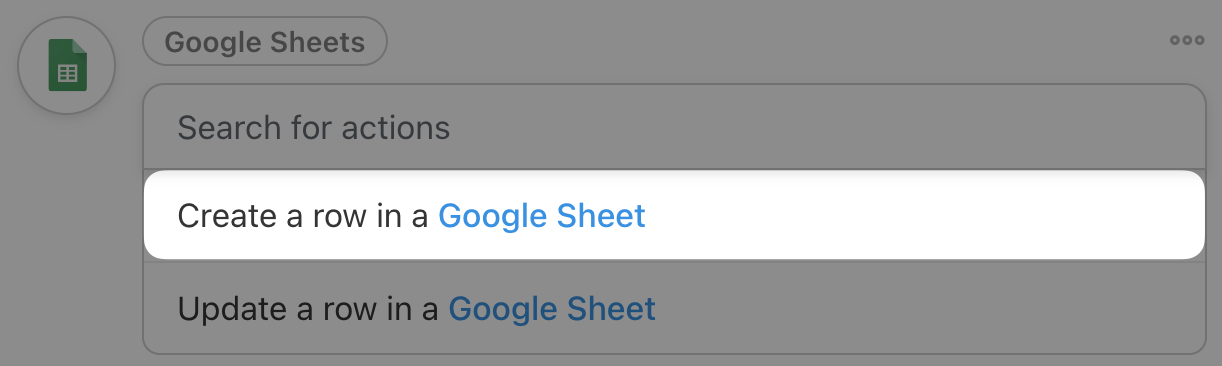
In the Actions panel, click Add action then select Google Sheets from the menu of available integrations.

To connect your Google account, click Connect account in the pop-up window that appears.
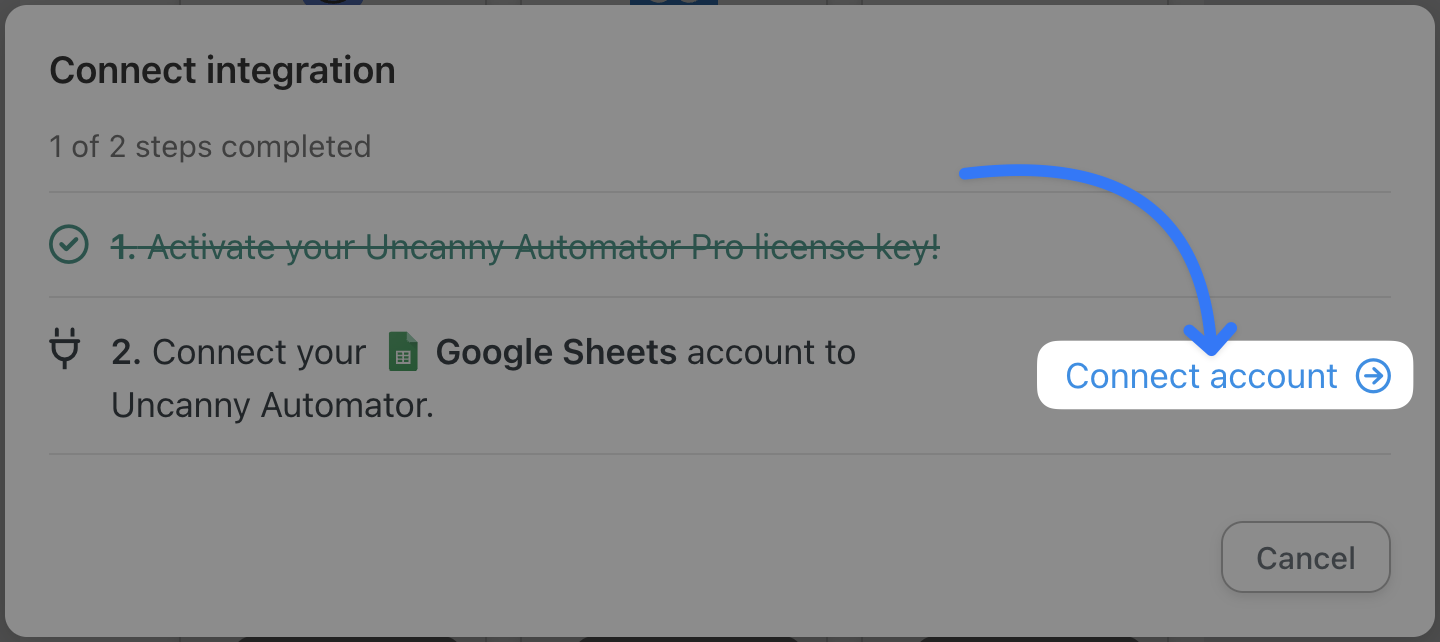
Follow the prompts as they appear to complete the connection.
Once you’ve connected your Google account, select Create a row in a Google Sheet from the drop-down list that appears.
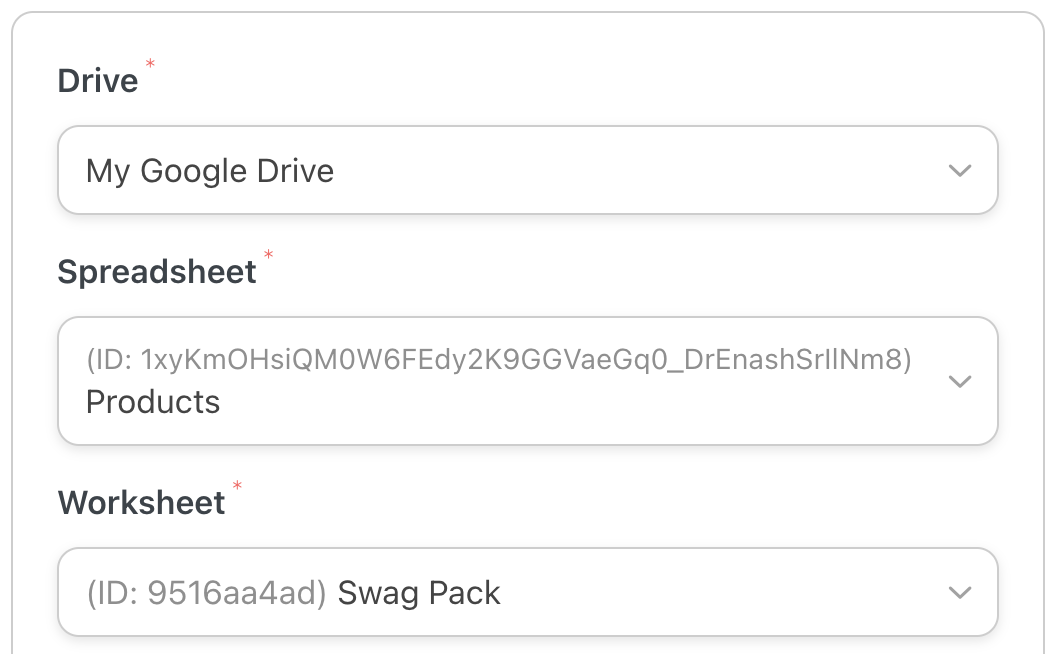
In the form that opens up, Automator will prompt you to select the Drive, Spreadsheet, and specific Worksheet where you want to store your WooCommerce sales data. For example, we have a worksheet for each product in our WooCommerce store where we want to store that product’s specific data.
Next, at the bottom of the form, click Get columns. Automator will retrieve the first value in each column on the specified worksheet and return it in the Column field.

Next, we’re going to populate the Value fields using tokens (i.e. dynamic data pulled from your WordPress website and from within recipes).
To select a token, click on the Asterisk in the field and select the desired token. For example, we have selected the Current Unix timestamp token to populate the “Order Date and Time” Value field.
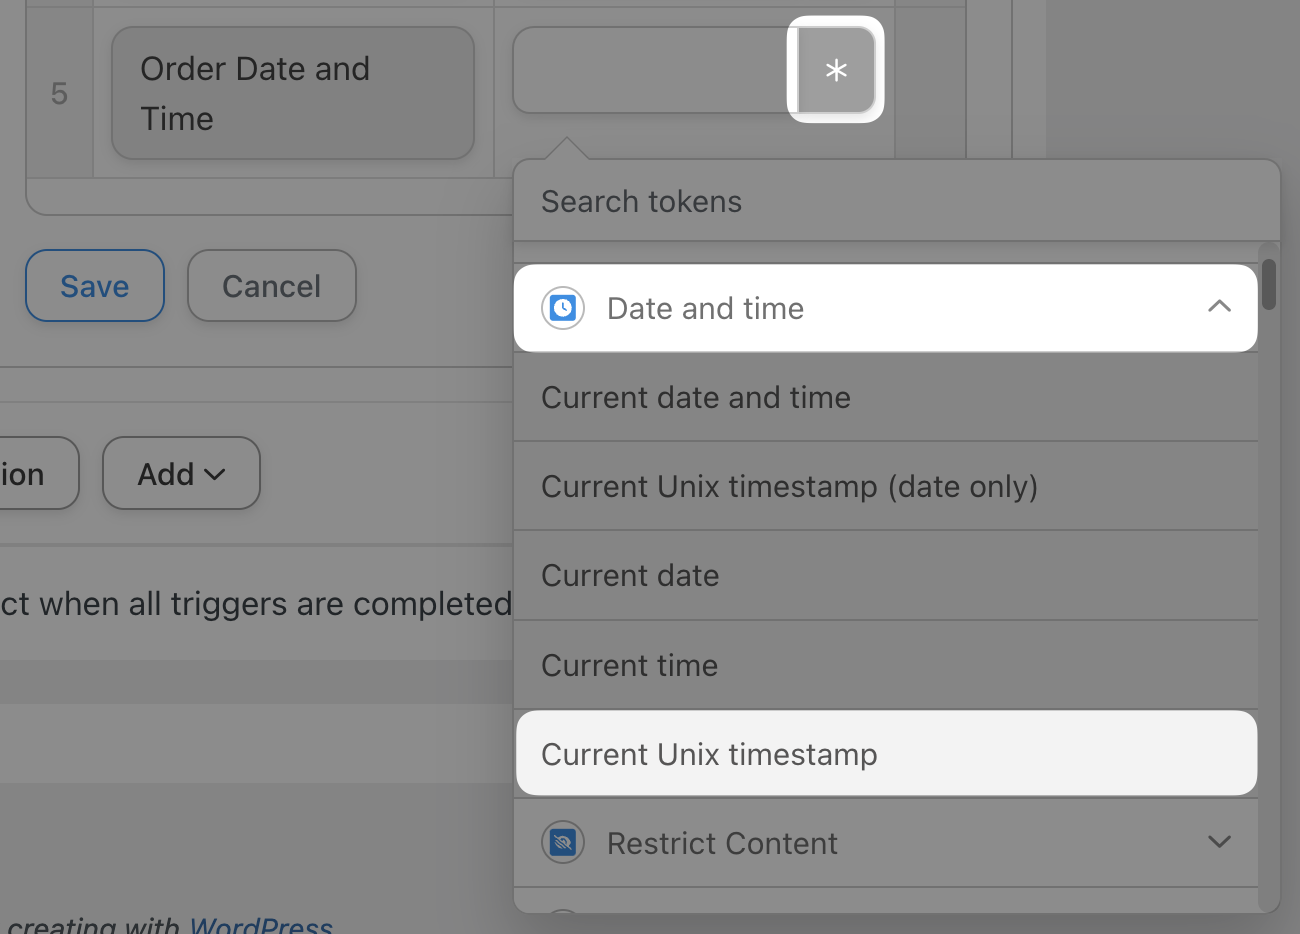
(Note: Automator provides a WooCommerce token for Order date and time. However, for our own workflows, we prefer using Unix timestamps. If you’re unfamiliar with the benefits of Unix timestamps, check out our nifty guide on incorporating them into your workflows.)
Fill out the remaining Value fields using the tokens that correspond to the Column headings. You can even use multiple tokens per field as we have in our “Customer Name” and “Email” Value fields.
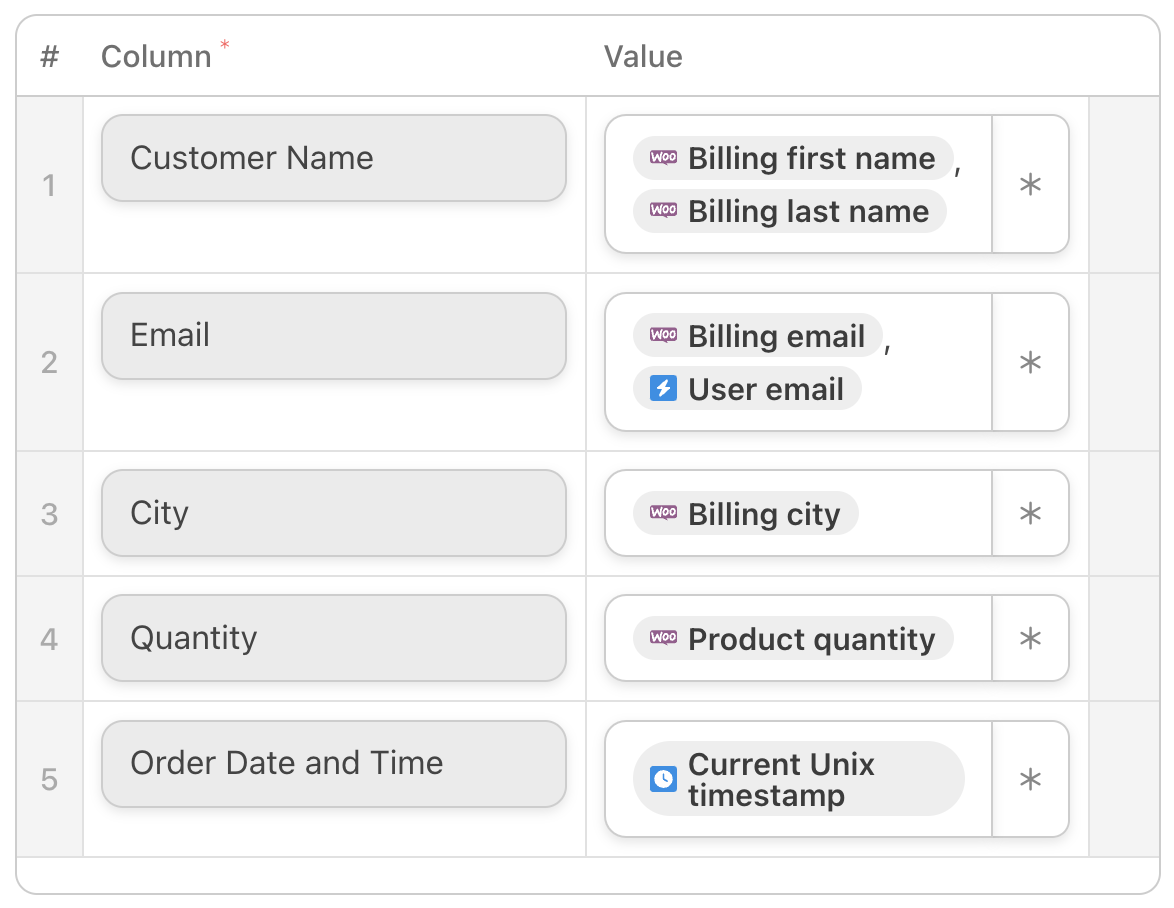
When you’re finished, click Save. Your Actions panel should now look like this:
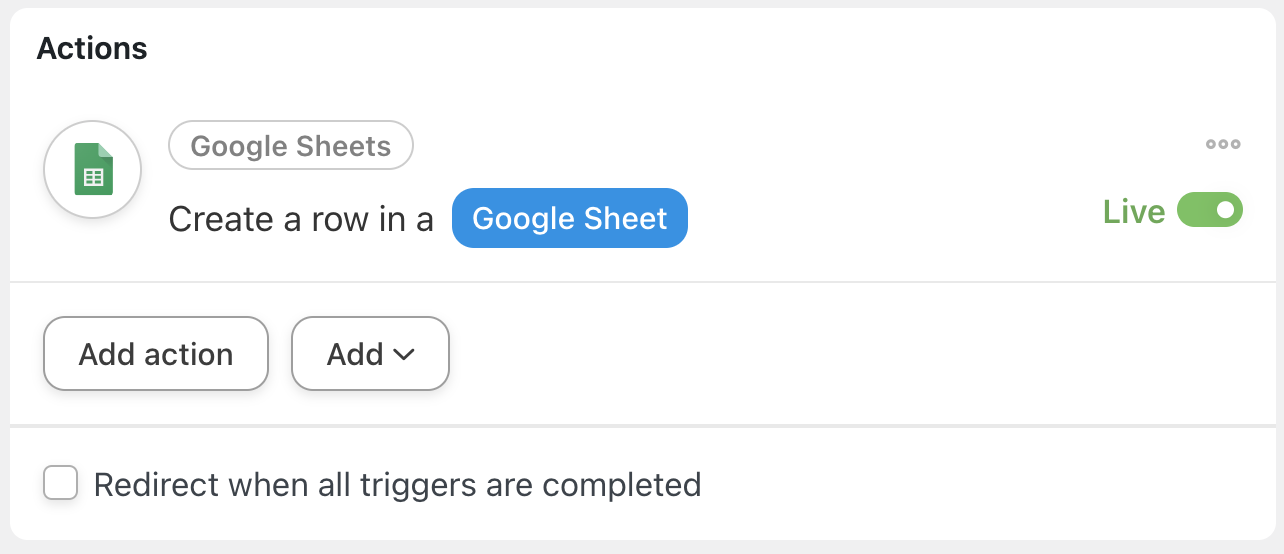
With your trigger and action all set up, you’re just about ready to connect WooCommerce to Google Sheets.
Step 5: Go Live!
Are you ready to complete the simplest WooCommerce and Google Sheets integration? All you have to do is toggle the recipe from Draft to Live!
Congratulations! You’ve just connected WooCommerce to Google Sheets! But this was a pretty simple example.
What about more complex orders with multiple products and product quantities? How about tracking WooCommerce order status or membership status? Believe it or not, you already have all of the tools you need to customize your WooCommerce and Google Sheets integration.
Let’s take a look.
Track WooCommerce Orders in Google Sheets
The first recipe that we created simply tracked WooCommerce orders with a specific product and sent that data to a specific product worksheet. Let’s take a look at how Automator can help you keep track of more complex WooCommerce orders in Google Sheets.
Step 1: Create a New Recipe
From your WordPress Admin Dashboard, navigate to Automator > Add new recipe. In the pop-up window that appears, select Logged-in users.
Step 2: Name Your Recipe
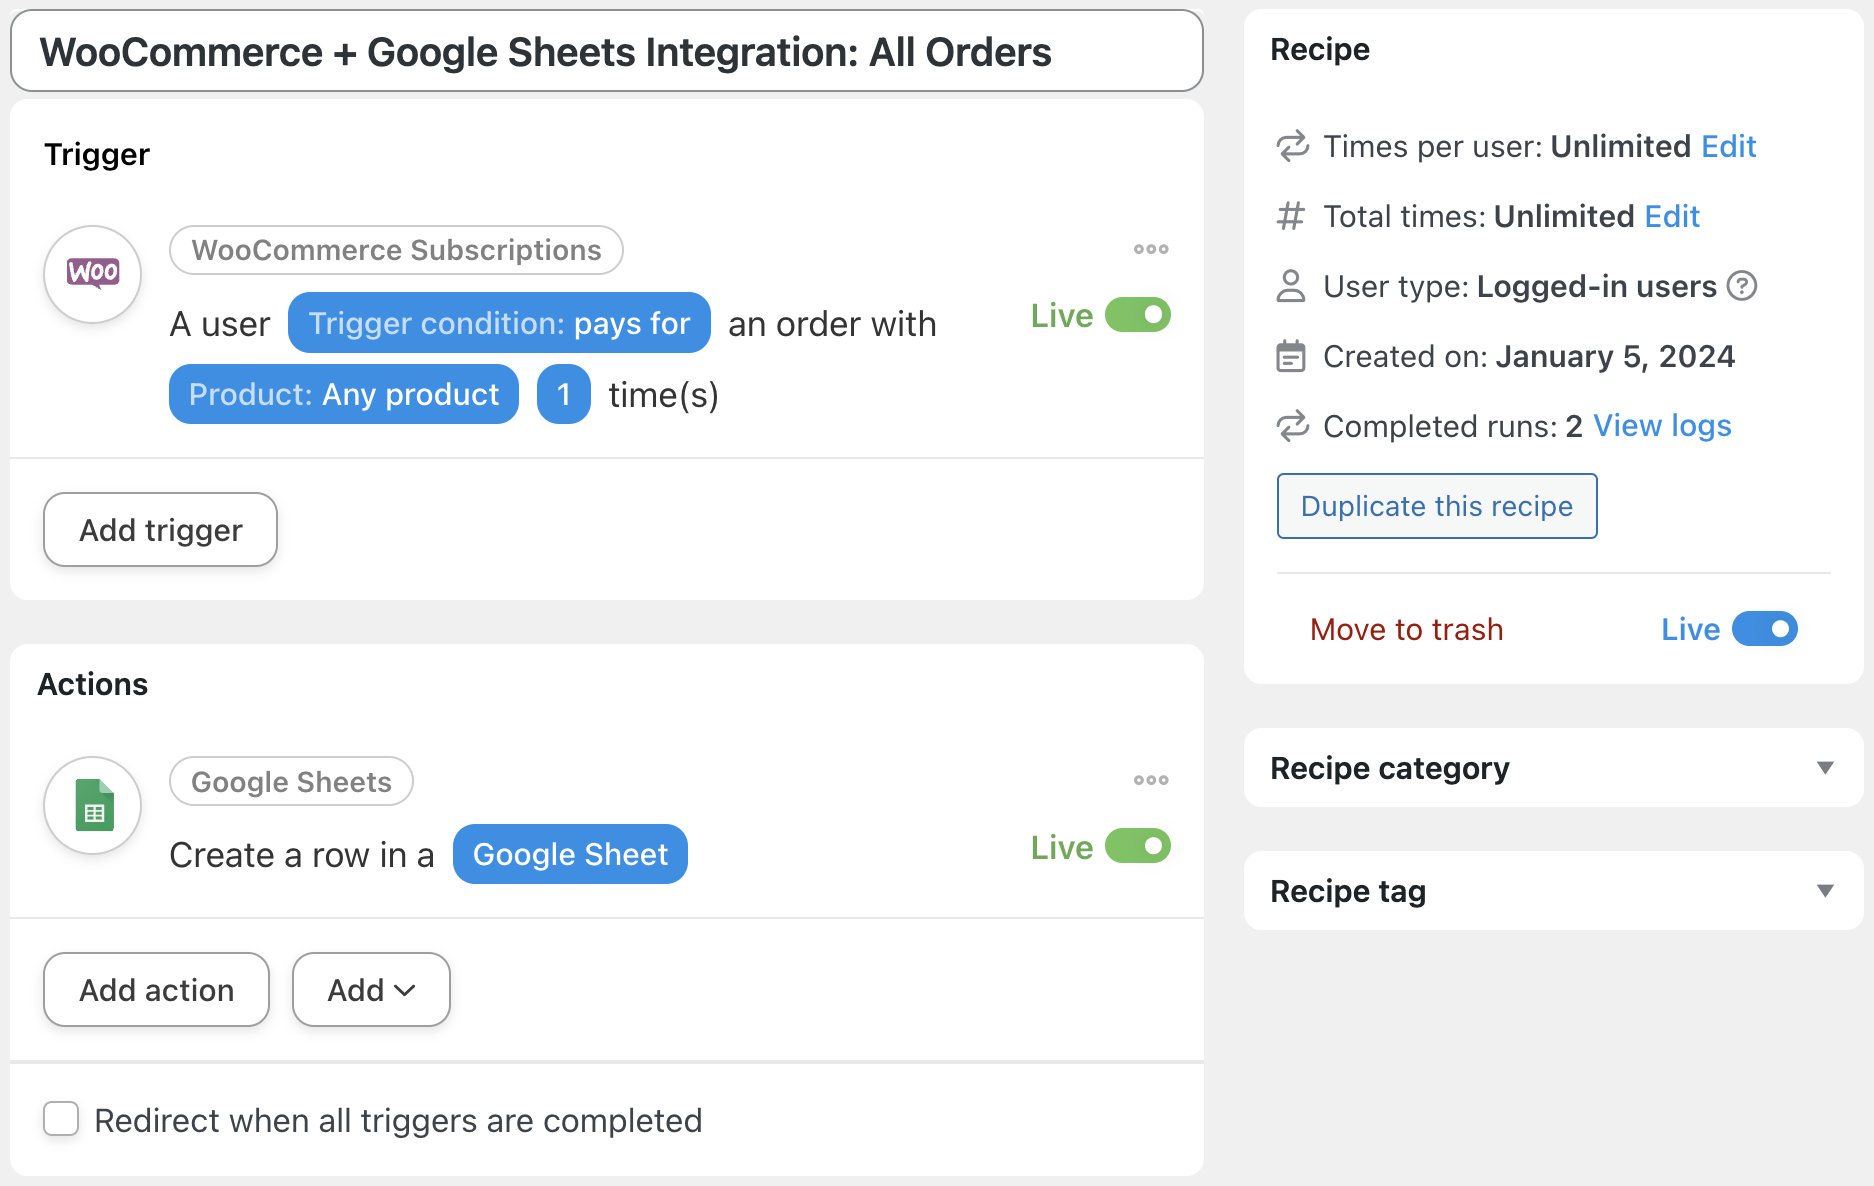
We’ve named this recipe “WooCommerce + Google Sheets Integration: All Orders”.
Step 3: Configure Your Trigger(s)
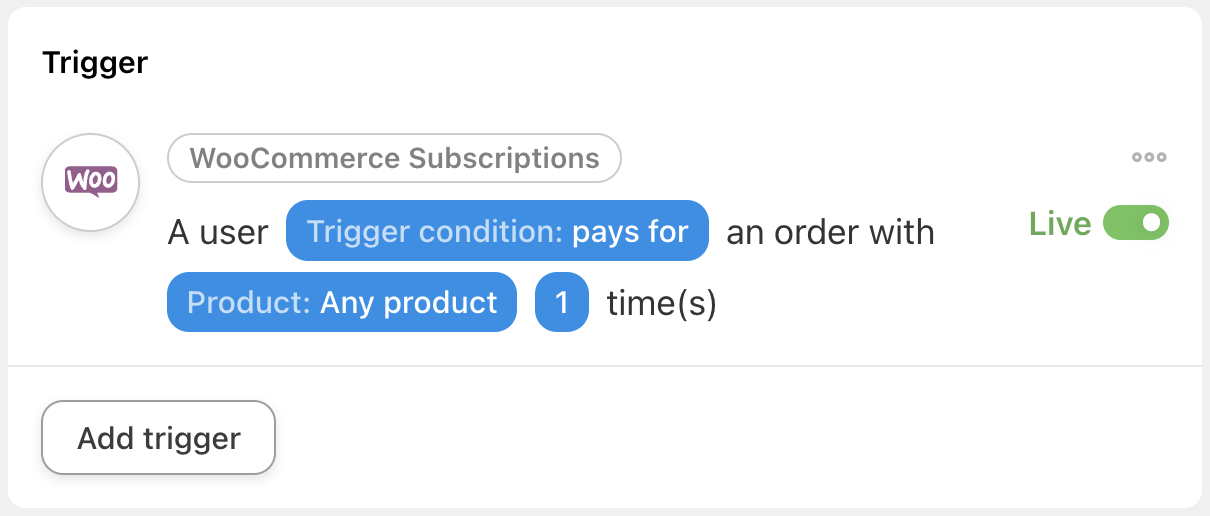
In the Trigger panel, from the menu of available integrations, select WooCommerce. From the drop-down list that appears, select A user completes, pays for, lands on a thank you page for an order with a product.
Just as before, Automator will prompt you to select the Trigger condition and Product. Because we want to keep track of all orders, we’ve simply selected “Any product”.
When you’re finished, click Save. Your Trigger panel should look like this:
Step 4: Configure Your Action(s)
In the Actions panel, from the menu of available integrations, select Google Sheets. From the drop-down list that appears, select Create a row in a Google Sheet.
Just as before, select the Drive, Spreadsheet and Worksheet where you want to have your WooCommerce order data stored and click Get columns.
Once again, we’re going to use tokens to populate the Value fields. However, we want to note some key differences between product tokens and order tokens.
If you select the Product title token in an order with more than one product, Automator will return the product titles in a single cell, separated by a comma. For example, if we have an order with our “Members Only Swag Pack” as well as our “Gold Membership” products, the product titles will appear in a single cell as such:
“Members Only Swag Pack,Gold Membership”
If you select the Order products token, in an order with more than one product, Automator will return the product titles in a single cell, separated by an upright slash with spaces. The text will appear as such:
“Members Only Swag Pack | Gold Membership”
Similarly, using the Order summary token will return the order values in a single cell, separated by line spaces.
Choose the token(s) that best suit your workflows and the set-up of your Google Sheets worksheet.
When you’re finished, click Save.
Step 5: Go Live!
Once again, simply toggle your recipe from Draft to Live.
With Automator, keeping track of your WooCommerce orders in Google Sheets is as simple as knowing which tokens to use. If you think that’s impressive, just wait until you see what you can do with Automator’s Action Filters feature.
Step 6 (Optional): Add a Filter
Let’s just say that we only wanted to keep track of our customers’ orders if they had an active subscription to a membership on our website. Using filters, this is a simple click-and-play feature to add to our recipe.
Hover over the Google Sheets action and click Filter.
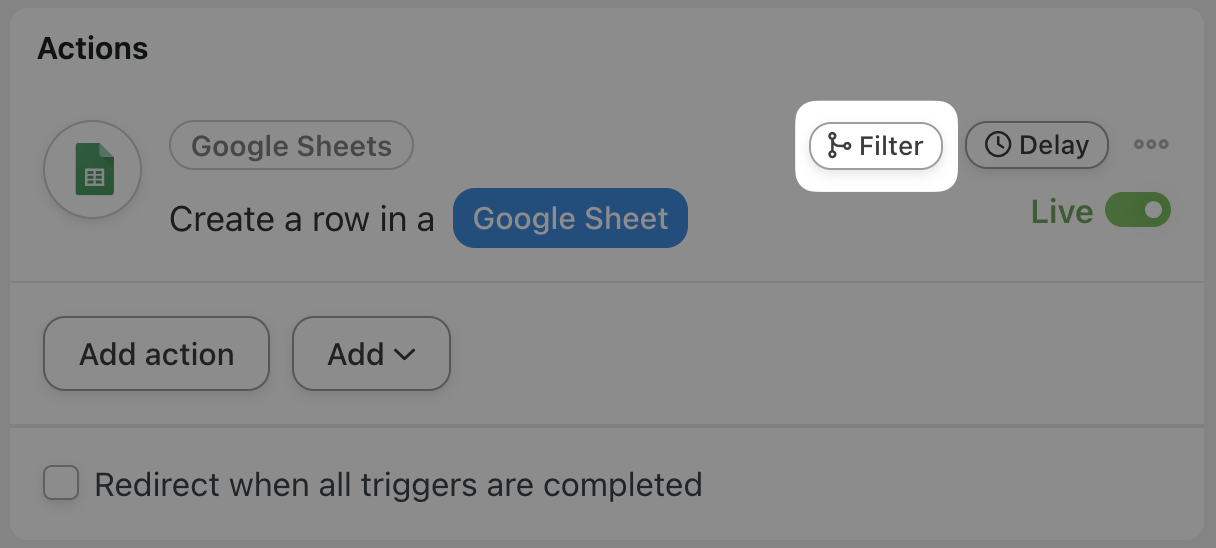
In the pop-up window that appears, select Woo Memberships > The user has an active membership of a specific plan.
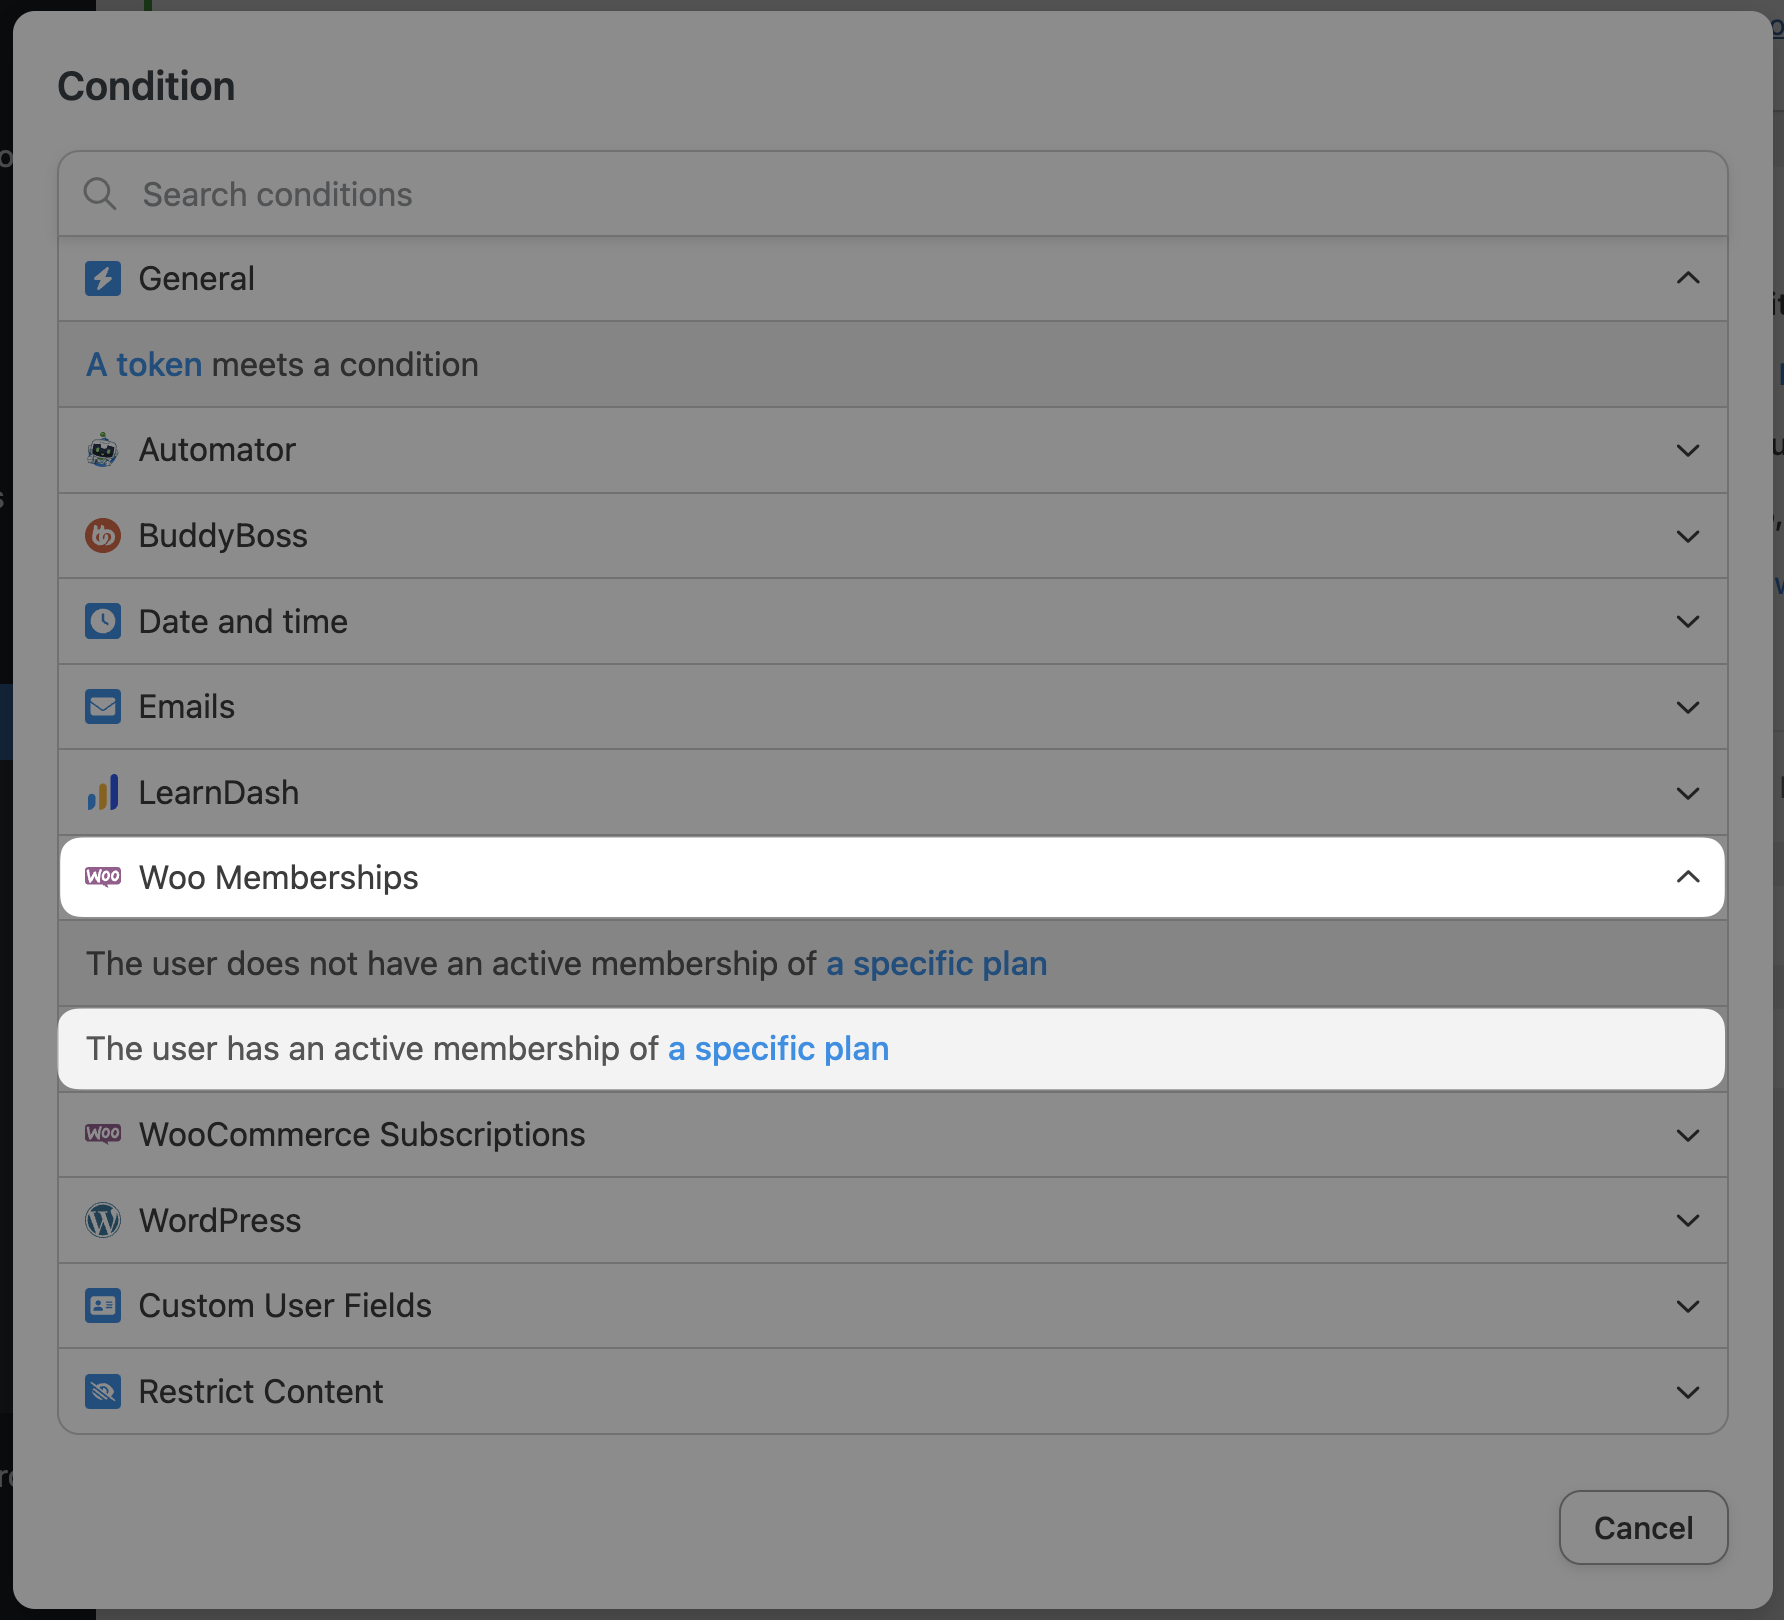
Automator will prompt you to select the specific membership plan. Once you’re finished, click Save filter. Your Actions panel should now look something like this:
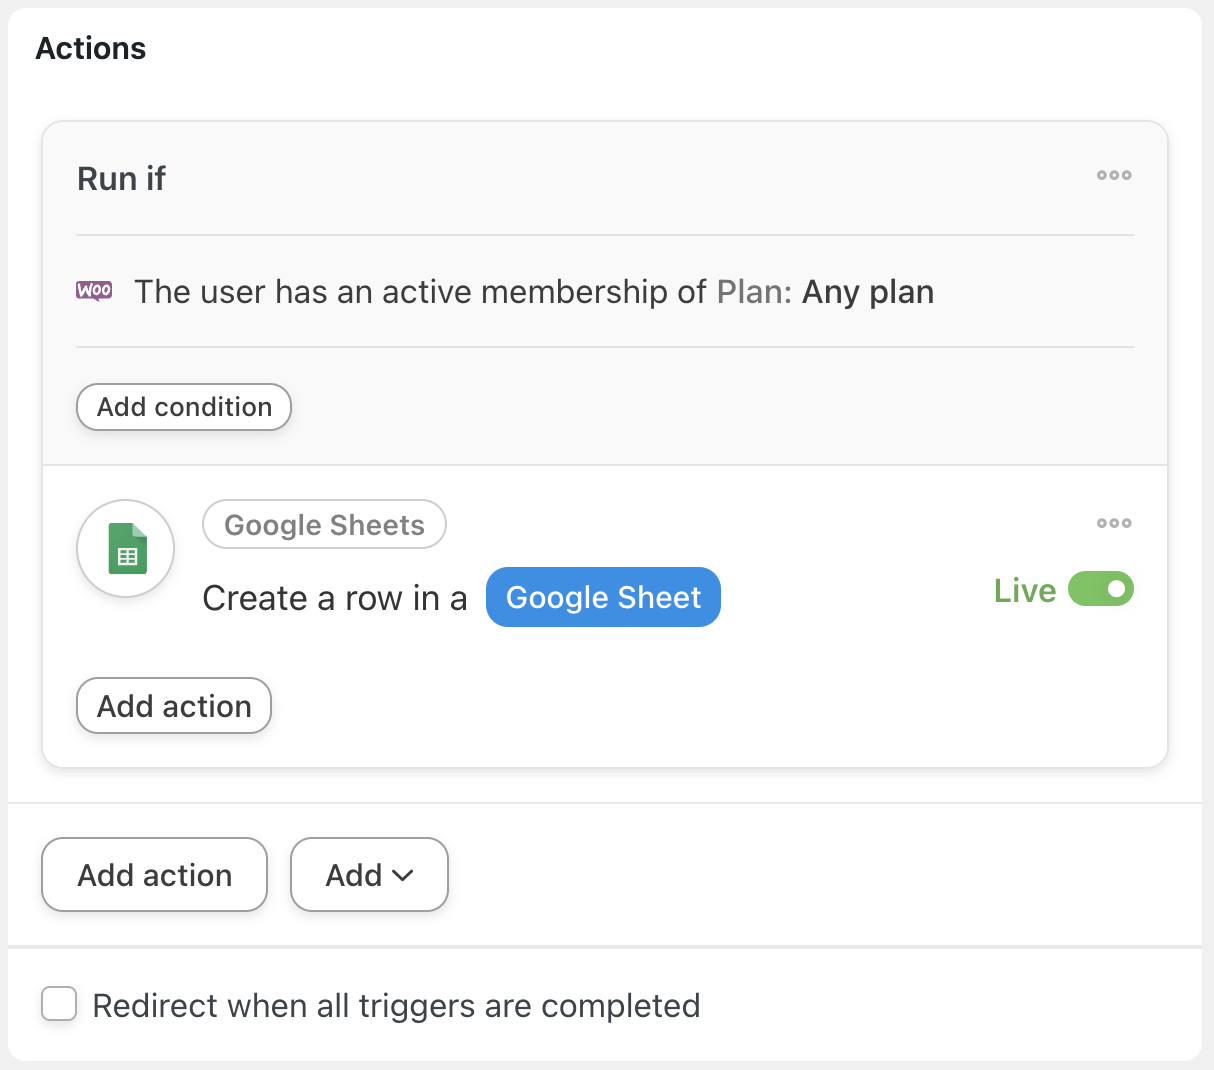
Not targeted enough? Add as many conditions to your new action filter as you would like. Simply click Add condition and customize the WooCommerce and Google Sheets integration to meet your needs.
More Ways to Connect WooCommerce to Google Sheets
So far, we’ve looked at connecting WooCommerce to Google Sheets in real-time. While there certainly are advantages to tracking our sales as they occur, we may also want to look at historical data. With even more advanced Automator features such as Loops, you can easily analyze your historical WooCommerce data.
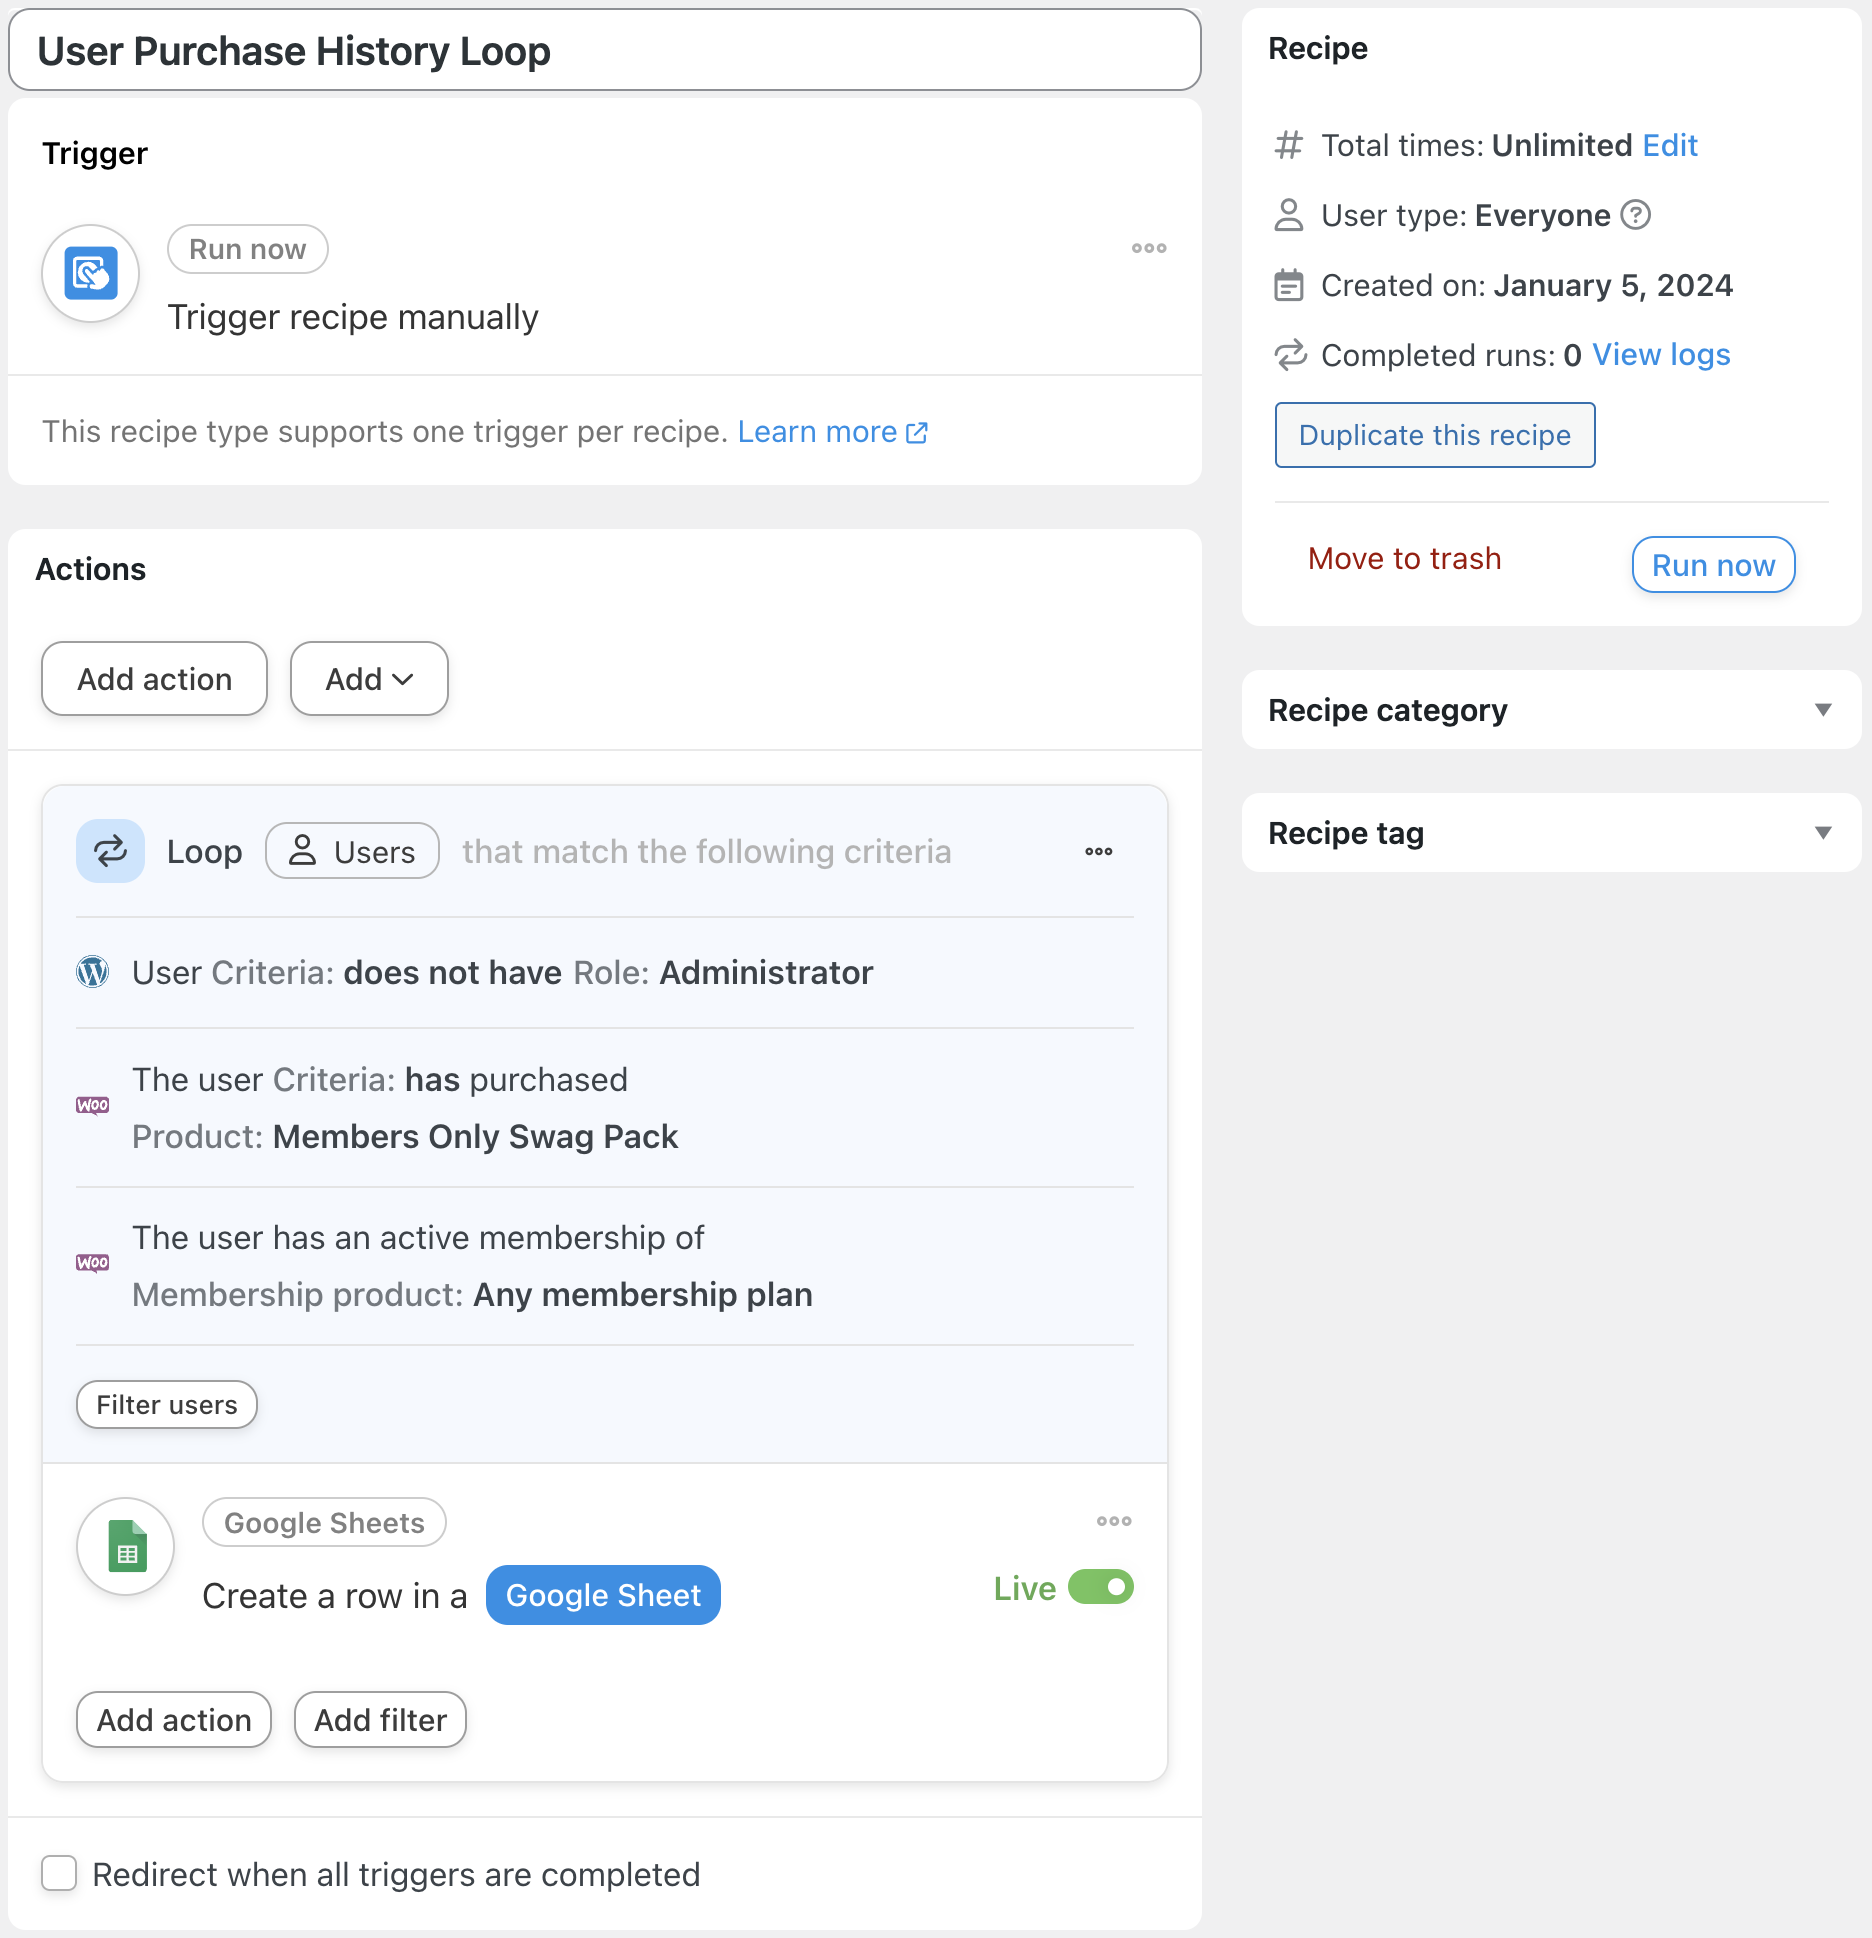
In the recipe pictured above, for example, we’re able to immediately generate a list of customers who have purchased our “Members Only Swag Pack” with an active subscription to any of our memberships. We could then generate a similar list of customers who have not purchased our “Members Only Swag Pack” to compare and contrast.
In other words, with Automator, you can connect WooCommerce to Google Sheets any way you want!
Conclusion
In this guide, we took a look at some of the advantages of tracking your WooCommerce sales in Google Sheets. Then we showed you how easy it is with Uncanny Automator, even when using advanced features such as filters and loops.
We hope that, with Automator at your fingertips, you feel comfortable and confident in your ability to connect WooCommerce to Google Sheets. But just in case there was anything that we didn’t cover, please drop us a line in the comments section below.
Until then, happy automating and integrating!

Related Posts


This Post Has 0 Comments