Revive old WordPress posts with AI and Uncanny Automator. Learn how to reverse content decay…
How to send an email campaign in WordPress
If you run a business online, you understand how crucially important it is to keep your audience engaged. Through regular communication and touch points, you can build brand loyalty, increase sales, and expand your market reach.
While there are countless platforms and tools out there to reach out to prospective customers more effectively and more often, email marketing remains a cornerstone of effective communication with your audience. Just how important are email campaigns in your marketing arsenal? Based on a 2023 report from Hubspot:
- Approximately 64% of small businesses use email marketing to reach customers.
- 37% of brands are increasing their email budget on an annual basis.
- 77% of markets have seen an increase in email engagement over the last 12 months.
For many websites (including my own), email marketing is the primary means of communicating with an existing audience that may not be visiting your website that often. It’s an easy way to reach thousands of users at very low cost, and the results of campaigns tend to pay for themselves many times over. In fact, it’s one of the lowest-cost marketing tools at your disposal, even though it’s one of the most powerful, allowing easy targeted messaging, higher brand awareness, easy results analysis, and for many people it’s the preferred communication channel. And what about the ROI? According to a Campaign Monitor report, for every $1 spent on email marketing, the average return on investment is $38.
Tools for building email campaigns in WordPress
To get started with email marketing in WordPress, your site will need to do a few things:
- Capture email addresses and add contacts to an email list
- Send email campaigns out to those contacts
For the purpose of this article, we’re going to keep things simple and do as much as possible with the #1 automation plugin for WordPress: Uncanny Automator. While Automator does have an extremely powerful free version, for this article we’re going to take advantage of some Pro features, particular the User Lists addon available at no extra cost to Plus and Elite license holders. The User Lists plugin makes it very easy to add site users to mailing lists, while Automator Pro itself simplifies the process of sending emails out to multiple users.

For capturing email addresses, the simplest option is to simple collect emails in an optin form. You can use any form builder plugin that integrates with Automator to build your optin forms, but we’re particularly fond of the free versions of WPForms and Formidable Forms. Both are more than sufficient for building forms on your site.
And, of course, you need a way to send the emails out, since most WordPress hosts are not able to support email campaigns that might sound out thousands of emails within a few minutes. You’ll probably want to connect your WordPress site to a transactional email service provider, and for that, check out our article on the best email service providers for WordPress.
How to capture email addresses
Uncanny Automator can, of course, add users to an email list based on any interaction. Perhaps when a user completes a course you add them to an alumni list, when a user makes a purchase you add them to your paid newsletter, or when a user joins a social group then you add them to a related list. While these are all great ways to segment users and send them targeted campaigns, we’re going to stick to the most basic of examples for this article: A user submits an email address in a form.
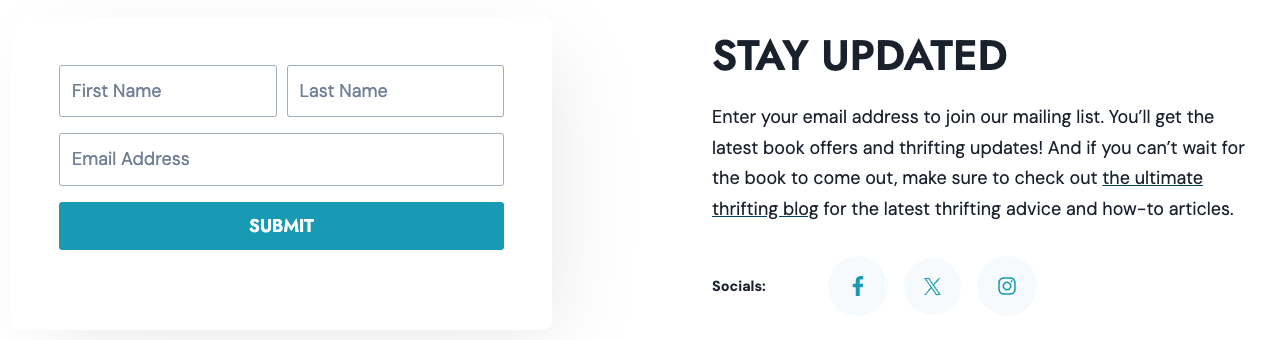
Besides my work with Uncanny Automator, I run a popular thrifting blog. On that website, optin forms are my primary means of collecting email addresses so that I can connect with my audience. Sometimes you might incentivize people to provide their email address, like offering a free ebook, a free email course, perhaps a special discount. Other times users might just want regular updates on something that interests them, which is how I use an optin form in my footer:
Let’s assume that you’re using WPForms on your website as a form builder. To create a new form:
- Visit WPForms > Add New in /wp-admin/.
- While you can choose a form template to get started, for this example, we’ll choose Blank Form.
- In the form editor, drag an Email field type over to your form on the right.

- Now click the Settings tab on the left and add a name for your form in the Form Name field. You can add more settings here, like notifications, confirmations, and other form extras, but these steps are all optional and we’ll keep this example as straightforward as possible.
- Click the Save button to save your form.
Now you have a form that you can add to any page, post, or other element on your website. But, of course, we haven’t yet connected that email capture to a contact list in WordPress.
Add contacts to a mailing list
In this next section, we’ll show you how easy it is to take that email address submission in your form and add it to a mailing list with Uncanny Automator. For this next section, we’ll assume you’re using Uncanny Automator, Automator Pro, and the User Lists addon. The first step is to create the mailing list that you will add users to. To do that:
- Visit Automator > Settings > Addons > User lists in /wp-admin/.
- Click the Add list button to create a new list.
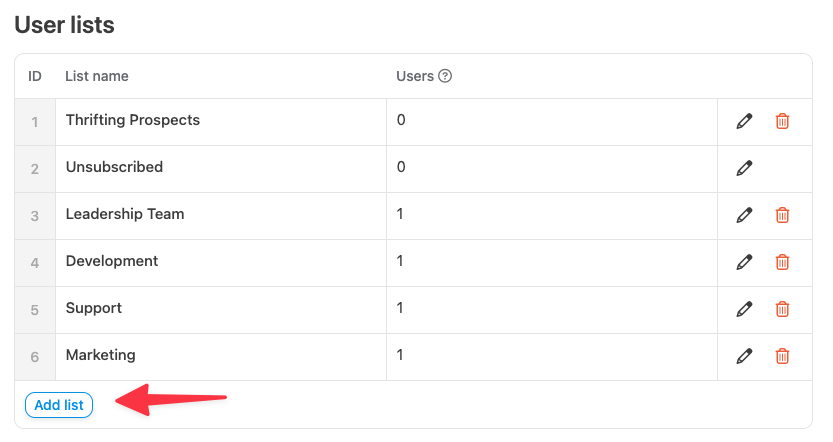
- Name the list anything you want and click Save. This will create the new list.
Of course, this new list doesn’t yet have any users, so our next step is to add anyone that submits an email address to the new list. Here’s how to do it:
- Visit Automator > Add New to create a new recipe. Recipes are automations that can be used to do things like add a value from a form submission to an email marketing list.
- Choose Everyone and click Confirm. We use an Everyone recipe type because visitors to the site may or may not be signed in when they view the form.
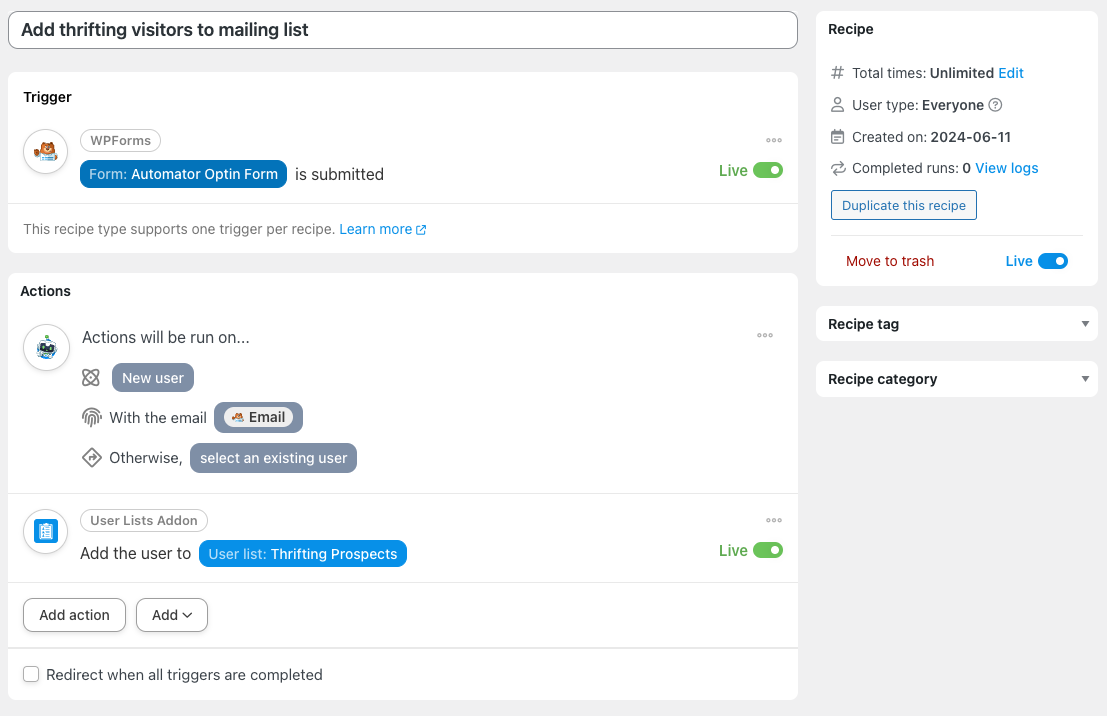
- Name your recipe. It should be something identifiable, so I might use something like, “Add thrifting visitors to mailing list”.
- In the Trigger section, choose WPForms, since it’s a form submission that will trigger the automation.
- Now choose the A form is submitted trigger, since it’s the form submission that will trigger the recipe.
- In the Actions section, choose the “Add the user to a list” action. You’ll see a warning that it requires user data; click Set user data.
- Choose the list you created next from the User list drop-down list in the action. Then click Save.
- Now we need to create a WordPress user so we can add them to the list. Above the action, choose New user.
- We’ll keep things simple when creating this user, so we’ll just populate the Email and Username fields. Both need to come from the email address in the form, so click the * icon to the right of the field to choose a token. We need to target the Email field from the trigger, so we’ll choose this token:
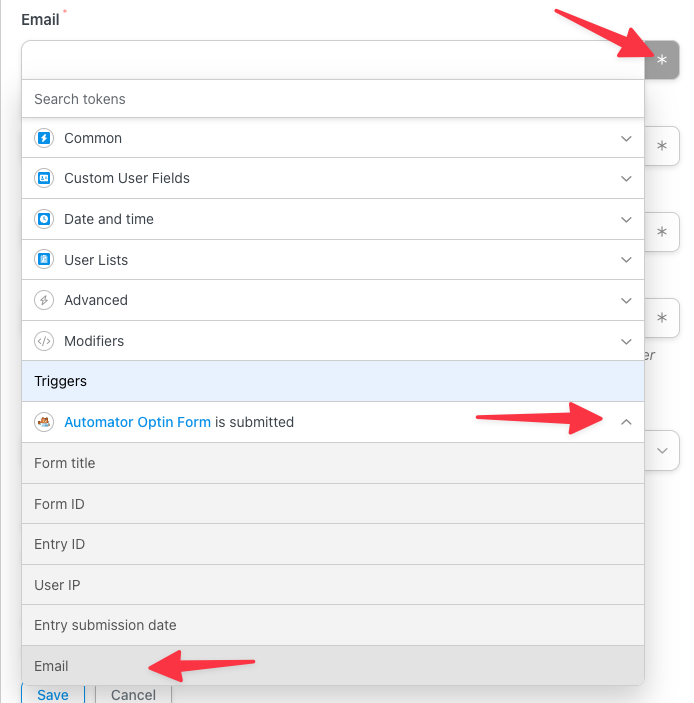 The same token can be used in the Username field.
 - Next, choose to Select existing user if the email address already exists (since we want to add existing users that sign up to the list as well) and leave the default Email selection.
- Click Save to finalize the user selector changes.
- To take the recipe live, use the switch on the right side of the recipe to change the status from Draft to Live.
Upon completion of these steps, you’ll have a live recipe that should look something like this:
To recap, now we have an optin form that accepts email addresses as submissions, and when users enter their email addresses, they will be added to a mailing list that we created.
Send a WordPress email campaign
The last automation that we’ll cover in this article is sending an email campaign to users in the list we created. Doing this, of course, will involve another Uncanny Automator recipe. For this one, we will run a recipe instantly (on demand rather than with some kind of user activity on the site) that will “loop” through users in the mailing list and send each of them an email.
To create this recipe, perform the following steps:
- Choose Automator > Add New in /wp-admin/.
- Since this recipe isn’t triggered by a user and is run in the back end by an administrator, choose Everyone as the recipe type.
- Name the recipe first. For this example, I’ll use “November Thrifting Campaign”.
- Select the Run now integration. This trigger allows us to run any set of actions instantly. Choose the Trigger recipe manually selection.
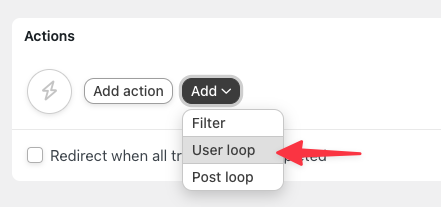
- In the Actions section, instead of adding a new action from an integration, choose Add > User Loop, like this:
- So the loop runs most efficiently, click the Filter users button. This allows us to loop through a subset of users.
- Since we’re targeting users in our mailing list only, choose User Lists > The user is/is not on a list.
- In the modal that pops up, leave the criteria as “is” and choose the list you created. For my example list of thrifting prospects, the selection will look like this:
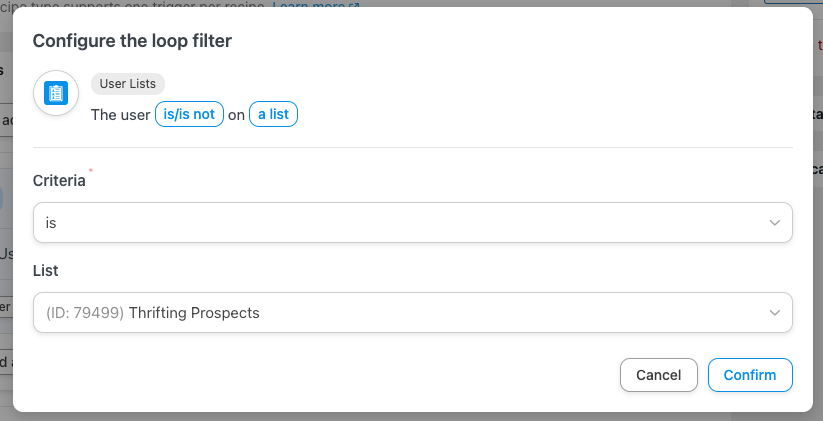
- Click Confirm to save the changes.
- Now, inside the user loop (and this is very important, use the button inside the loop section and not the button at the top of the Actions section), click Add action.
- Since we’re sending out an email, choose the Emails integration.
- Within the integration, select Send an email.
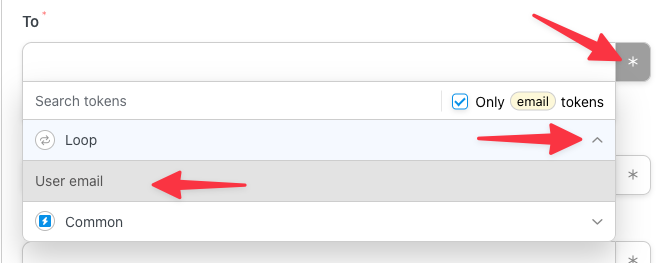
- For this example, we’ll focus on the key fields for the email. The first one is who to send the email to, and for this we need to target the email address of users in the loop (so users on our mailing list). In the token list for the To field, choose the User email option in the Loop set of tokens, like this:
- Next you will need to populate a Subject for the email; you can use anything you want here.
- In the Body area, you can add whatever content you want to send out. If the optin form you create includes a first name, you might choose to use a First Name token or other personalization.
- Since this is a campaign email, it’s a good idea to include the “Unsubscribe link” token from the User Lists set of tokens. When this is included in an email and a user clicks it, they will be taken to a page where they can remove themselves from mailing lists. This link works even if the user is signed out from the site (the URL and unsubscribe link text can be managed from the Automator > Settings > Addons > User Lists page).
- Since this email might be going out to a lot of people, using the Send test email button can be a good idea.
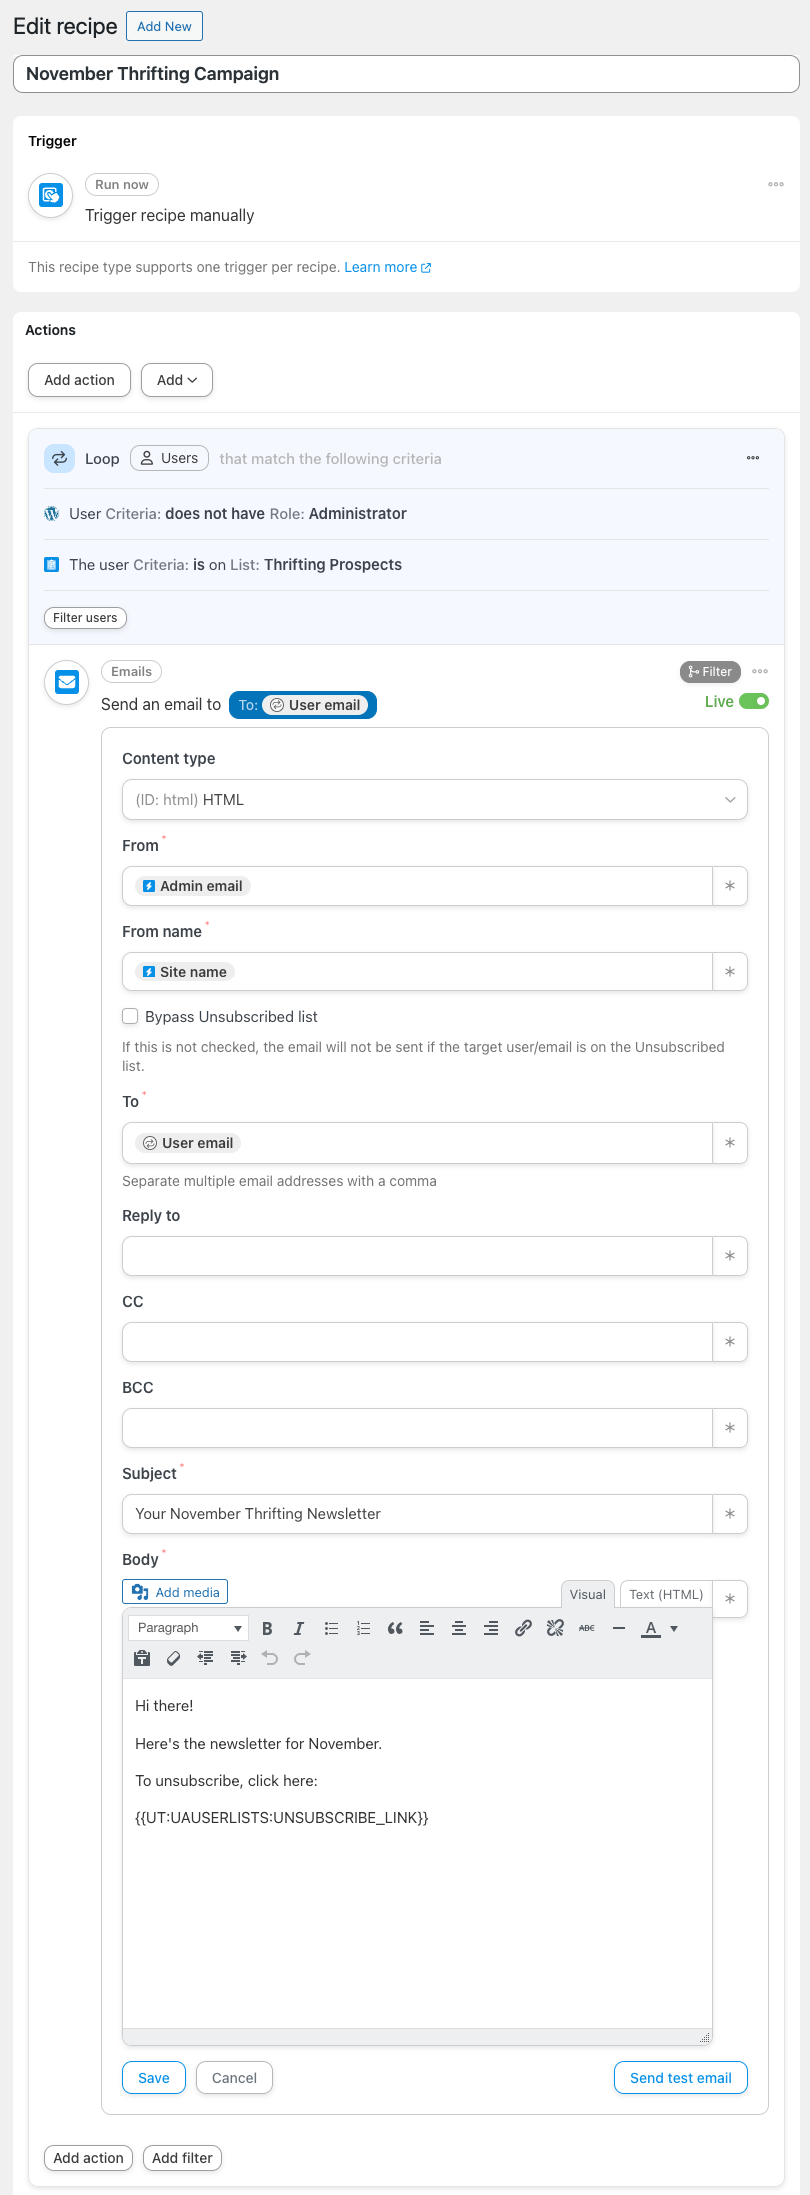
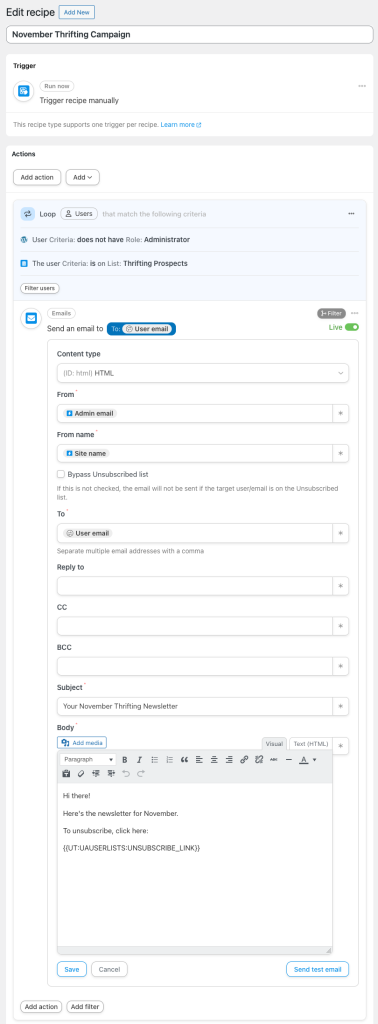
- Click Save to save your campaign changes. Once the updates have been made, your recipe should look something like this:
- As a final step, use the Run now button on the right side of the edit recipe page to initiate the recipe and send out your email to the users in the list. Your first campaign email is complete!
For Run Now recipes, the actions that are running will be queued and send out in batches to minimize load on your site. You can watch the progress of your recipe from the Automator > Logs page inside the recipe run details.
CRM alternatives
Even if you’re not using a Plus or Elite license, there are still many tools you can use to send email campaigns that are natively supported by Uncanny Automator. You might choose (or already use) a WordPress-based CRM, like Groundhogg or FluentCRM (which I also use for my thrifting blog). Or maybe you use a CRM SaaS product like ActiveCampaign or Drip. Automator supports a variety of CRM platforms and all can help you make your email campaign dreams a reality.
Conclusion
If you have followed the steps in this very long article, you will be well on your way to collecting email address, adding contacts to a mailing list, and sending email campaigns to your users. Email marketing is a critical part of user engagement and conversions for every online business, and we hope this article has made it even easier for you to implement a marketing solution on your WordPress site.

Related Posts


This tutorial is exactly what I was looking for. I’m building my newsletter service on my blog. Thank you very much!