Uncanny Automator is the #1 no-code, low-cost QuickBooks plugin for WordPress. Automate and integrate invoices,…
How to Use Advanced Custom Fields with Uncanny Automator
Get the most out of the Advanced Custom Fields plugin with Uncanny Automator and unlock a whole world of WordPress possibilities.

We probably don’t have to tell you: Advanced Custom Fields is a great, user-friendly plugin for any WordPress website to have. From configuring product variations to defining member profiles, ACF is one of those all-purpose plugins that can expand the functionality of WordPress websites.
However, as great as ACF is at creating custom fields, you could probably use some help in managing those fields.
That’s where Uncanny Automator comes in. By combining the power of Automator with the versatility of ACF, you can gain control of your WordPress metadata and unlock a world of possibilities.
Integrating ACF and Automator is a lot simpler than you might think (especially with the Custom User Fields Addon).
So, without further ado, let’s get started!
Introduction
Whether you’re an experienced WordPress developer or business owner, taking control of your website’s metadata will greatly expand your website’s functionality. And, ultimately, improve your end users’ experience.
That’s precisely what this article will help you do. In this guide, we’ll:
- explain Advanced Custom Fields meta keys,
- show you how to use ACF meta keys in Uncanny Automator recipes and,
- introduce you to the Custom User Fields Addon for Uncanny Automator.
By the end of this article, we’re confident that you’ll be a WordPress wizard when it comes to managing your custom fields. You’ll just need the right tools for the job.
Understanding Advanced Custom Fields Meta Keys
The first step in unlocking the full potential of a plugin like Advanced Custom Fields is understanding how ACF stores meta keys.
ACF employs a simple rule for storing both user and post type meta fields. In short, whether you’re creating a custom field for users or posts, ACF will store the meta key for that field as follows:
- lower case letters
- spaces replaced with an underscore “_” (option to replace with a dash “-”)
By default, ACF will use underscores “_” for both user and post fields and dashes “-” for new post types. Let’s take a look at an example for an events directory website.
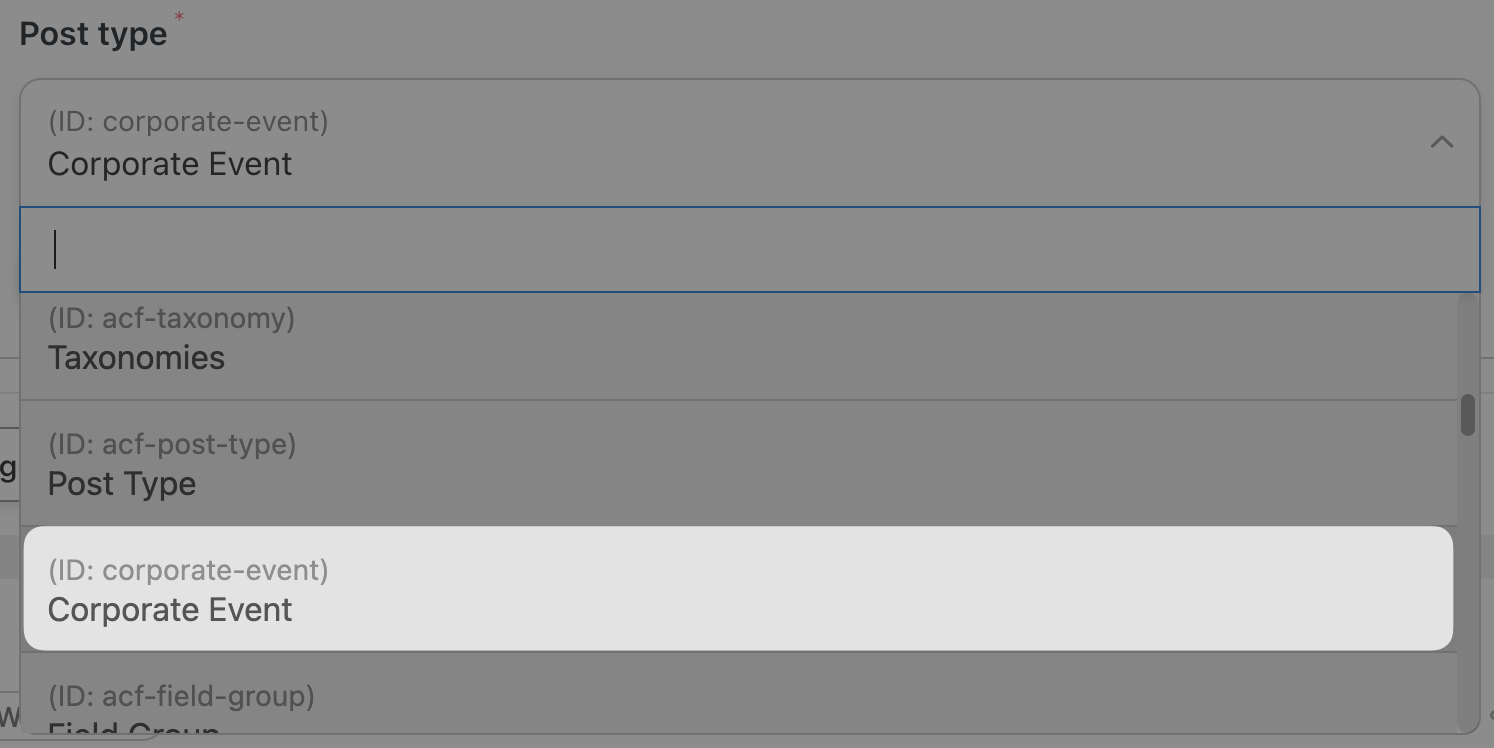
First, in creating the new post type “Corporate Events”, we can see that ACF automatically stored the meta key for this post type as “corporate-event”.

We added the custom post field “Event Organizer” to our new post type. ACF automatically stored the meta key for this post field as “event_organizer”.

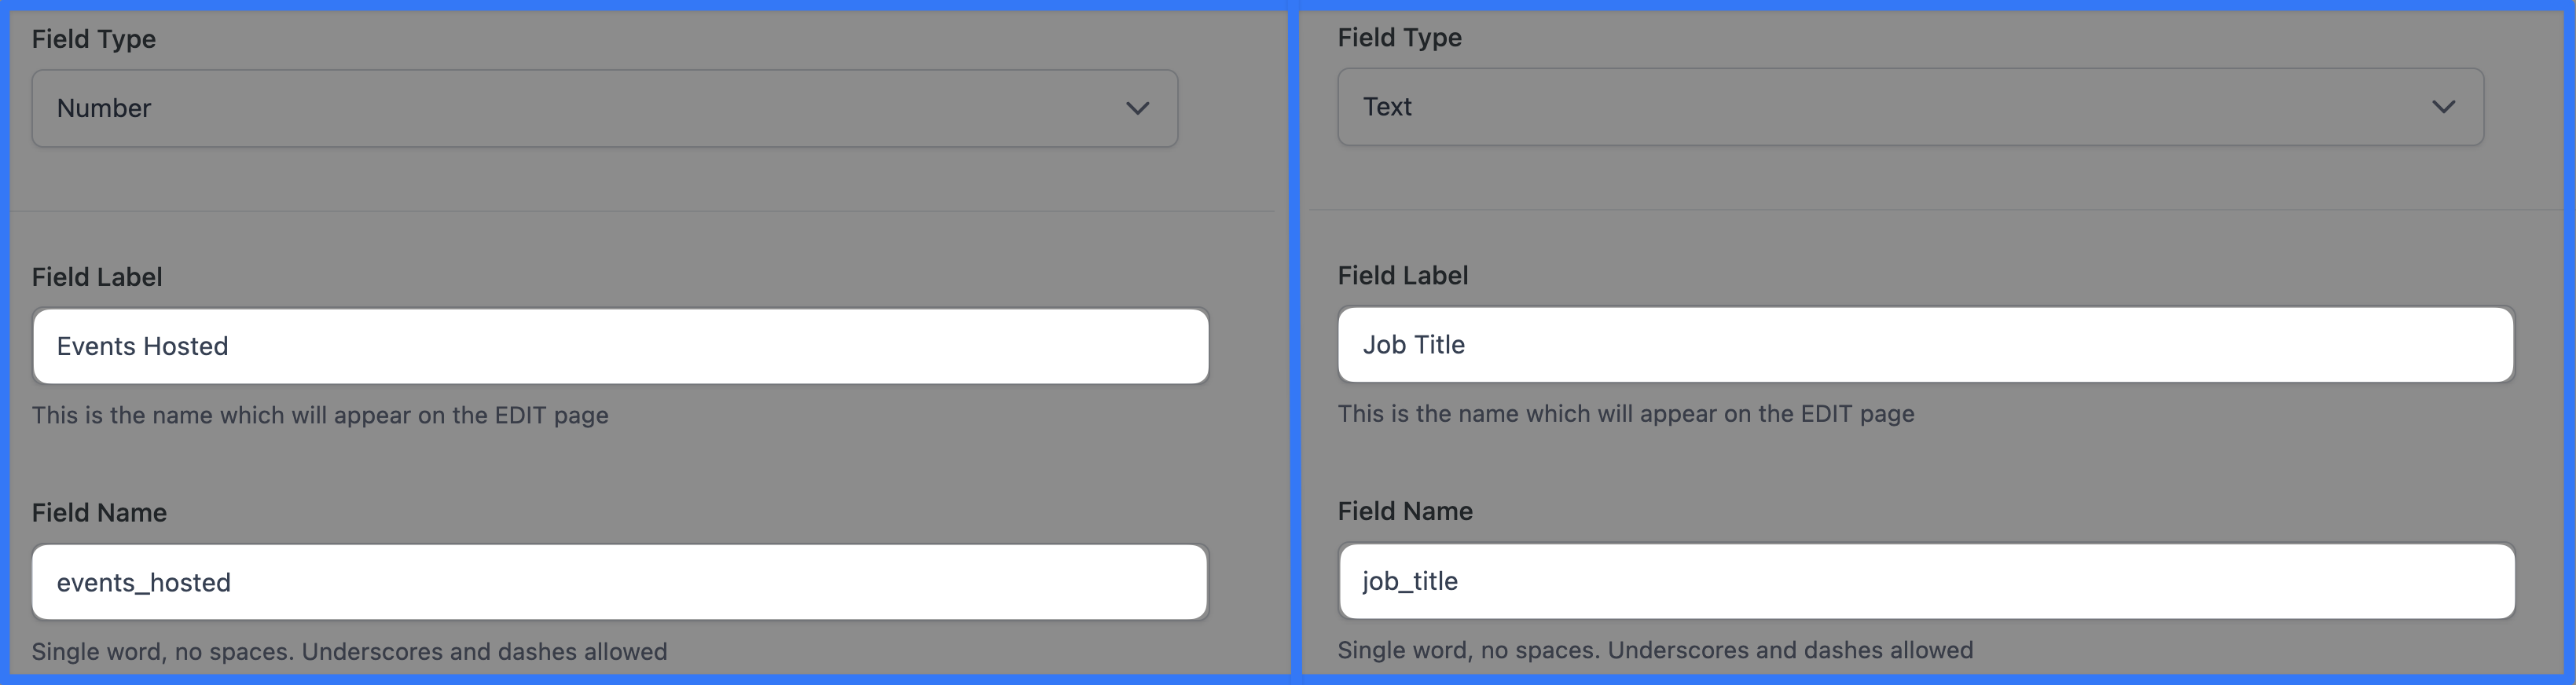
Similarly, we added the new user fields, “Job Title” and “Events Hosted”. ACF will store the values for these fields under the keys “job_title” and “events_hosted” respectively.
ACF allows for limited customization of custom field keys. However, if you choose to customize your meta keys, it’s always best to have a well-defined naming convention to follow. Throughout this guide, we will simply use ACF’s default meta keys as they are easy to remember and align with WordPress standards.
Using Advanced Custom Fields with Automator
Now that we know how ACF stores new user and post fields, we can begin to use these fields in Automator recipes to manage our website’s metadata.
Returning to our example of an events directory website, let’s take a look at how simple managing ACF plugin custom fields is with Automator.

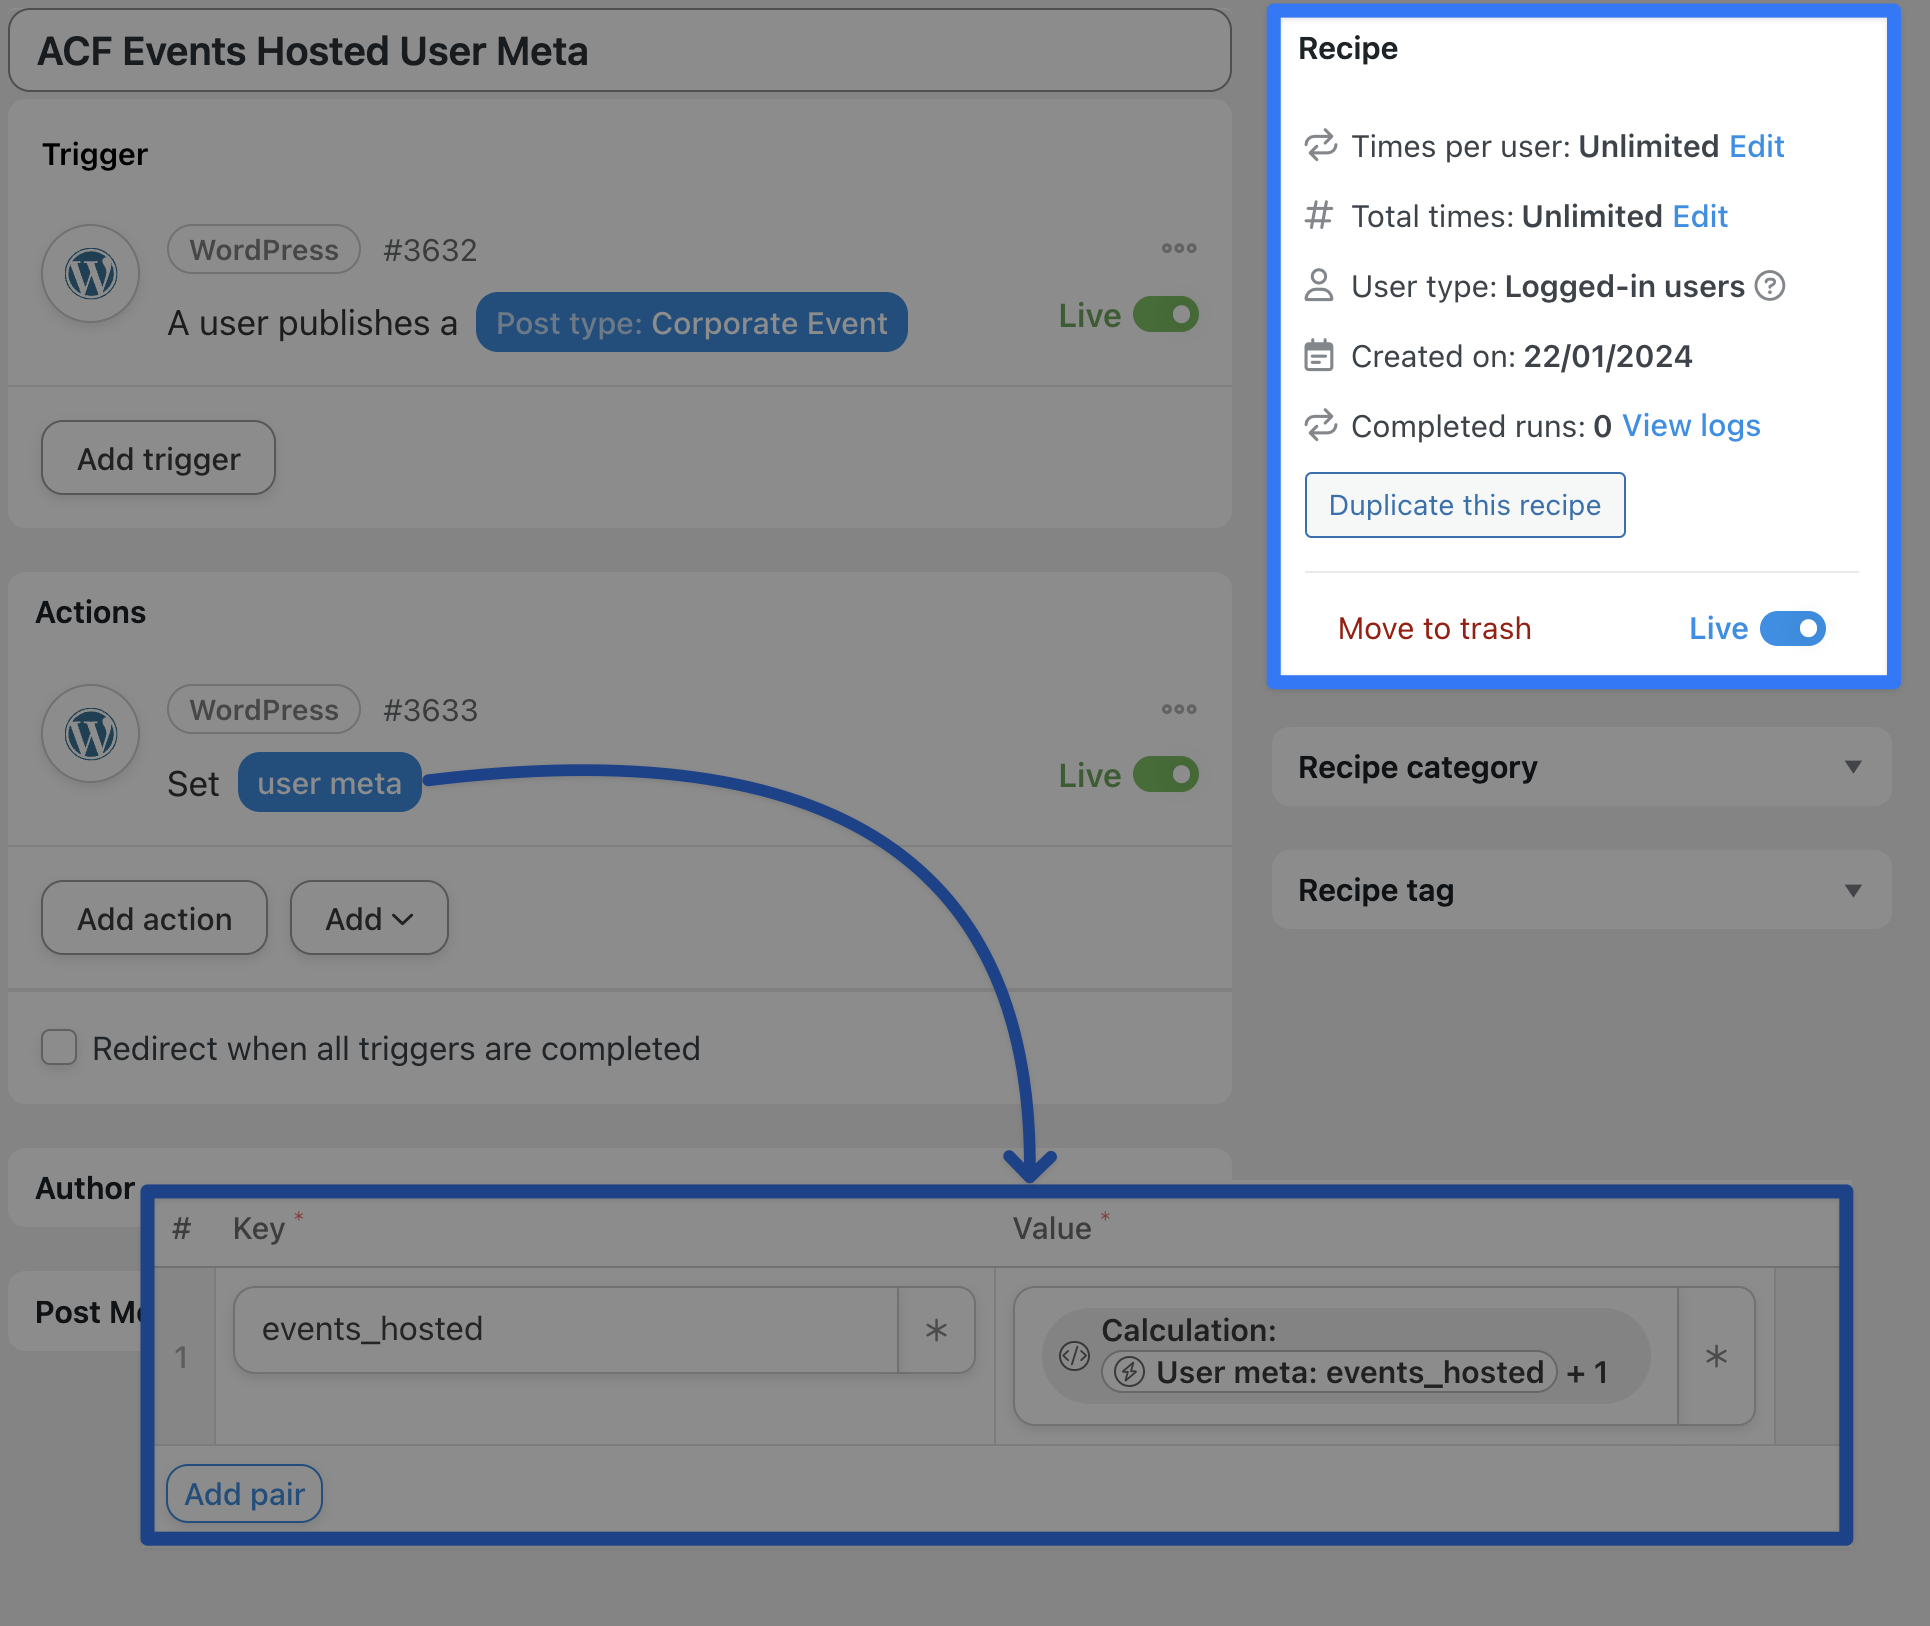
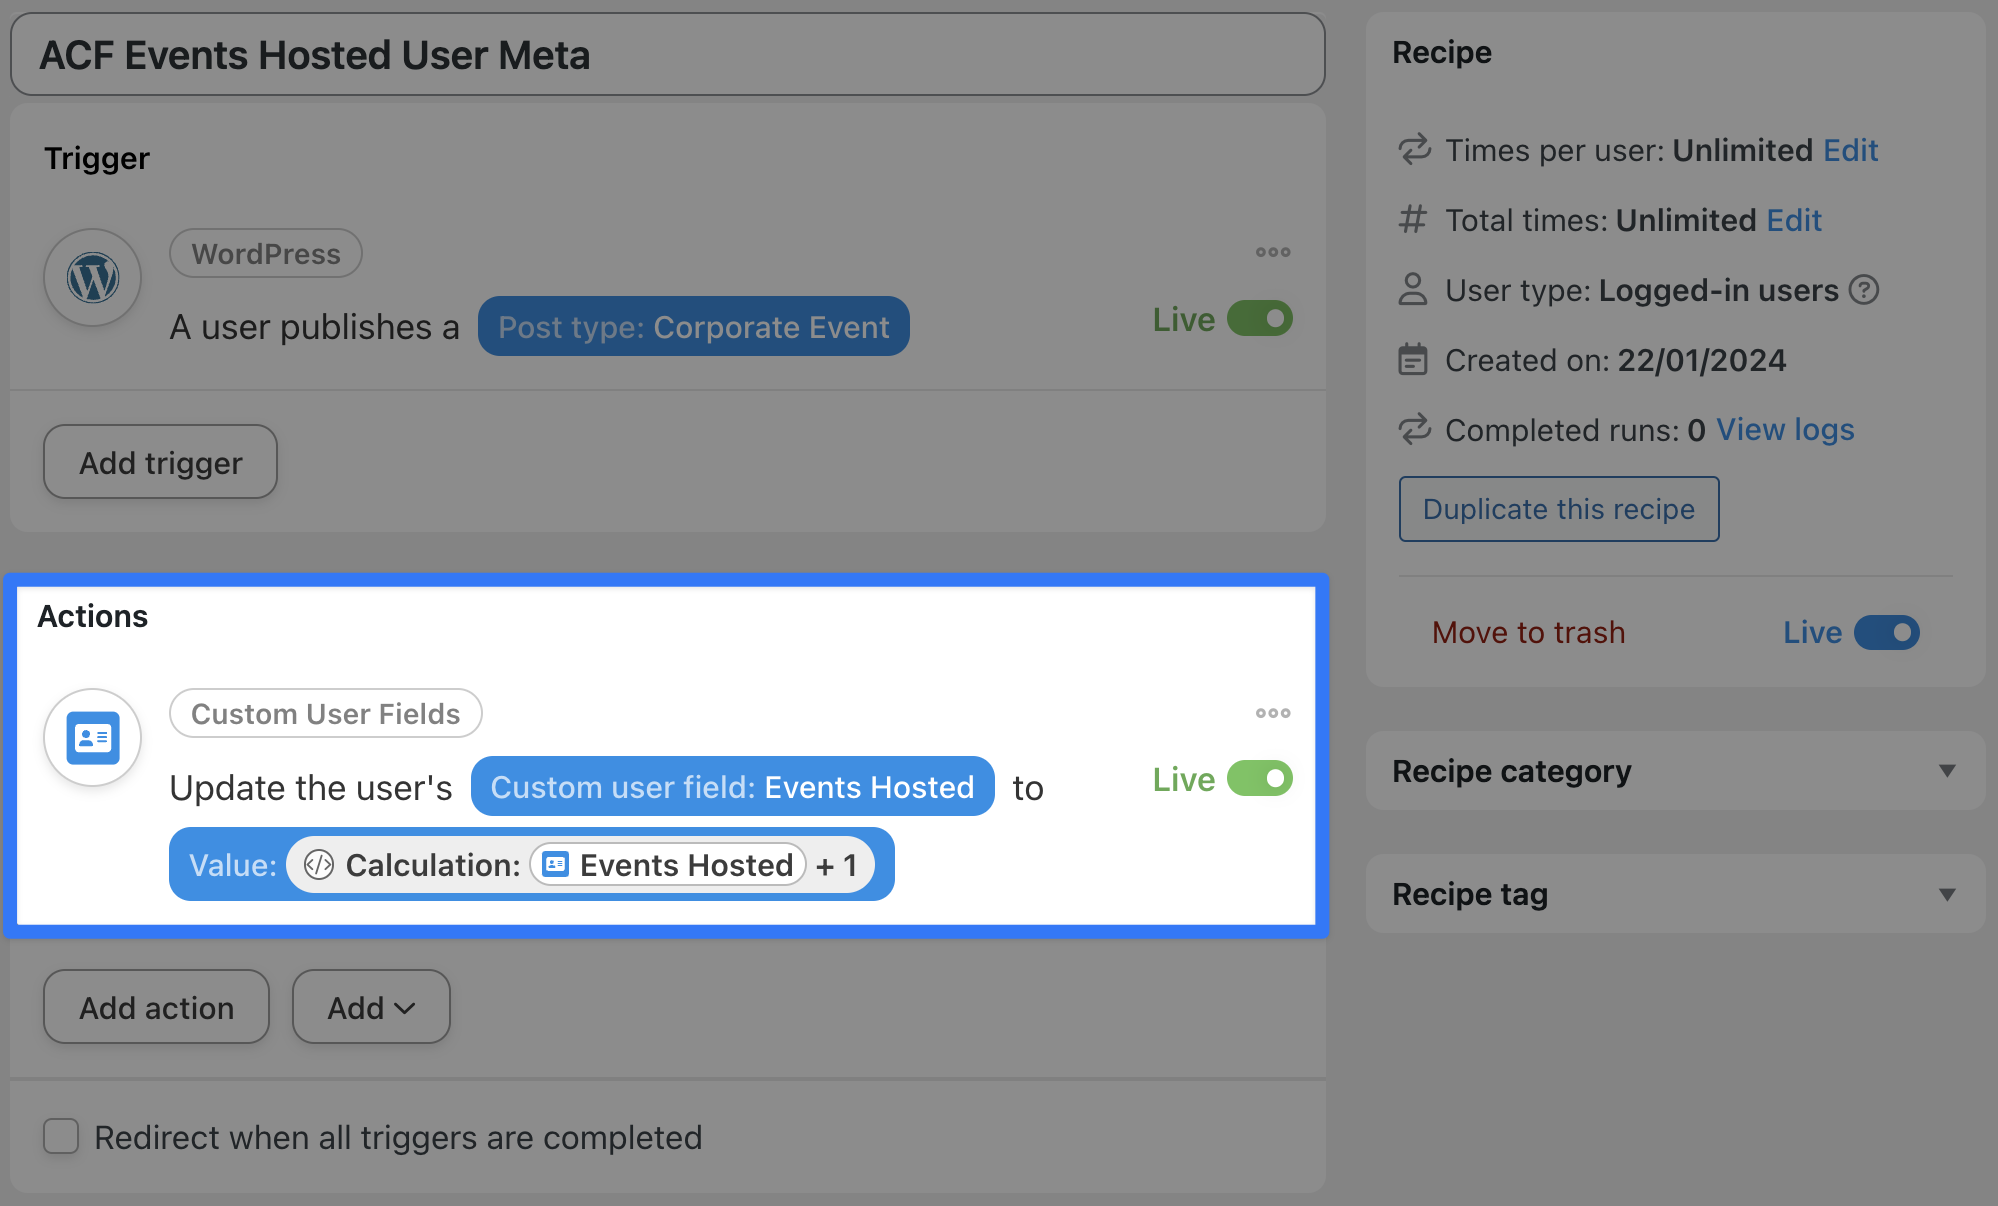
In the recipe pictured above, we’re able to automatically update the custom field that we created to keep track of the number of events that our organizers are planning. Let’s take a look at how we did it.
Step 1: Create a New Recipe
From your WordPress Admin Dashboard, navigate to Automator > Add new recipe. In the pop-up window that appears, select Logged-in users.
Step 2: Name Your Recipe
Give your recipe a name that makes it easy to recognize at a glance. For example, we have named this recipe ACF Events Hosted User Meta.
Step 3: Configure Your Trigger(s)
In the Trigger panel, from the menu of available integrations, select WordPress. From the drop-down list that appears, select A user publishes a post.
Automator will prompt you to select a post type. Select the Corporate Events post type or any custom post type that you created with Advanced Custom Fields.
Click Save.
Step 4: Configure Your Action(s) and Manage Your Custom Field(s)
In the Actions panel, click Add action and select WordPress from the menu of available integrations. From the drop-down list that appears, select Set user meta.

Automator will present you with a form that has Key and Value fields that represent the user meta we want to set. Now that we know how ACF stores the custom fields that we create, Automator allows us to easily target these fields using the keys.
In the Key field, type “events_hosted” or whichever user meta field you want to target.
Next, to populate the Value field, we’re going to use an Automator feature called Calculations to manipulate the value that corresponds to the key we entered. We’re going to do this using a token (i.e., dynamic data pulled from your WordPress website and even from within recipes).
In the Value field, click on the Asterisk and select Modifiers > Calculation.
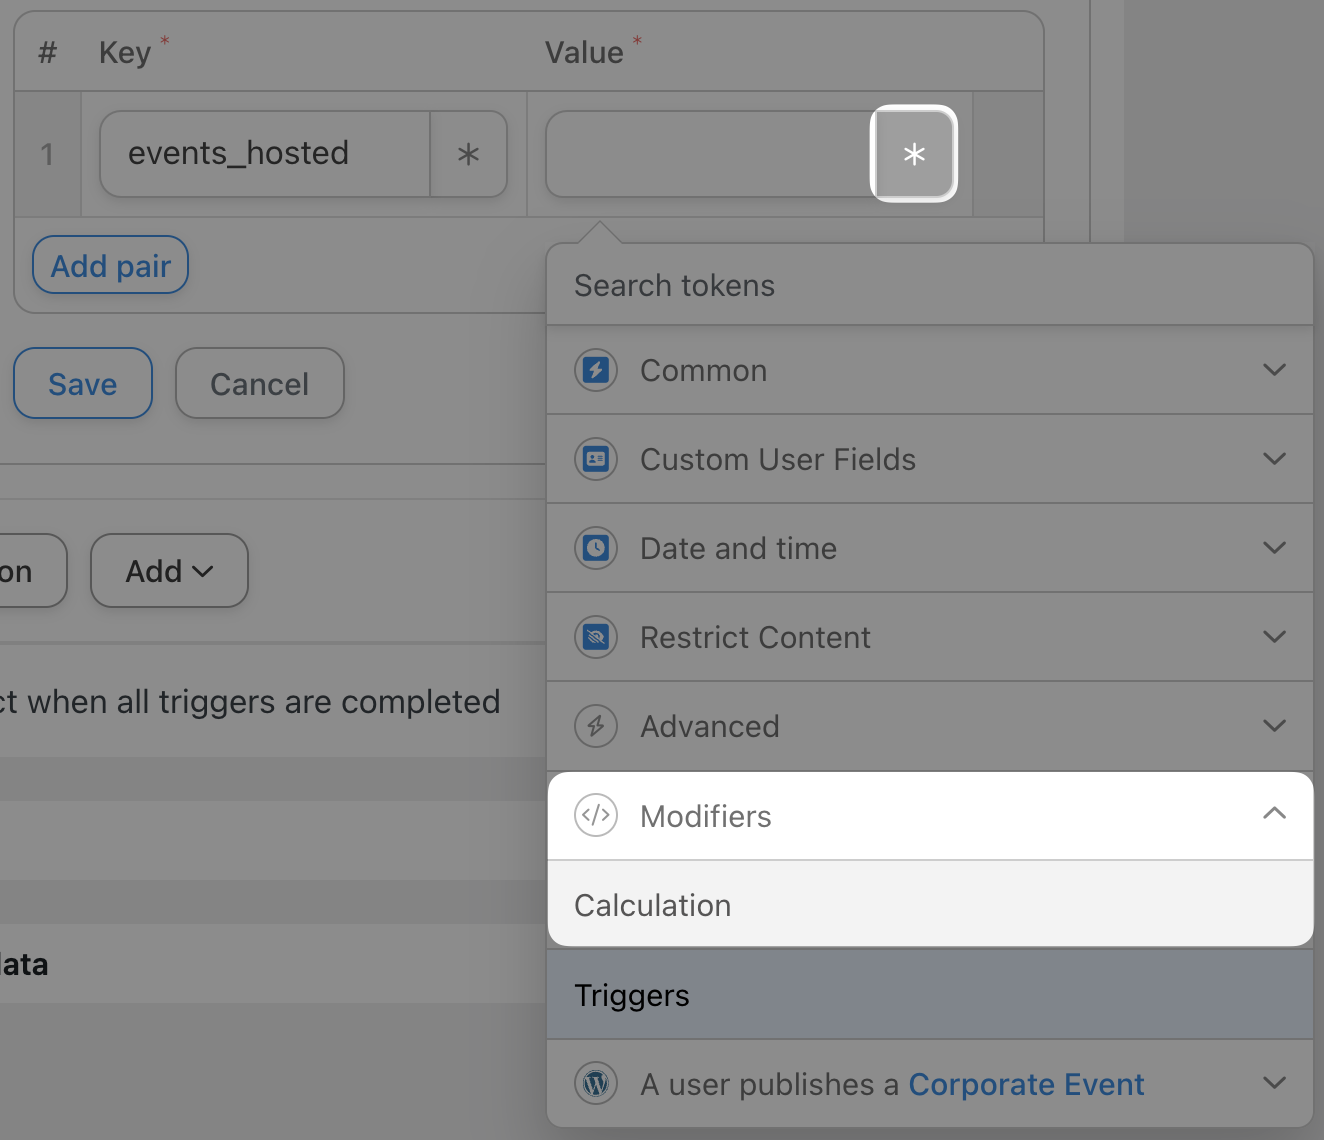
Automator will open up a Calculation window. In the Formula field, simply click the Asterisk, select Advanced > User meta and enter “events_hosted” (or whichever custom field you created). This will tell Automator to retrieve the value associated with that user meta key.
Next, enter the formula you want to perform on the meta value.

When you’re finished, click Add token. Automator will return you to the Actions panel. Click Save.
Step 5: Go Live and Customize!
All that’s left for you to do is to toggle the recipe from Draft to Live.
That’s how simple it is to manage your Advanced Custom Fields metadata with Automator!
But you might be asking yourself: “What about managing post meta?”
Whether you want to edit custom user fields or custom post fields, the same rules apply. If you still have questions about using metadata in Automator recipes, check out our guides on post meta tokens and user meta tokens respectively.
Using Advanced Custom Fields with Automator Filters
Once you’ve gotten the hang of incorporating ACF metadata into your recipes’ triggers and actions, you can take on more advanced recipes. For example, by incorporating ACF metadata into Automator filters, you can greatly expand the functionality of your WordPress website and improve user engagement.
Returning to our events directory website, we want to reward our active event organizers to encourage greater engagement and expand the offerings to our end users.
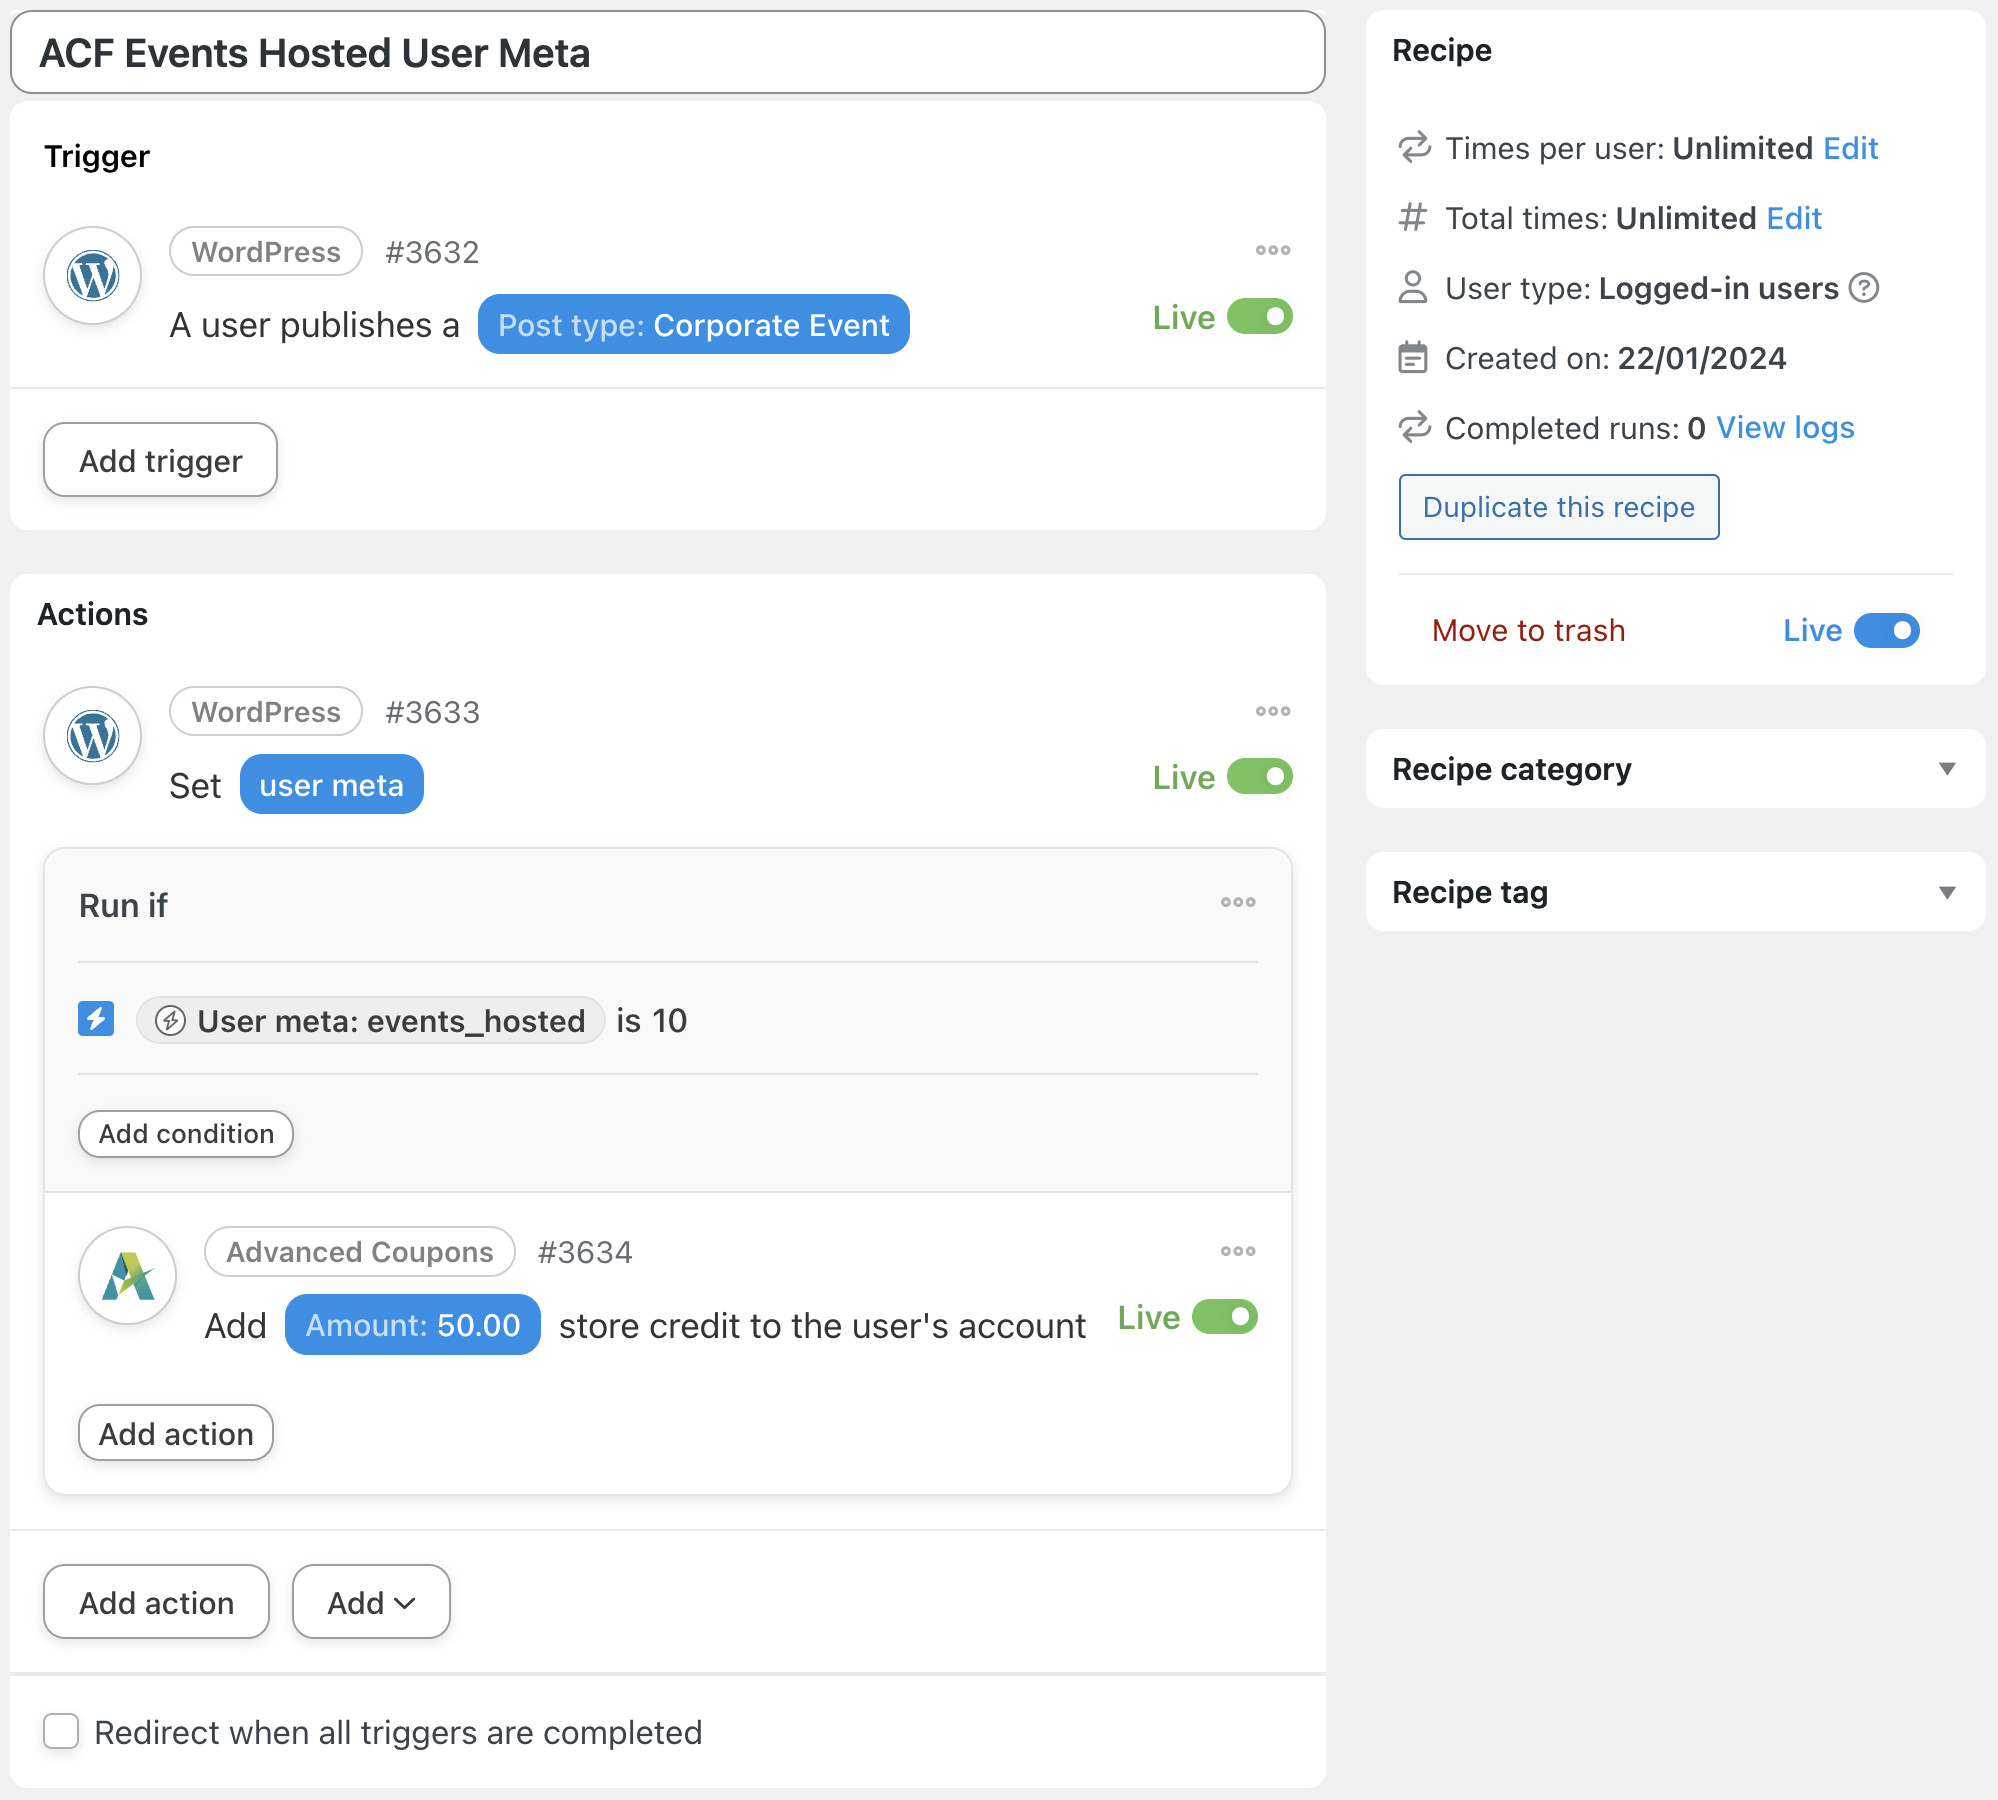
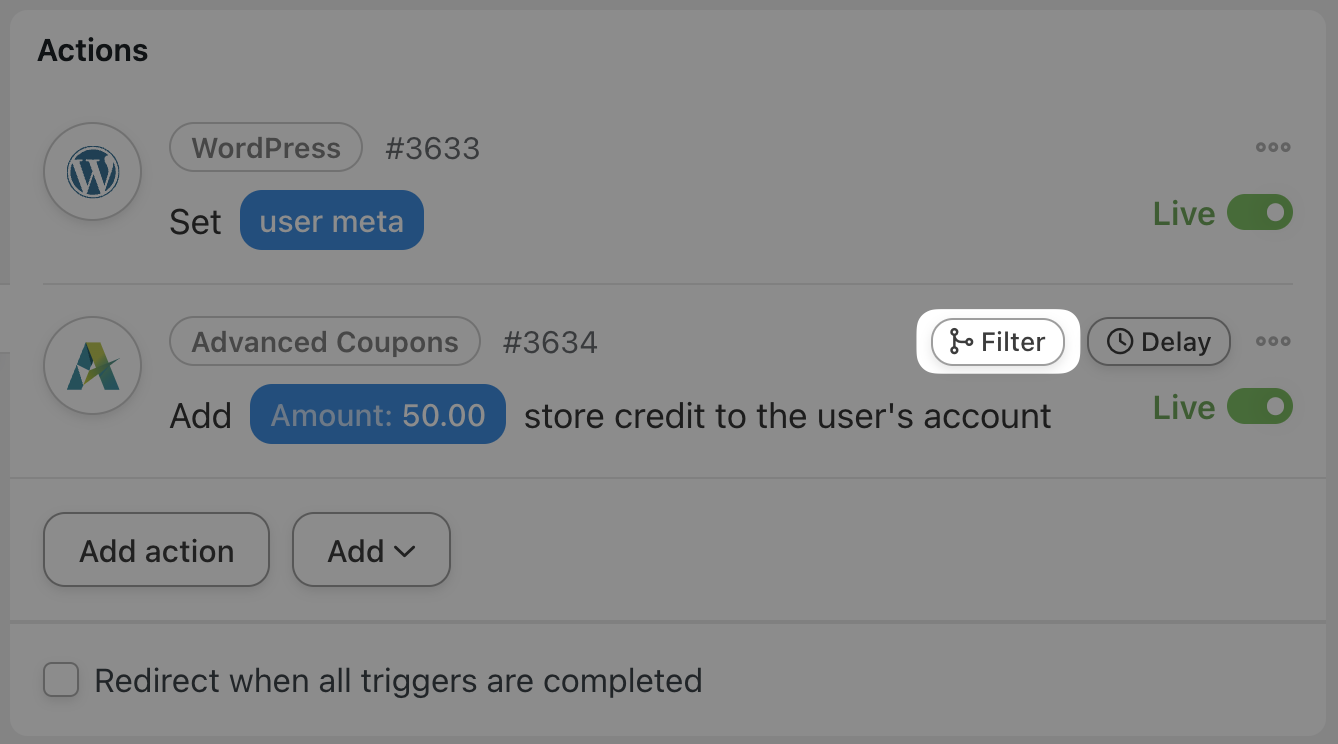
In the recipe pictured above, we’ve added an action with a filter to reward the event organizers whose Events Hosted metadata reaches the value “10” with store credit. Let’s take a quick look at how we incorporated ACF metadata into this Automator filter.
To add a filter to any action, simply hover over it and click Filter.
In the pop-up window that appears, select A token meets a condition. Automator will present you with another window where you can configure the rule that will define the condition.
In the Token field, click the Asterisk and select Advanced > User meta. Automator will present you with a window to enter the user meta key (“events_hosted”). After entering the key, click Add token then set the Criteria and Value. When you’re finished, click Save.
Now, whenever one of our event organizers reaches the threshold of “10” events, they will receive store credit. We can also tie these custom fields into a CRM such as ActiveCampaign to better target our organizers and end users.
Bulk Edit ACF Posts and Fields with Automator
There are still more ways to use Automator to manage your Advanced Custom Fields unique post types and user meta. One of the primary advantages is the ability to manage these custom fields in bulk.
For example, what if we wanted to change the “Event Organizer” field for all or some of our “Corporate Events” unique post types? Using the Automator Loops feature, we can easily edit dozens (or even hundreds and thousands) of ACF post fields at the click of a button.
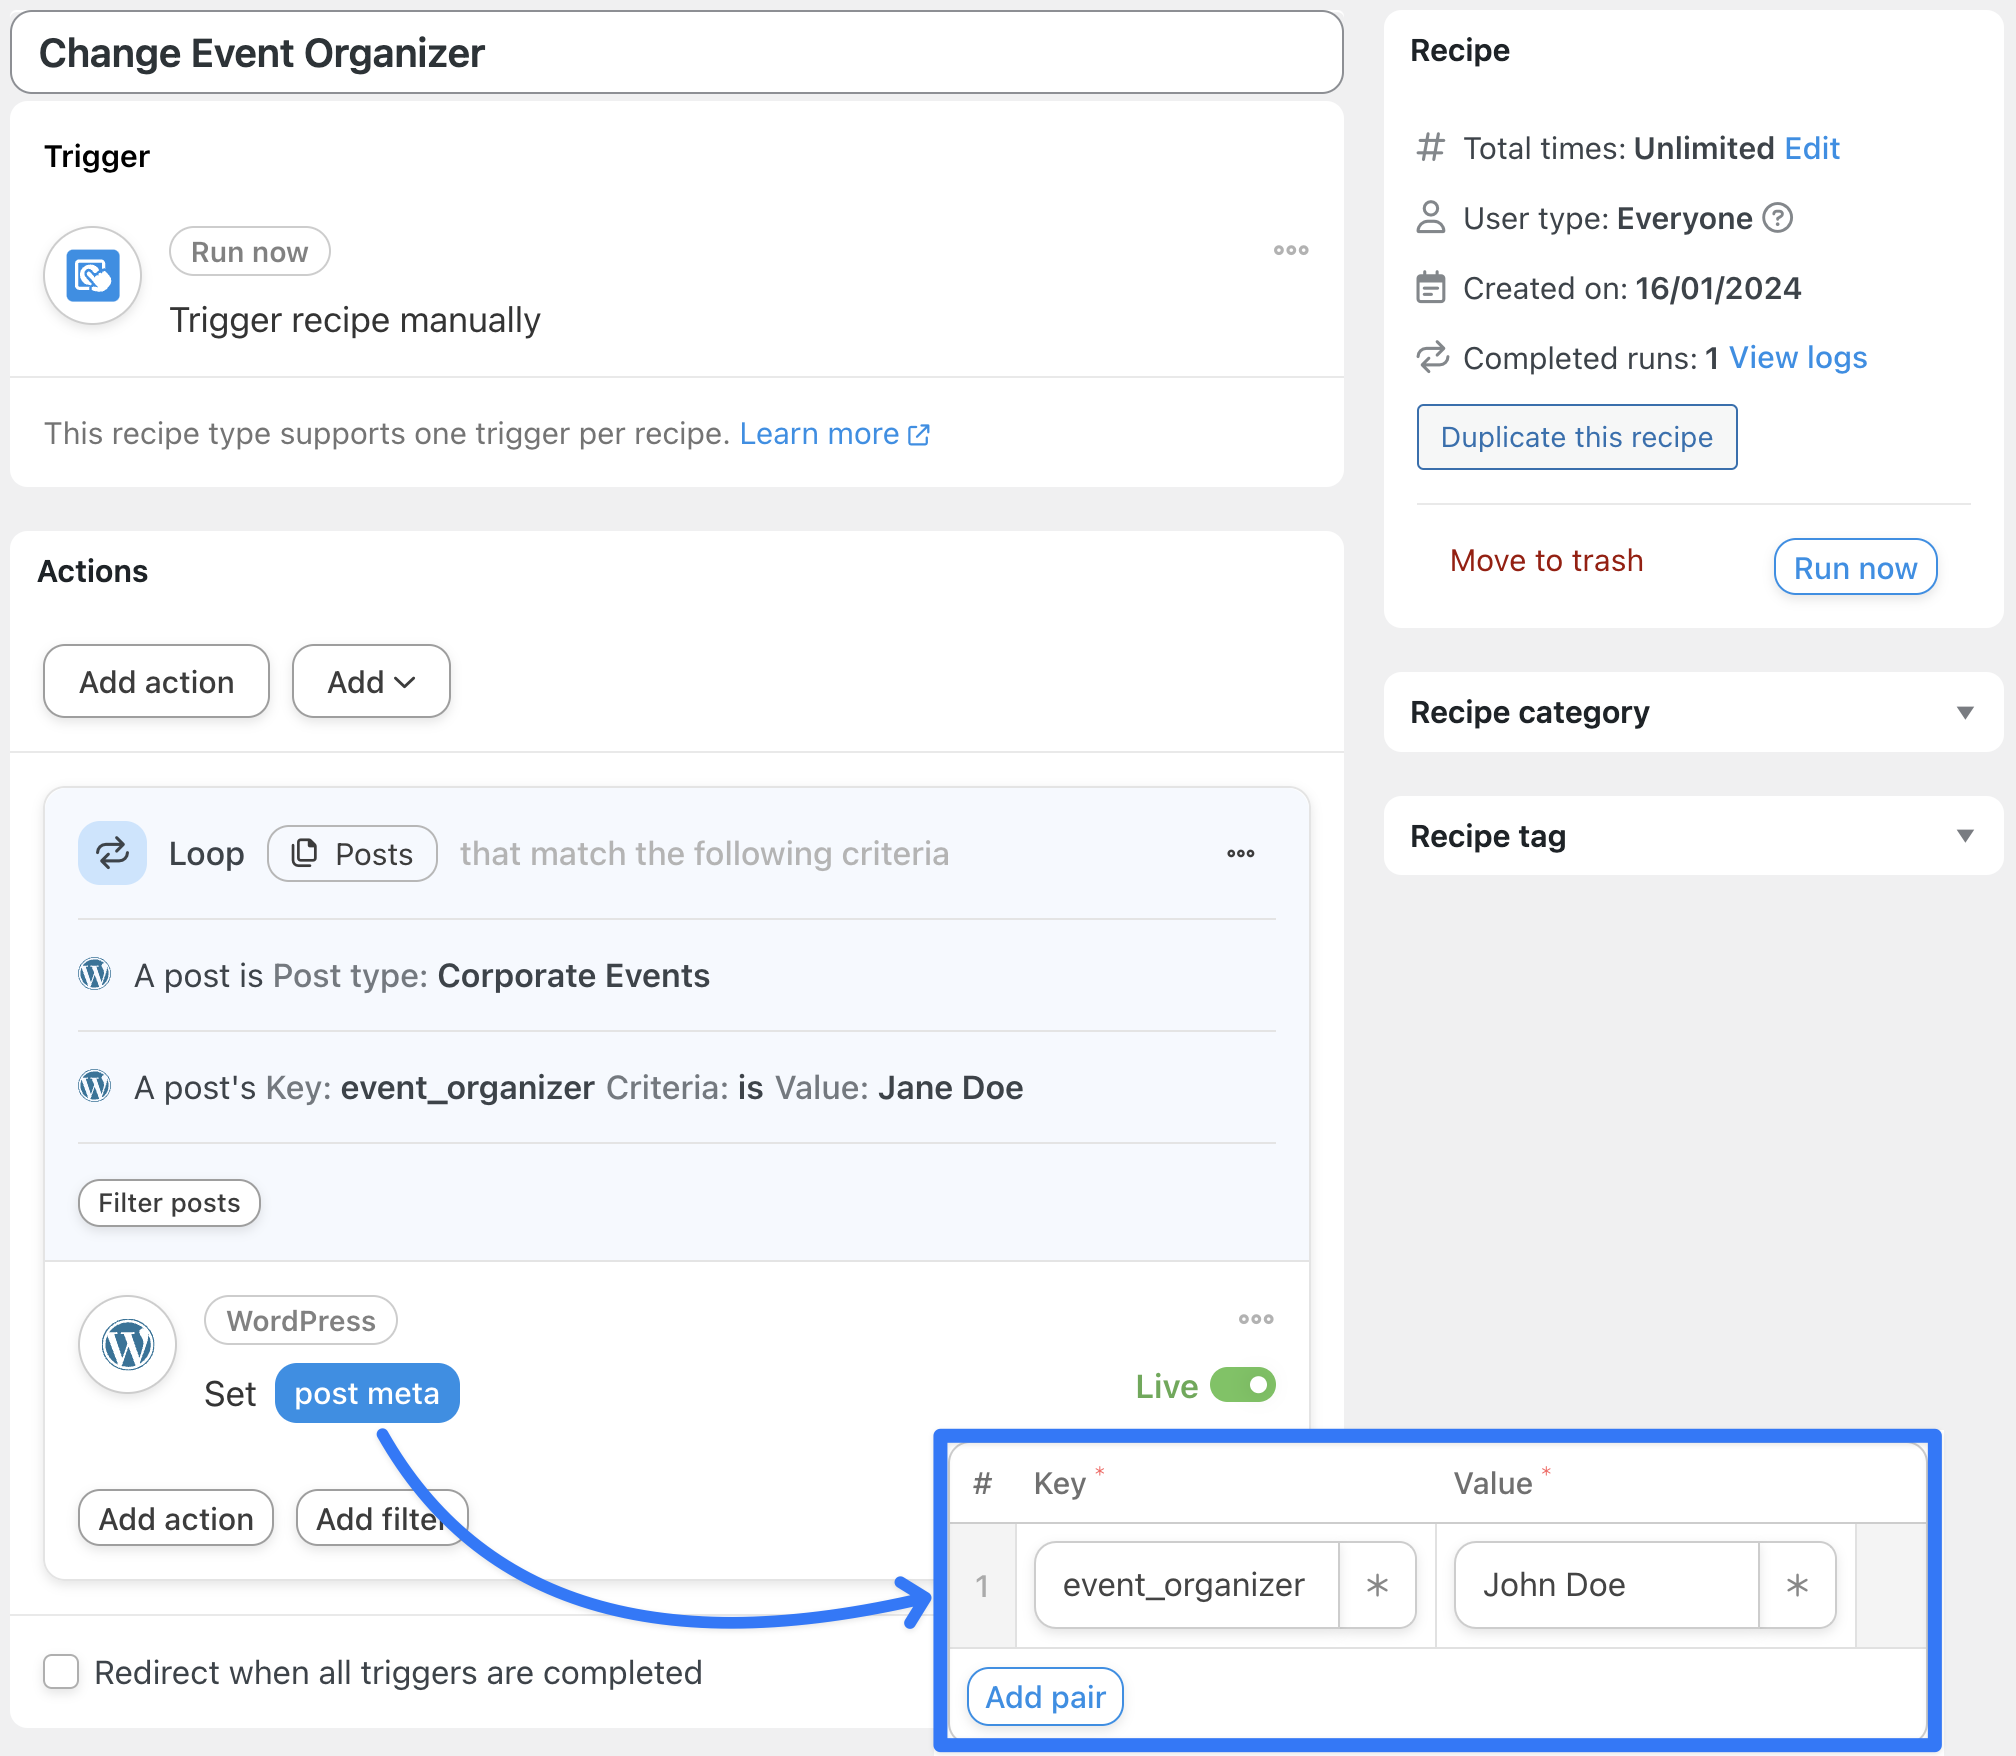
In the recipe pictured above, we’re able to change every “Corporate Event” post whose “Event Organizer” field has the value “Jane Doe” to “John Doe”. Want to know more about editing your WordPress posts and users in bulk? Read our nifty guide here>>>.
ACF + Custom User Fields Addon for Automator
What if you have hundreds—or even thousands—of custom fields to manage? Unless you have an eidetic memory then you would probably have difficulty keeping track of that many meta keys.
Fortunately, for those of us without perfect recall, there’s the Custom User Fields Addon for Automator.

The CUF Addon takes the power of WordPress user meta out of MySQL and puts it directly into your hands—without the risk of crashing your website! Create a unique user field with the click of a button, manage it on the backend with recipes and display it on the frontend with shortcodes.
Most importantly, you can map these customizable fields onto your existing ACF fields to make them even easier to manage! No messy code, no phpMyAdmin.
The Custom User Fields Addon is included for FREE with Uncanny Automator Plus and Elite licenses, making it a great deal for WordPress developers and businesses with multiple websites.
Get your Automator Plus or Elite license to get the CUF Addon for FREE.>>>
Mapping ACF Meta Keys Onto Custom User Fields
By now, we’re pretty confident that you have a good understanding of ACF meta key names and conventions. As such, you can easily connect or map your ACF fields onto the ones you create with Automator’s Custom User Fields Addon.
From your WordPress Admin Dashboard, navigate to Automator > Settings. Click on the Addons tab and select Custom user fields from the list on the left-hand side.
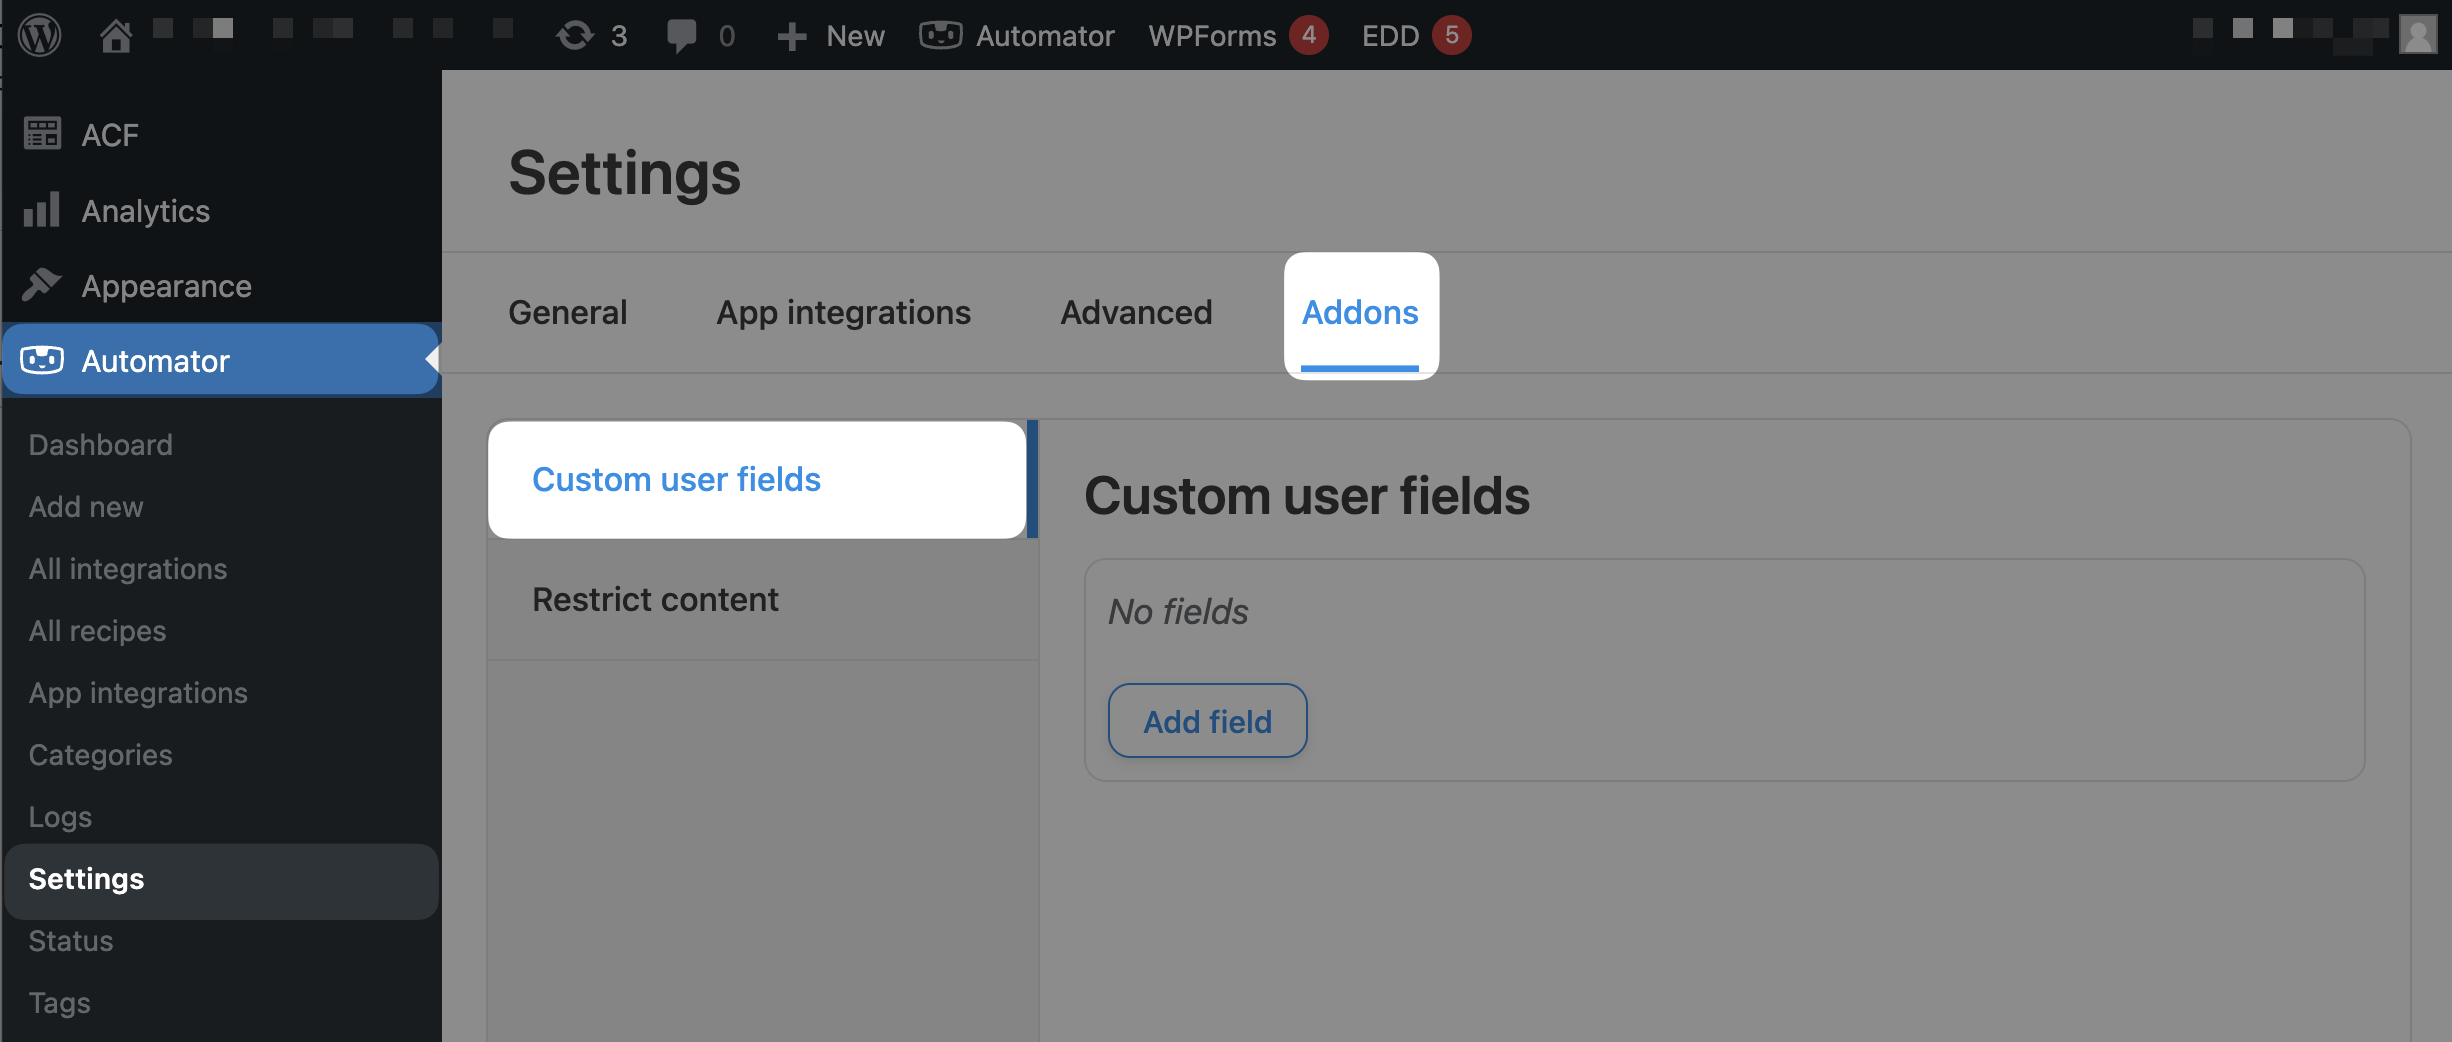
By default, Automator will create the meta key following the convention:
- every meta key will begin with “uacuf_”
- spaces replaced with an underscore “_”
As you can see, apart from the beginning of the meta key, this naming convention is very similar to the convention employed by ACF. As such, mapping these newly created fields onto one another is quite simple.
Returning to our events directory website example, we had created the user fields “Job Title” and “Events Hosted”. To map these ACF fields onto CUF fields, simply click Add field.
In the pop-up window that appears, name the field “Job Title”. Toggle Use custom meta key to “Yes” then simply remove the “uacuf_” from the beginning of the meta key. Click Save.

That’s it! Repeat the process for the “Events Hosted” field and any other custom user fields that you created in ACF. Your WordPress website and any plugins and/or apps that interact with your user meta will recognize these CUF and ACF fields as the same thing.

Now comes the fun part. Let’s recreate our ACF Events Hosted User Meta recipe using the Custom User Fields Addon to see how much easier it will be.
Steps 1-3: Create and Name a New Recipe and Configure Your Trigger(s)
Follow the same steps as before.
Step 4: Configure Your Action(s)
In the Actions panel, click Add action and select Custom User Fields from the menu of available integrations.

From the drop-down list that appears, select Update the user’s custom user field to a value.

In the field labeled Custom user field, select “Events Hosted” from the drop-down list.
Once again, we’re going to use the Calculation feature to populate the Value field. However, because we’re working with the CUF Addon, we won’t need to remember the meta key.
In the Value field, click on the Asterisk and select Modifiers > Calculation. In the Formula field, click the Asterisk and simply select the Events Hosted token then enter the rest of the formula.

When you’re finished, click Add token. Automator will return you to the Actions panel. Click Save.
Step 5: Go Live!
Just as before, toggle your recipe from Draft to Live.
As you can see, managing your ACF metadata with Automator is easy. But it’s even easier with the Custom User Fields Addon!
Conclusion
We’re confident that you now have all of the tools you need to unlock the full potential of the Advanced Custom Fields plugin. In this post, we’ve:
- explained how Advanced Custom Fields meta keys work,
- demonstrated using ACF in Automator recipes,
- shown you how to use the Custom User Fields Addon
- walked you through mapping ACF fields onto CUF fields
- demonstrated ACF and CUF working together and,
- unlocked a whole wide world of WordPress wonders!
What we covered here really was just the beginning of the powerful integration between ACF and Automator.
If you’re not totally confident in using Automator and the Customer User Fields Addon to manage your Advanced Custom Fields post types and user fields, drop us a line in the comments section below.
Until then, happy automating!

Related Posts


Can you copy custom post type fields to another custom post type upon a change event?
Hi Gavin, great question!
Yes—you can copy ACF field values from one custom post type to another using Uncanny Automator Pro, depending on your setup. For example, you could create a recipe that triggers when a post in one custom post type is updated (or when a specific ACF field value changes), then use an action to create or update a post in another custom post type and populate its ACF fields using tokens.
To make this work, you’ll want to:
1. Use a “Post is updated” or “ACF field value changes” trigger (depending on your needs).
2. Add an action like “Update post meta” or “Create a post”.
3. Use tokens from the original post to copy the ACF data into the new post.
Let us know more about your specific use case, and we’d be happy to walk you through a working example!