Uncanny Automator now supports a powerful integration with Facebook Lead Ads, allowing you to trigger automations on your WordPress site when someone submits a lead form on Facebook. This article provides a comprehensive, step-by-step guide to help you set everything up, even if you’re new to Facebook Business tools.
⚠️ Important:
Facebook requires a number of setup steps to properly collect leads and send them to Automator. Skipping any step may prevent the integration from working.
Before You Begin
To successfully connect Facebook Lead Ads with Uncanny Automator, you must have the following in place:
- A Facebook Business Portfolio
- A Facebook Page linked to that business
- An Ad Account associated with the business and page
- A Leads campaign with an Instant Form
- Admin access to all of the above assets
➡️ Already have your Facebook setup ready?
If you’ve already completed above steps, you can skip ahead to Step 7: Connect Facebook Lead Ads in Automator.
Step 1: Set Up Your Facebook Business Portfolio
Go to https://business.facebook.com. If you already have a Business Portfolio, proceed to Step 2. Otherwise, follow the instructions below:
- Click the menu icon in the top left corner.
- Select Create Business Portfolio.
- Enter your business information and follow the prompts until your business is created.

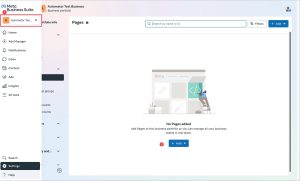
Step 2: Create or Link a Facebook Page
If you already have a Facebook Page, skip to Step 3. Otherwise:
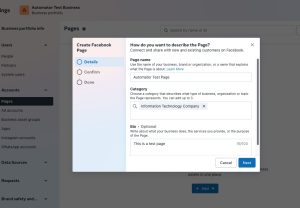
- Click the menu icon again and choose Pages.
- Create a new page by entering your page name, category, and other required info.
- Refer to the example details shown in the screenshot.
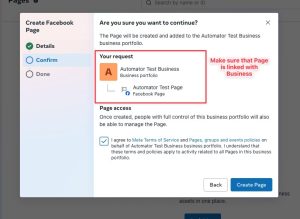
- Once created, ensure your page is connected to your Business Portfolio.
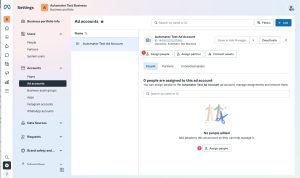
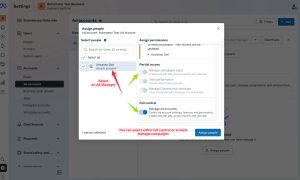
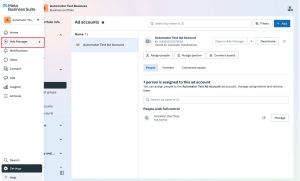
Step 3: Set Up an Ad Account and Assign Access
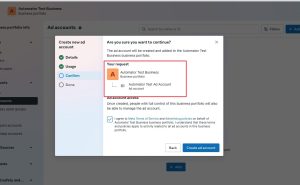
Check if your page has an Ad Account linked. If not:
- Go to Business Settings → Accounts → Ad Accounts.
- Create a new ad account or add an existing one.
- Ensure the ad account is linked to your business and the correct page.
- Assign a person (you or someone else) to the ad account with at least Manage Campaigns permission.

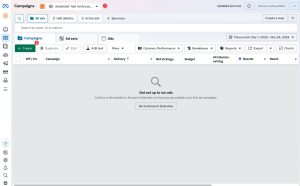
Step 4: Open Ad Manager and Start Creating a Campaign
- Click the menu icon and select Ad Manager.
- Choose the correct business and page at the top.
- Click Create to start a new campaign.
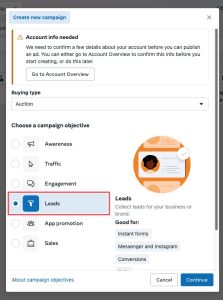
Step 5: Configure Your Leads Campaign
- Select Leads as your campaign objective.
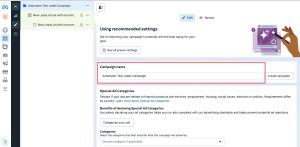
- Give your campaign a recognizable name.
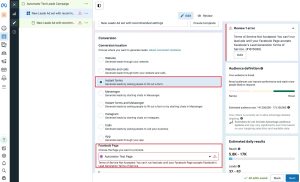
- Select Instant Form as the conversion location.
- Choose your Facebook Page and scroll down to accept the Facebook Terms if prompted.
- Adjust your budget, audience, and other settings as needed.
- Do not publish the campaign yet—you can save it as a draft to avoid incurring charges.
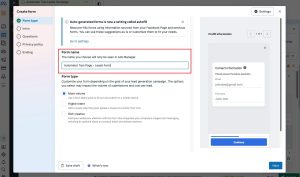
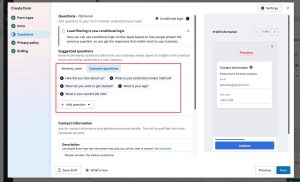
Step 6: Create a Facebook Lead Form
- Click to create a new lead form in the final section of the ad creation process.
- Enter a name for your form.
- Update the form questions to match the information you want to collect.
- Preview the form using the built-in preview tool.
- Fill in your Privacy Policy URL.
- Set the “Thank You” screen behavior or choose a redirect link.

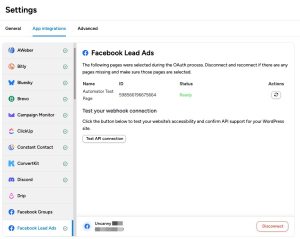
Step 7: Connect Facebook Lead Ads in Automator
- Log in to your WordPress site.
- Go to Automator → App Integrations → Facebook Lead Ads.
- Click Connect.
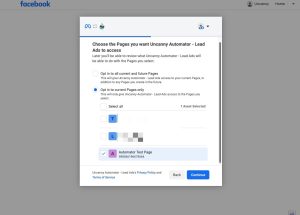
- Choose the correct Page(s) when prompted.
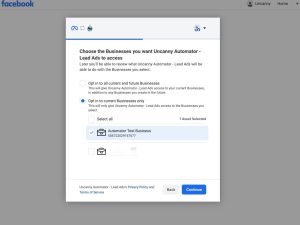
- On the next screen, select the correct Business(es).
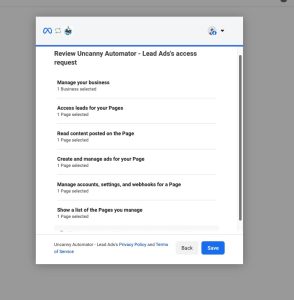
- Review the requested permissions and click Save.
- Click Got it when returned to your site.
- Check that the status next to your page now says Ready.
- Click “Test API connection” to confirm that your site is reachable by Facebook Lead Ads and ensure the connection is working properly.
💡 Optional:
You can verify app access directly in Facebook Business Tools. It’s helpful for confirming everything is connected properly.
Verify App Access
Go to Facebook Business Tools Settings and confirm that Uncanny Automator – Lead Ads appears in the list of connected tools.

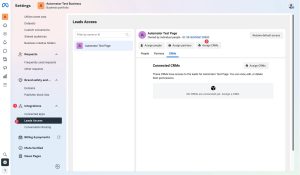
Step 8: Assign Uncanny Automator as a CRM
- Return to Facebook Business and select the same business and page.
- Go to the bottom left and click Settings.
- In the menu, click Leads Access under “Integrations.”
- Click Assign CRMs.
- From the list, select Uncanny Automator – Lead Ads and click Assign.

Step 9: Create a Recipe in Automator
- Go to Automator → Add New.
- Select the Everyone recipe type.
- Add a trigger from Facebook Lead Ads.
- Select your Page and Form.
- Add your desired actions (e.g., send an email, tag a user, enroll in a course).
- Click Activate to enable the recipe.

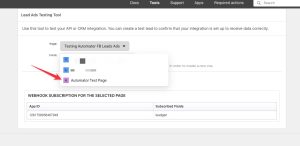
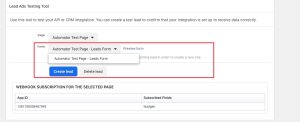
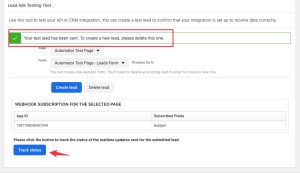
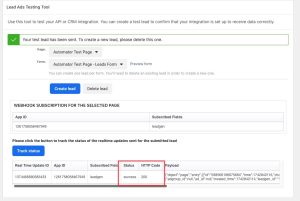
Step 10: Test the Connection
- Go to Lead Ads Testing Tool.
- Select the Page you used in your campaign.
- Select the lead form you created.
- Click Create Lead.
- Wait for the success confirmation.
- Click Track Status to verify it returned a 200 OK status.
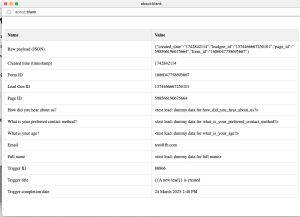
Step 11: Confirm the Lead Reached Automator
- In your WordPress admin, go to the Automator recipe you created.
- Click the Logs tab.
- You should see a completed recipe run.
- Click Details to view the submitted lead data.

Troubleshooting
If you don’t see the recipe run:
- Ensure that the page, business, and ad account are properly linked.
- Verify that permissions were granted during app connection.
- Double-check that Uncanny Automator – Lead Ads is assigned as a CRM.
- Re-connect the app from Automator settings and re-authorize access.
You’re Ready!
That’s it! Your Facebook Lead Ads are now integrated with Uncanny Automator. You can begin building powerful workflows based on lead submissions in just a few clicks.


