Introduction
Uncanny Automator features the only WhatsApp integration available anywhere that gives you full access to the WhatsApp Cloud API with no added transaction fees.
Unlike the various WhatsApp chat plugins available for WordPress that require users to initiate messages and for you to respond manually to every message, it enables you to send direct, business-initiated messages, message templates, and automatic responses to your users based on actions they take on your site such as making a purchase, joining a group, completing a course, receiving comments on their articles, and much, much more. It even provides tools to handle opt-ins and dynamic variables in message templates!
Setting up WhatsApp on your WordPress site with Uncanny Automator
As this is a very powerful integration that integrates directly with the Cloud API, setup is a bit more involved than a typical integration, so you can expect to spend about 30 minutes on the process.
Here’s an overview of the steps:
- Create a Business app on developers.facebook.com
- Add the WhatsApp product to your new Business app
- Connect Uncanny Automator to your Business app
- Add a Webhook to your Business app
- Add a phone number to your Business app
These instructions assume that you already have a Facebook account.
1 – Create a Business app on developers.facebook.com
You’ll first need to create a Business app on Meta for access to Facebook services, including WhatsApp.
To create a Business app:
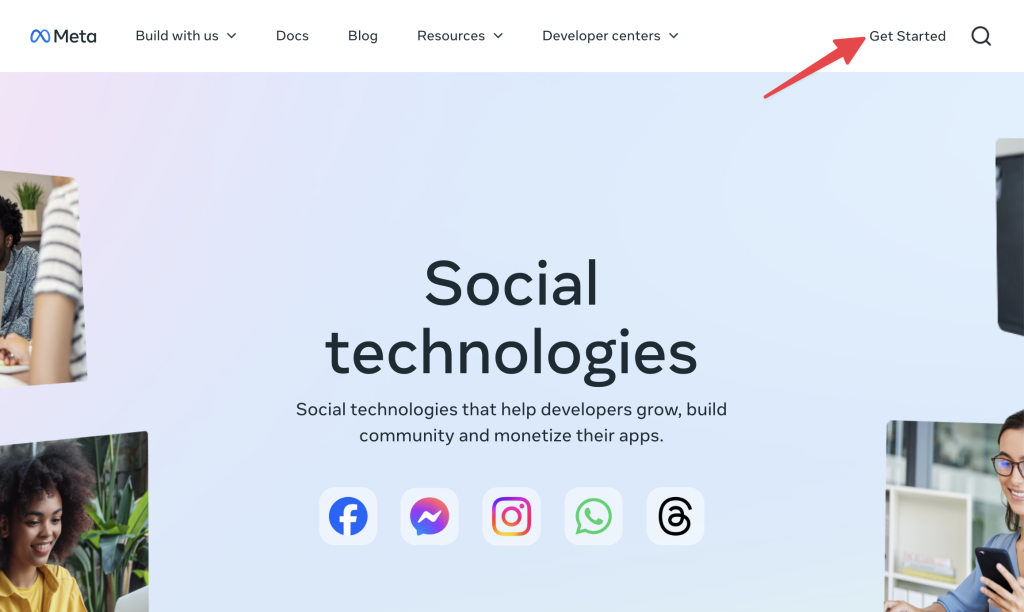
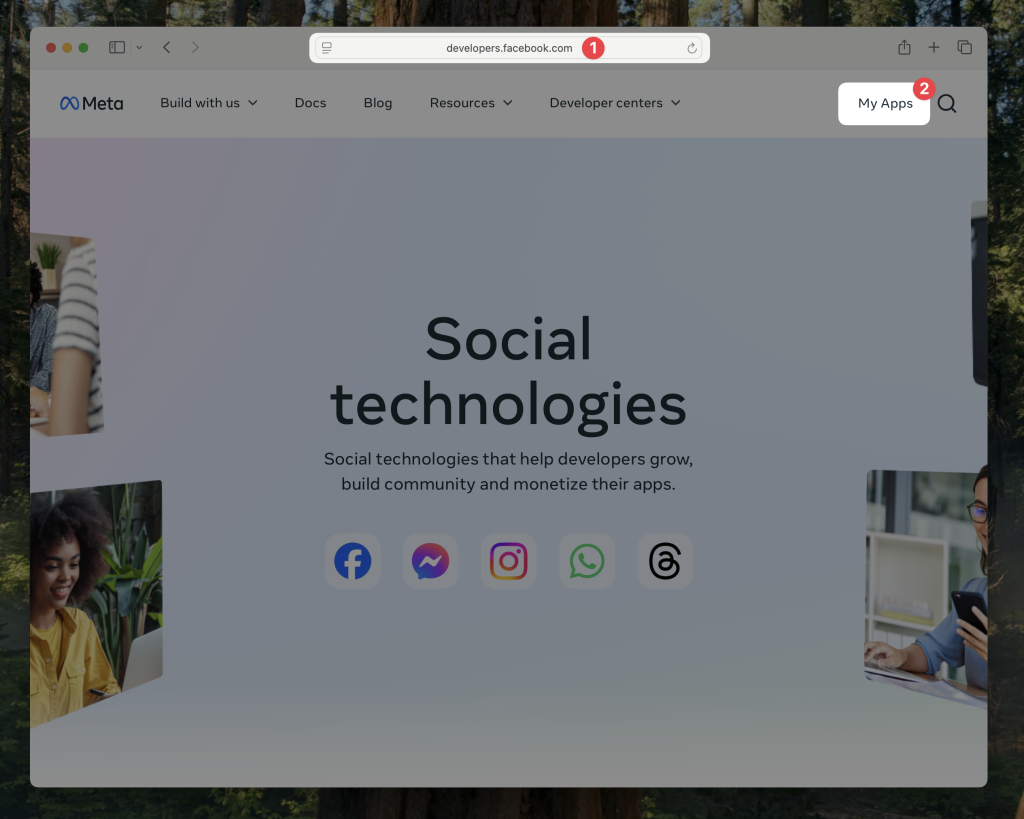
- Go to developers.facebook.com. If you’re not already logged in, click Log in in the top right. (Note: You may need to register as a developer if you haven’t already. Don’t worry—it’s free and easy. Simply click Get started in the upper right-hand corner.)
- Click My Apps in the top right.
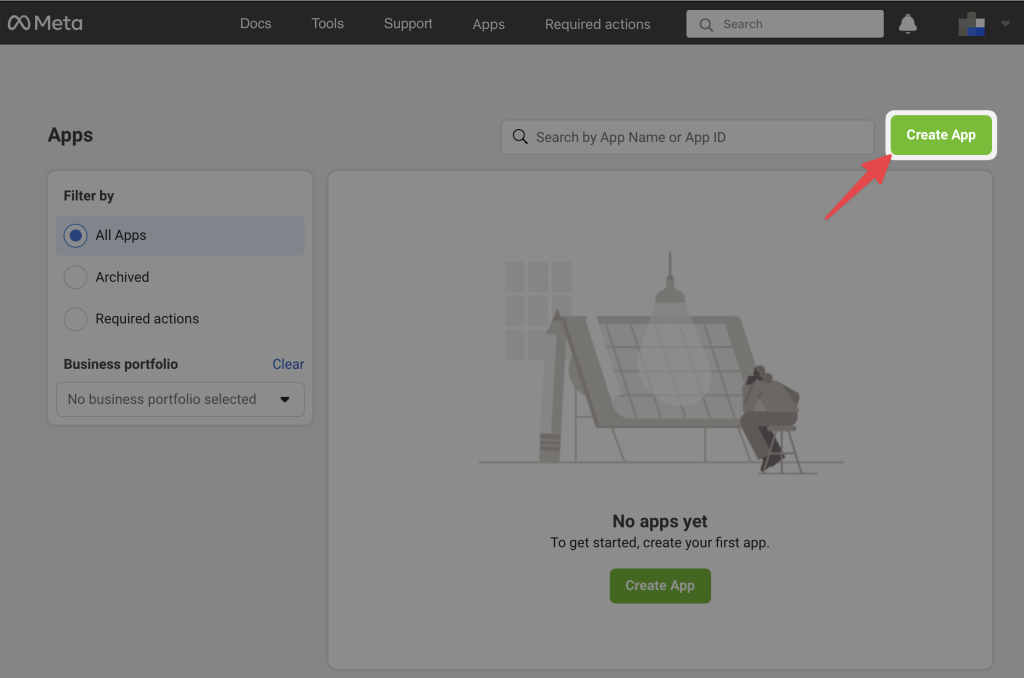
- Click Create app.
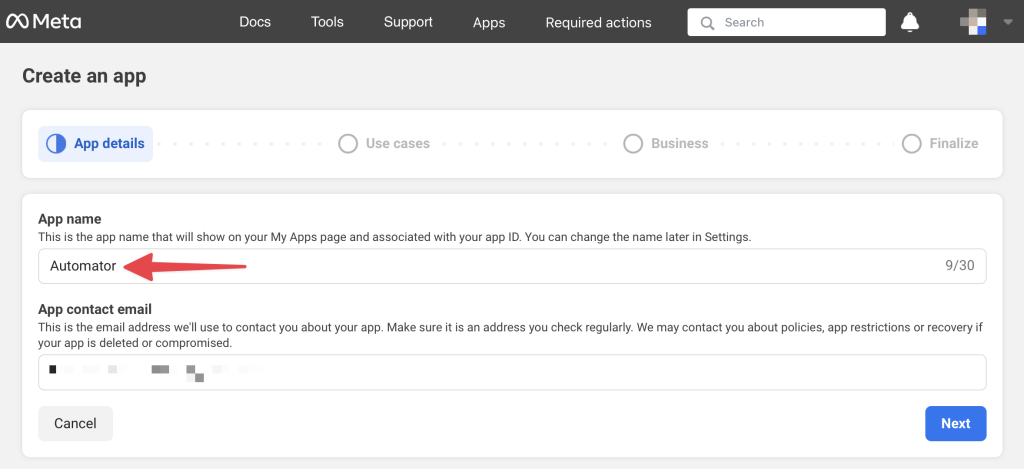
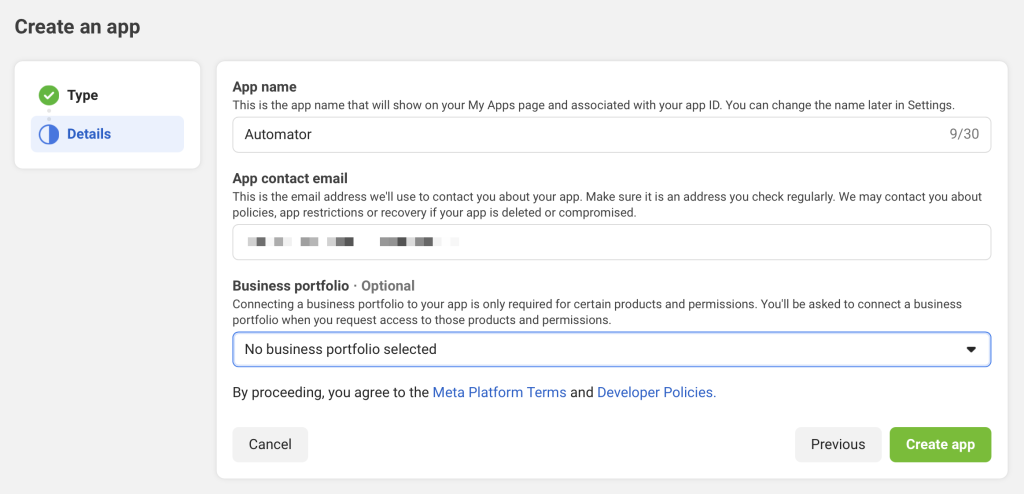
- You may see a modal appear for developing apps with “use cases”. You can exit this modal. Next, create an “App name”. For example, we have named our app “Automator”. After naming your app, click Next.
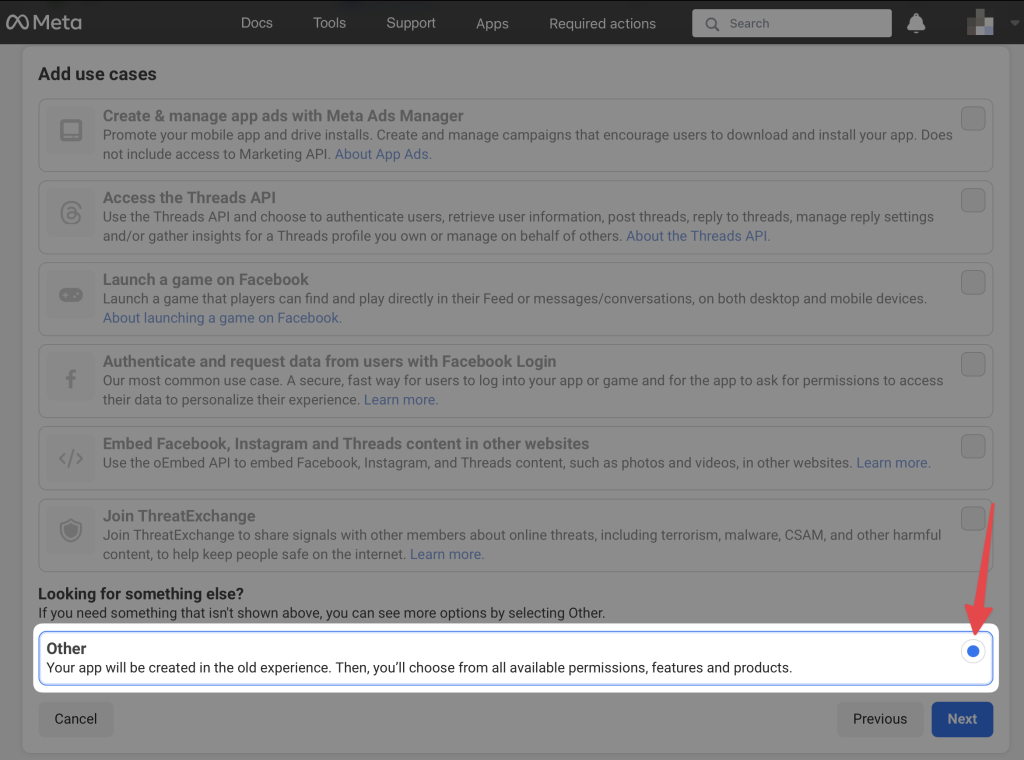
- Under the Use Cases tab, select Other and click Next.
- Choose Business then click Next.
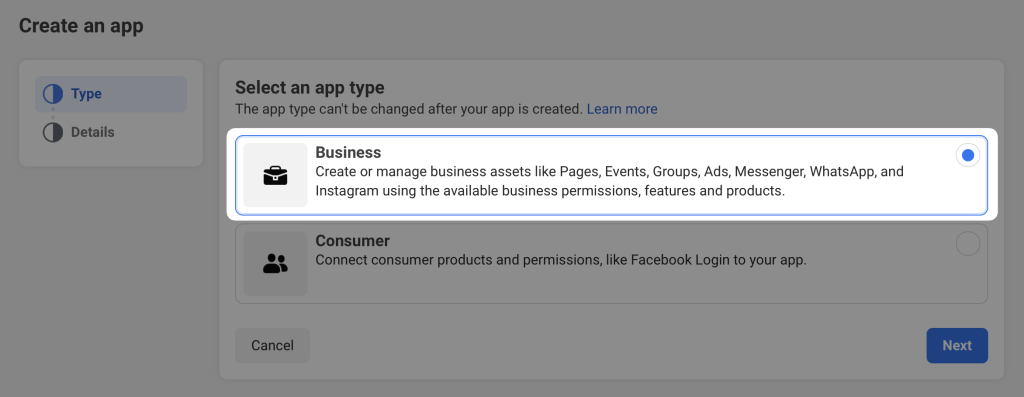
- Fill out the required fields. Leave the Business Account field empty, or select an associated Business Account if desired. Click Create app.
2 – Add the WhatsApp product to your Business app
Your app can be used to access multiple Meta services. In this article, we’ll add the WhatsApp product to your new app.
To add the WhatsApp product to your Business app:
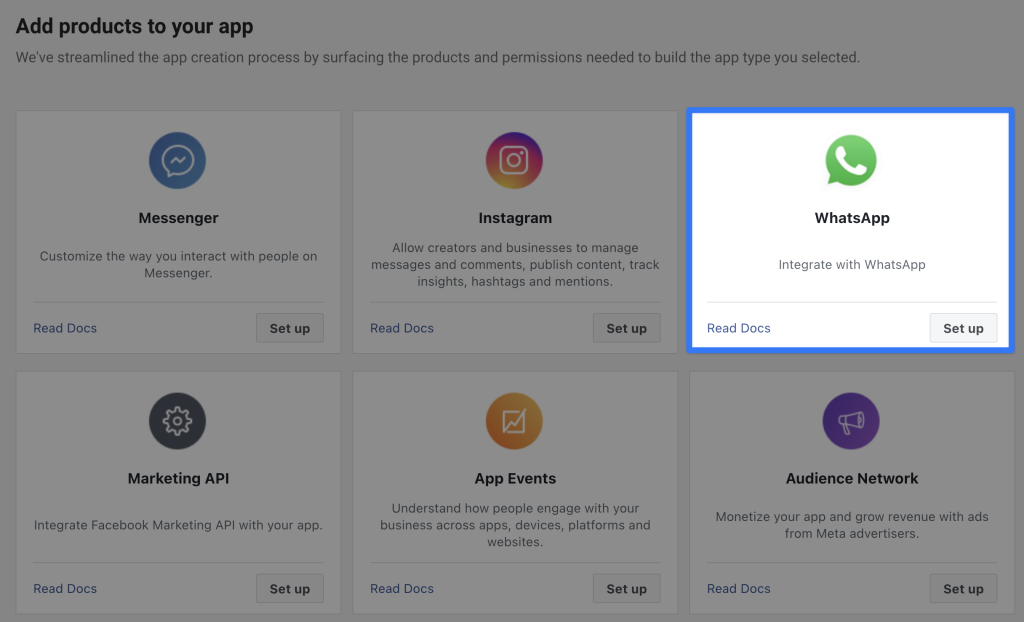
- In the Add products to your app screen. Select WhatsApp and click Set up.
- Create a new Meta Business Account or select an existing account. You will see a Getting started screen with technical details of your app.
3 – Add a phone number to your Business app
To begin sending messages from WhatsApp, you’ll need to add a phone number.
To set up a phone number:
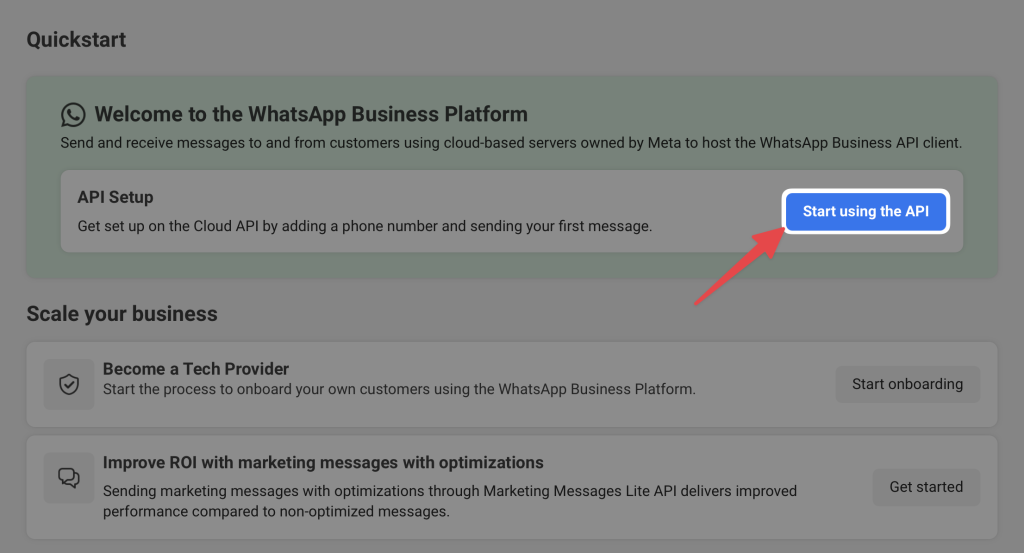
- In the Quickstart screen, click Start using the API.
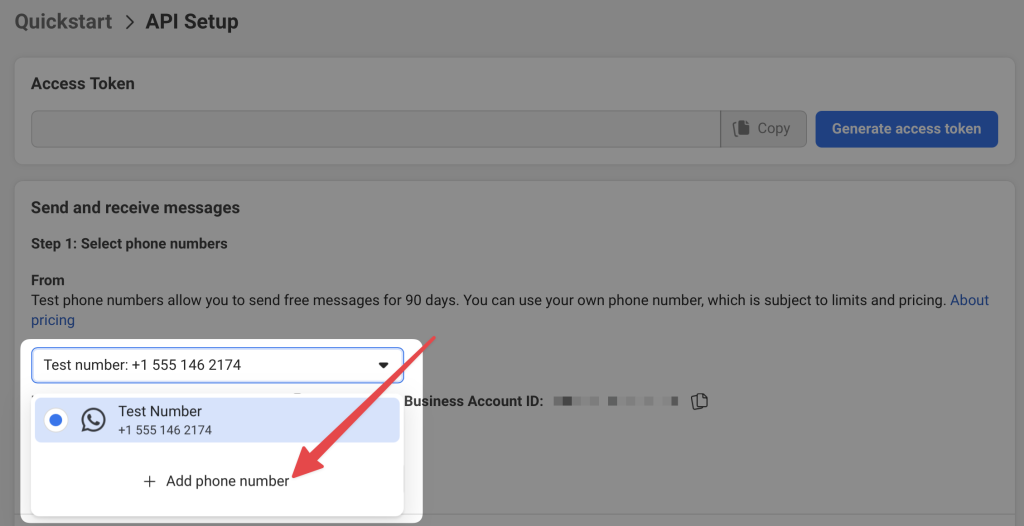
- Under the API Setup, use the Test number or click Add phone number.
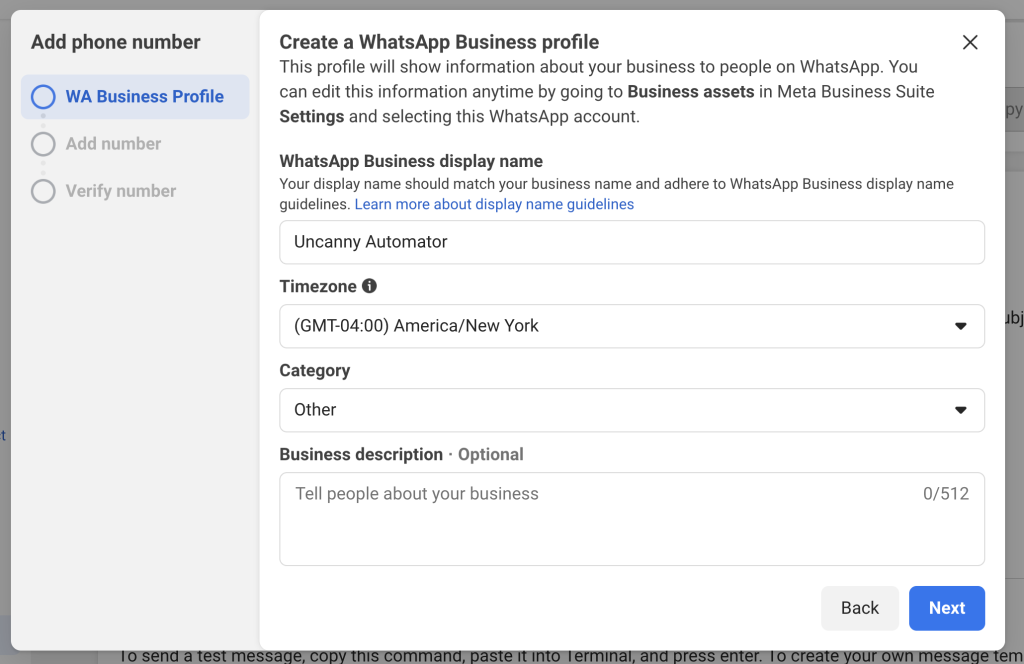
- Create a WhatsApp Business profile then click Next.
- Enter a phone number to use with WhatsApp. You will need to register a number that’s not already associated with a WhatsApp account. If you want to use a number that’s already associated with a WhatsApp account, you will need to migrate the number to your business account (login required). Click Next to verify your number via text or phone call.
- Click Generate access token and follow the prompts in the modal that appears.
(Note: This access token will be valid for 24 hours only. We will show you how to create a permanent access token.)
4 – Connect Uncanny Automator to your Business app
Uncanny Automator needs some information about your Business app to send messages via WhatsApp.
To connect Uncanny Automator to your Business app:
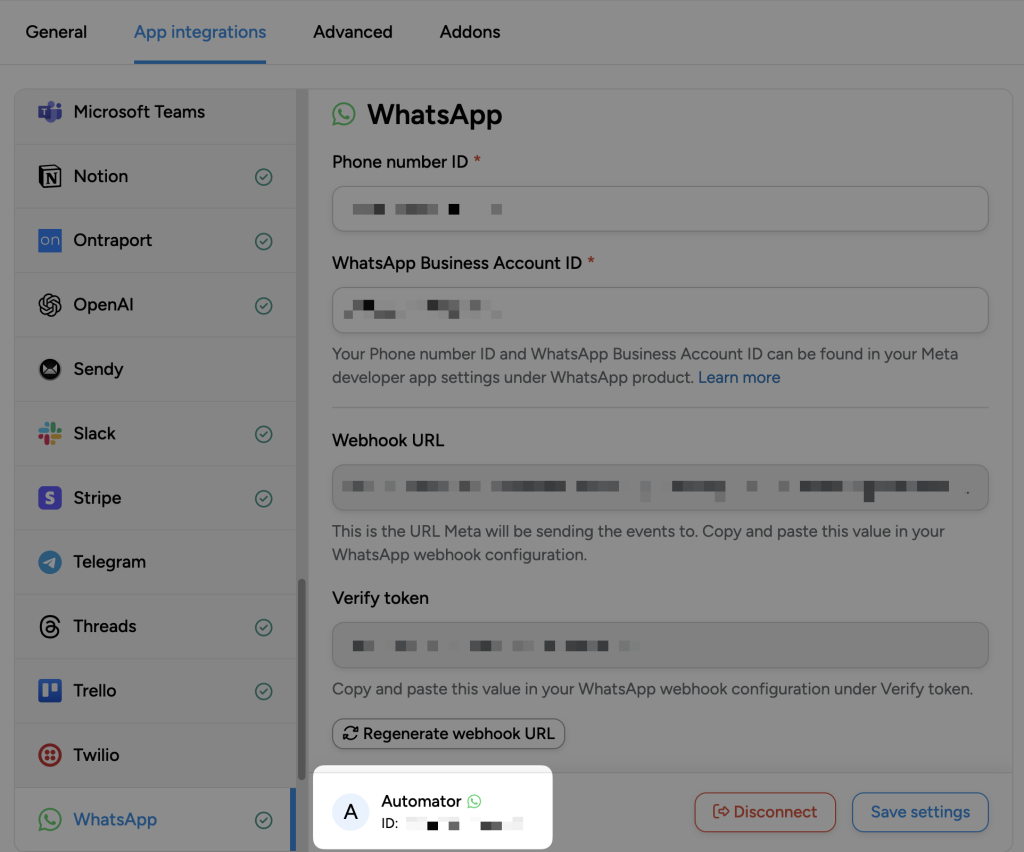
- From your WordPress Admin Dashboard, navigate to Automator > Settings > App Integrations > WhatsApp.
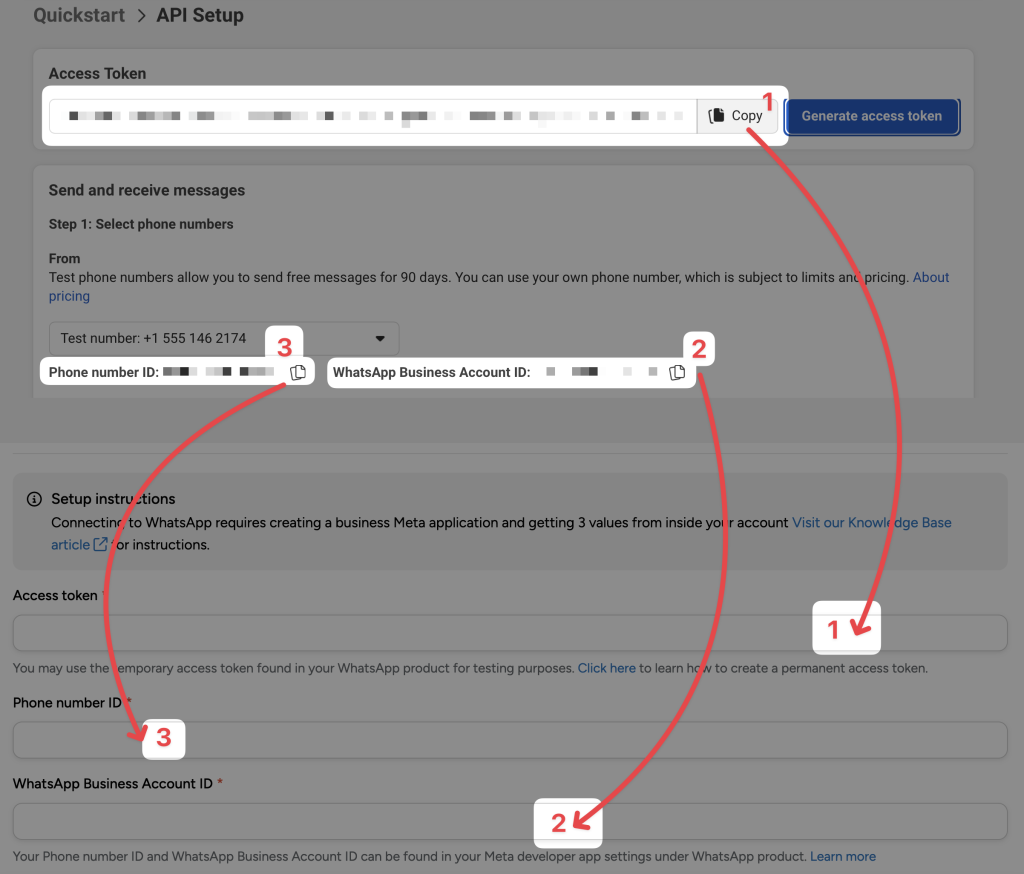
- On the Getting started screen of your Business app, copy and paste these three pieces of information into your Uncanny Automator WhatsApp settings:
- Access token
- Phone number ID
- WhatsApp Business Account ID
- On your WordPress site, click Connect WhatsApp Account. You should see the message: Your test account “[Account name]” has been connected successfully!
5 – Add a webhook to your Business app
A webhook enables Uncanny Automator to receive message confirmations from WhatsApp. This enables Automator to confirm whether messages were sent successfully, as well as automatically respond when certain conditions are met (e.g. send an opt-in request when a message was not delivered because the user has not opted-in to receive communications from your business).
To set up the webhook:
- From your Meta Business app, in the left menu, navigate to WhatsApp > Configuration.
- Return to the WhatsApp settings page in Automator.
- Copy and paste these two pieces of information into your WhatsApp webhook settings:
- Callback URL
- Verify token
- Click Verify and save.
- Under Webhook fields, scroll down to “messages” and switch the toggle to Subscribed.
That’s it! You will now be able to send and receive messages via Uncanny Automator.
Generating a Permanent Access Token
The steps above are a quick way to get started with WhatsApp on your WordPress site. The temporary access token generated in Step 2 is only valid for 24 hours. When you’re ready to go live, you’ll need to generate a permanent access token.
Meta uses System Users to provide permanent access tokens to their services. So you’ll need to add a System User to your Business Manager account, then use that System User’s access token for permanent access.
To add System Users to your Business Manager account and generate a permanent access token:
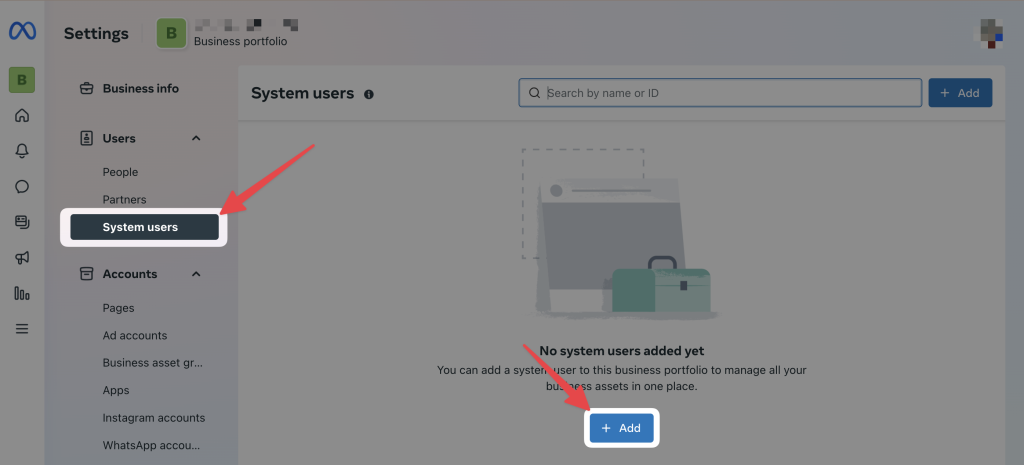
- Go to Business Settings.
- Below Users, click System Users.
- Click Add.
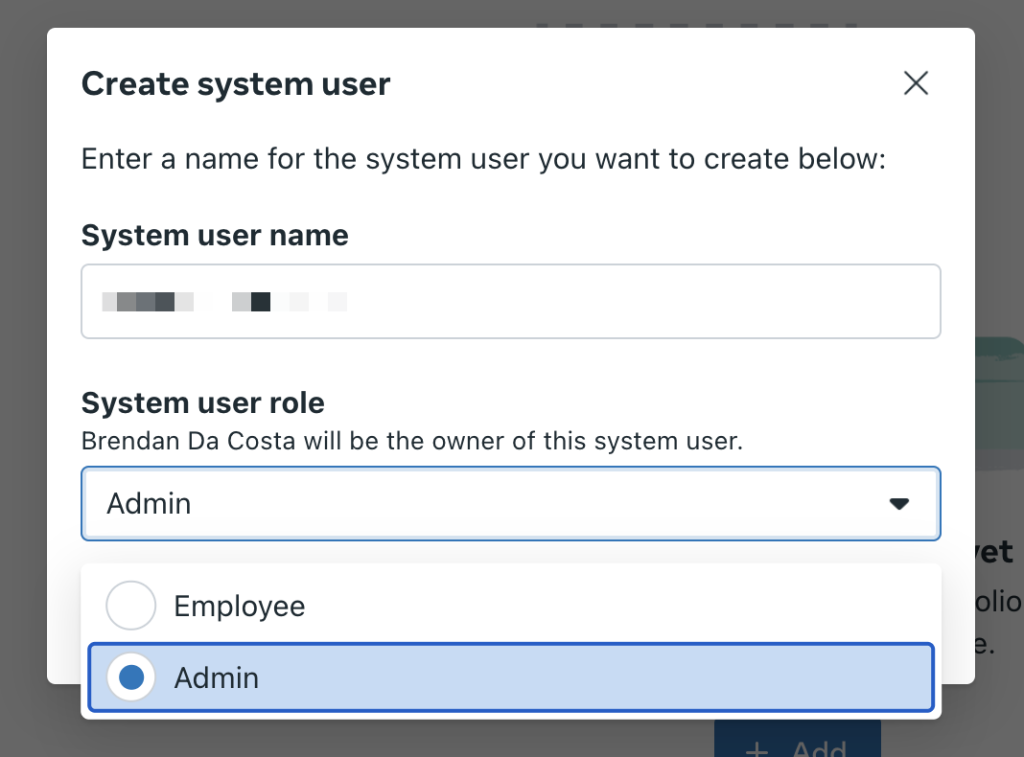
- Give a name to the system user and choose Admin. Then click Create System User.
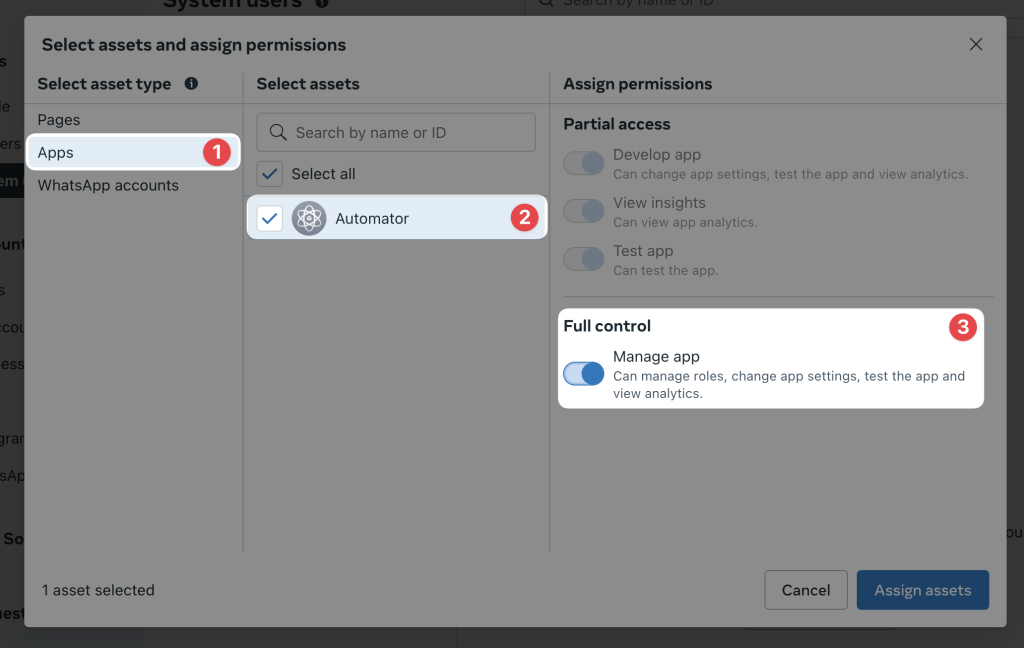
- Click Assign assets. In the modal that appears, select Apps > [App Name] > Full control.
- At the top of the screen, next to the user, click Generate token.
- In the modal that appears, select an app, expiration period for the token, and permissions. The permissions must be: “whatsapp_business_management” and “whatsapp_business_messaging”. Click Generate token.
- Copy your token.
Using the permanent access token
To switch to the new access token, you’ll need to disconnect and reconnect with the new token.
- From your WordPress Admin Dashboard, navigate to Automator > Settings > App integrations > WhatsApp.
- Click Disconnect.
- Paste the permanent access token into the Access token field, and enter the same Phone number ID and Whatsapp Business Account ID as before.
Using Uncanny Automator to send WhatsApp messages from your WordPress site
Uncanny Automator can be used to send messages when users complete actions on your site, such as registering, making a purchase, completing a course, joining a group, receiving a private message, receiving a comment on their blog post, and many, many other supported triggers.
Here are the WhatsApp triggers and actions supported by Uncanny Automator:
- Trigger: A message is received
- Trigger: A message to a recipient is not delivered because they have not opted in
- Trigger: A message to a recipient was not delivered
- Trigger: A message to a recipient is set to a specific status
- Action: Send a WhatsApp message to a number
- Action: Send a WhatsApp message template to a number
Meta enforces a very strict policy regarding sending messages to users. It can be summarized as follows:
- You may only send approved message templates to users who have not opted-in for communications from your business. These message templates can cover many scenarios such as product purchase confirmations, activity updates, marketing messages and more. These message templates are subject to WhatsApp platform fees (paid directly to WhatsApp).
- Once a user has opted-in (by responding to a message template), you may send message templates or regular messages over the next 24-hour period. These messages/message templates are not subject to WhatsApp platform fees.
- After 24-hours since the last message received from the user, you are again limited to sending only approved message templates to the user, and these messages are subject to WhatsApp platform fees.
Click here for the full policy.
Messages vs. message templates
Given how the WhatsApp business policy is designed, you will typically use the action Send a WhatsApp message template to a number, since non-template messages will be rejected if the user has not opted-in (by responding to a message template).
Message templates are set up directly on the WhatsApp platform and must be approved by WhatsApp before they can be sent.
When you use the Send a message template to a number action, you can populate pre-defined dynamic variables in the message template with Uncanny Automator using tokens. Tokens can include things like product names, private messages, comments, course names, or anything else you want to include in your message based on the action the user took on your site.
Creating WhatsApp message templates goes beyond the scope of this article, but Meta offers their own comprehensive documentation on this feature. Click here to learn how to set up WhatsApp message templates.Once the user has opted-in by responding to a message template, you can use the Send a message to a number action to automatically send any desired response to the user.
Example 1 – Sending a purchase confirmation message
A common use of WhatsApp could be to send an order confirmation and thank you message when a customer makes a purchase through WooCommerce. Here’s an example of how this could be set up:
- Create a WhatsApp message template for the purchase confirmation message. Example: “{First name}, thank you for your purchase of {product name}! Would you like to receive a coupon code valid for 10% off your next order? Reply “10COUPON” now!”
- Create two recipes:
- Recipe 1
- Trigger: A user pays for an order with {a product}
- Action: Send {thank you for your order} message template to the user
- Recipe 2:
- Trigger: A message is received
- Condition: If the message = “10COUPON” or “10coupon”
- Action: Send {a message} to {the sender’s number} (that includes the 10% off coupon code)
Example 2 – Forwarding article comments to authors via WhatsApp
Another use could be to send comments to blog post authors in real-time, with a link to view the comment. Here’s how this automation could be set up:
- Create a WhatsApp message template for the comment message. Example: “Your article has received a new comment! Comment: {comment} Tap to view the comment: {comment URL}”
- Create a recipe:
- Trigger: A user’s post receives a comment
- Action: Send {post comment} message template to the user
- Create a recipe:
These examples are really just the tip of the iceberg. We’re excited to see how users create interactive automated workflows with this powerful integration!
Note: Starting April 1 2023, users on the free tier of WhatsApp Business can only respond to user-initiated conversations. If you want to use business-initiated conversations after April 1 2023, you will need to add a payment method. Learn more about free tier conversations.
