Revive old WordPress posts with AI and Uncanny Automator. Learn how to reverse content decay…
Simply and Seamlessly Connect Learndash to ActiveCampaign
Create a seamless LearnDash and ActiveCampaign integration with Uncanny Automator. Tag your learners based on course progress and segment your student body with ease.

Are you looking for a way to connect LearnDash to ActiveCampaign? Maybe you want to add new enrollees to your ActiveCampaign CRM? Or, how about tagging your learners based on their courses and course progress?
Whatever the reason, if you’re looking for the best way to create an ActiveCampaign and LearnDash integration, then you’ve landed on the right page.
In this blog post, we’ll show you how to connect these powerful platforms together using the #1 automation and integration tool on the market: Uncanny Automator. Make sure to read through to the end for some conversion-boosting tips and tricks.
Let’s get started.
Why Connect LearnDash to ActiveCampaign with Automator
ActiveCampaign is one of the leading CRMs for marketing professionals. With tons of lead scoring and segmentation features built right into the platform, ActiveCampaign makes marketing automation simple.
Likewise, LearnDash is the leading LMS for WordPress websites. Whether you’re running entirely online or looking for the right digital tool to complement your in-person curriculum, LearnDash is the best option.
By combining these two powerhouse platforms with Uncanny Automator you can unlock a world of possibilities. Sync your student lists with your ActiveCampaign contacts, segment your learners based on their enrollment and progress and enhance the learning experience.

Want to know what makes Automator the best automation and integration tool for your WordPress website?
Ease-of-Use: Using simple combinations of triggers and actions called recipes, Automator connects all of your favorite apps and plugins. A user-friendly click-and-play interface means that you can automate your workflows in just minutes—or even seconds.
Versatility: With features such as filters and delays, Automator gives you the flexibility to connect your favorite apps and plugins however you choose. Features like these give you the ability to extend ActiveCampaign’s segmentation tools to LearnDash.
Affordability: Unlike other automation and integration solutions, Automator won’t charge you each time you run an automation. In other words, the more you automate and integrate, the more you save!
Integrations: Automator has 214 integrations with more on the way all of the time. This means that you can connect LearnDash to ActiveCampaign and a whole lot more.
Support: Unparalleled support has made Automator one of the highest-rated plugins in the WordPress ecosystem. Whether you need help setting up a time-saving recipe or want to see some new integrations or features, the Automator support team is always at the ready.
Are you ready to up your marketing automation game and enhance student engagement? Get Automator Pro now>>>.
Automatically Add LearnDash Students to ActiveCampaign
Now that you have your Automator Pro license, let’s take a look at setting up your first ActiveCampaign and LearnDash integration.
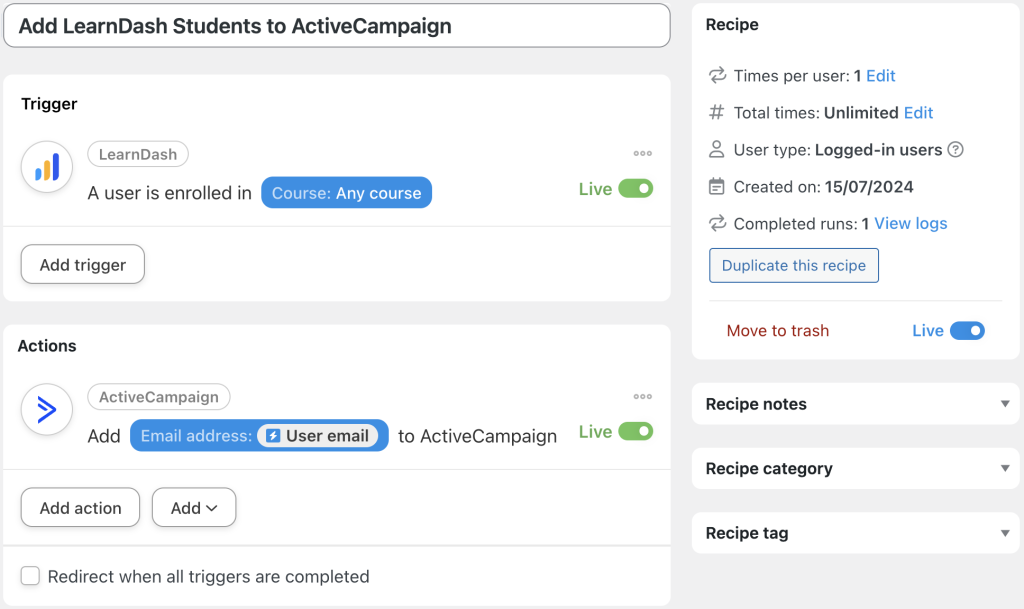
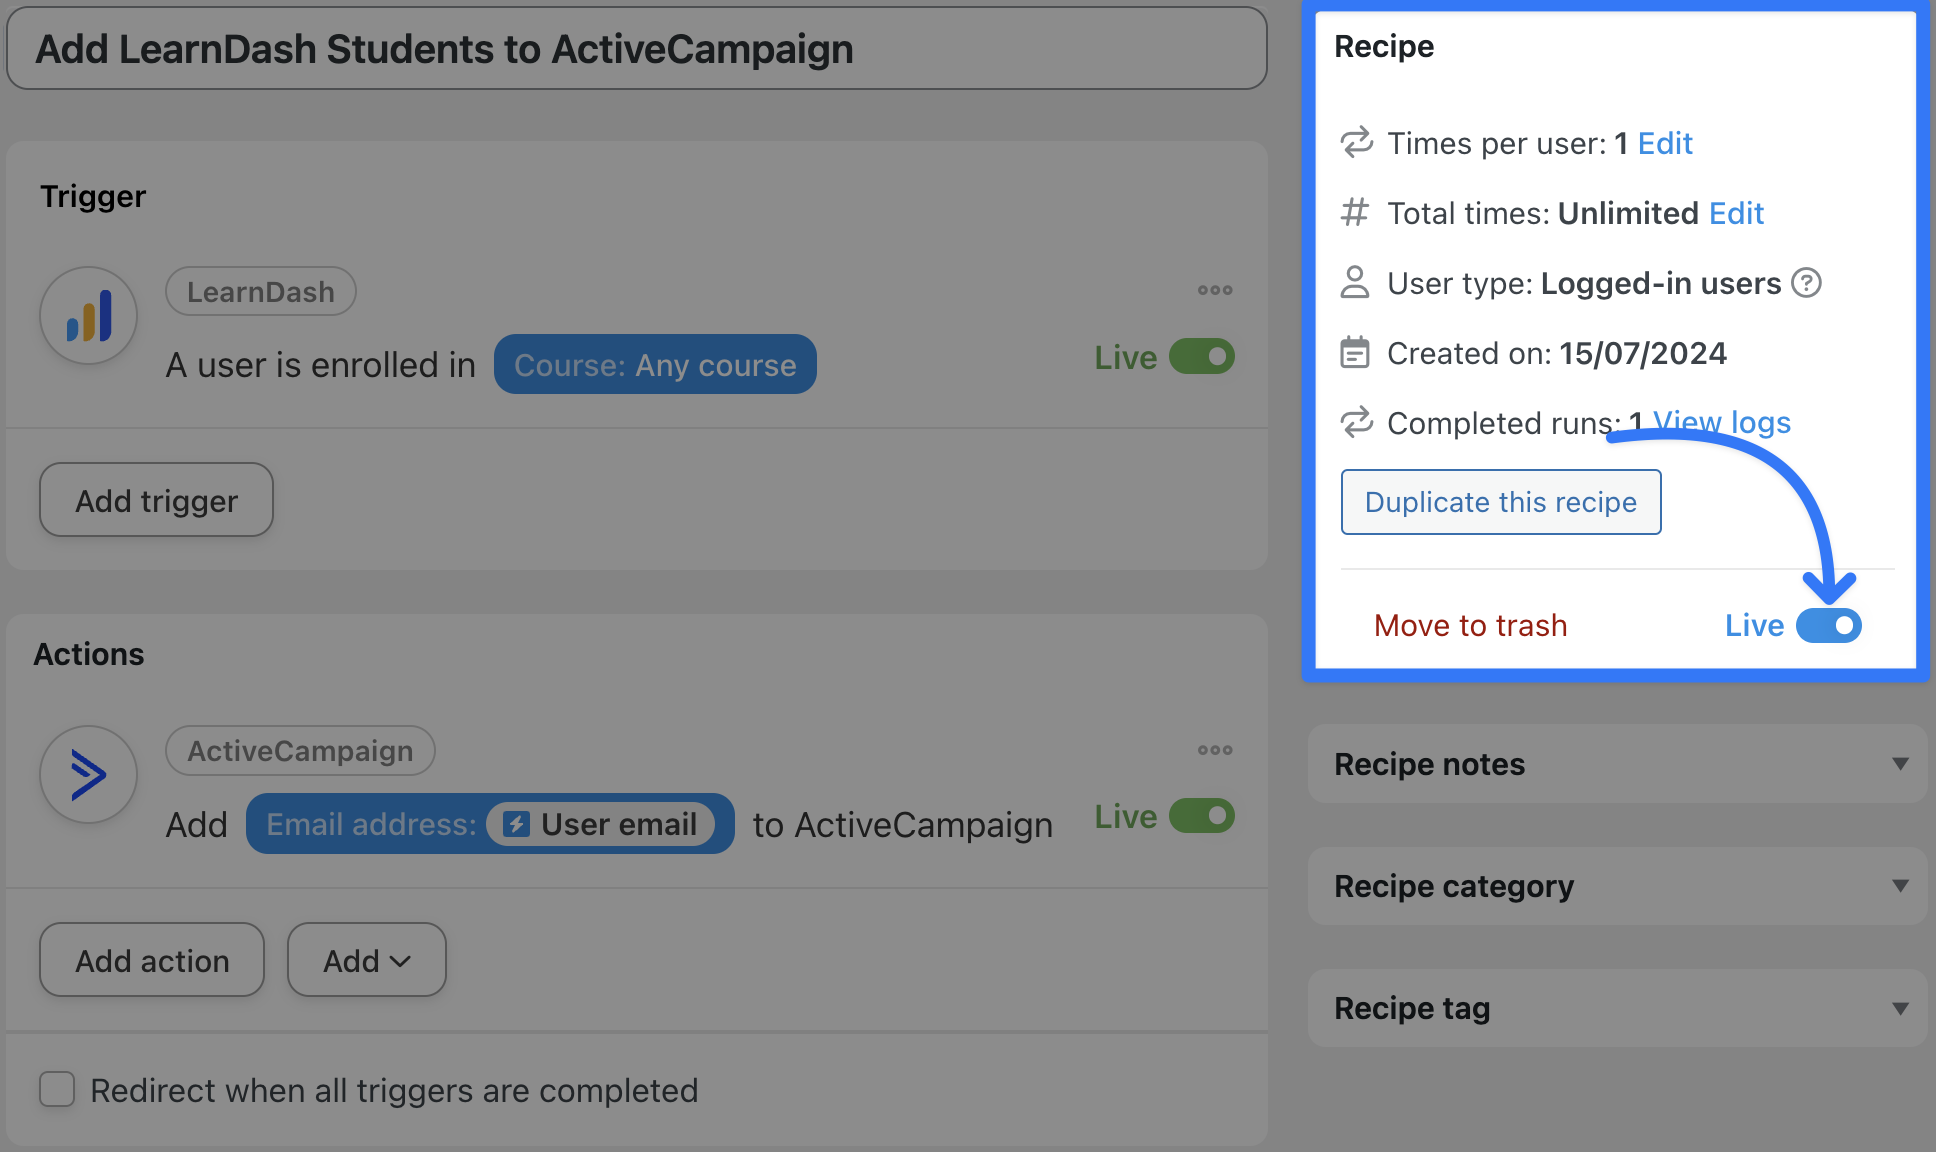
In the recipe pictured above, we’re able to add our LearnDash students to ActiveCampaign as contacts whenever they register for a course. Once added as contacts, we can do things like add them to lists, tag them, or have ActiveCampaign run automations on them.
Want to know how we did it? Follow the steps below. (Alternatively, jump down to this section to learn how to add users in bulk.)
Step 1: Create a New Recipe
From your WordPress Admin Dashboard, navigate to Automator > Add new recipe. In the popup window that appears select Logged-in users.

(Note: We used Logged-in users because our course registration process requires students to create an account prior to or during enrollment.)
Step 2: Name Your Recipe
Give your recipe a name that makes it easy to recognize at a glance. For example, we’ve named this recipe “Add LearnDash Students to ActiveCampaign”.
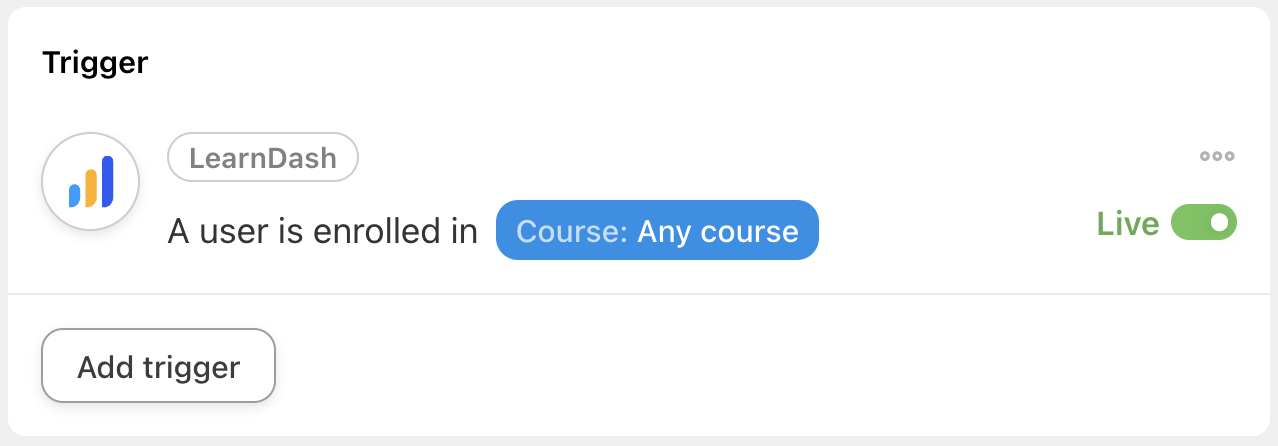
Step 3: Configure Your Trigger(s)
In the Trigger panel, from the menu of available ingredients, select LearnDash.

From the dropdown list that appears, select A user is enrolled in a course.

Automator will prompt you to select a course. Because we want to add all of our LearnDash students to ActiveCampaign, we have selected Any course.
When you’re finished, click Save. Your trigger should look like this:
Step 4: Configure Your Action(s)
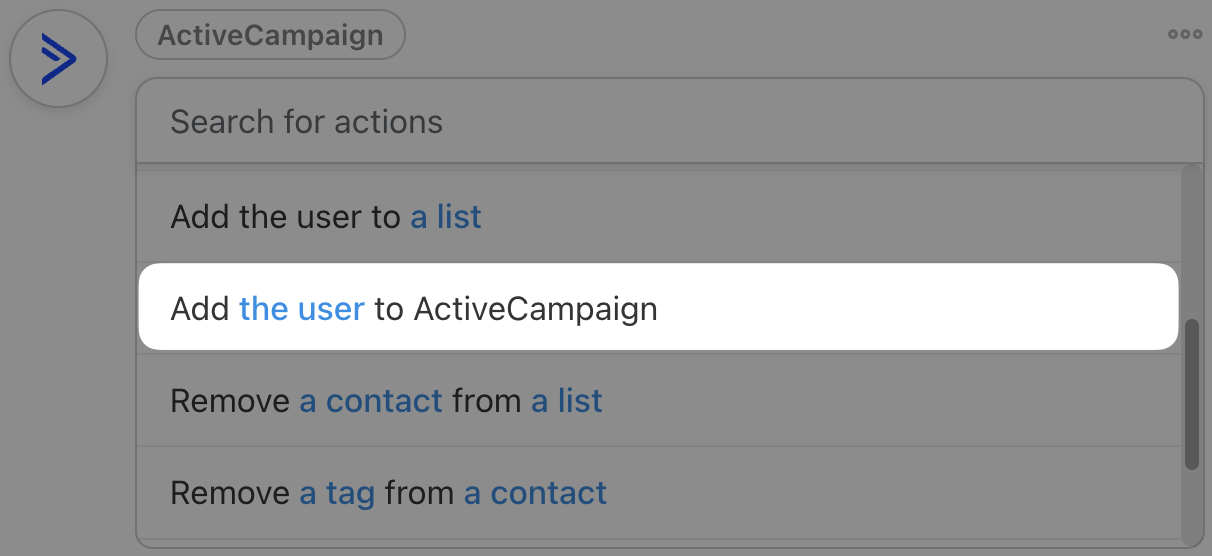
In the Actions panel, click Add action and select ActiveCampaign from the menu of available integrations.
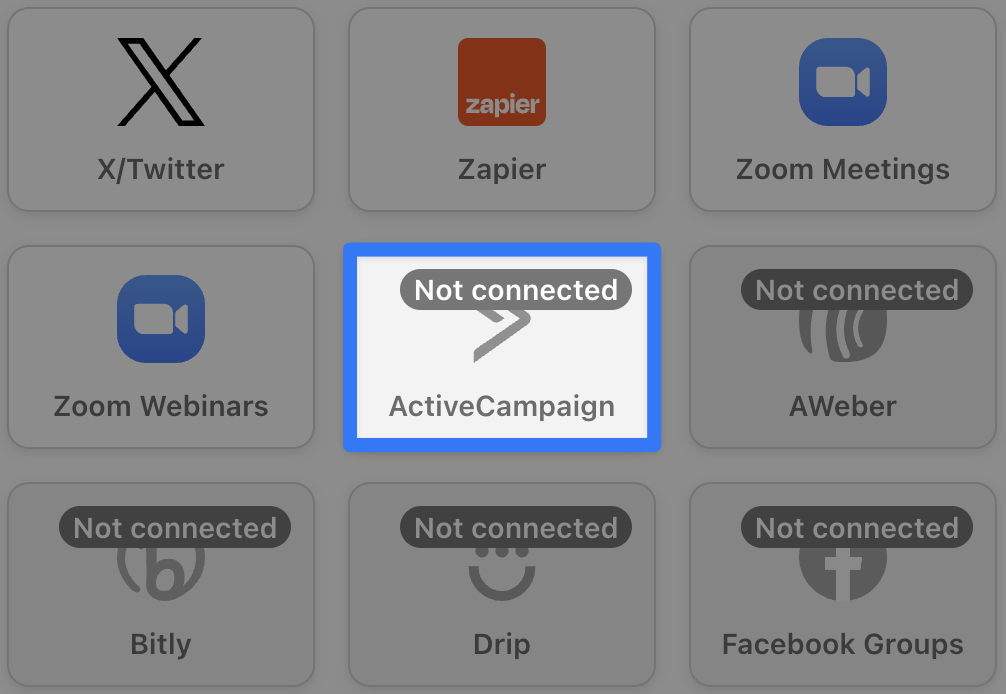
If you haven’t yet connected your ActiveCampaign account, then a pop-up window will appear. Click Connect account.
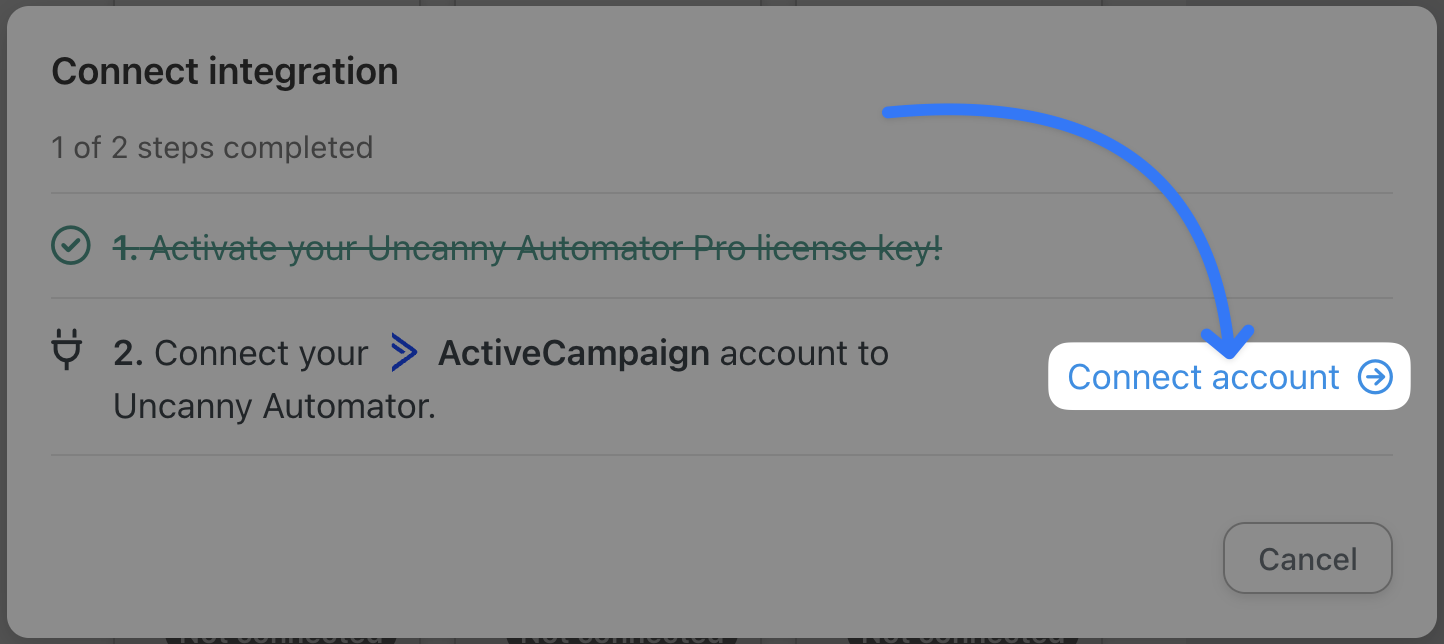
Another pop-up window will appear, prompting you to enter your Account URL and API key. To find these, go to your ActiveCampaign account and navigate to Settings > Developer. Copy the URL and API key.
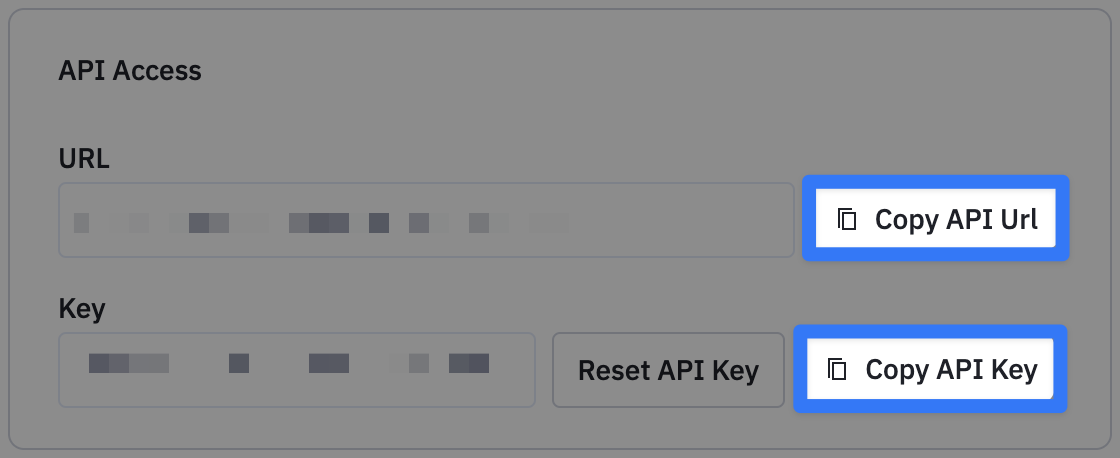
Paste the information into the corresponding fields in the Automator pop-up window. When you’re finished, click Connect ActiveCampaign account.
Next, click Save Settings and return to the recipe editor.
From the dropdown list that appears, select Add the user to ActiveCampaign or Add a contact to ActiveCampaign.
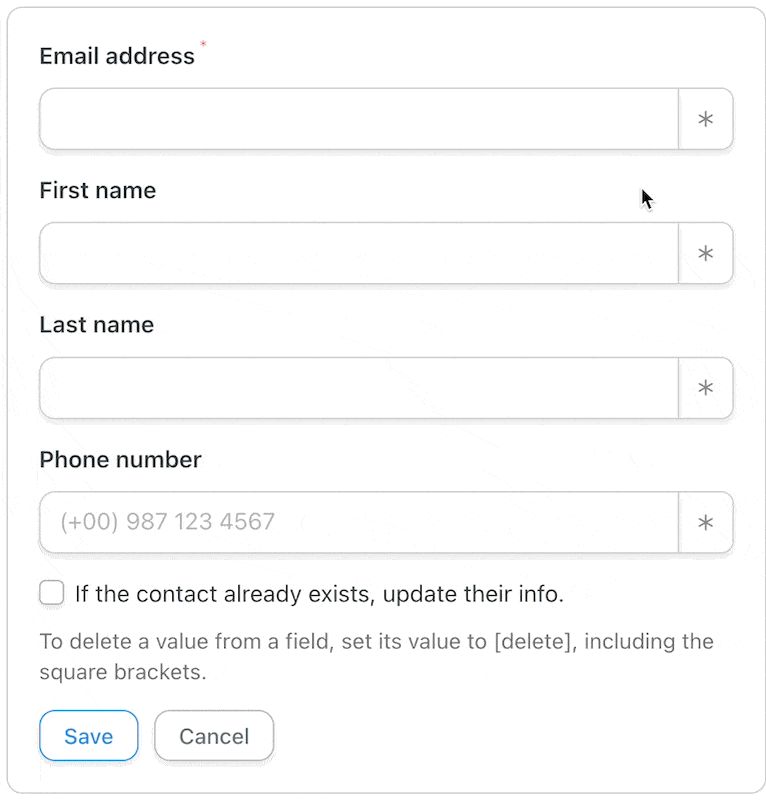
(Note: If you selected the action Add a user to ActiveCampaign, Automator will use the user’s first name, last name and email to create the ActiveCampaign contact. If you selected the action Add a contact to ActiveCampaign, you can add this information yourself using tokens by clicking on the Asterisk.)
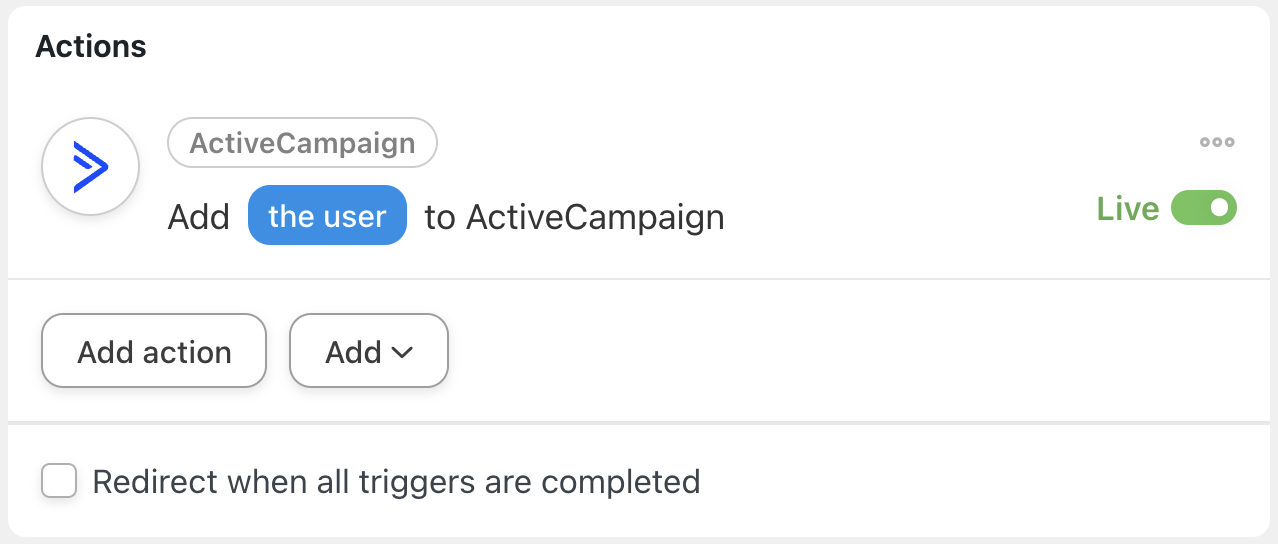
When you’re finished, click Save. Your completed action should look like this:
Step 5: Go Live
You’re just about ready to connect LearnDash to ActiveCampaign. All that’s left for you to do is toggle the recipe from Draft to Live.
(Note: Automator will not add duplicates to your ActiveCampaign contacts. If an email address already exists, Automator can update the contact’s information.)
That’s it! You’ve just created your first ActiveCampaign and LearnDash integration.
Ready to turn your LearnDash students into ActiveCampaign contacts? Grab your Automator Pro license now if you haven’t already>>>.
Now that you’ve gotten all of your LearnDash contacts into ActiveCampaign, let’s take a look at different ways to segment them.
Automatically Tag LearnDash Students in ActiveCampaign
Now that you’ve added some LearnDash students to ActiveCampaign, let’s take a quick look at using Automator to segment our learners.
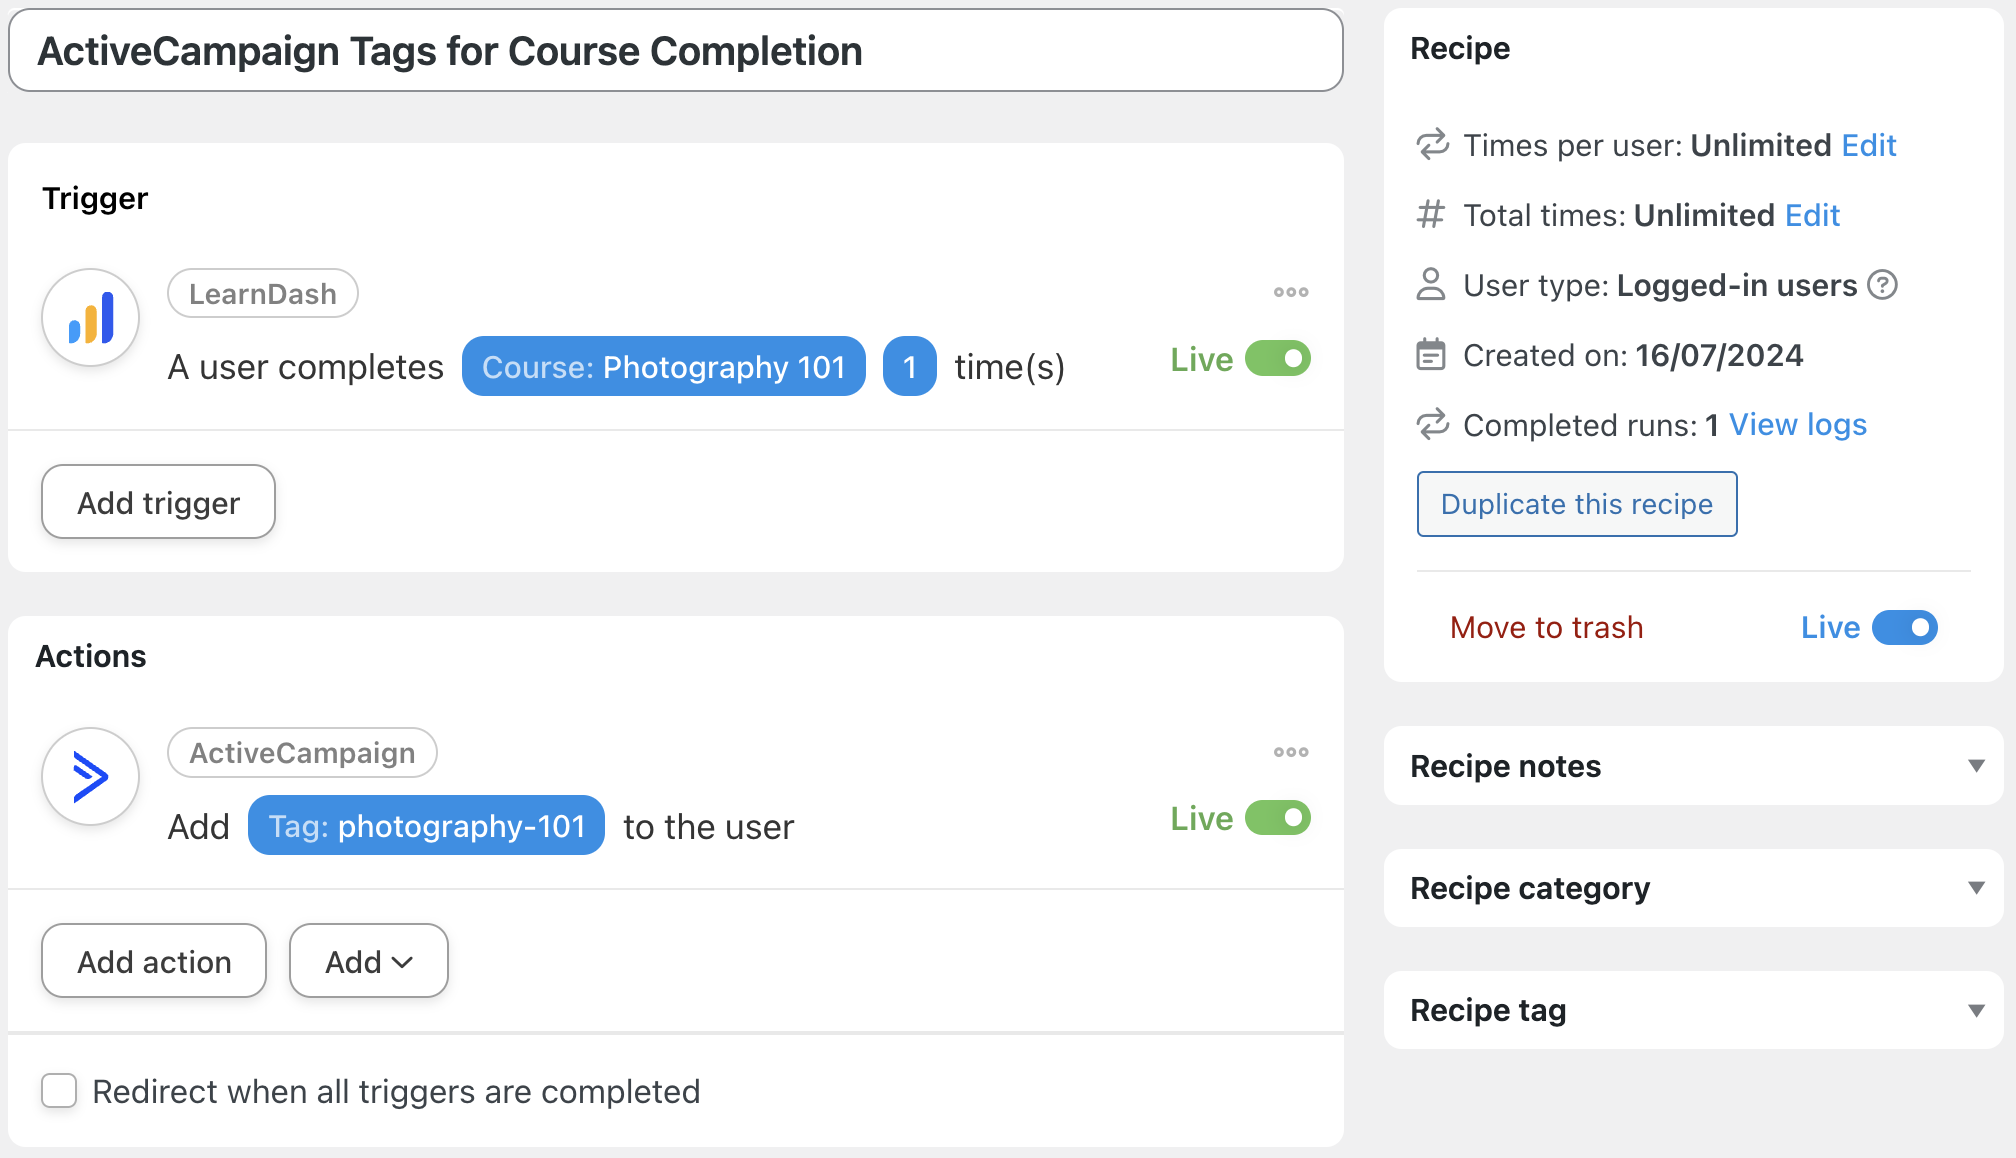
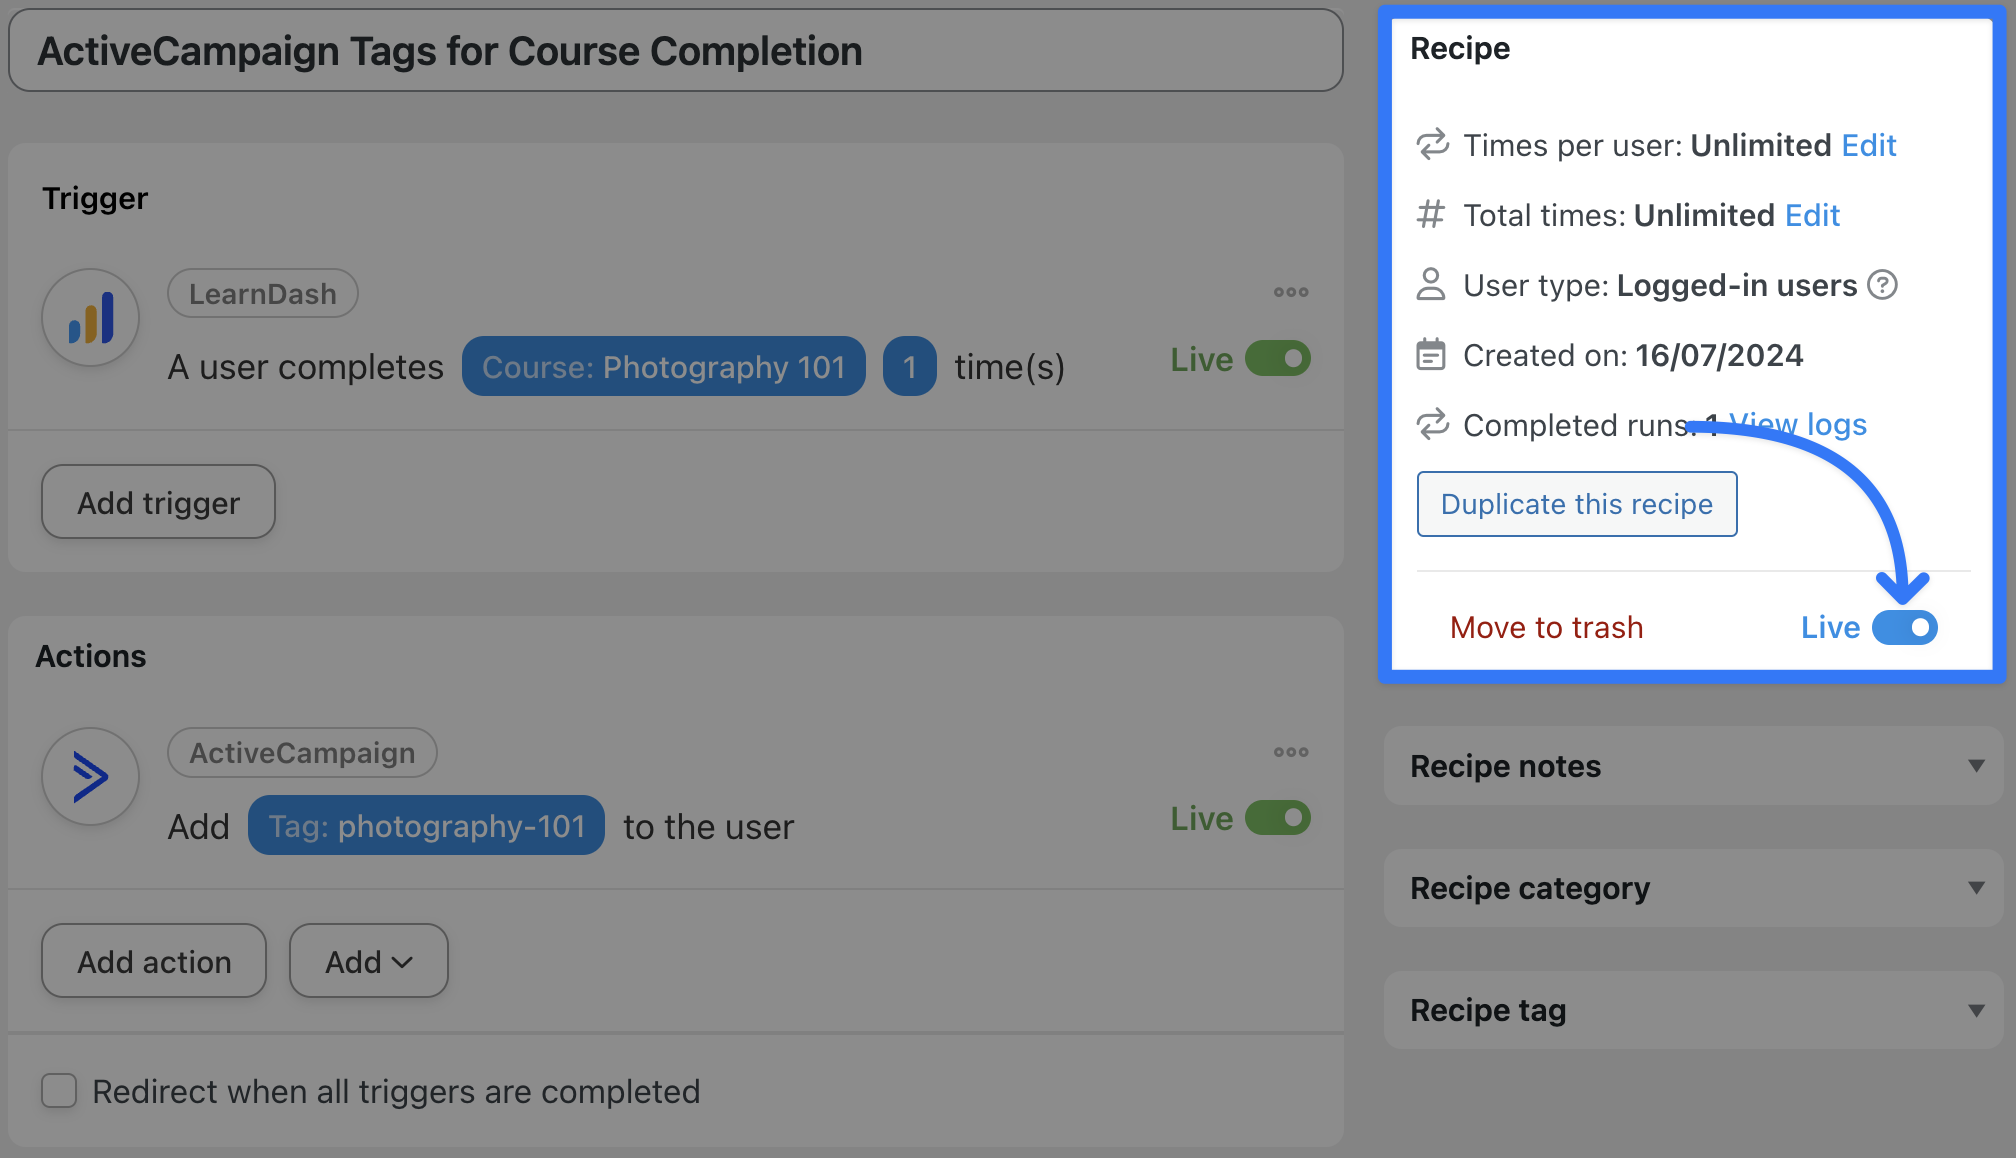
In the recipe pictured above, we’re able to tag our users based on their course completion. We can use this segmentation to generate course feedback and to market similar or more advanced courses that our learners might be interested in.
Let’s take a look recreating that recipe below.
Step 1: Create a New Recipe
From your WordPress Admin Dashboard, navigate to Automator > Add new recipe. In the pop-up window that appears, select Logged-in users.
Step 2: Name Your Recipe
We’ve named this recipe “ActiveCampaign Tags for Course Completion”.
Step 3: Configure Your Trigger(s)
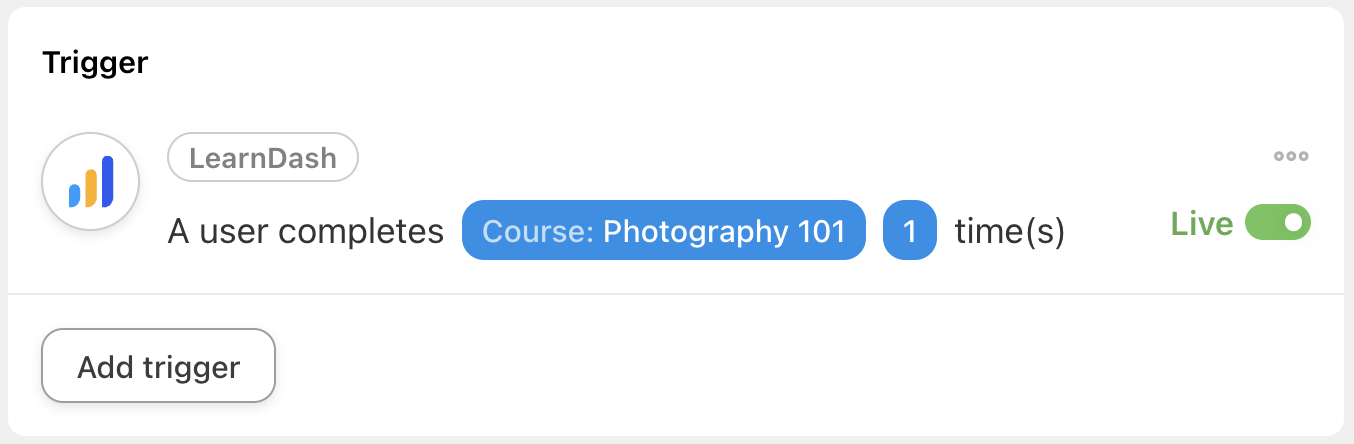
In the Trigger panel, from the menu of available integrations, select LearnDash. From the dropdown list that appears, select A user completes a course.
Automator will prompt you to select a course. For example, we have selected our “Photography 101” course.
Once you’re finished, click Save. Your completed trigger should look something like this:
Step 4: Configure Your Action(s)
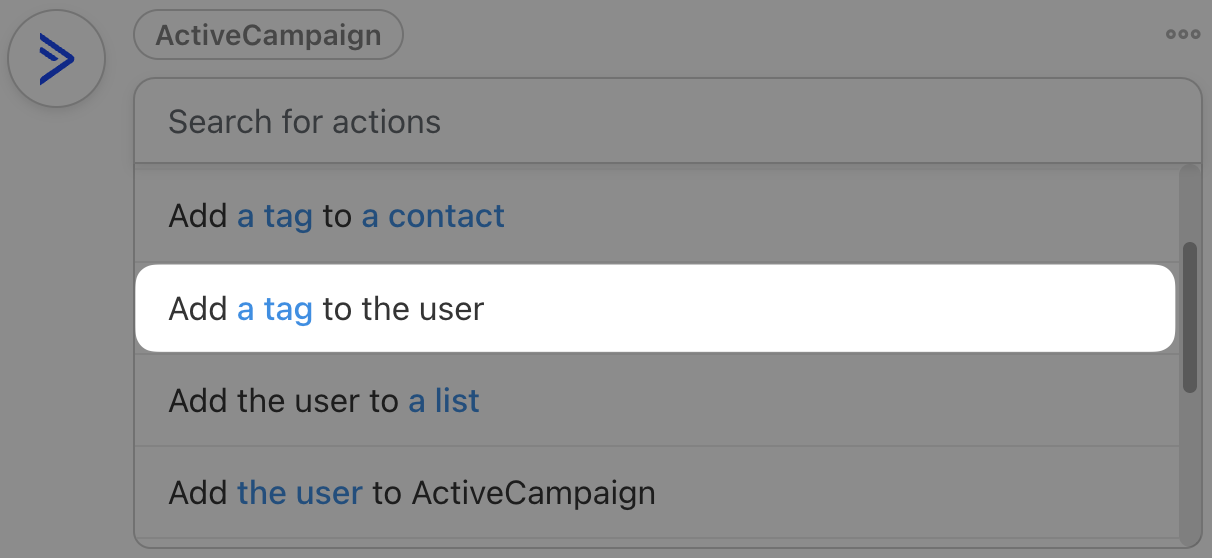
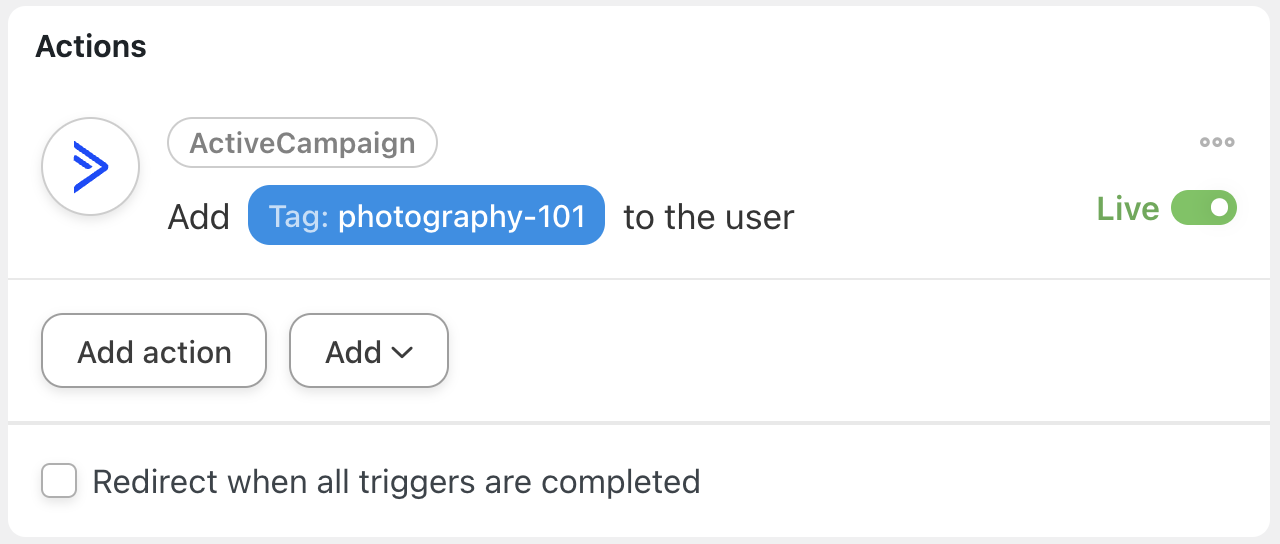
In the Actions panel, click Add action and select ActiveCampaign. From the dropdown list that appears, select Add a tag to the user.
Automator will prompt you to select from one of your existing tags. For example, we have selected our “photography-101” tag, i.e., the tag that corresponds to the course we selected in the trigger.
(Note: If you want to tag your LearnDash students in ActiveCampaign dynamically, i.e., by selecting Any course and having Automator detect the correct tag, you can do this using the Advanced Custom Fields plugin. Add a custom field to your LearnDash courses with a value that corresponds to the tag ID of the course’s tag in ActiveCampaign. You can then retrieve this custom field value as post meta using Automator’s tokens feature.)
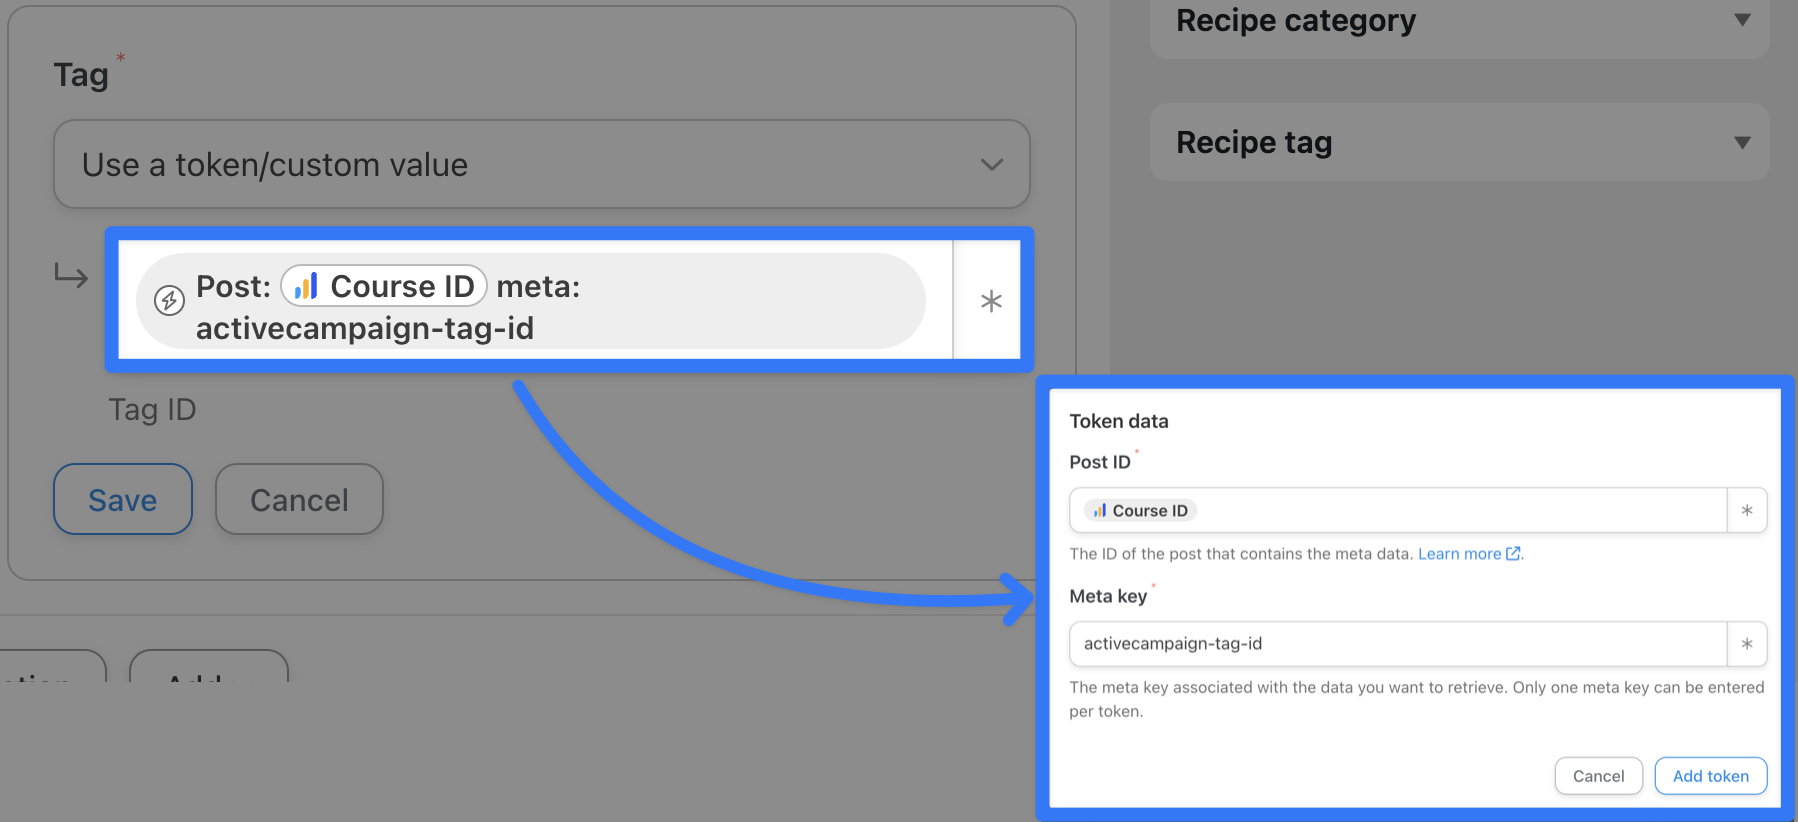
Once you’re finished, click Save. Your completed action should look something like this:
Step 5: Go Live!
That’s it. Just toggle your recipe from Draft to Live and segment your way to better learning!
Why stop there? Automator has dozens of LearnDash triggers for you to choose from, meaning that you can segment your learners any way you want. Want to segment learners by group? How about by quiz score or even lesson/topic completion? You can do it all with Automator.
So what are you waiting for? Grab your Automator Pro license now if you haven’t already and start communicating with your learners in an effective way>>>.
Create ActiveCampaign Lists from LearnDash Groups and Courses
So far, we’ve shown you how Automator can add your LearnDash students to ActiveCampaign. Then we showed you how to tag your students for granular segmentation.
However, ActiveCampaign’s primary segmentation feature is the ability to create lists. And, with Automator, creating ActiveCampaign lists from your LearnDash courses and groups is as easy as clicking a button.
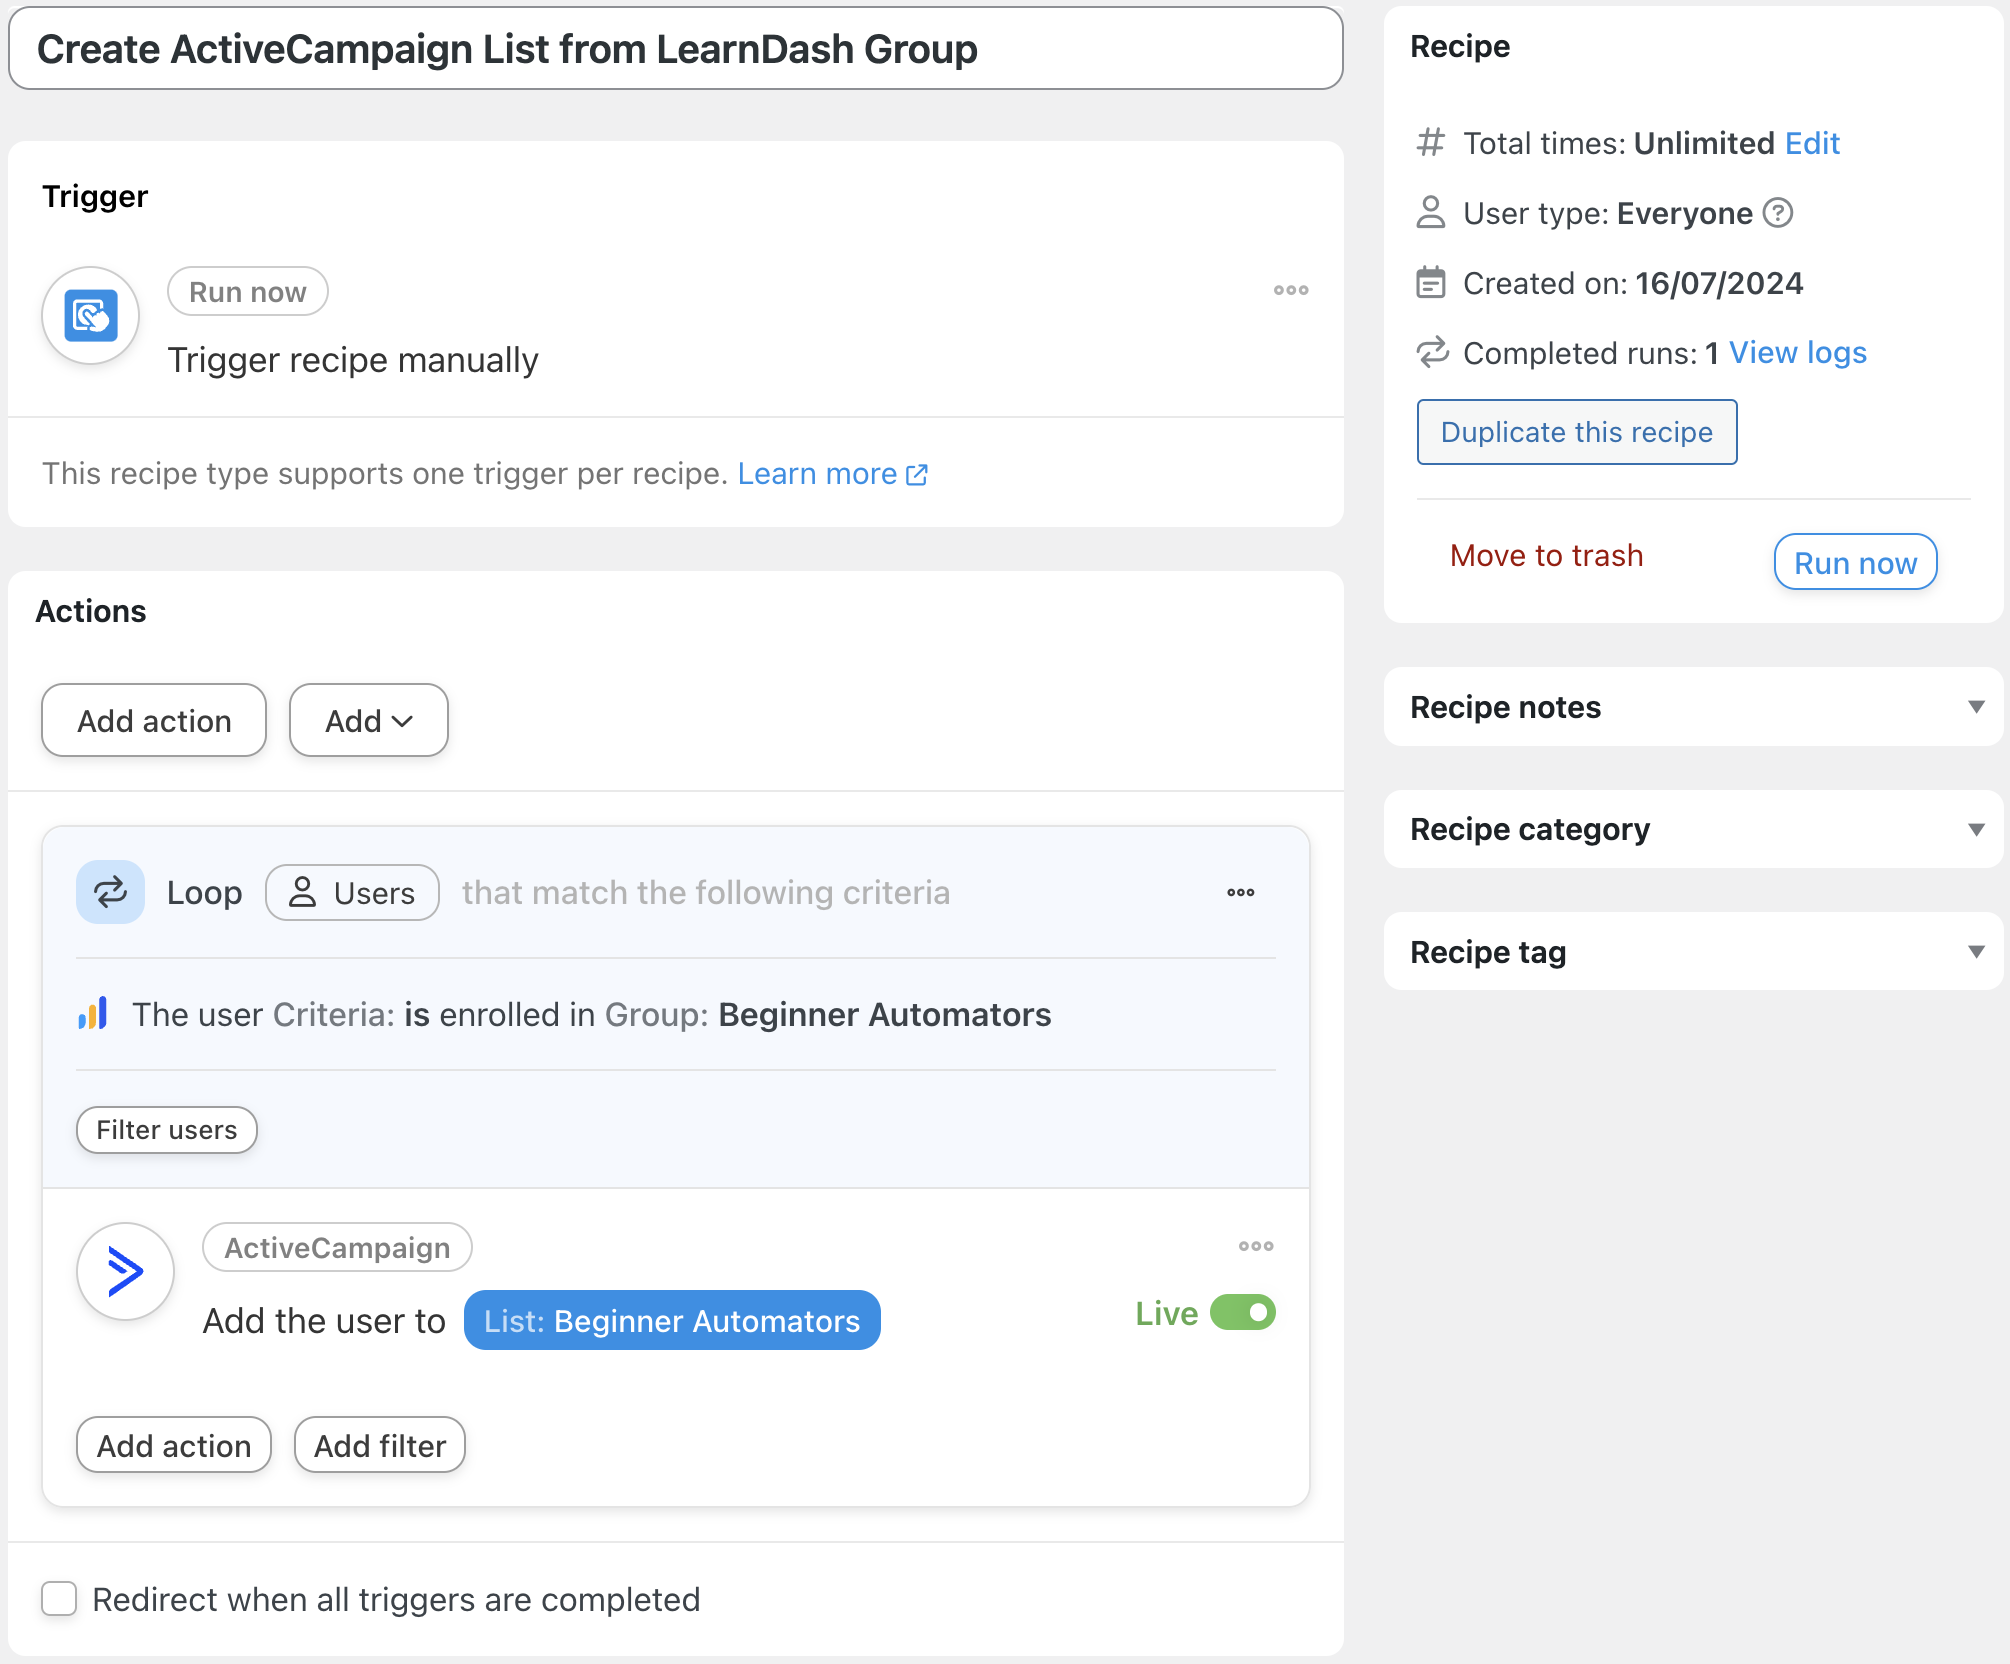
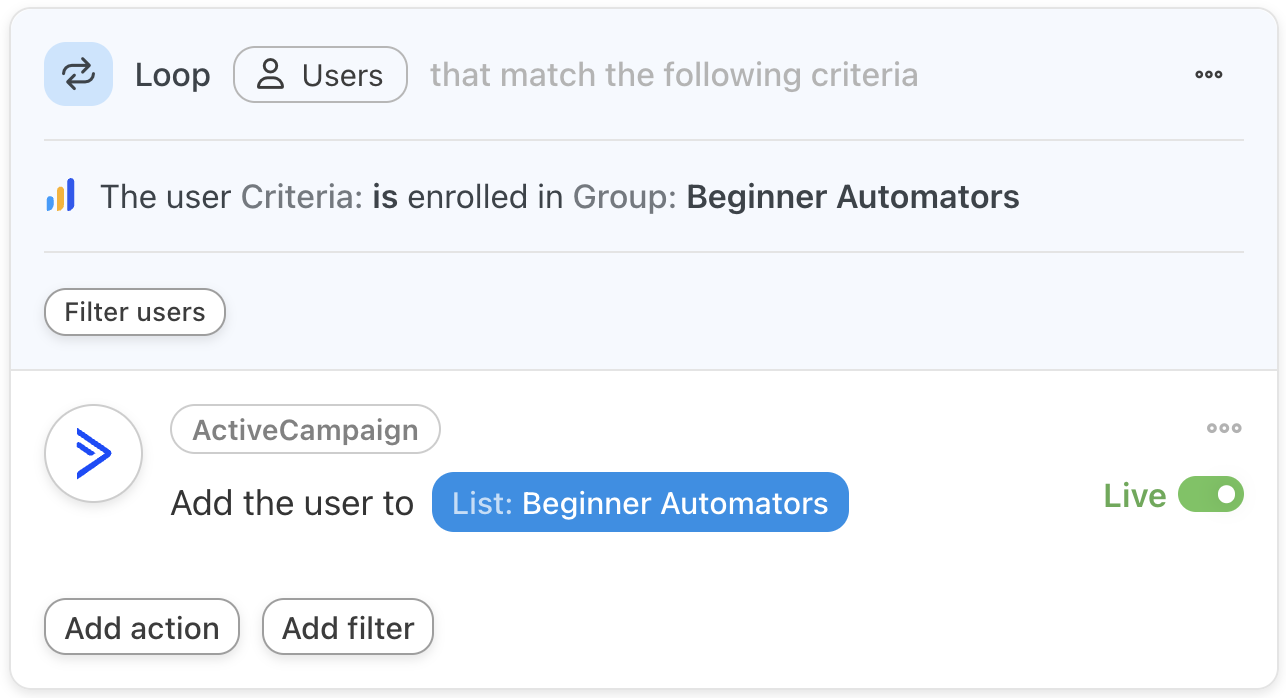
In the recipe pictured above, we were able to populate one of our ActiveCampaign lists based on LearnDash student group enrollment. Here’s how we did it.
Step 1: Create and Name a New Recipe
From your WordPress Admin Dashboard, navigate to Automator > Add new recipe. In the popup window that appears, select Everyone. We have named this recipe “Create ActiveCampaign List from LearnDash Group”.
Step 2: Configure Your Trigger(s)
In the Trigger panel, from the menu of available integrations, select Run now. From the dropdown list that appears, select Trigger recipe manually.
Step 3: Configure Your User Loop Action(s)
In the Actions panel, click Add then select User loop.
In the Loop pane, click Add action and select ActiveCampaign. From the dropdown list that appears, select Add the user to a list.
Automator will prompt you to select a list. For example, we have selected our “Beginner Automators” list that corresponds to our LearnDash group of the same name. Once you’re finished, click Save.
Your Actions panel should now look something like this:
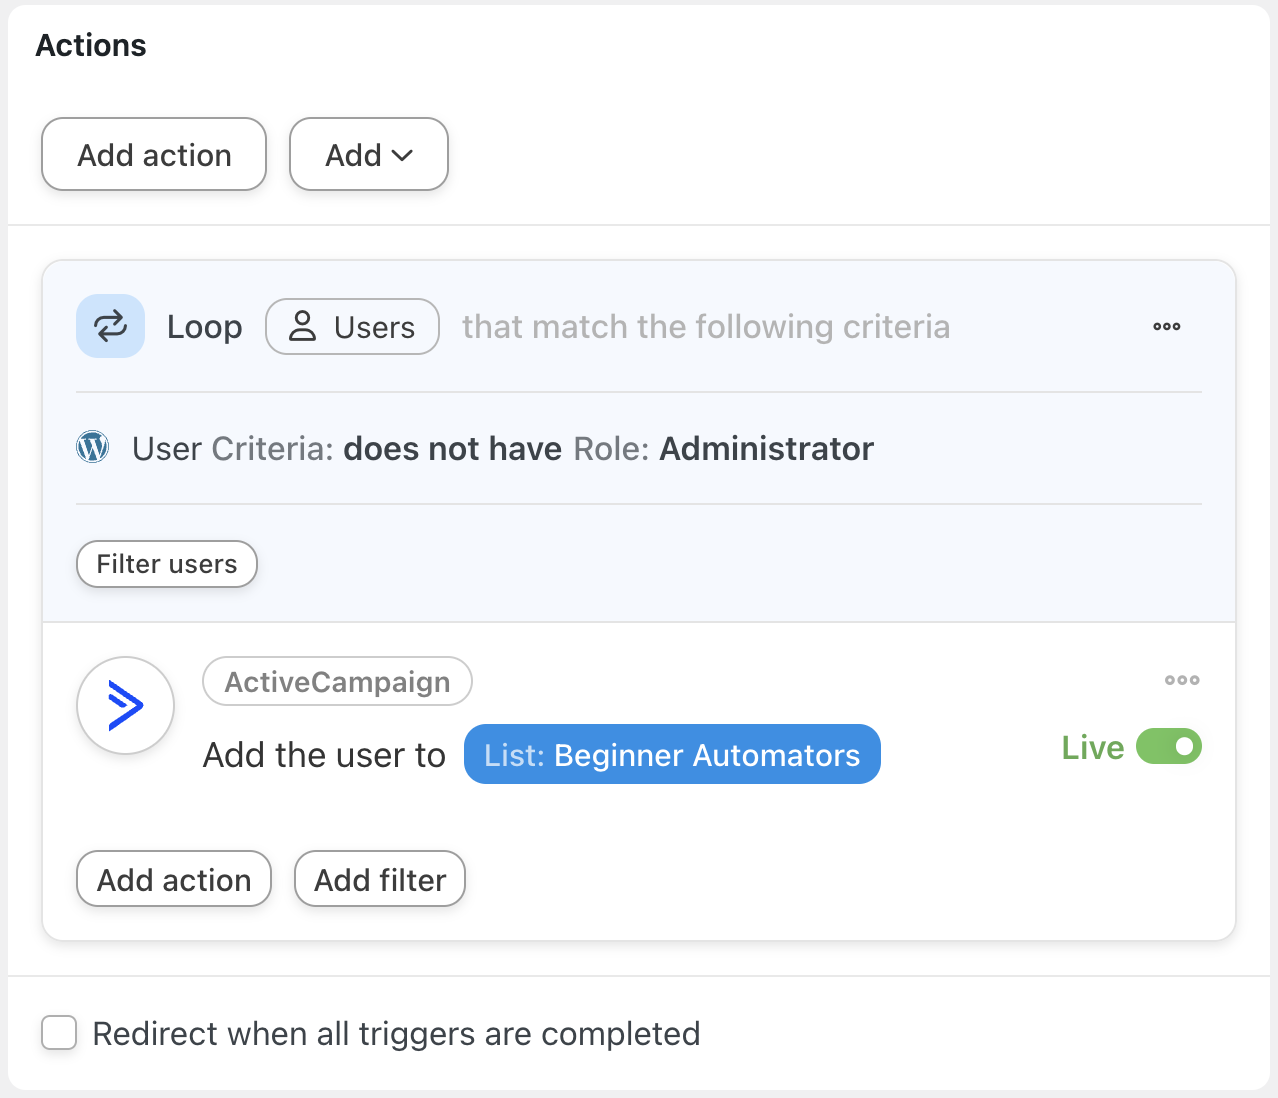
(Note: With the action we selected, Automator will not add users to ActiveCampaign. That is to say, if a user is enrolled in a group but their email does not exist in ActiveCampaign, Automator will not add them to the list. If you are uncertain if all of your LearnDash students have been added to ActiveCampaign, you can easily change the action to Add the user to ActiveCampaign then run another recipe to add different users to different lists.)
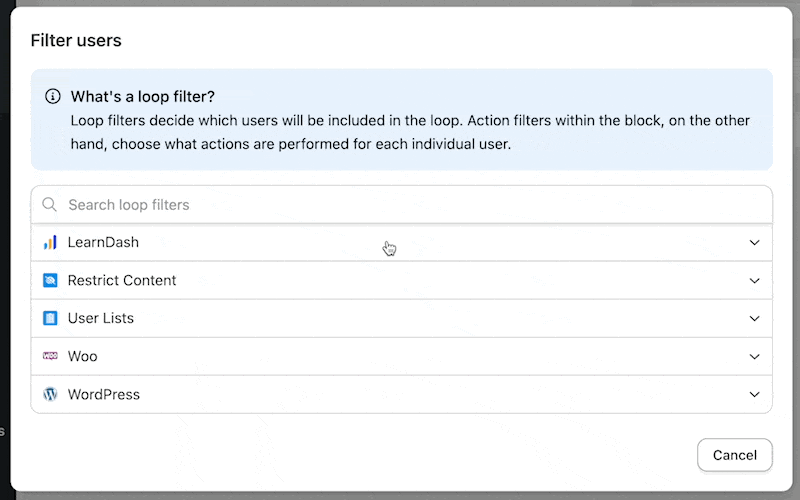
Step 4: Configure Your User Loop Filter(s)
User loop filters determine the users on whom the actions within the loop will be performed. By default, Automator will have a filter to exclude site Administrators from the actions. You can keep this filter if you want or delete it.
To target our LearnDash users who are members of a specific LearnDash group, click Filter users. In the modal that appears, select LearnDash > The user is/is not enrolled in a specific group.
Next, select the Criteria (i.e., is or is not) and the Group. When you’re finished, click Confirm.
Your updated Actions panel should look something like this:
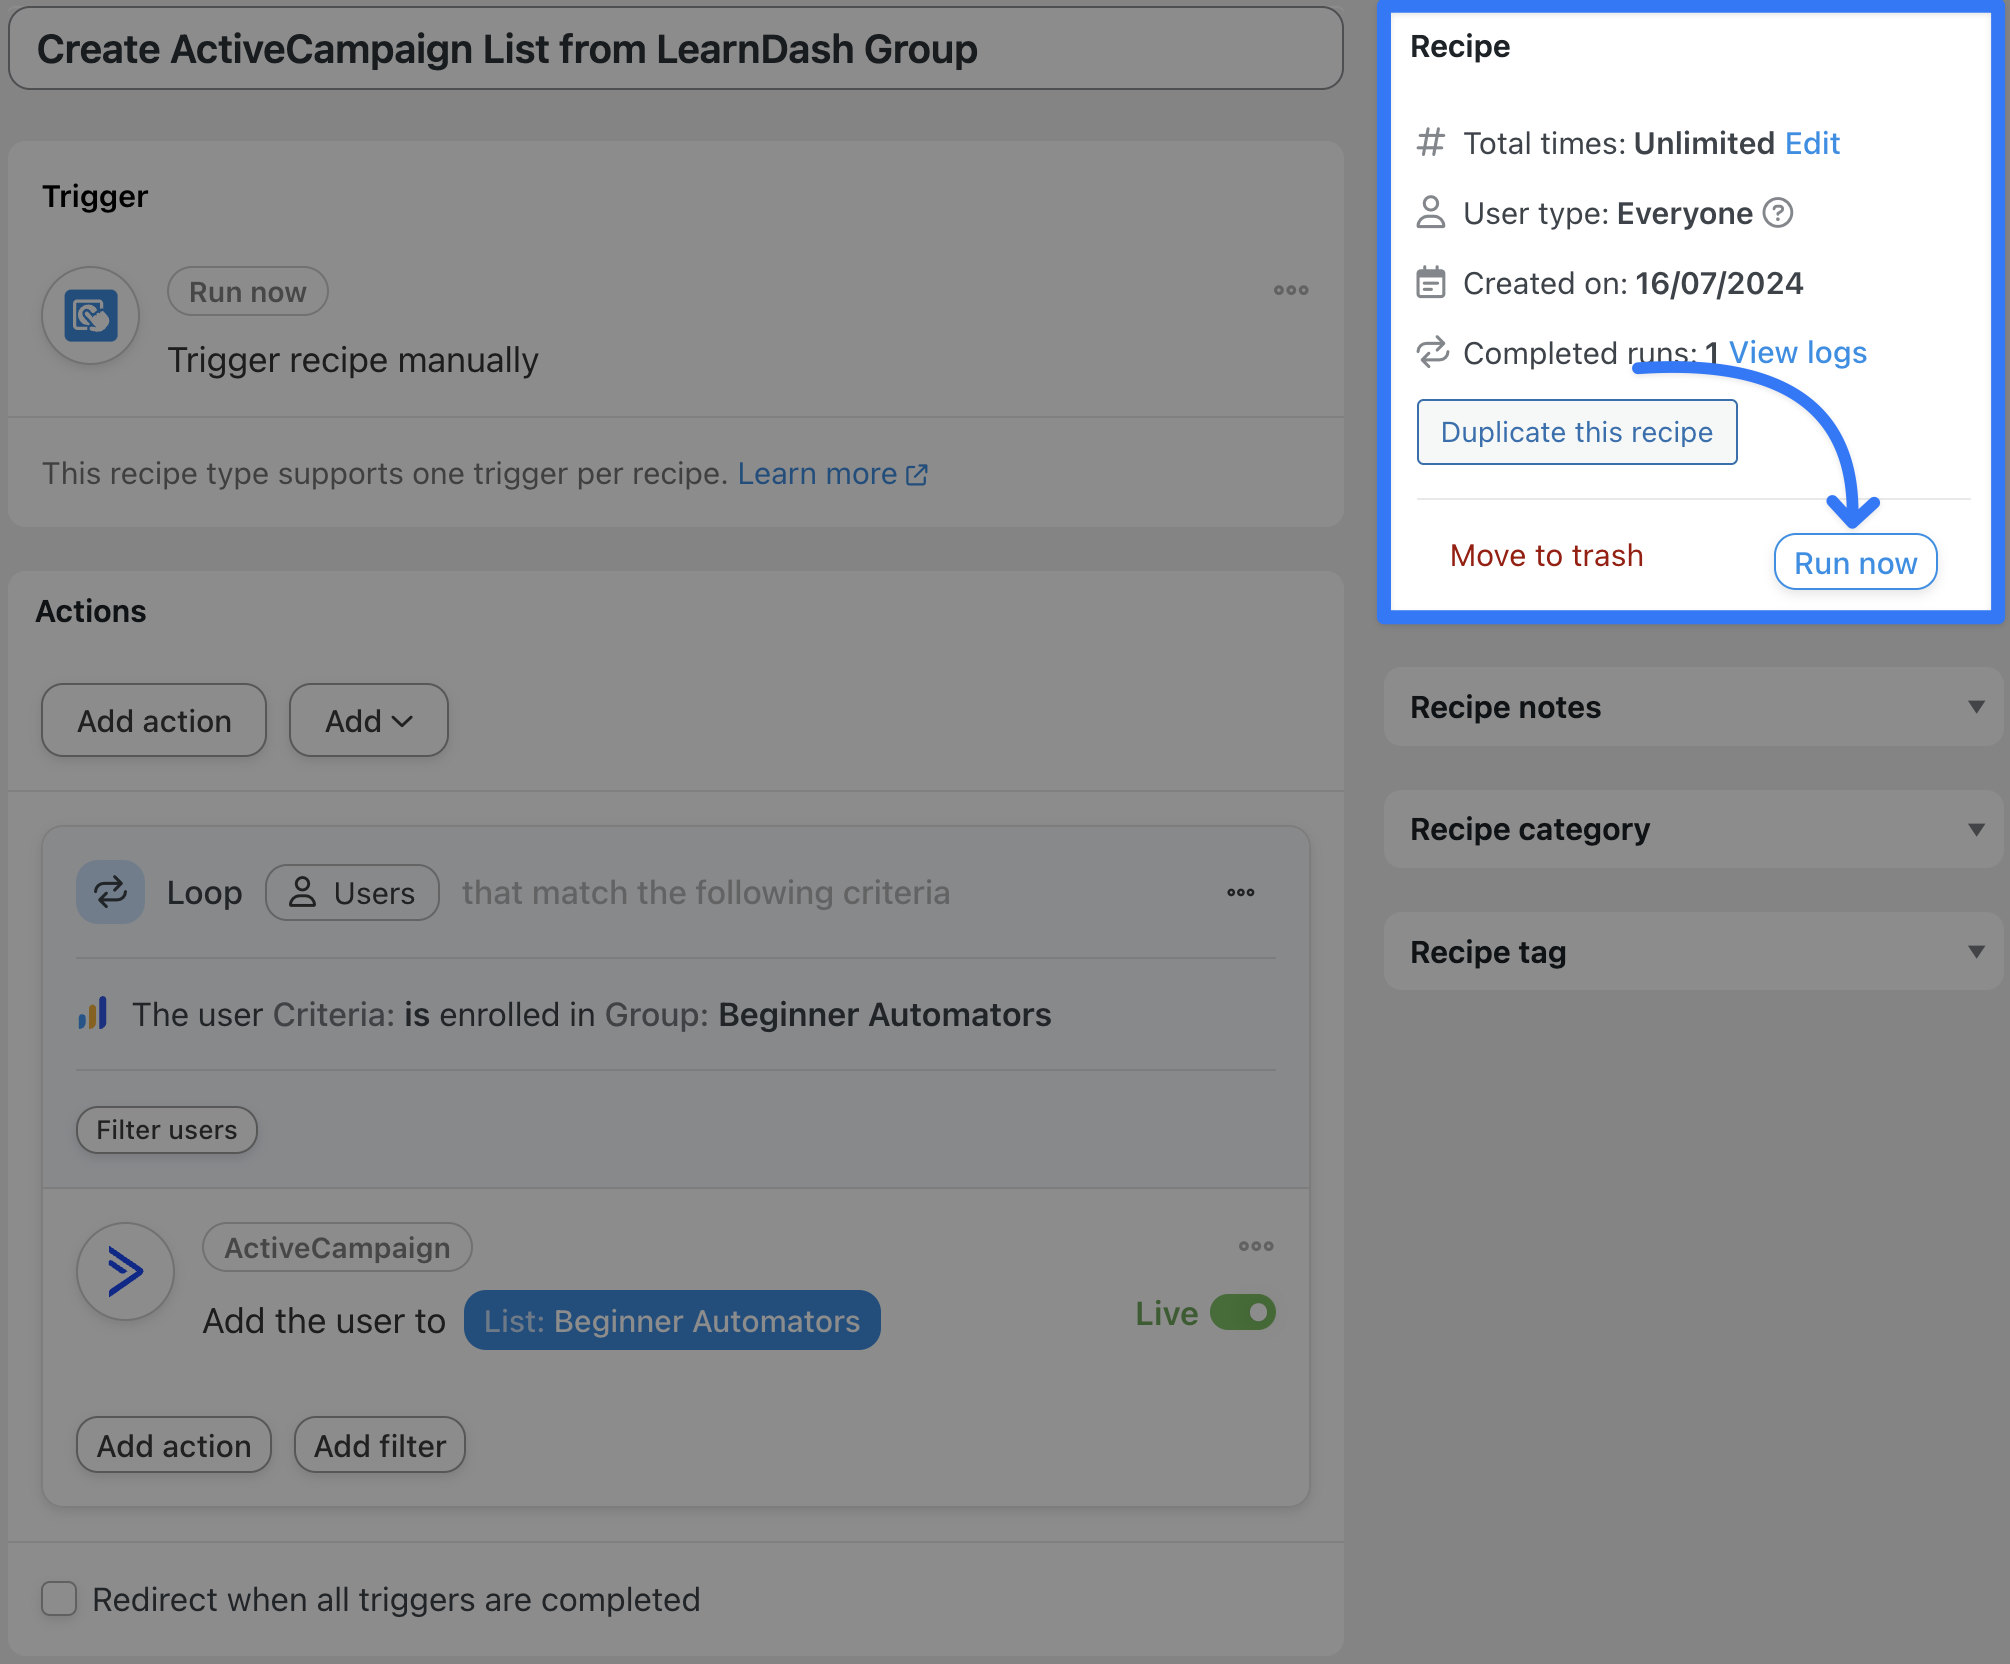
Step 5: Create Your List!
You’re just one click away from populating your ActiveCampaign list with your LearnDash group enrollees. Hit the Run now button in the recipe box and get ready to send out some broadcasts.
(Note: Automator will not add group leaders to the ActiveCampaign mailing list. You can, however, use additional filters to include group leaders.)
Convinced yet? Automator is definitely the best tool for connecting LearnDash to ActiveCampaign so grab your Pro license now if you haven’t already>>>.
Frequently Asked Questions and Best Practices
By now, you’re very well on your way to becoming a master automator. Nevertheless, here are some tips and tricks for improving your new ActiveCampaign and LearnDash integration.
1. Use Clear and Consistent Naming Conventions
When creating recipes in Automator or tags, lists, and custom fields in ActiveCampaign, use clear and consistent naming conventions. This makes it easier to manage and identify your marketing automations, ensuring that your communications run smoothly.
2. Leverage Custom Fields for Advanced Segmentation
Take advantage of custom fields to create more targeted and personalized communication. Custom fields can help you segment your audience based on specific criteria and give you more dynamic automations. Check out the Advanced Custom Fields plugin to add custom fields to your LearnDash courses, quizzes and more. Additionally, Automator Pro Plus and Elite licenses come with the Custom User Fields Addon, giving you easy access to custom user data.
3. Test Your Automations Thoroughly
Before going live with your automations, thoroughly test each recipe to ensure that triggers and actions are working as expected. This will help you to predict the behavior of automations and allow you to adjust them as your workflows change.
4. Regularly Review and Optimize Your Automations
Periodically review your automations to ensure they are still relevant and effective. As your course offerings and student base evolve, you may need to update or create new recipes to keep your marketing and communication strategies aligned with your goals.
5. Utilize Analytics for Continuous Improvement
Take advantage of ActiveCampaign’s and LearnDash’s internal analytics and reporting tools to track the performance of your automations. Additionally, Automator makes it easy to collect and analyze data of your own with integrations such as Google Sheets and Airtable. If you’re looking for more detailed LearnDash reports to help you further segment your student body, check out the Tin Canny Reporting plugin.
Conclusion
Connecting LearnDash to ActiveCampaign with Uncanny Automator offers a powerful way to enhance your elearning platform’s functionality. By automating communication, personalizing learning experiences, and efficiently managing student data, you can significantly improve student engagement and streamline your administrative tasks.
Whether you’re adding new enrollees to your CRM, tagging students based on their progress, or creating dynamic segments for targeted campaigns, Automator makes it easy and efficient. The combination of these tools empowers you to create a seamless and effective learning environment that keeps your students engaged and informed.
Ready to elevate your elearning platform? Get started with Uncanny Automator today and unlock the full potential of your ActiveCampaign and LearnDash integration>>>.
Until next time, happy automating!

Related Posts


This Post Has 0 Comments