Revive old WordPress posts with AI and Uncanny Automator. Learn how to reverse content decay…
The Easiest Way to Connect Mailchimp to WordPress (for FREE)
Connect Mailchimp to WordPress with Uncanny Automator in just 5 easy steps. Start integrating your WordPress CRM for FREE!

If you’ve been looking for a simple (and FREE) Mailchimp and WordPress integration, then congratulations! You’ve stumbled onto the right page.
In this brief but detailed guide, we’ll walk you through the steps of connecting Mailchimp to WordPress with the #1 WordPress automation and integration plugin: Uncanny Automator. By the end of this tutorial, you’ll be able to:
- add WordPress users/site visitors to Mailchimp audiences,
- tag WordPress users in Maichimp based on WordPress site behavior such as page/product views, purchase history, membership status, and more.
- launch targeted Mailchimp campaigns directly from WordPress website whenever you create new content on your WordPress website.
You’ll even be able to trigger events on WordPress website from changes to your Mailchimp audiences and contacts!
p.s., Make sure to read through to the end. We’ve included some great ideas to get you started with your WordPress and Mailchimp integrations.
Why Connect Mailchimp to WordPress With Automator
Uncanny Automator is the #1 automation and integration tool for WordPress websites. Whether it’s connecting your eCommerce platform to your CRM, or your customer support plugin to OpenAI, Automator is the preferred tool for thousands of WordPress users.
Using simple combinations of triggers and actions called recipes, Automator gives you the ability to create deep integrations between your existing WordPress tech stack to reduce costs, save time, and unlock new capabilities.
So, what makes Automator the best tool for connecting Mailchimp to WordPress?
- Easy to use: Automator’s user-friendly click-and-play interface means that you can create deep Mailchimp and WordPress integrations in just a few clicks—and even fewer minutes. No code required. Better yet, use a preconfigured template and start automating right away.
- Affordable: Automator Lite is a free forever plugin that, unlike other workflow automation tools, doesn’t charge per-automation fees. In other words, the more you automate and integrate, the more you save. Automator Pro licenses begin at just $149/year, and give you access to hundreds more triggers, powerful features and integrations, and unlimited credits to use with premium app integration such as Mailchimp, OpenAI, Facebook, and more.
- Scalable: Whether you have dozens, hundreds, or thousands of contacts, Automator scales with you.
- Integrations and Addons: With Automator, connecting Mailchimp to WordPress is just the beginning. With 214 integrations and more on the way all the time, Automator lets you create workflows across your entire tech stack. Addons like Restrict Content and Dynamic Content Blocks give you more ways to organize your WordPress website and create a truly immersive experience for your site visitors.
Not ready to go Pro just yet? You can still connect Mailchimp to WordPress with Automator Lite. Install and activate Automator Lite on your WordPress website and register your account to receive complimentary app credits. Once you run out of credits, upgrade to an Automator Pro license to unlock new triggers and actions and continue automating your workflows.
How to Connect Mailchimp to WordPress
Once you have installed and activated Automator on your WordPress website, connecting your Mailchimp account only takes a few steps.
Automator allows for both Mailchimp triggers and actions, meaning you can connect Mailchimp to WordPress and vice versa.
To enable Mailchimp actions (i.e., perform tasks in Mailchimp based on activity on your WordPress website), follow these steps:
- From your WordPress Admin Dashboard, navigate to Automator > Settings > App integrations > Mailchimp.
- Click Connect Mailchimp account and follow the prompts as they appear.
That’s it! For a more detailed guide, click here.
To enable Mailchimp triggers (i.e., perform tasks in WordPress based on activity in your Mailchimp account), follow these steps:
- Once you’ve connected your Mailchimp account to Automator, enabling Mailchimp actions, you’ll see the option to Enable triggers. Toggle the button.
- Once you’ve enabled the triggers, a panel will appear with the instructions for setting up your triggers. Highlight and copy the URL provided in the Webhook URL field.
- In a new tab in your browser, sign in to your Mailchimp account and navigate to Audience > Audience dashboard. Next, navigate to Manage Audience > Settings.
- Once you’re on the Settings page, scroll down to and click on Webhooks. Mailchimp will take you to a new page. On the Webhooks page, click on Create New Webhook.
- Paste the webhook URL from the Automator settings page into the Callback URL field. Make sure that all of the options for sending updates are selected. By default, the only option that should not be selected is the final one, Via the API. Make sure to select that one before clicking Save.
That’s it! You have enabled Mailchimp triggers in Automator, allowing you to carry out tasks on your WordPress website based on activity in your Mailchimp account. For a more detailed guide, click here.
Add WordPress Users to Mailchimp
Now that you have Automator installed and activated on your WordPress website, it’s time to create a recipe to connect Mailchimp to WordPress.
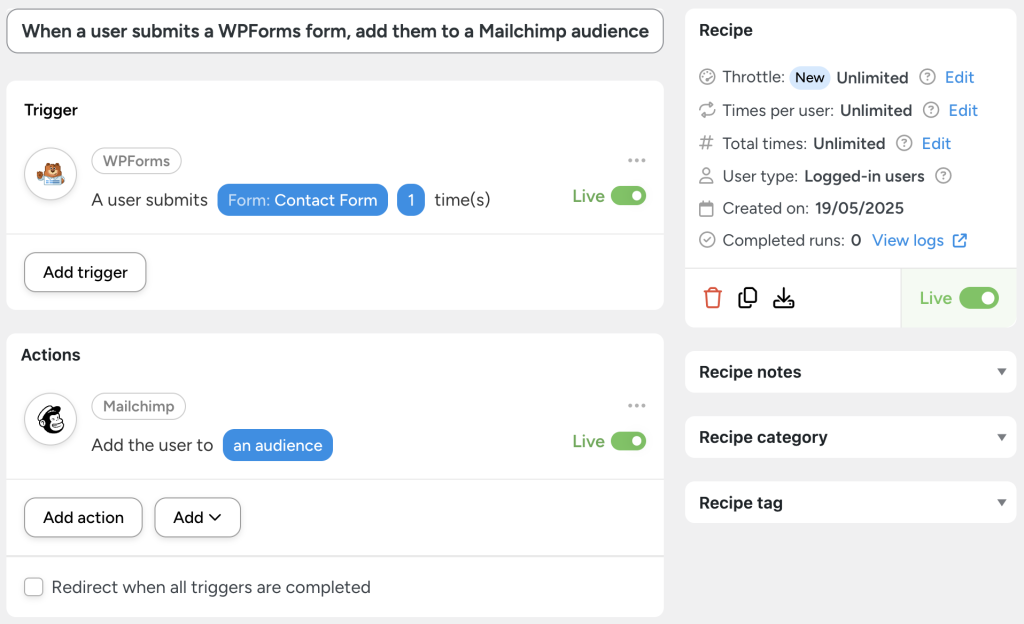
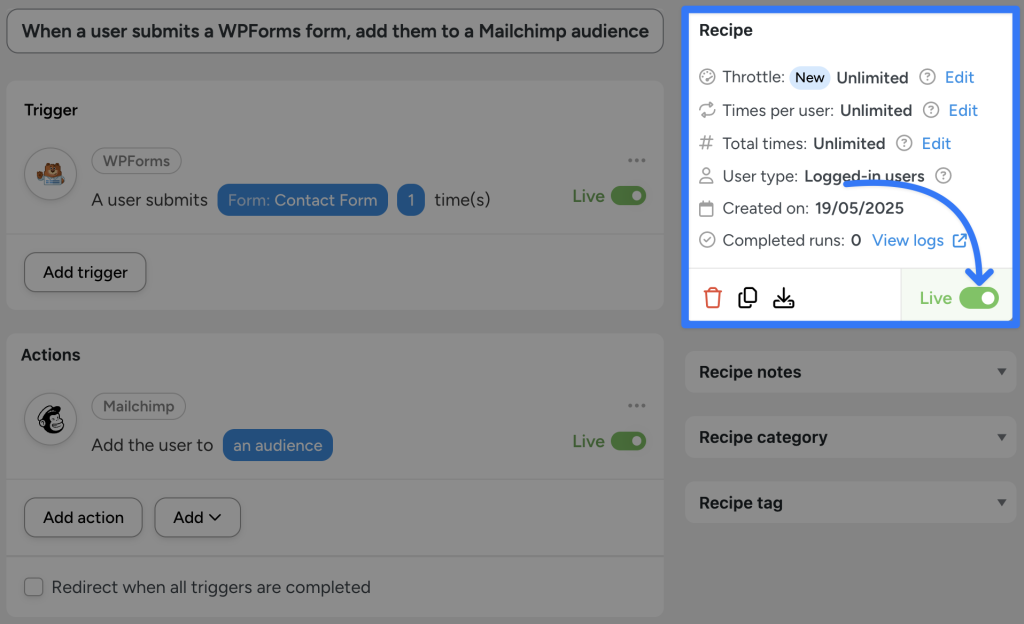
In the recipe pictured above, we’re able to add a WordPress user to a Mailchimp audience whenever they submit a WPForms contact form. Here’s how we did it:
Step 1: Create a New Recipe
From your WordPress Admin Dashboard, navigate to Automator > Add new recipe. In the modal that appears, select Logged-in users.
Step 2: Name Your Recipe
Give your recipe a name that makes it easy to recognize at a glance. For example, we have named this recipe “When a user submits a WPForms form, add the user to Mailchimp”.
Step 3: Configure Your Trigger(s)
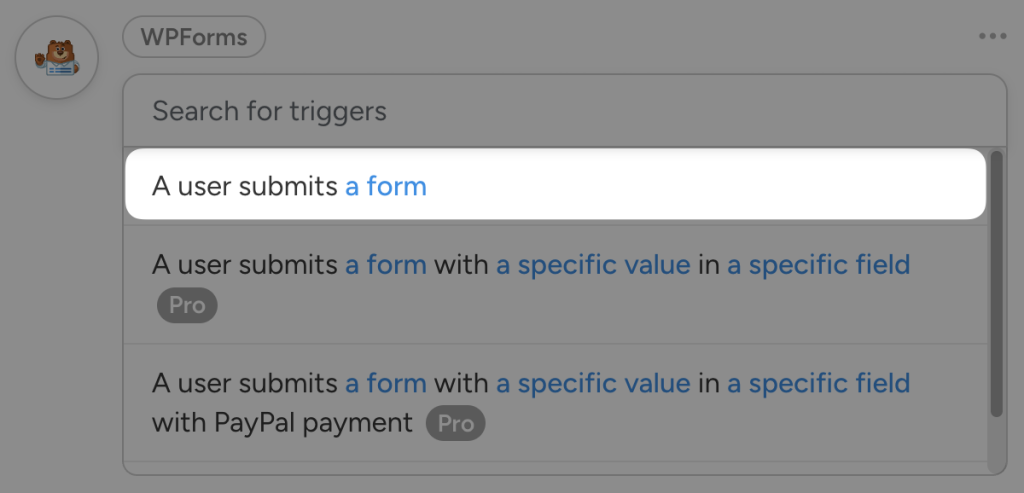
In the Trigger panel, from the menu of available integrations, select WPForms or your preferred form-building plugin.
From the dropdown list that appears, select “A user submits a form”.
Automator will prompt you to select a form. Once you’re finished, click Save.
Step 4: Configure Your Action(s)
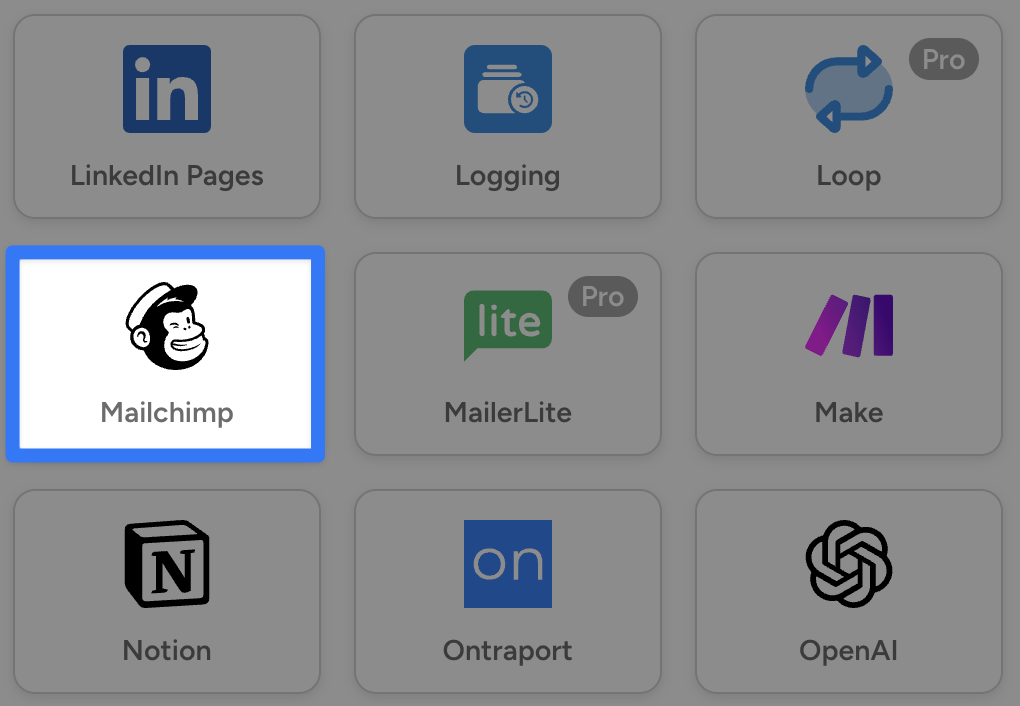
In the Actions panel, click Add action and select Mailchimp.
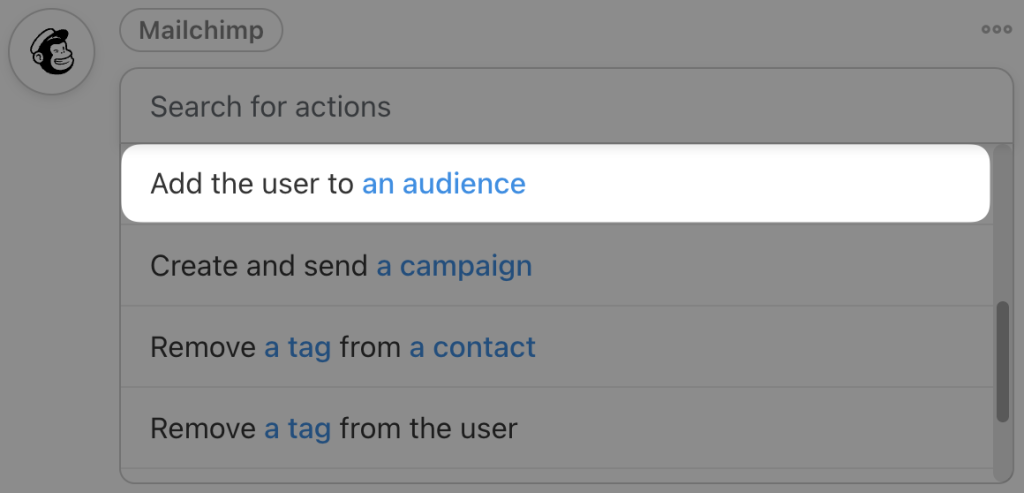
From the dropdown list that appears, select “Add the user to an audience”.
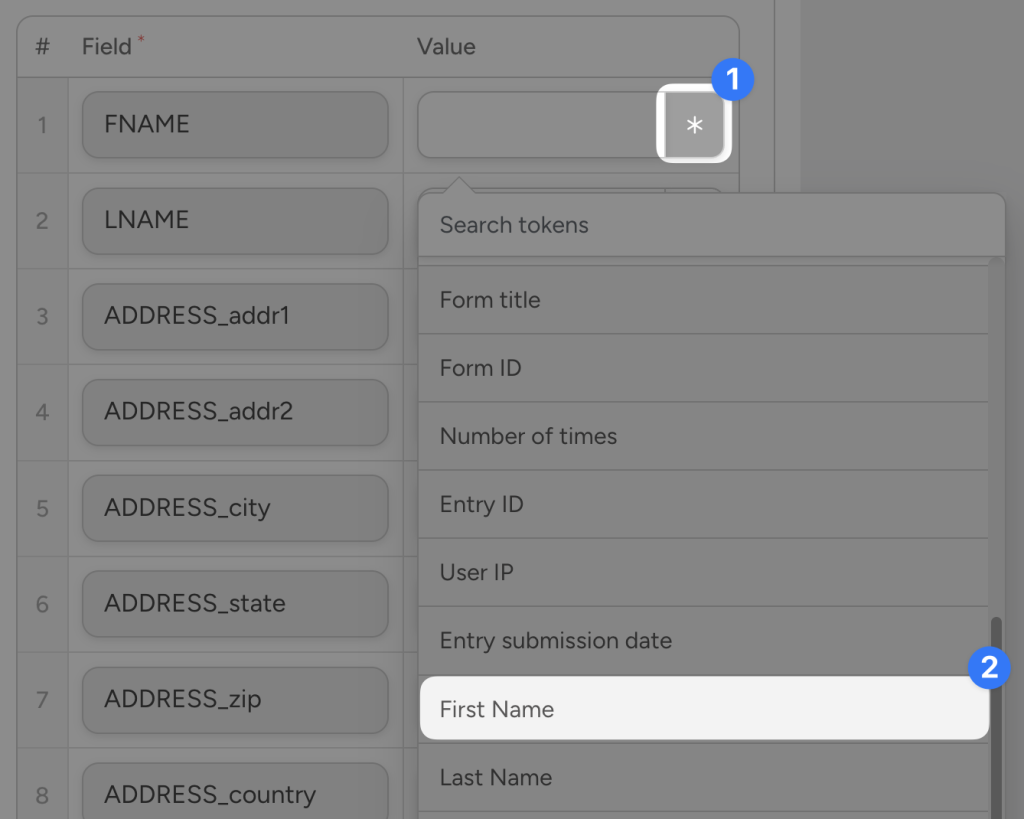
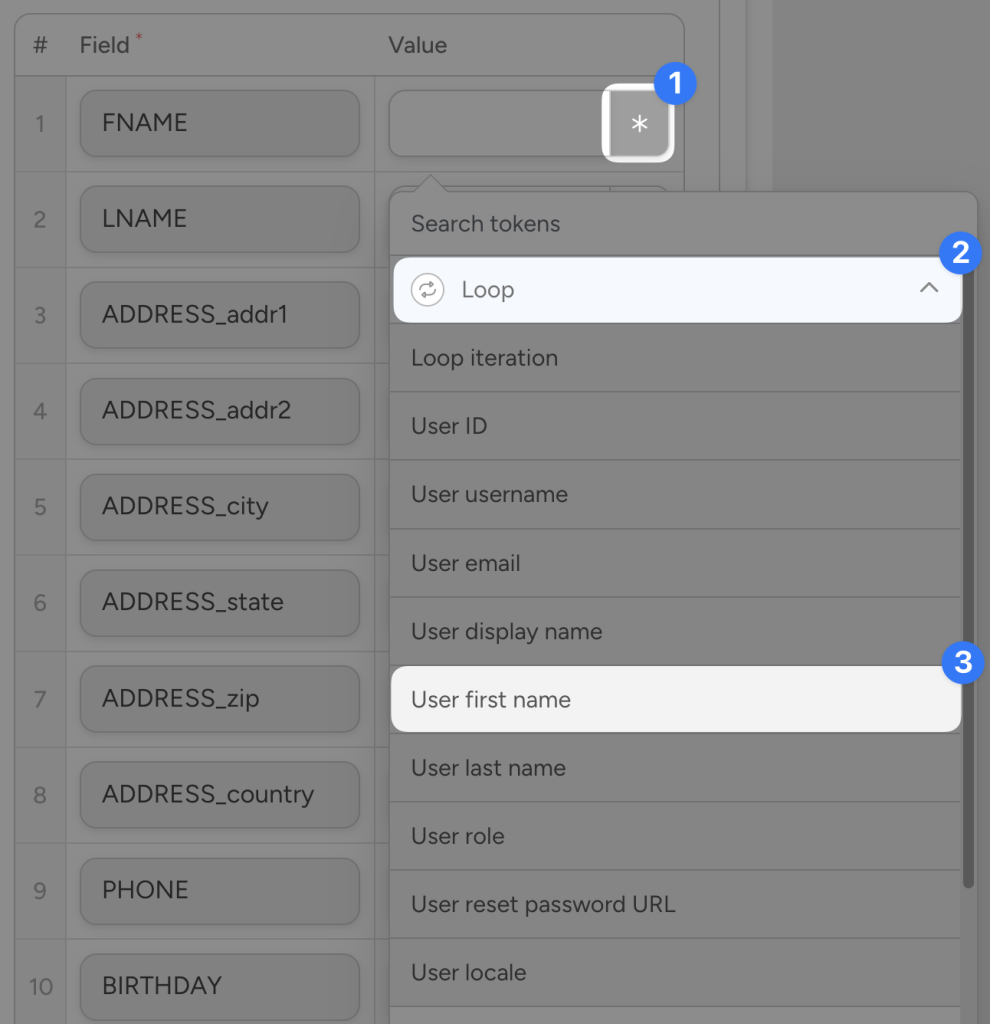
Automator will present you with a form to set the conditions and information for the user’s contact in Mailchimp. Click Load fields and use tokens (i.e., dynamic data from your WordPress website and from within recipes) to fill out the fields.
To use a token, click the Asterisk in a field and select the corresponding token. For example, we have selected the “First Name” token from the “First Name” field in our WPForms form to use in the “FNAME” field of our Mailchimp audience.
Once you’re finished, click Save.
Step 5: Go Live!
You’re just about ready to complete your first Automator recipe connecting Mailchimp to WordPress. All you have to do is toggle the recipe from Draft to Live.
That’s it! You’ve successfully created your first Mailchimp and WordPress integration. If you haven’t already, now is a good time to grab your Automator Pro license and unlock even more triggers, actions, and features that we’ll explore in the next section.
Connect Mailchimp to WordPress with Automator Pro >>>
Add WordPress Users to Mailchimp in Bulk
Now that you’ve mastered the basics of creating Automator recipes, let’s take a look at a recipe that makes good use of some Automator Pro features.
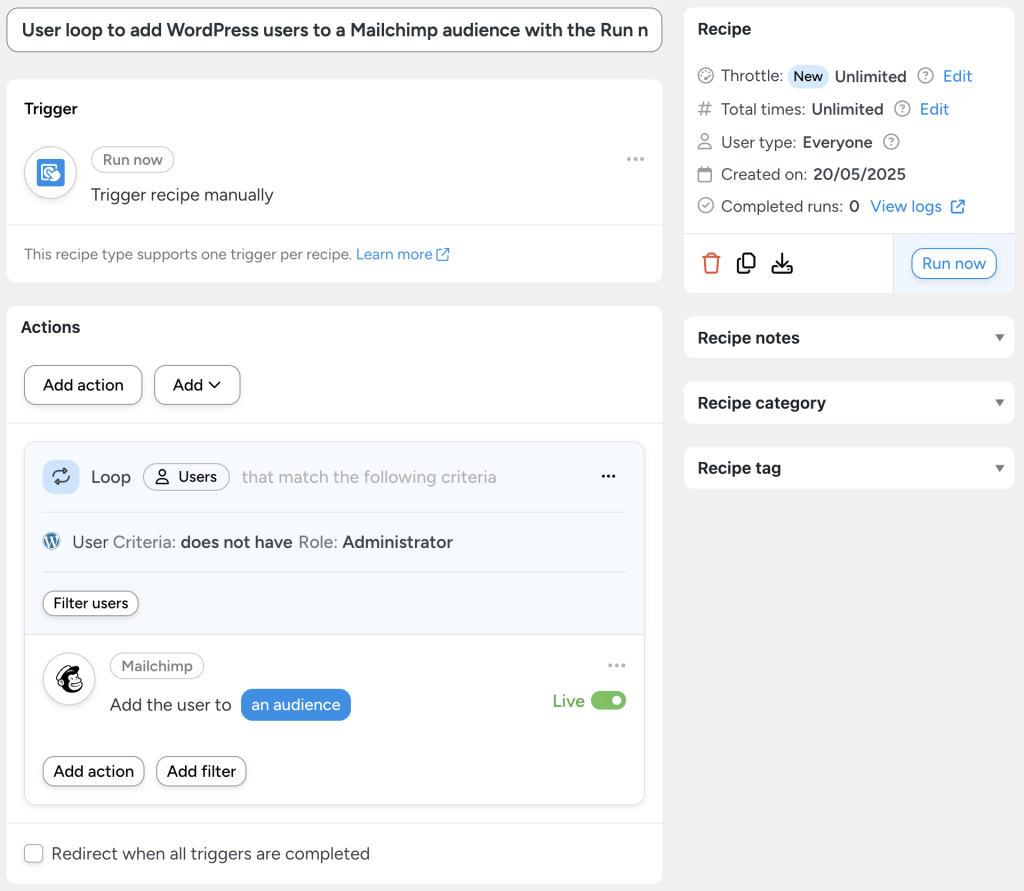
In the recipe pictured above, we’re able to add multiple WordPress users to our Mailchimp audience(s) with the click of a button. No files. No spreadsheets. No code. Just one click.
Here’s how we did it:
Step 1: Create and Name a New Recipe
From your WordPress Admin Dashboard, navigate to Automator > Add new recipe. In the modal that appears, select Everyone.
Give your recipe a name that makes it easy to recognize at a glance. For example, we have named this recipe “User loop to add WordPress users to a Mailchimp audience with the Run now integration”.
Step 2: Configure Your Trigger(s)
In the Trigger panel, from the menu of available integrations, select Run now. From the dropdown list that appears, select “Trigger recipe manually”.
Step 3: Configure Your Action(s)
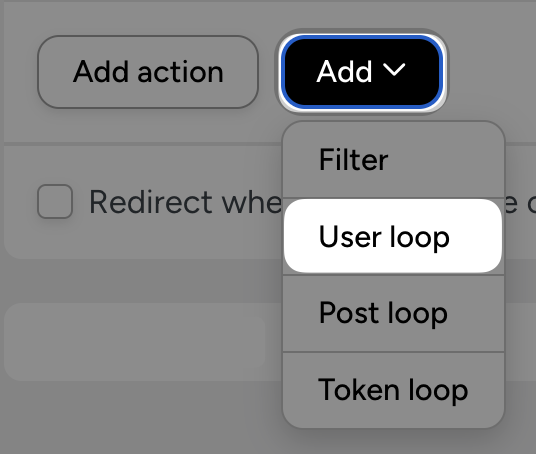
In the Actions panel, click Add and select User loop.
Within the Loop panel, click Add action and select Mailchimp. From the dropdown list that appears, select “Add the user to an audience”.
Just as before, Automator will present you with a form to fill out the users’ contact information in Mailchimp. Just as before, you can fill out this information using tokens. However, this time you will want to use “Loop” tokens.
Once you’re finished click Save.
Step 4: Configure Your Loop Filter(s)
As the recipe is right now, it will add every user who isn’t a site Administrator in WordPress to Mailchimp. Now, for your purposes, that may be fine. However, if you would like to select a smaller subset of WordPress users, you can use Loop filters.
To edit an existing loop filter, simply hover the filter and click the Edit icon.
Step 5: Run now!
All you have to do to start adding hundreds or even thousands of WordPress users to Mailchimp is click Run now and let Automator do the rest of the work.
Ready to upgrade to Automator Pro to unlock more features like Loops?
More Ways to Connect Mailchimp to WordPress
Believe it or not, we’ve just scratched the surface of what’s possible by integrating Mailchimp with WordPress using Automator.
If you’re looking for more ways to automate your lead generation and email marketing workflows, try out these powerful automations.
Tag Woo Customers in Mailchimp
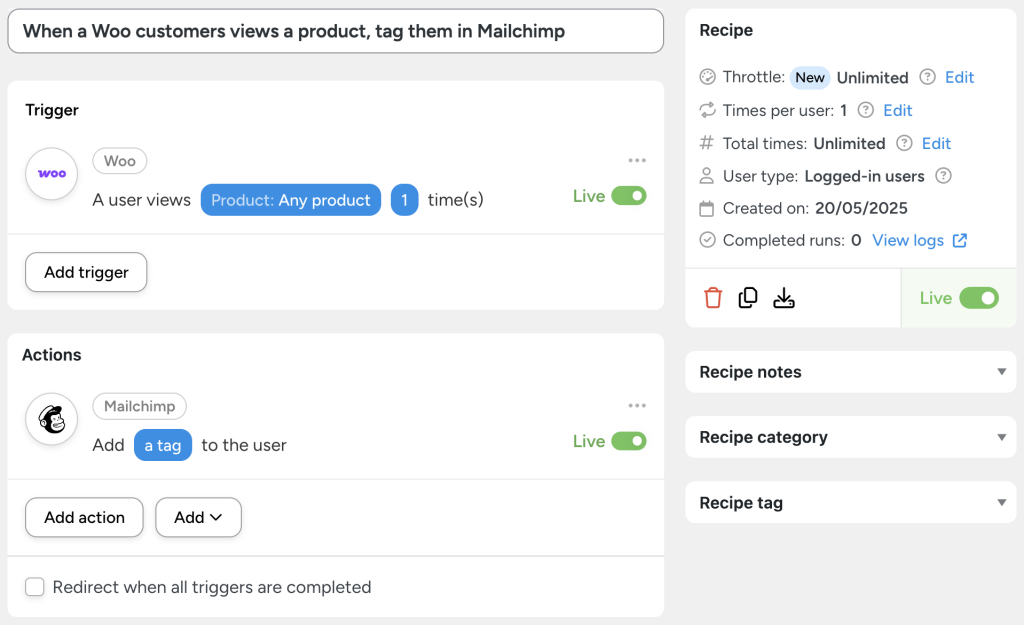
Tag your Woo customers in Mailchimp based on their product views and/or product purchases. You can use these tags for targeted email marketing campaigns based on interest. Or deliver timely product information and updates.
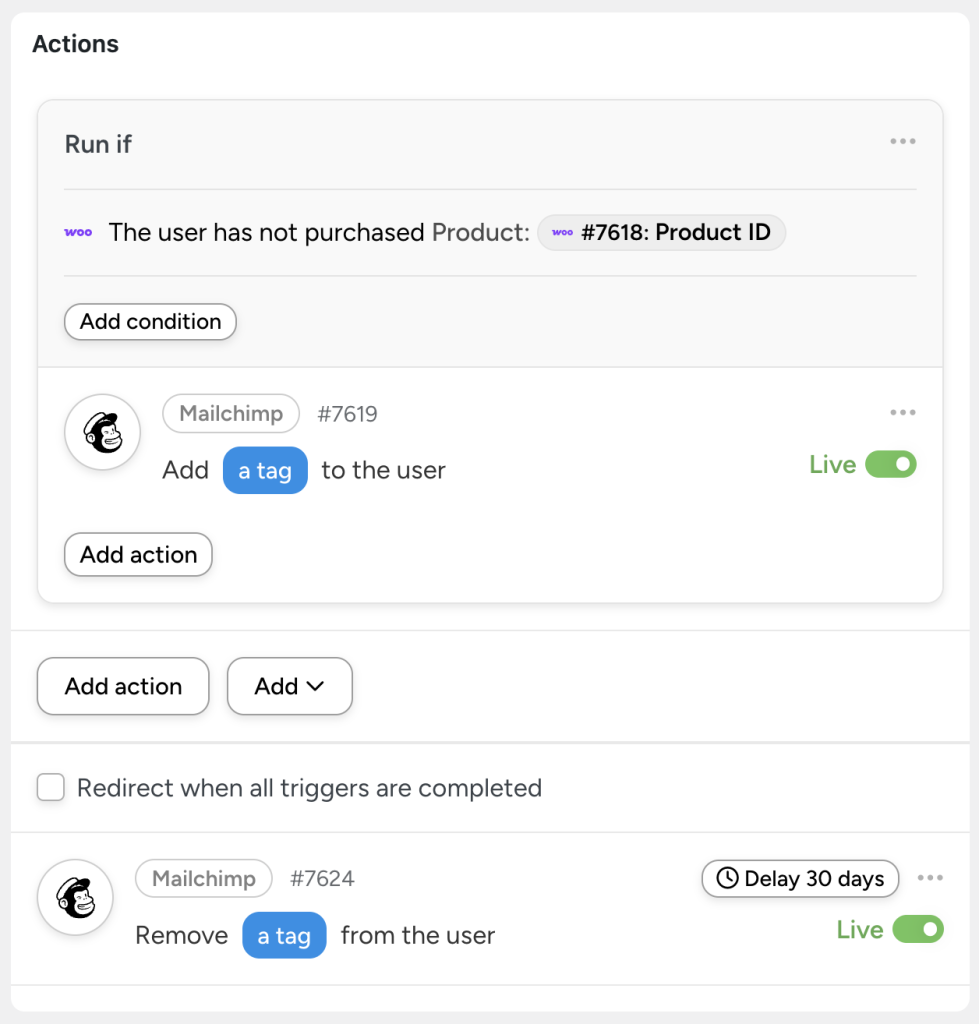
You can even set a filter to only add the tag if a user has not already purchased the product and a secondary action with a delay to remove the tag if the user purchases the product within a given timeframe.
Grow Your Mailchimp Audience with Advanced Coupons
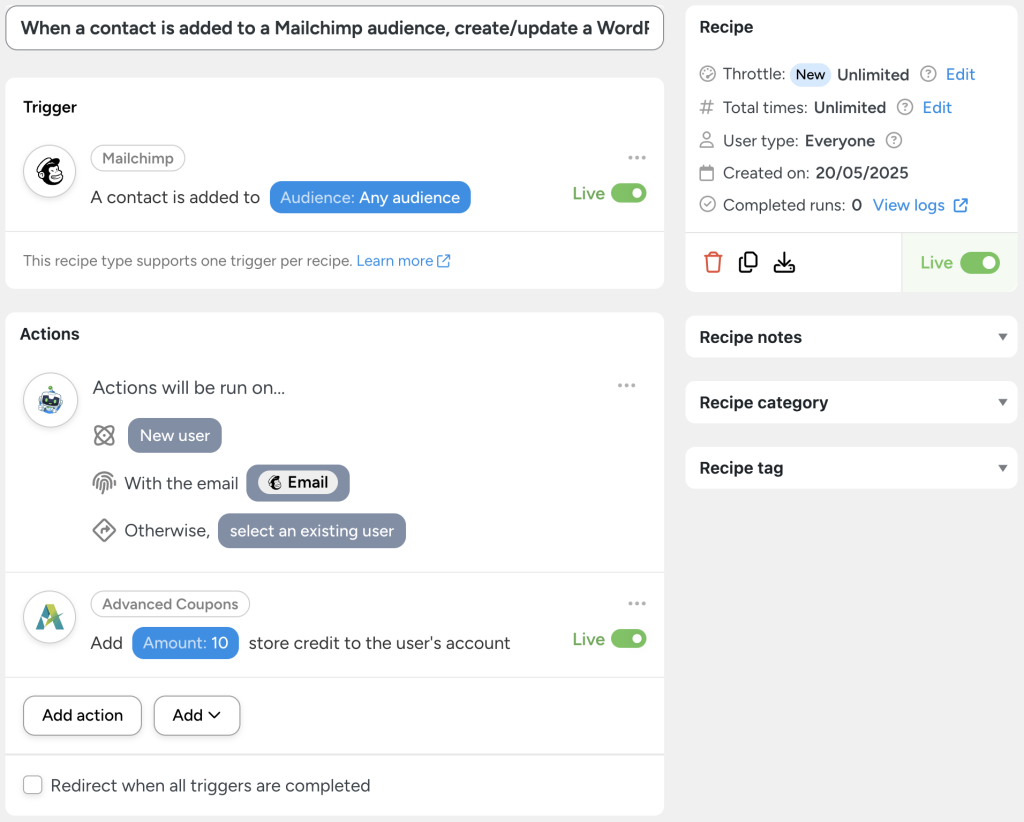
With the previous recipes, we showed you how easy it is to automatically add new registrants or customers to your Mailchimp audience. Nevertheless, it can still be a challenge to get new customers to sign up for your mailing list.
With the recipe pictured above, however, we’re able to automate our incentive program. Whenever a new contact is (automatically) added to our Mailchimp audience, they will (automatically) receive $10 in store credit with the Advanced Coupons plugin.
Launch Mailchimp Campaigns From WordPress
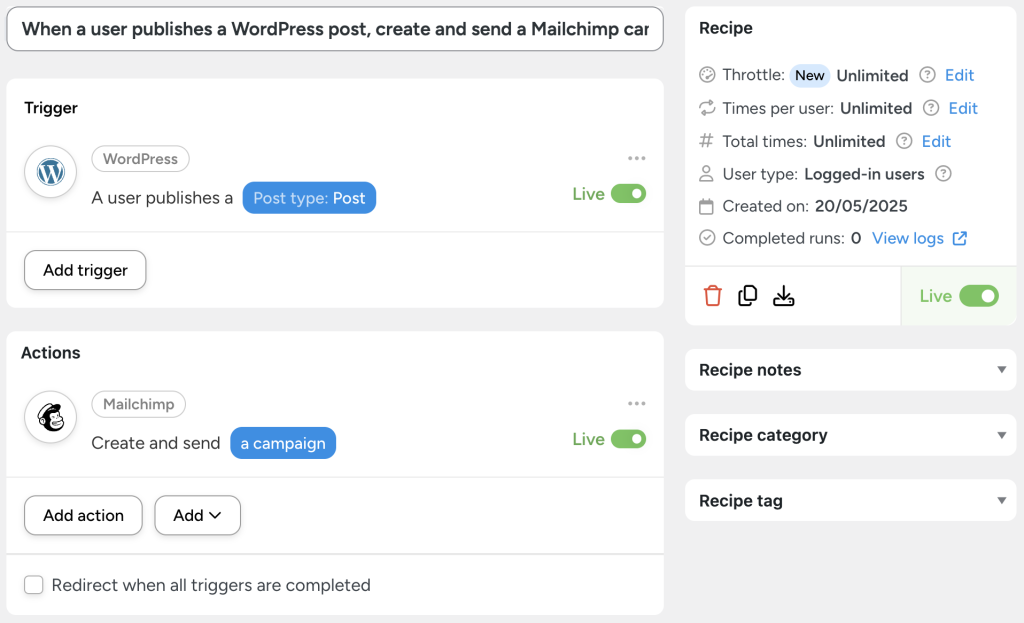
Growing your Mailchimp audience isn’t the only task that you can automate. The recipe picture above is one of the most powerful automations you can create with Mailchimp and Automator.
You can automatically launch entire Mailchimp email campaigns based on actions on your WordPress website. Additionally, because you’ve connected your Mailchimp account to Automator, you’ll be able to target your campaigns with your existing tags and segments.
Most importantly, you can use your existing Mailchimp email templates and populate them with Automator tokens.
Connect Mailchimp to LearnDash or BuddyBoss
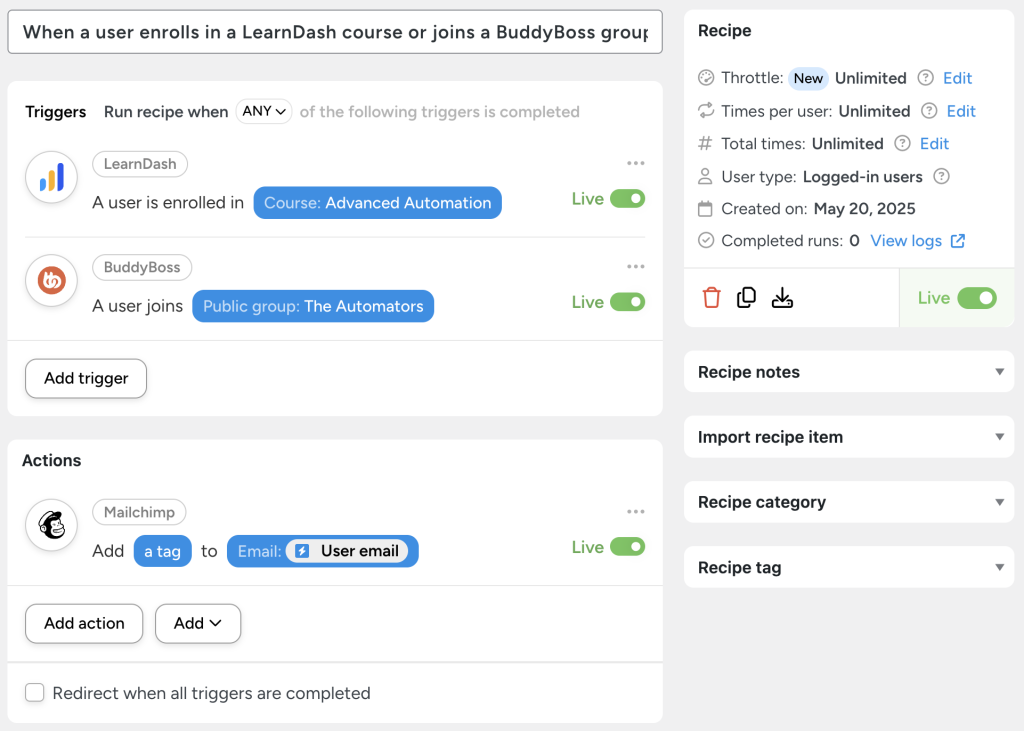
Saying, “Auf wiedersehen,” to your Mailchimp contacts is never easy. It’s even more painful when you have to manually remove those contacts from the LearnDash courses and/or BuddyBoss groups that their subscription gave them access to.
With the recipe pictured above, however, you can automate the process of removing contacts from your course or group offerings whenever they unsubscribe from your Mailchimp audience.
Frequently Asked Questions
Conclusion
In this blog post, we showed you how to connect Mailchimp to WordPress. We showed you what makes Uncanny Automator the #1 integration and workflow automation tool, and gave you some ideas for Mailchimp and WordPress integrations. No coding, no headaches, and no missed opportunities to grow your email list.
From syncing form submissions to tagging users based on WooCommerce purchases, Automator gives you complete control over how and when data flows to Mailchimp. It’s the easiest way to build smarter, more targeted email marketing workflows—right inside WordPress.
You now have everything you need to create a fully-automated Mailchimp and WordPress integration that is totally bananas!
Until next time, happy automating!



![automator-edit-user-loop-filter Uncanny Automator user loop filter showing only users who do not have the WordPress Administrator role, with an arrow pointing to the “Edit filter” option.]To add another filter, simply click Filter users.](https://automatorplugin.com/wp-content/uploads/2023/05/automator-edit-user-loop-filter-1024x612.png)


This Post Has 0 Comments