Revive old WordPress posts with AI and Uncanny Automator. Learn how to reverse content decay…
The Easiest Way to Connect MailPoet to WPForms
Connect MailPoet to WPForms the easy way: with Uncanny Automator. Add and remove subscribers, monetize your newsletter, process GDPR requests and more!
Have you been looking for a way to integrate WPForms and MailPoet?
Maybe you want to harness the payment processing power of WPForms to monetize your MailPoet newsletter? Or, perhaps, you’re looking for a way to automate your GDPR requests? Maybe you simply want to take advantage of the flexibility of WPForms to create a more seamless registration process for your MailPoet subscribers?
Whatever the reason, you’ve landed on the right page.
In this post, we’ll introduce you to Uncanny Automator: the #1 automation and integration tool for WordPress websites. We’ll show you how to add and remove MailPoet subscribers from WPForms entries and how to monetize your newsletter.
The best part? You can get started for FREE!
Without further ado, let’s get started.
Why Connect MailPoet to WPForms with Automator
When it comes to connecting MailPoet to WPForms, WordPress users have a few options. However, only one of those options offers a seamless integration that is as easy to use as it is efficient.
Of course, we’re talking about Uncanny Automator.
Using simple combinations of triggers and actions called recipes, Automator allows you to connect all of your favorite apps and plugins—including MailPoet and WPForms!
From creating new subscribers to processing GDPR requests, Automator is the best tool for creating a MailPoet and WPForms integration. Here are just a few of the reasons why:
- Affordability: Unlike other automation and integration tools, Automator doesn’t charge per automation fees. That means you can register and manage dozens, hundreds or even thousands of MailPoet subscribers without incurring any additional costs. The more you automate and integrate, the more you save!
- Ease-of-Use: Automator’s user-friendly click-and-play interface means that you can automate complex workflows in just a few clicks—and even fewer minutes. Simply select the integrations you want in your automated workflow, choose a few triggers and actions and let Automator do the work.
- Seamlessness: Automator integrates fully with your WordPress website and your chosen apps and plugins. Using tokens, you can automatically transfer data from WPForms submissions to MailPoet contacts. Additionally, Automator gives you the ability to create and delete WordPress users, thus allowing you to process GDPR requests.
- Integrations: Are you paying for dozens of addons? Is bloatware slowing down your website? Replace your addons and bloatware with Automator. With 214 integrations (and more on the way all of the time) Automator can help you connect MailPoet to WPForms and… just about any other app or plugin you can think of.
- Scalability: Automator’s Post Loops and User Loops features gives you the ability to manage all or any specific subset of your MailPoet users with the click of a button. Add and remove your subscribers from lists in bulk.
Ready to connect MailPoet to WPForms? Get your Automator Pro license now so you can follow along>>>.
Not sure that Automator is for you? No worries. Download the FREE FOREVER version of Automator then register your account. In addition to connecting MailPoet to WPForms, you’ll get a limited number of app credits to try out integrations with OpenAI, Slack, Notion and much more.
Add MailPoet Subscribers from WPForms Entries
Now that you have your Automator Pro license, let’s take a look at creating your first recipe.
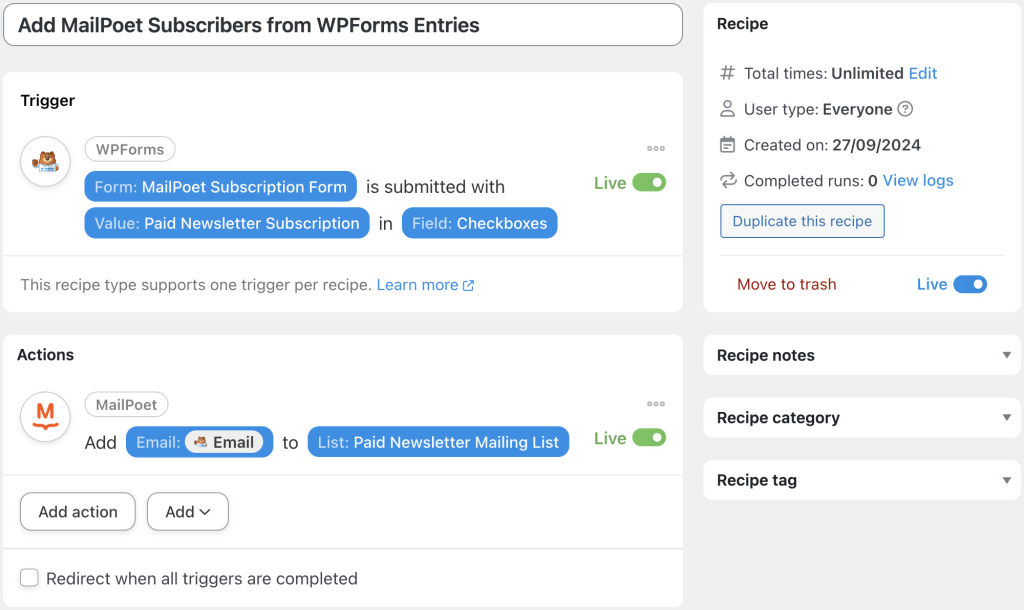
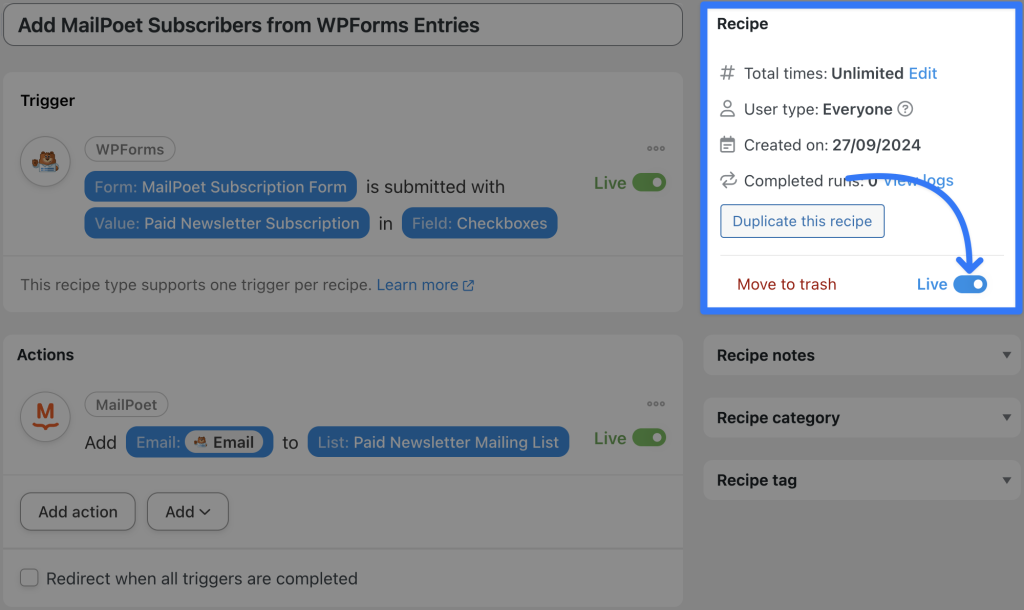
If you’ve been looking for a way to monetize your newsletter, then the recipe pictured above is for you. Using the WPForms PayPal Commerce Addon and/or the WPForms Stripe Pro Addon, we’re able to create new WordPress users and add them to a MailPoet list of our choice automatically.
Here’s how we did it.
Step 1: Create a New Recipe
From your WordPress Admin Dashboard, navigate to Automator > Add new recipe. In the popup window that appears, select Everyone.
Step 2: Name Your Recipe
Give your recipe a name that makes it easy to recognize at a glance. For example, we have named this recipe “Add MailPoet Subscribers from WPForms Entries”.
Step 3: Configure Your Trigger(s)
In the Trigger panel, from the menu of available integrations, select WPForms.
Depending on how you’ve configured your WPForms subscription form and whether you’re using the PayPal or Stripe addon to process payments, the trigger you select will vary.
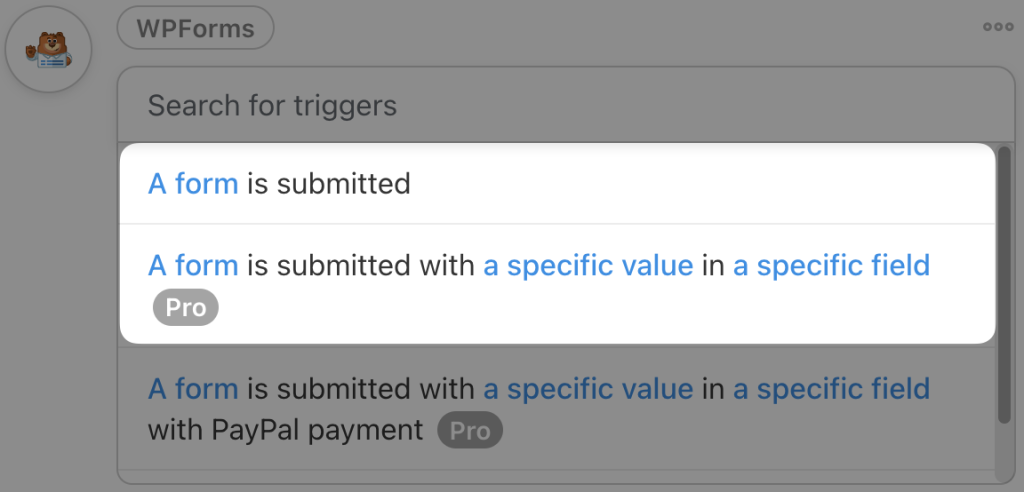
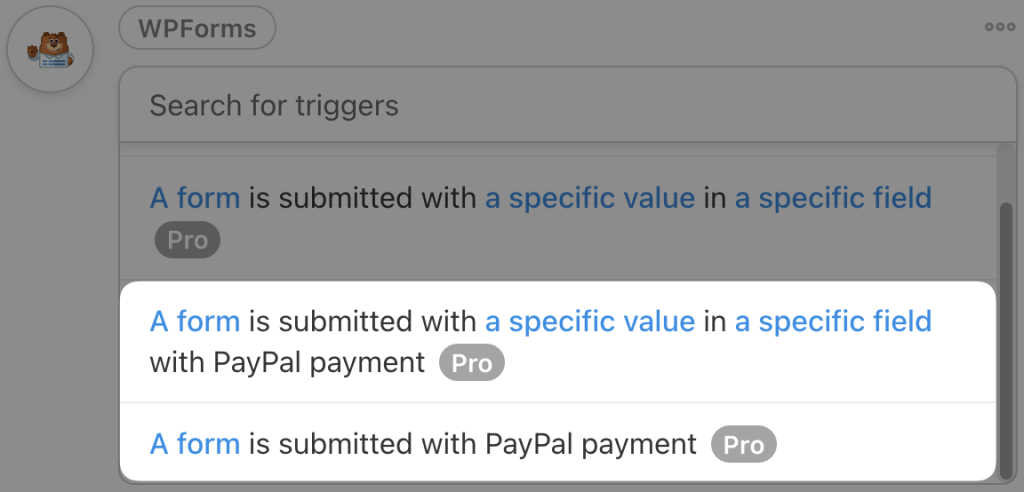
If you are using WPForms with Stripe and you have set the payment field to Required, then you can select the Automator trigger “A form is submitted” or “A form is submitted with a specific value in a specific field”.
If you are using the PayPal addon, you can select from one of the triggers with a PayPal payment condition.
Regardless of the trigger you have selected, Automator will prompt you to select the form that you have created to register new MailPoet subscribers.
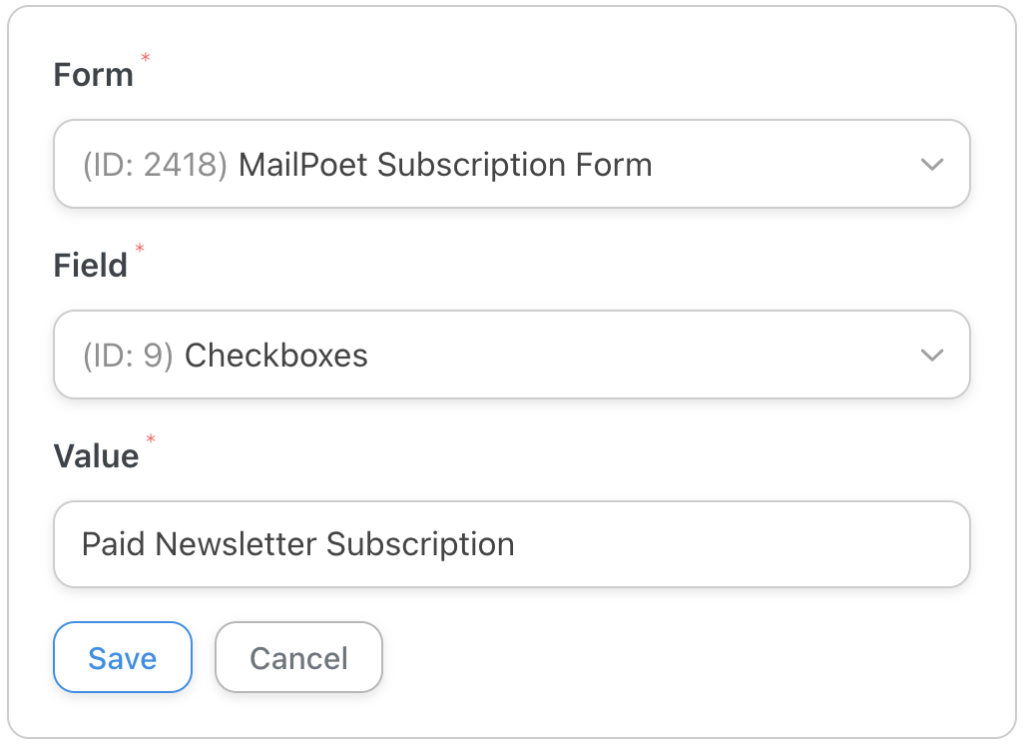
If you have selected one of the triggers with field conditions, Automator will prompt you to select the Field and the Value it must match.
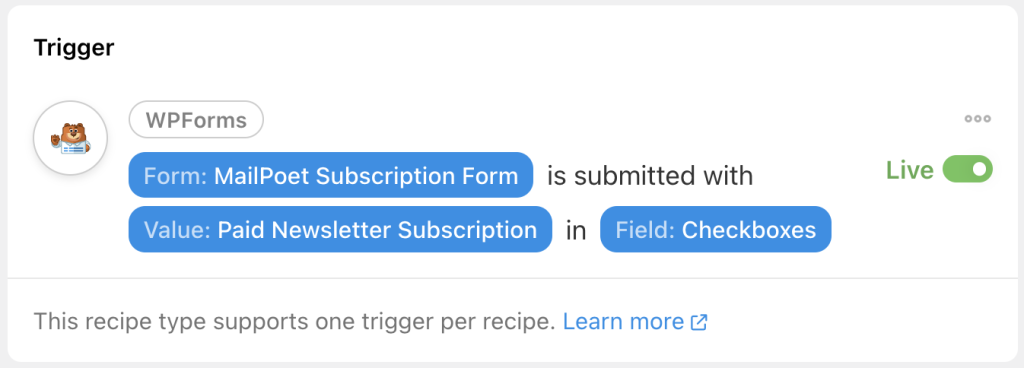
For example, we have selected our WPForms form “MailPoet Subscription Form”. We have set the Value for our “Checkbox” field (representing our various newsletter options) to “Paid Newsletter Subscription”.
Once you’re finished, click Save. Your completed trigger should look something like this:
Step 4: Configure Your Action(s)
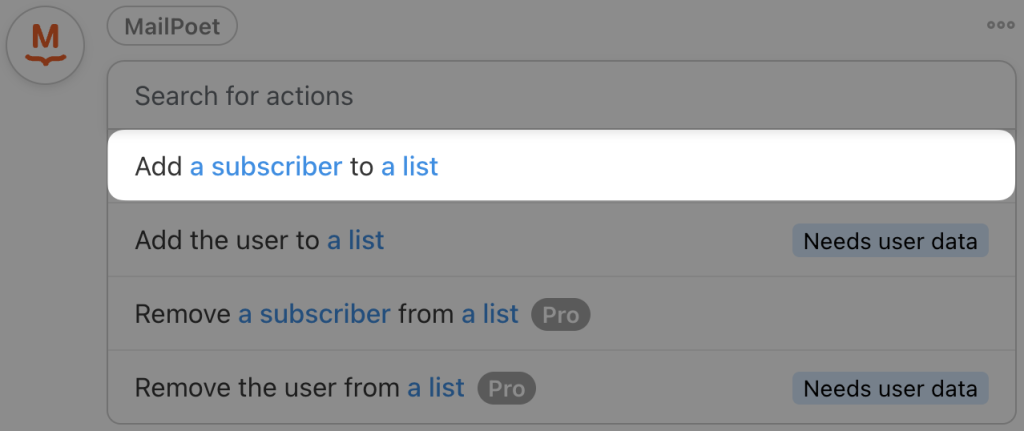
In the Actions panel, click Add action and select MailPoet.
From the dropdown list that appears, select Add a subscriber to a list.
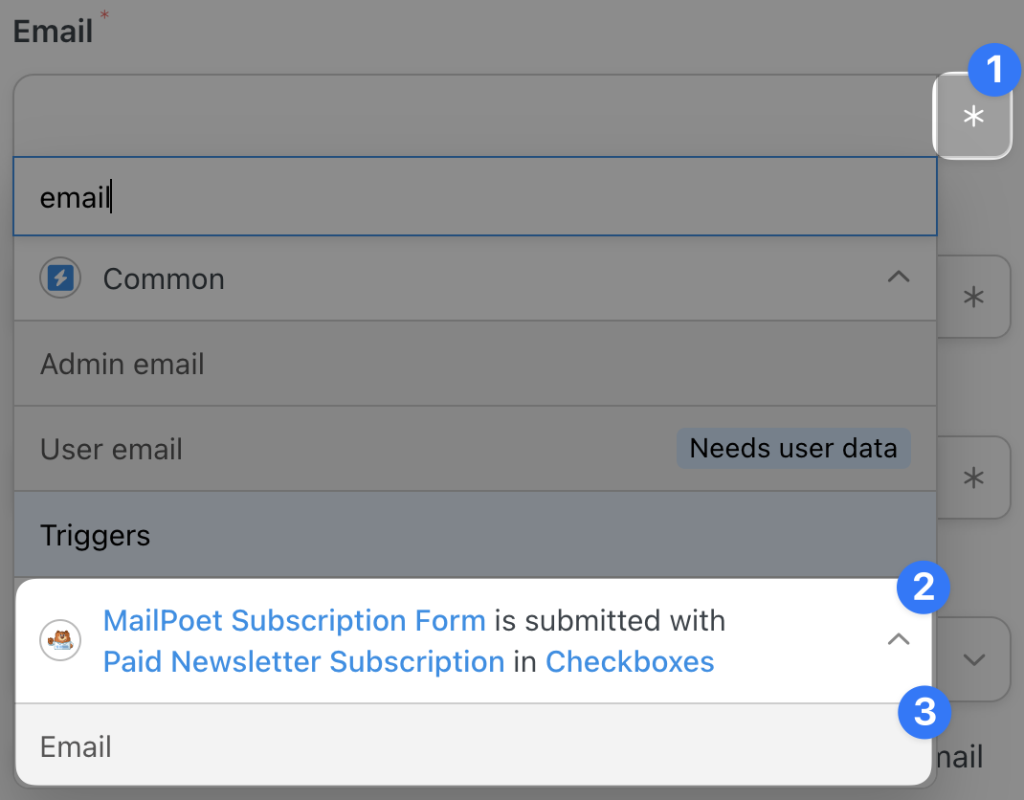
Automator will present you with a form to input your new subscriber’s information. We are going to fill out these fields using tokens (i.e., dynamic data pulled from your WordPress website and from within recipes) from our WPForms subscription form.
To use a token, click on the Asterisk in a field and select the corresponding token. For example, we have selected the “Email” token for the Email field.
(Note: You can use the token search bar to find tokens faster.)
Fill out the remaining fields using tokens and/or static data. Automator will also give you the option to set the subscriber’s status as well as the option to send a confirmation email.
(Note: You will always want to remain GDPR compliant. However, if your registration form already has a confirmation field, then you can skip sending a confirmation email.)
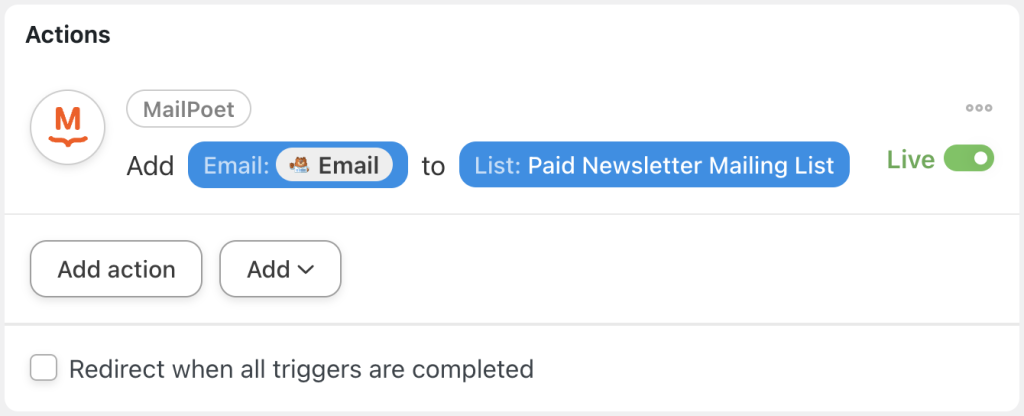
Once you’ve added all of your new subscriber’s details, click Save. Automator will then prompt you to select the list(s) to which you would like to add your new subscriber. Select the list(s) that correspond to your new subscriber’s entries in your registration form.
Once you’re finished, click Save. Your completed action should look something like this:
Step 5: Go Live!
You’re just about ready to connect MailPoet to WPForms and get your paid newsletter subscription service up and running.
All you have to do is toggle the recipe from Draft to Live.
That’s it! You’ve just created your first MailPoet and WPForms integration.
Want to expand your WordPress website’s capabilities even further? Upgrade to a Pro – Plus or Pro – Elite license now and get FREE addons like User Lists and Custom User Fields>>>.
Automate MailPoet and WPForms GDPR Compliance
Getting new subscribers is only half the process of managing a newsletter subscription. As painful as it can be, saying goodbye to some of your subscribers is the necessary inverse.
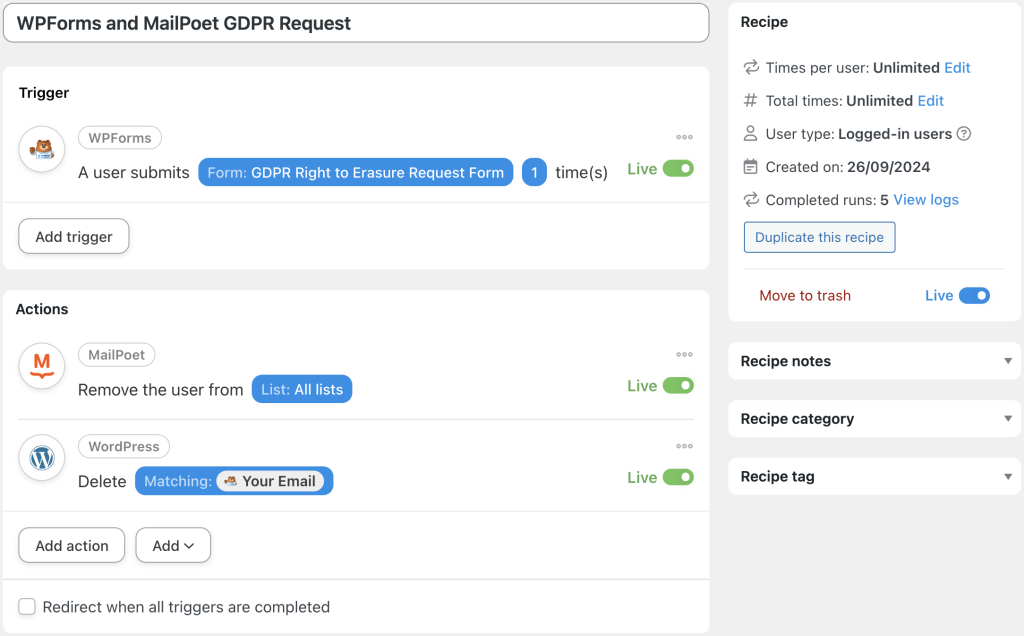
With the recipe pictured below, however, we’re able to make the process of removing subscribers from your mailing list(s) that much easier.
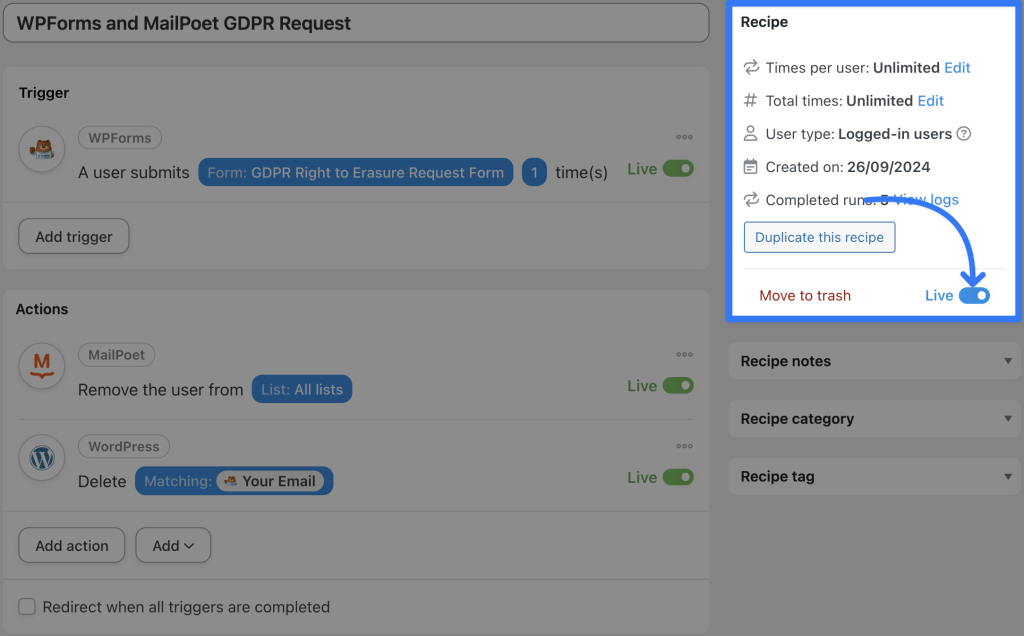
With a simple submission of a GDPR Right to Erasure Request Form, we’re able to remove our MailPoet subscribers from all of our lists and delete their information.
Here’s how we did it.
Step 1: Create a New Recipe
From your WordPress Admin Dashboard, navigate to Automator > Add new recipe. In the popup window that appears, select Logged-in users.
Step 2: Name Your Recipe
Give your recipe a name that makes it easy to recognize at a glance. For example, we have named this recipe “WPForms and MailPoet GDPR Request”.
Step 3: Configure Your Trigger(s)
In the Trigger panel, from the menu of available integrations, select WPForms. From the dropdown list that appears select A user submits a form.
Automator will prompt you to select your GDPR Right to Erasure Request Form. (We used the template provided by WPForms.) Once you’re finished, click Save.
Your completed trigger should look like this:
Step 4: Configure Your Action(s)
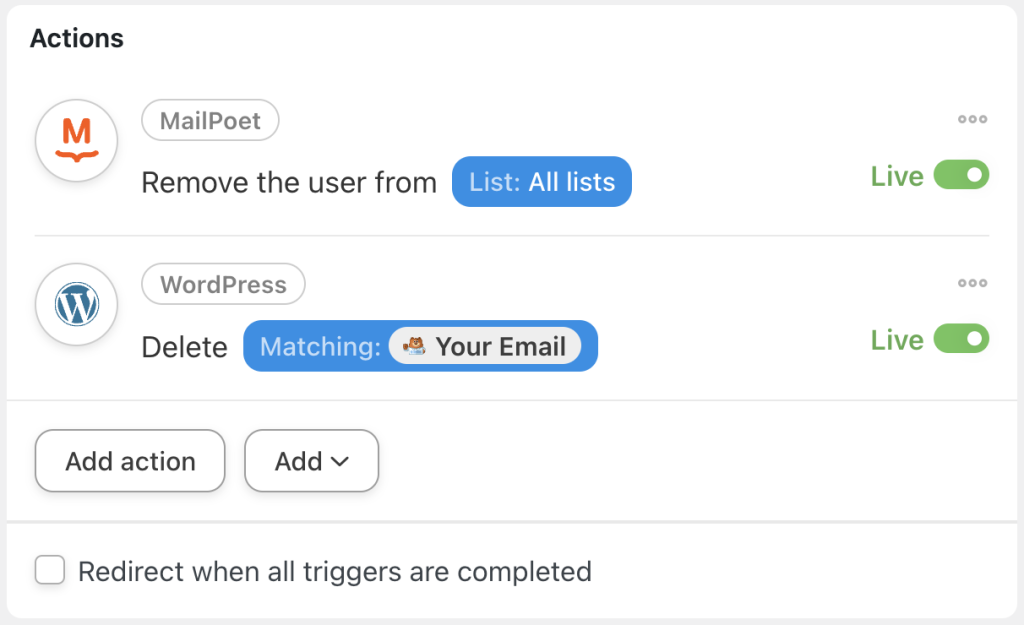
We’re going to configure two (2) actions. The first one will remove the subscriber from all of our MailPoet lists except for the default “WordPress Users” list. The second action will delete the user from WordPress and, subsequently, remove them from the “WordPress Users” list.
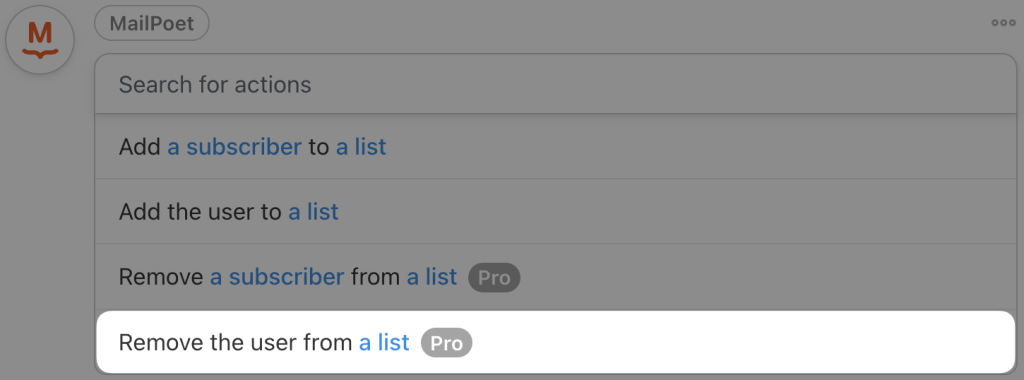
To create the first action, click Add action and select MailPoet. From the dropdown list that appears, select Remove the user from a list.
(Note: You can also select the action Remove a subscriber from a list. However, that action leaves open the possibility that someone might submit a Right to Erasure Request form on someone else’s behalf. If this is not in compliance with your GDPR processes and procedures, select the action Remove the user from a list.)
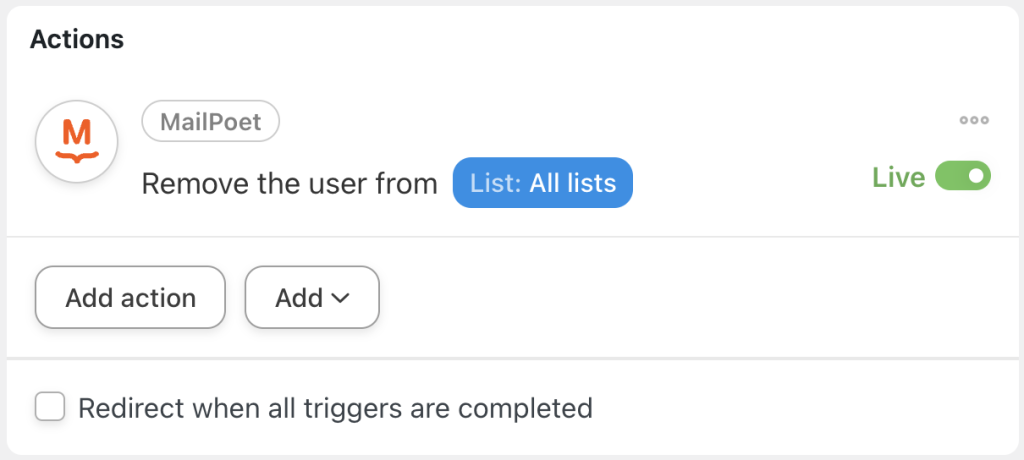
Automator will prompt you to select the list(s) from which you would like to remove the user. We have selected “All lists” to comply with GDPR law.
Once you’re finished, click Save. Your first action should look like this:
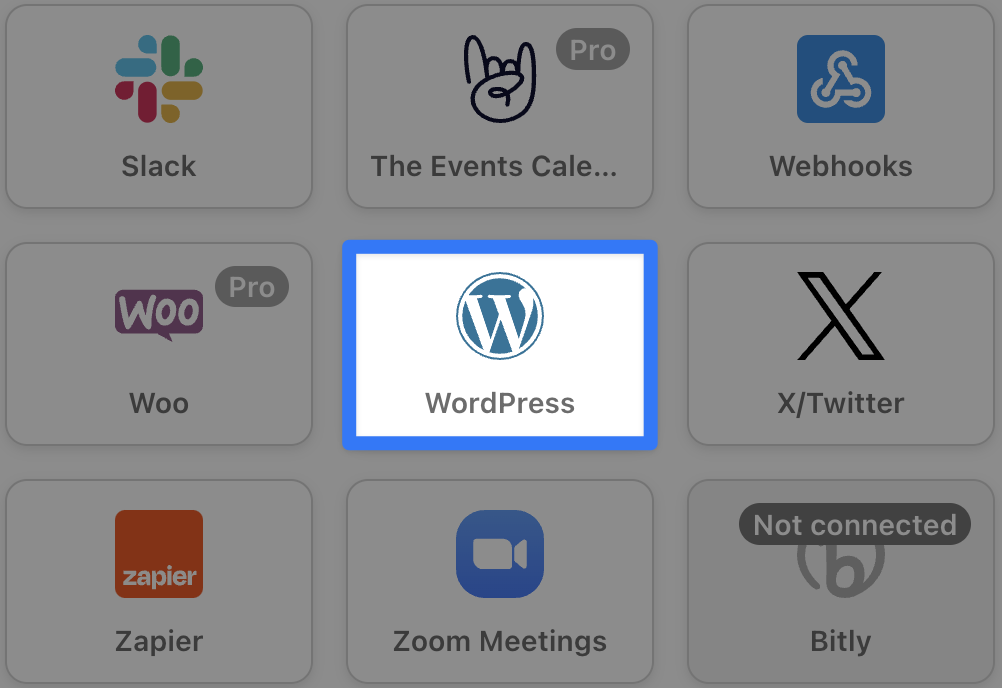
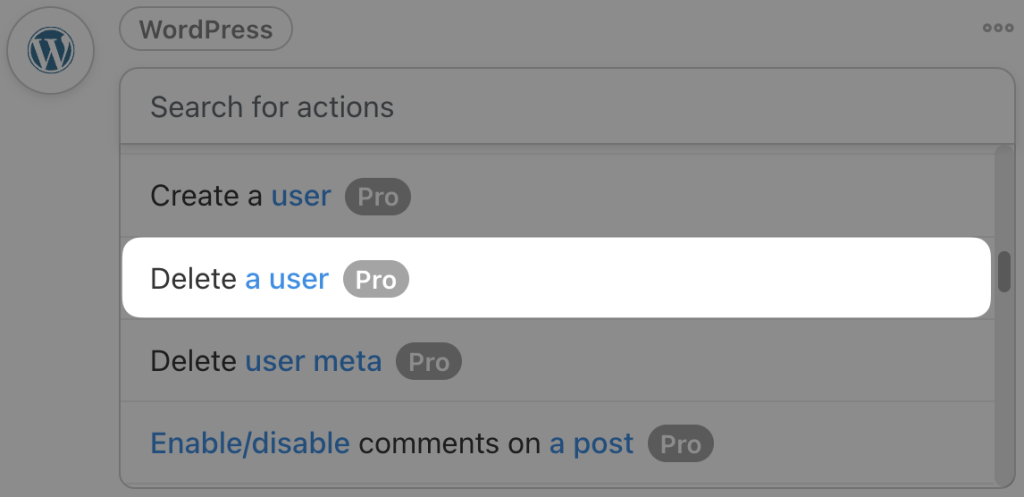
To configure your second action, click Add action and select WordPress.
From the dropdown list that appears, select Delete a user.
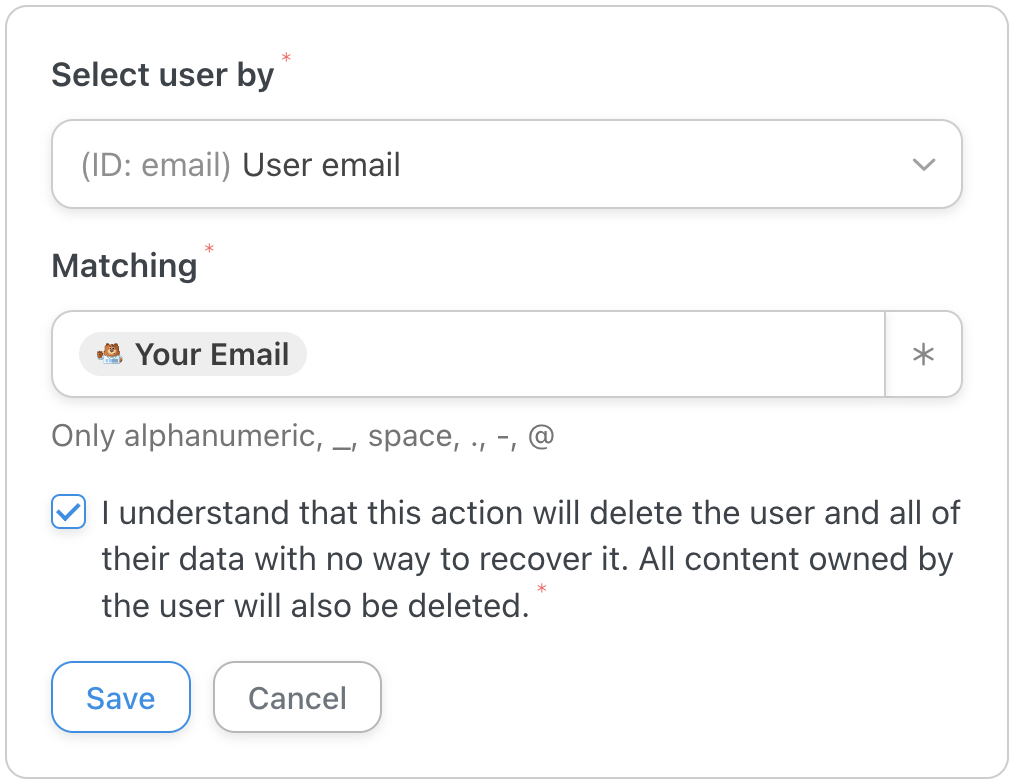
Automator will prompt you to select the criterion for identifying the user to be deleted. More often than not, this will be the user’s email address.
Finally, check the box confirming that you understand that Automator will delete the user and all of their data.
Once you’re finished, click Save. Your Actions panel should look like this:
Step 5: Go Live!
All you need to do now is toggle the recipe from Draft to Live.
Frequently Asked Questions
Conclusion
Connecting MailPoet to WPForms with Uncanny Automator is a powerful way to streamline your email marketing and form management processes.
Whether you’re looking to open up new revenue streams with a paid newsletter subscription or simply trying to streamline your mailing list management, Automator is the tool for the job.
By automating the transfer of data from WPForms form submissions to your MailPoet subscriber lists, you can save time and effort, giving you more resources to dedicate to creating compelling content and connecting with your audience.
Ready to start automating? Get started with Uncanny Automator today, and transform the way you manage forms and email lists.
Until next time, happy automating!











This Post Has 0 Comments