Revive old WordPress posts with AI and Uncanny Automator. Learn how to reverse content decay…
How to Convert Unix Timestamps to Dates in Google Sheets & Airtable
In this quick how-to, we’ll explain what Unix timestamps are and, more importantly, how to convert Unix timestamps to dates in Google Sheets and Airtable.

If you’re unfamiliar with Unix and Epoch time, strings of numbers like 1671408000 probably just look like computer gibberish. However, as intimidating as those numbers might appear, we promise you, you haven’t slipped into the matrix—not yet, at least.
You’ve come to the right place to learn all about Unix and Epoch time and how to convert those strings of numbers into date and time formats that don’t make your head spin.
At the end of this quick tutorial, we’ll show you some cool ways to use Unix timestamps in everyday workflows.
What Is a Unix Timestamp?
Unix time is simply a measurement of the number of seconds that have elapsed since January 1, 1970. Seriously. That’s it. That’s what all the fuss is about.
Given that there are 24 hours in a day and that each hour consists of 60 minutes and that, in turn, each minute consists of 60 seconds, each day in Unix time has a value of 86,400 (i.e., 24 × 60 × 60).
To give you a better idea, here are a few examples of dates and times represented in Unix time:
January 1, 1970 12:00:00 AM —— 0
March 11, 1989 3:00:00 PM —— 605631600
July 16, 2006 10:00:00 AM —— 1153044000
October 5, 2022 7:41:00 PM —— 1633462860
As a fun exercise, click here to learn more about Unix time and check out the running Coordinated Universal Time (UTC) clock, converter and reference chart.
What Is Epoch Time?
In your search to make sense of number strings like 788400000, you may have across the terms Epoch, Epoch time or Unix epoch. While computer programmers often use these terms interchangeably, it’s worth noting that Unix time and Epoch time are not necessarily the same thing.
In computing, an epoch refers to the date and time relative to which a computer’s internal clock and system calculates its timestamps. In other words, an epoch can be any date with time 00:00:00.
By that definition, the Unix epoch is, as we have recently discovered, January 1, 1970 00:00:00.
Because so many computing systems and programming languages use the Unix epoch, it is practically ubiquitous. However, other notable epochs include January 1, 1601 (Windows API) and January 1, 1900 (Network Time Protocol).
There’s also the Coffee Epoch (a.k.a., the How We Start Our Day Epoch).
How to Convert Unix Time to Dates in Google Sheets
If you can multiply, divide and add, you can easily convert Unix time into a date format that doesn’t resemble coordinates on a global positioning system.
Step 1: Set Up Your Google Sheet
How you configure your spreadsheet will depend on your own needs. For illustrative purposes, we’ve set up a simple spreadsheet that an eCommerce business might have.
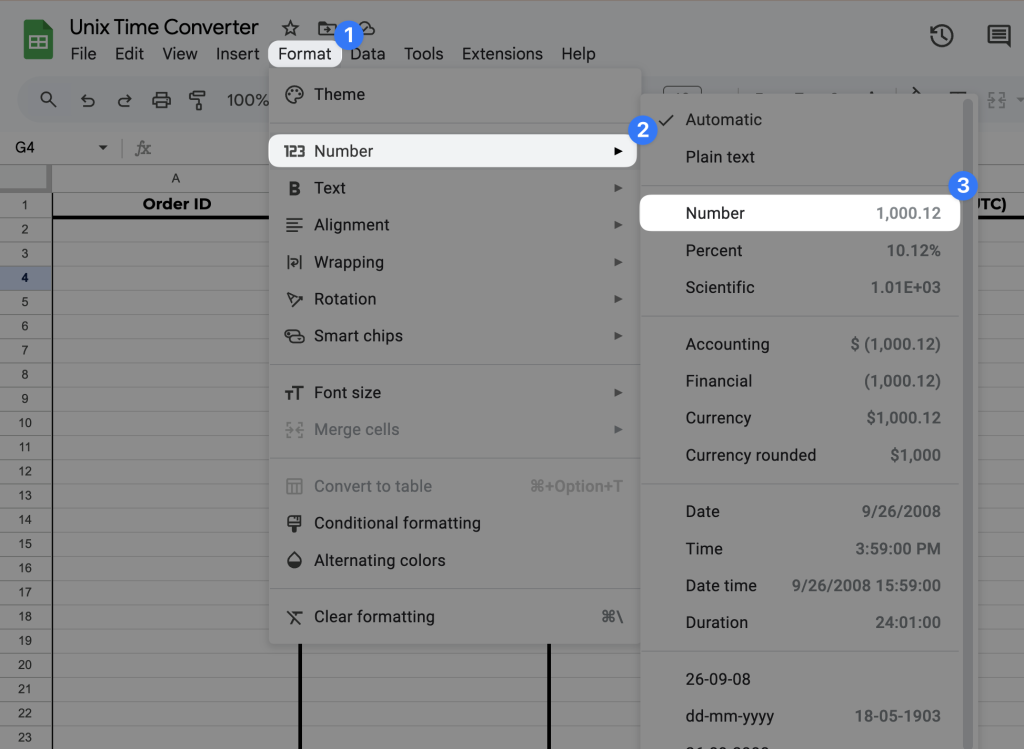
We’ve labeled Column C “Date and Time Unix”. This will be the column where we input our Unix timestamps. Given that Unix timestamps only exist in integers, you can format the cells accordingly. To do so, select the column that you’ll use for Unixstamps then navigate to Format > Number > Number and reduce the decimal places by two (2).
Similarly, for any columns in your worksheet where you will input dates, change the format to “Date time”. Date time.
Step 2: Convert Unix Time to Dates
Unfortunately, there are no simple formulas for converting Unix time into money. But there is an easy formula for converting any Unix timestamp into a date.
To convert Unix time to a date in Google Sheets, use the “epochtodate” formula. To use the “epochtodate” formula, select the cell where you want to display dates. Copy and paste the formula below:
=epochtodate([cell], 1)The first part of the formula, “timestamp”, is the Unix time integer. Replace “[cell]” in the formula above with the cell containing your Unix timestamp in your own worksheet. The second value, “time_unit”, denotes whether the Unix time is in seconds, milliseconds, or microsends.
That’s it! You’ve just converted Unix time to dates—and it only took you two steps!
It’s not exactly time travel but it is a pretty nifty time conversion trick.
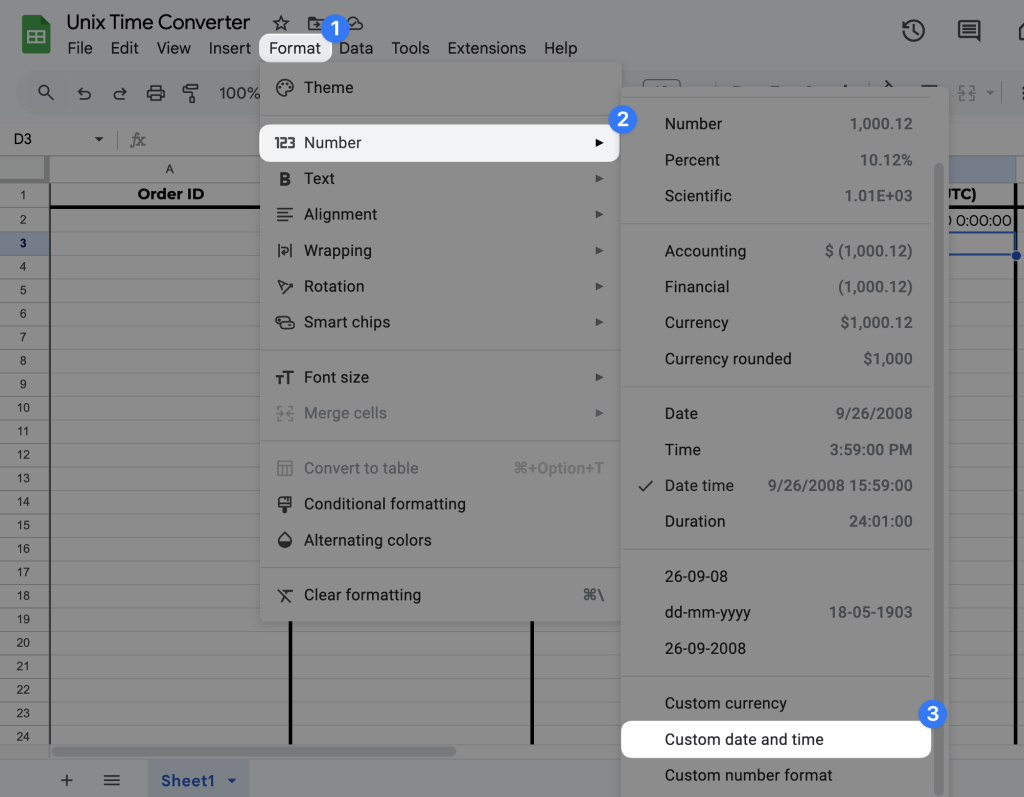
Note: You can change the format of the cells in your results column (the column we’ve labeled Date and Time) by navigating to Format > Number > Custom date and time.
How to Convert Unix Time to Dates in Airtable
If you’re using a database like Airtable, you can still convert Unix timestamps to dates. In fact, with AirTable’s processing power, it wouldn’t surprise us if you did, incidentally, discover the formula for time travel.
Step 1: Configure Your Base
Just as with Google Sheets, the exact configuration of your Airtable base will depend on your specific needs. Regardless, you’ll have to include a table with at least two columns; “Unix Time” for inputting Unix timestamp values, and “Date and Time” for displaying dates:

Step 2: Edit Your Unit Time Field
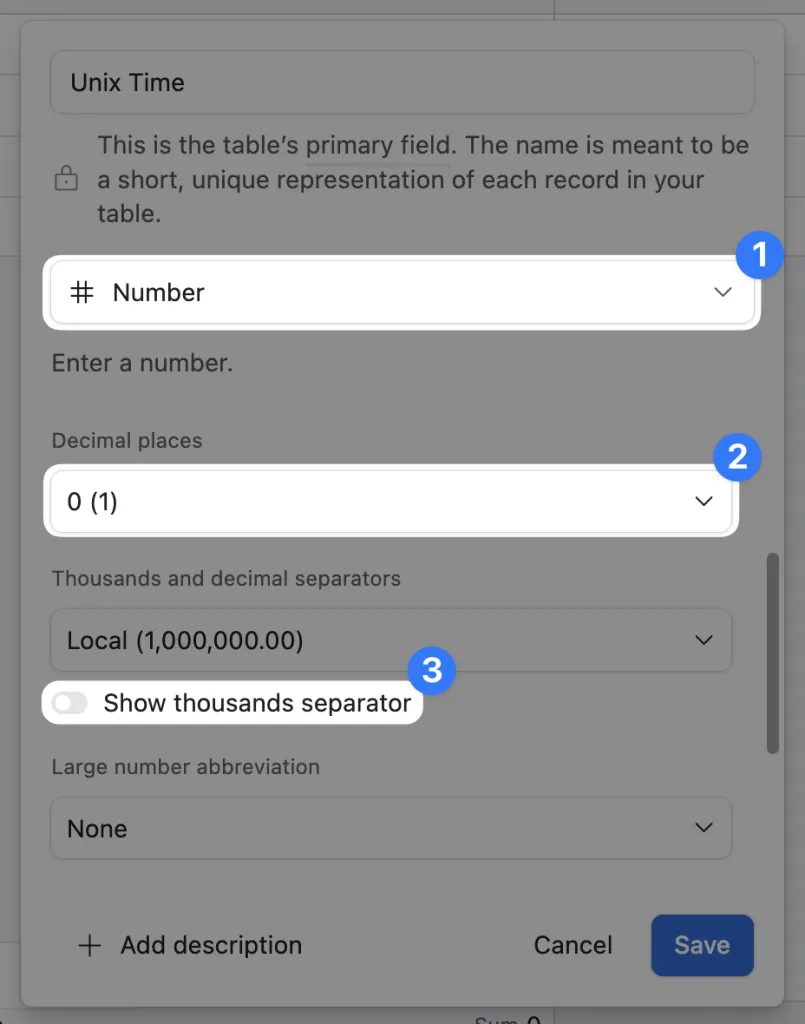
Either create or edit a field to be a “Number” with no decimal places and no thousand separator.
This will be the field with your Unix timestamps.
Step 3: Edit Your Date Field
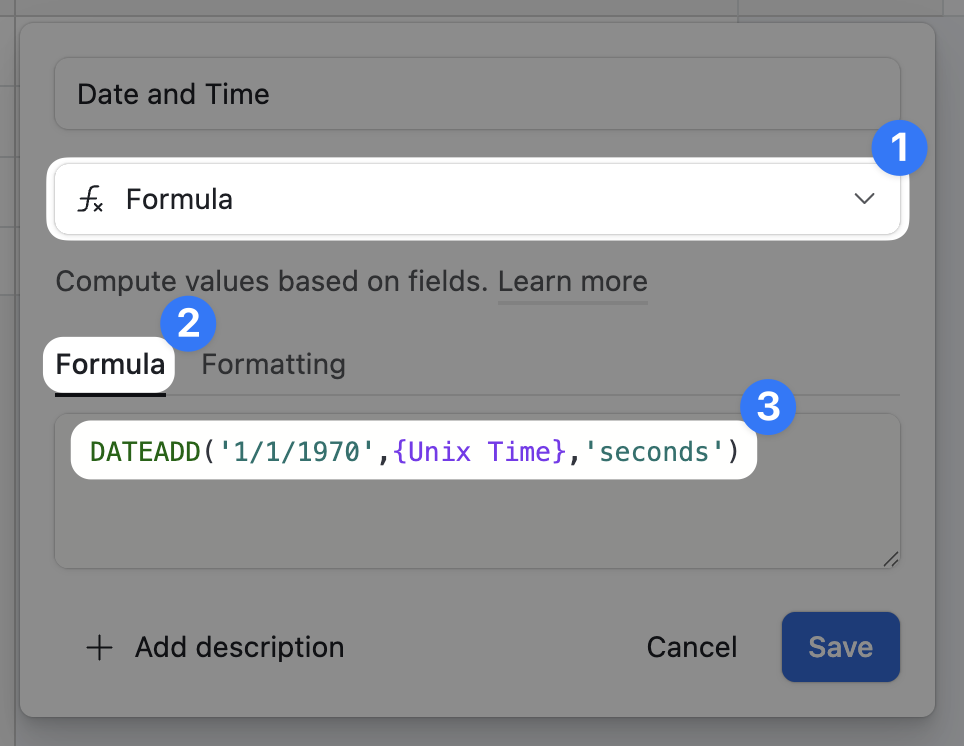
Edit or create a field to be a “Formula”. Manually type (do not copy and paste) the following formula into the “Formula” field:
“DATEDADD(‘1/1/1970’,{Unix Time},’seconds’)Note: You may need to edit the formula above depending on what name you’ve given to your Unix Time field. If you’ve chosen a name other than Unix Time, then replace {Unix Time} with {Your Field Name} and leave the rest of the formula unchanged.
Test out your Airtable time converter with the dates and times from our previous example.

Note: Airtable stores data in Greenwich Mean Time (GMT). This means that your date will be displayed in GMT as well. If you want to adjust the timezone, you can use this slight variation of the same formula: DATEADD(DATEADD(‘1/1/1970’, {Unix Time}, ‘seconds’), -5, ‘hours’). Replace “-5” with your desired timezone’s GMT offset. Remember, you must type the formula in Airtable. Do not copy and paste it.
Save (Unix) Time with Uncanny Automator
Now that you’ve mastered the art of converting time, you can start saving it.
Uncanny Automator is the #1 automation and integration plugin for WordPress websites. Using simple combinations of triggers and actions, you can connect all of your favorite apps and plugins, enabling you to work less, do more, and cut costs while you’re at it.
So, who exactly is Automator for? Well, with a lightweight free version, Automator is for every WordPress user.
- eCommerce Automation: Track sales (anonymous shoppers or logged-in users), create AI-powered personal shopping assistants, integrate with your CRM, manage inventory at scale, synchronize shops across sites. Anything to help you work less and sell more.
- Marketing Automation: Create seamless integrations with your CRM and any of your other apps and plugins. From capturing leads to calculating lifetime value, Automator gives you the power to create fully customizable customer profiles, automate segmentation, and personalize communications.
- Content Automation: Automate the creation of blog posts, SEO-friendly titles, excerpts, product descriptions, social media blurbs, and even AI images right from your WordPress website. No other plugin lets you type less to say more.
- Membership Automation: From registering new members to managing access, Automator makes it easy to turn your WordPress website into a walled garden. Addons like Restrict Content and User Lists give you all of the functionality necessary to connect with your members.
- Everything Else: Whatever tasks you need to perform on your WordPress website, Automator’s U-Bot has you covered. Whether you want to automate support ticket triage or webinar enrollment, Automator is the tool for the job.
Ready to upgrade your WordPress workflows?
Try Automator Pro—integrate anything, automate everything >>>
Google Sheets and Airtable are just two of Automator’s exhaustive list of the most popular and powerful integrations. See which of your apps and plugins you can start integrating and automating today.
Getting Started With Automator
For WordPress users, converting Unix time to different date formats and time zones can seem daunting. However, with Automator, it can all happen behind the scenes as you can focus on what matters most—your customers, your content, your company.
Here’s how to get started converting Unix timestamps to dates in WordPress with Automator:
- Install and Activate Automator on your WordPress website. Setting up is like any other plugin, however you can find detailed instructions here.
- Navigate to Automator > Add new, select your recipe type, and name your new recipe.
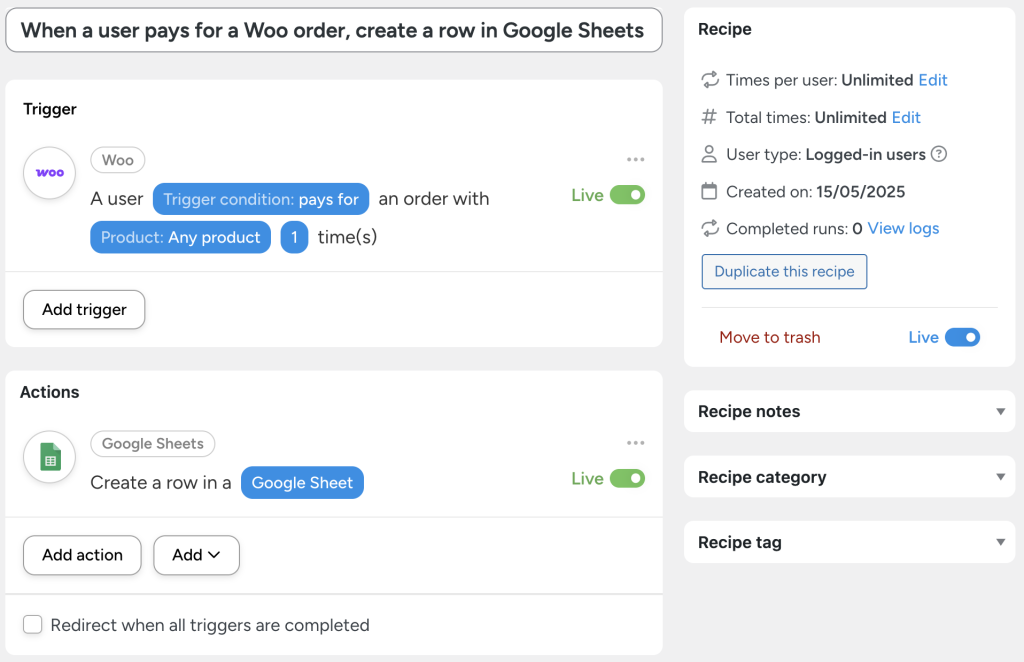
- Configure your trigger. For example, if you run a Woo store, you might select Woo > A user pays for, completes, lands on a thank you page for an order with a product.
- Configure your action. Click Add action and select Google Sheets > Create a row in a Google Sheet.
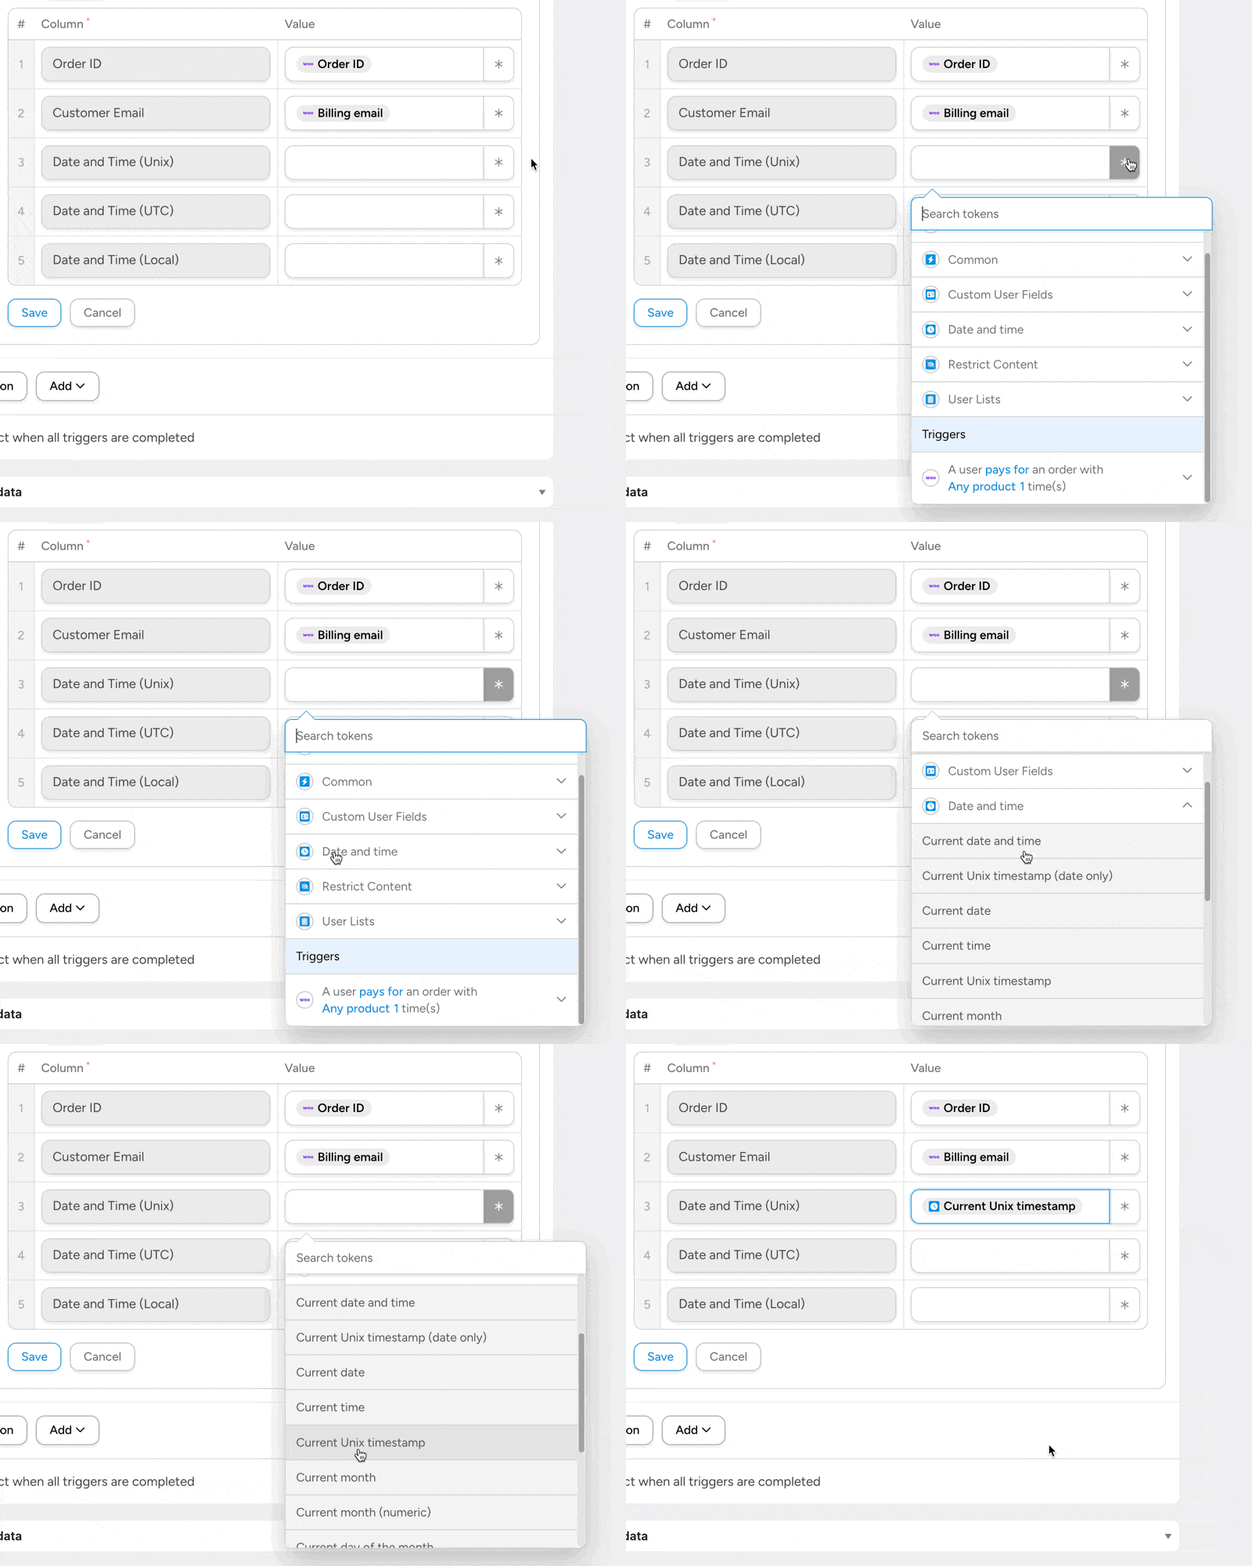
- Select the “Spreadsheet” and “Worksheet” where you want to send your Unix timestamps. Automator will load the columns. (Note: Automator will treat the first value in each column as that column’s title.)
- Fill in the values using tokens (i.e., dynamic data from your WordPress website and from within recipes) and static data as necessary. To use a token, click on the Asterisk in a field and select the corresponding token. For example, select the “Current Unix timestamp” token.
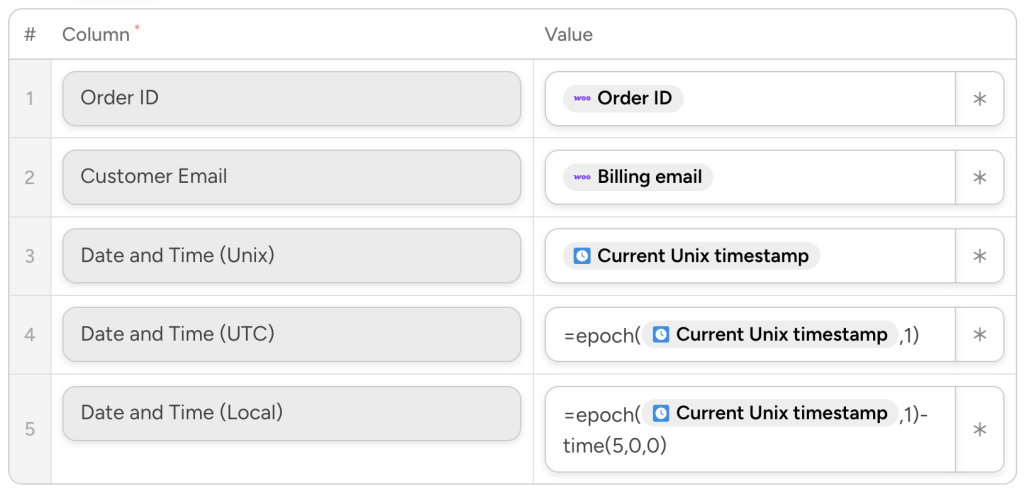
- Automator allows you to enter Google Sheets formulas in the “Value” cells. For example, in our “Date and Time (UTC)” cell, we have entered:
=epochtodate({{current_unix_timestamp}}, 1)- To adjust the time zone, you can enter this formula:
=epochtodate({{current_unix_timestamp}}, 1)-time(5,0,0)- Click Save and toggle your recipe from Draft to Live.
That’s it! You’ve successfully created a recipe that automatically converts Unix timestamps from your WordPress website to dates in Google Sheets.
Upgrade to Pro and Save Even More Time
If you have Automator Pro, you can skip all of the formulas and take advantage of Automator’s Formatter integration.
Simply select the “Input”, the format of the original date and time, and then the output format that you are looking for.
Frequently Asked Questions
Conclusion
With your new knowledge of Unix timestamps and the power of Automator at your fingertips, you may just become a master horologist!
How do you intend to use your Unix timestamps? What are some of the workflows that you would like to see? Let us know in the comments section below. Until then, do what the Unix clock does and keep ticking!
Happy automating!






This Post Has 0 Comments